- ubuntu12.04环境下使用kvm ioctl接口实现最简单的虚拟机
- Ubuntu 通过无线网络安装Ubuntu Server启动系统后连接无线网络的方法
- 在Ubuntu上搭建网桥的方法
- ubuntu 虚拟机上网方式及相关配置详解
CFSDN坚持开源创造价值,我们致力于搭建一个资源共享平台,让每一个IT人在这里找到属于你的精彩世界.
这篇CFSDN的博客文章Springboot中集成Swagger2框架的方法由作者收集整理,如果你对这篇文章有兴趣,记得点赞哟.
摘要:在项目开发中,往往期望做到前后端分离,也就是后端开发人员往往需要输出大量的服务接口,接口的提供方无论是是java还是php等语言,往往会要花费一定的精力去写接口文档,比如a接口的地址、需要传递参数情况、返回值的json数据格式以及每一个字段说明、当然还要考虑http请求头、请求内容等信息。随着项目的进度快速高速的迭代,后端输出的接口往往会面临修改、修复等问题,那也意味着接口文档也要进行相应的调整。接口文档的维护度以及可读性就大大下降.
既然接口文档需要花费精力去维护,还要适当的进行面对面交流沟通,我们何不想一个办法,第一:可以不用写接口文档;第二:前端与后端沟通接口问题的时候,后端是否可以提供一个url,在这个url中罗列出所有可以调用的服务接口,并在每个服务接口中罗列出参数的说明,返回值的说明,第三:后端接口如果能模拟调用就所有问题都解决了。本文我们重点讲解一下sringboot中集成swagger2框架.
1.1. 添加swagger2依赖 。
在项目的pom.xml文件中增加如下的依赖.
|
1
2
3
4
5
6
7
8
9
10
|
<dependency>
<groupid>io.springfox</groupid>
<artifactid>springfox-swagger2</artifactid>
<version>
2.7
.
0
</version>
</dependency>
<dependency>
<groupid>io.springfox</groupid>
<artifactid>springfox-swagger-ui</artifactid>
<version>
2.7
.
0
</version>
</dependency>
|
首先,我们需要建立一个启动类,代码如下:
|
1
2
3
4
5
6
|
@springbootapplication
public
class
application {
public
static
void
main(string[] args) {
springapplication.run(application.
class
, args);
}
}
|
然后在上述类的同级目录中新建swagger2的配置类如下所示:
|
1
2
3
4
5
6
7
8
9
10
11
12
13
14
15
16
17
18
19
20
21
22
23
|
@configuration
@enableswagger2
public
class
swagger2 {
@bean
public
docket createrestapi() {
return
new
docket(documentationtype.swagger_2)
.apiinfo(apiinfo())
.select()
.apis(requesthandlerselectors.basepackage(
"com.shareniu.web"
))
.paths(pathselectors.any())
.build();
}
private
apiinfo apiinfo() {
return
new
apiinfobuilder()
.title(
"跟着分享牛学习springboot源码分析系列课程"
)
.description(
"更多spring boot相关文章请关注分享牛的博客"
)
.termsofserviceurl(
"http://www.shareniu.com/"
)
.contact(
"牛牛"
)
.license(
"copyright 2017-2018 分享牛"
)
.version(
"1.0"
)
.build();
}
}
|
@configuration制定了spring要加载这个类,@enableswagger2注解要开启swagger功能.
上述中的apiinfo最终都会展现在前端,我们使用了扫描包的方式配置配置,也就是requesthandlerselectors.basepackage。在这个包以及子包中的控制器最终都是生成api文档。(除了被@apiignore注解指定的请求).
1.2. 新增文档说明 。
上述的类声明之后,我们其实就可以直接调用了,但是为了增加文档的可读性,我们还是需要在接口中增加一些说明,我们先写一个控制器如下所示:
|
1
2
3
4
5
6
7
8
9
10
11
12
13
14
15
16
17
18
19
20
21
22
23
24
25
26
27
28
29
30
31
32
33
34
35
36
37
38
39
40
41
42
43
44
45
46
47
48
49
50
51
|
@restcontroller
@requestmapping
(value=
"/users"
)
public
class
usercontroller {
static
map<
long
, user> users = collections.synchronizedmap(
new
hashmap<
long
, user>());
static
{
user user =
new
user();
user.setage(
18
);
user.setid(1l);
user.setname(
"aa"
);
users.put(1l, user);
}
@apioperation
(value=
"获取所有用户列表"
, notes=
""
)
@requestmapping
(value={
""
}, method=requestmethod.get)
public
list<user> getuserlist() {
list<user> r =
new
arraylist<user>(users.values());
return
r;
}
@apioperation
(value=
"创建新的用户"
, notes=
"根据user对象创建用户"
)
@apiimplicitparam
(name =
"user"
, value =
"用户详细实体user"
, required =
true
, datatype =
"user"
)
@requestmapping
(value=
""
, method=requestmethod.post)
public
string postuser(
@requestbody
user user) {
users.put(user.getid(), user);
return
"success"
;
}
@apioperation
(value=
"获取用户详细信息"
, notes=
"根据url的id来获取用户详细信息"
)
@apiimplicitparam
(name =
"id"
, value =
"用户id"
, required =
true
, datatype =
"long"
)
@requestmapping
(value=
"/{id}"
, method=requestmethod.get)
public
user getuser(
@pathvariable
long
id) {
return
users.get(id);
}
@apioperation
(value=
"更新用户详细信息"
, notes=
"根据url的id来指定更新对象"
)
@apiimplicitparams
({
@apiimplicitparam
(name =
"id"
, value =
"用户id"
, required =
true
, datatype =
"long"
),
@apiimplicitparam
(name =
"user"
, value =
"用户详细实体user"
, required =
true
, datatype =
"user"
)
})
@requestmapping
(value=
"/{id}"
, method=requestmethod.put)
public
string putuser(
@pathvariable
long
id,
@requestbody
user user) {
user u = users.get(id);
u.setname(user.getname());
u.setage(user.getage());
users.put(id, u);
return
"success"
;
}
@apioperation
(value=
"删除已存在的用户"
, notes=
"根据url的id来指定删除对象"
)
@apiimplicitparam
(name =
"id"
, value =
"用户id"
, required =
true
, datatype =
"long"
)
@requestmapping
(value=
"/{id}"
, method=requestmethod.delete)
public
string deleteuser(
@pathvariable
long
id) {
users.remove(id);
return
"success"
;
}
}
|
@apioperation:用来描述该接口的作用。可以通过该注解说明接口的职责、返回头信息、方法的请求方式("get", "head", "post", "put", "delete", "options" and "patch")、协议( http, https, ws, wss)、http状态码。 @apiimplicitparam:用来给参数增加说明。可以设置参数的名称、是否是必填项、参数的描述信息、是否只读等.
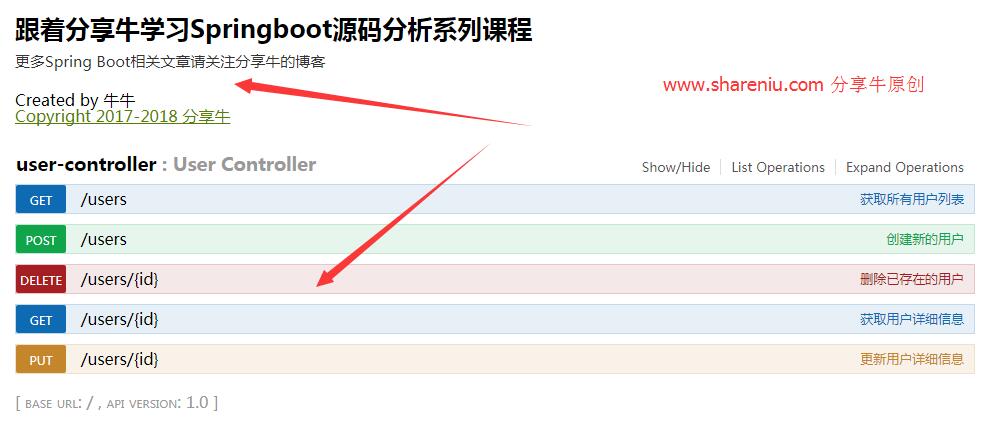
上述代码提交之后,启动springboot,访问,如下图所示: 。

上图分为两个部分,上部分是通过swagger2类配置出来的,下半部分是usercontroller类中的接口文档。 这里我们以/user为例进行说明:
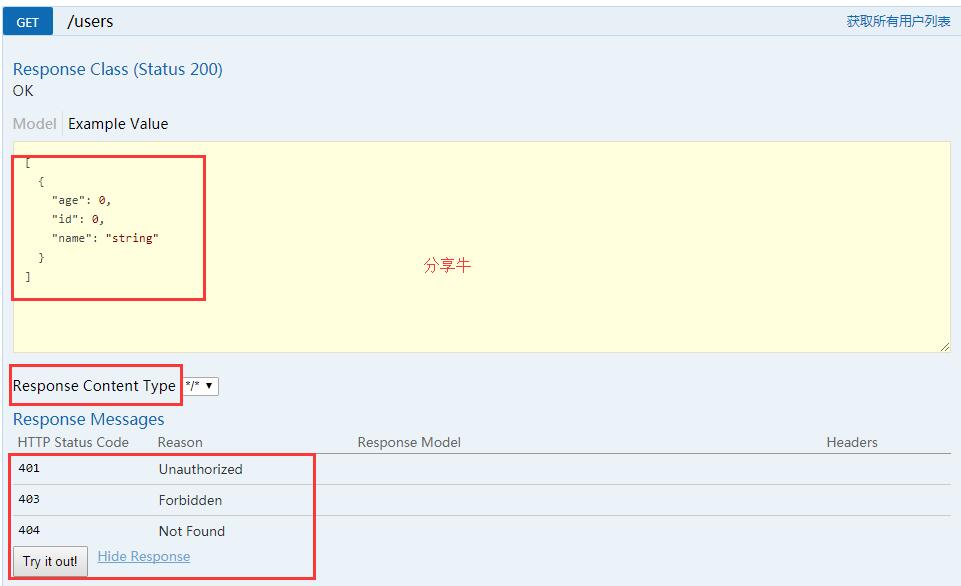
点击/user如下图所示: 。

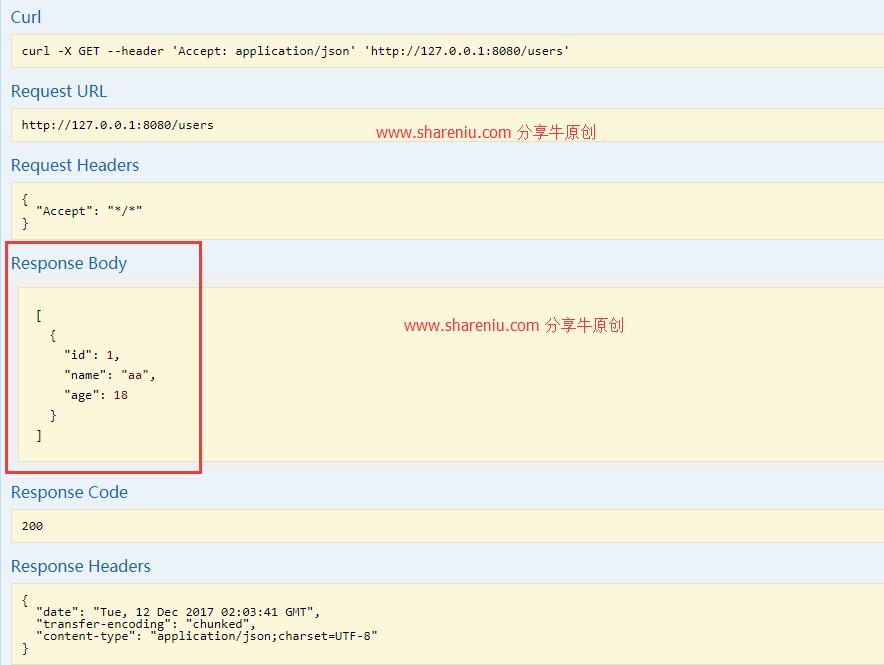
上图黄色的地方表示,该接口返回的样例数据。也就是user的数据结构。response content type:接口返回的头信息。点击try it out。如下所示: 。

该接口返回的baody、code码、响应头已经成功返回了.
总结 。
以上所述是小编给大家介绍的springboot中集成swagger2框架的方法,希望对大家有所帮助,如果大家有任何疑问请给我留言,小编会及时回复大家的。在此也非常感谢大家对我网站的支持! 。
原文链接:http://blog.csdn.net/qq_30739519/article/details/78779317 。
最后此篇关于Springboot中集成Swagger2框架的方法的文章就讲到这里了,如果你想了解更多关于Springboot中集成Swagger2框架的方法的内容请搜索CFSDN的文章或继续浏览相关文章,希望大家以后支持我的博客! 。
我需要开发一个简单的网站,我通常使用 bootstrap CSS 框架,但是我想使用 Gumbyn,它允许我使用 16 列而不是 12 列。 我想知道是否: 我可以轻松地改变绿色吗? 如何使用固定布局
这个问题在这里已经有了答案: 关闭 13 年前。 与直接编写 PHP 代码相比,使用 PHP 框架有哪些优点/缺点?
我开发了一个 Spring/JPA 应用程序:服务、存储库和域层即将完成。 唯一缺少的层是网络层。我正在考虑将 Playframework 2.0 用于 Web 层,但我不确定是否可以在我的 Play
我现有的 struts Web 应用程序具有单点登录功能。然后我将使用 spring 框架创建一个不同的 Web 应用程序。然后想要使用从 struts 应用程序登录的用户来链接新的 spring 应
我首先使用Spark框架和ORMLite处理网页上表单提交的数据,在提交中文字符时看到了unicode问题。我首先想到问题可能是由于ORMLite,因为我的MySQL数据库的字符集已设置为使用utf8
我有一个使用 .Net 4.5 功能的模块,我们的应用程序也适用于 XP 用户。所以我正在考虑将这个 .net 4.5 依赖模块移动到单独的项目中。我怎样才能有一个解决方案,其中有两个项目针对不同的版
我知道这是一个非常笼统的问题,但我想我并不是真的在寻找明确的答案。作为 PHP 框架的新手,我很难理解它。 Javascript 框架,尤其是带有 UI 扩展的框架,似乎通过将 JS 代码与设计分开来
我需要收集一些关于现有 ORM 解决方案的信息。 请随意编写任何编程语言。 你能谈谈你用过的最好的 ORM 框架吗?为什么它比其他的更好? 最佳答案 我使用了 NHibernate 和 Entity
除了 Apple 的 SDK 之外,还有什么强大的 iPhone 框架可供开始开发?有没有可以加快开发时间的方法? 最佳答案 此类框架最大的是Three20 。 Facebook 和许多其他公司都使用
有人可以启发我使用 NodeJS 的 Web 框架吗?我最近开始从免费代码营学习express js,虽然一切进展顺利,但我对express到底是什么感到困惑。是全栈框架吗?纯粹是为了后端吗?我发现您
您可以推荐哪种 Ajax 框架/工具包来构建使用 struts 的 Web 应用程序的 GUI? 最佳答案 我会说你的 AJAX/javascript 库选择应该较少取决于你的后端是如何实现的,而更多
我有生成以下错误的 python 代码: objc[36554]: Class TKApplication is implemented in both /Library/Frameworks/Tk.
首先,很抱歉,如果我问的问题很明显,因为我没有编程背景,那我去吧: 我想运行一系列测试场景并在背景部分声明了几个变量(我打印它们以仔细检查它们是否已正确声明),第一个是整数,另外两个字符串为你可以看到
在我们承担的一个项目中,我们正在寻找一个视频捕获和录制库。我们的基础工作(基于 google 搜索)表明 vlc (libvlc)、ffmpeg (libavcodec) 和 gstreamer 是三
我试过没有运气的情况下寻找某种功能来杀死/中断Play中的正常工作!框架。 我想念什么吗?还是玩了!实际没有添加此功能? 最佳答案 Java stop类中没有像Thread方法那样的东西,由于种种原因
我们希望在我们的系统中保留所有重大事件的记录。例如,在数据库可能存储当前用户状态的地方,事件日志应记录对该状态的所有更改以及更改发生的时间。 事件记录工具应该尽可能接近于事件引发器的零开销,应该容纳结
那里有 ActionScript 2.0/3.0 的测试框架列表吗? 最佳答案 2010-05-18 更新 由于这篇文章有点旧,而且我刚刚收到了赞成票,因此可能值得提供一些更新的信息,这样人们就不会追
我有一个巨大的 numpy 数组列表(一维),它们是不同事件的时间序列。每个点都有一个标签,我想根据其标签对 numpy 数组进行窗口化。我的标签是 0、1 和 2。每个窗口都有一个固定的大小 M。
我是 Play 的新手!并编写了我的第一个应用程序。这个应用程序有一组它依赖的 URL,从 XML 响应中提取数据并返回有效的 URL。 此应用程序需要在不同的环境(Dev、Staging 和 Pro
关闭。这个问题不满足Stack Overflow guidelines .它目前不接受答案。 想改善这个问题吗?更新问题,使其成为 on-topic对于堆栈溢出。 4年前关闭。 Improve thi

我是一名优秀的程序员,十分优秀!