- ubuntu12.04环境下使用kvm ioctl接口实现最简单的虚拟机
- Ubuntu 通过无线网络安装Ubuntu Server启动系统后连接无线网络的方法
- 在Ubuntu上搭建网桥的方法
- ubuntu 虚拟机上网方式及相关配置详解
CFSDN坚持开源创造价值,我们致力于搭建一个资源共享平台,让每一个IT人在这里找到属于你的精彩世界.
这篇CFSDN的博客文章iOS指纹验证TouchID应用学习教程由作者收集整理,如果你对这篇文章有兴趣,记得点赞哟.
指纹验证这个功能现在在一些app中经常常见,常常与数字解锁,手势解锁联合起来使用。前几天接到说实现一个指纹验证的功能,捣鼓了挺久,然后今天,我就简单的介绍下指纹验证,会做个简单的demo实现一下基本的功能。 。
支持系统和机型:ios系统的指纹识别功能最低支持的机型为iphone 5s,最低支持系统为ios 8。实现起来呢,其实还是很简单的,下面我们就用纯代码方式实现一个简单的demo1.
第一部分:调用原生服务实现指纹验证 。
这部分了解个大概就可以了 。
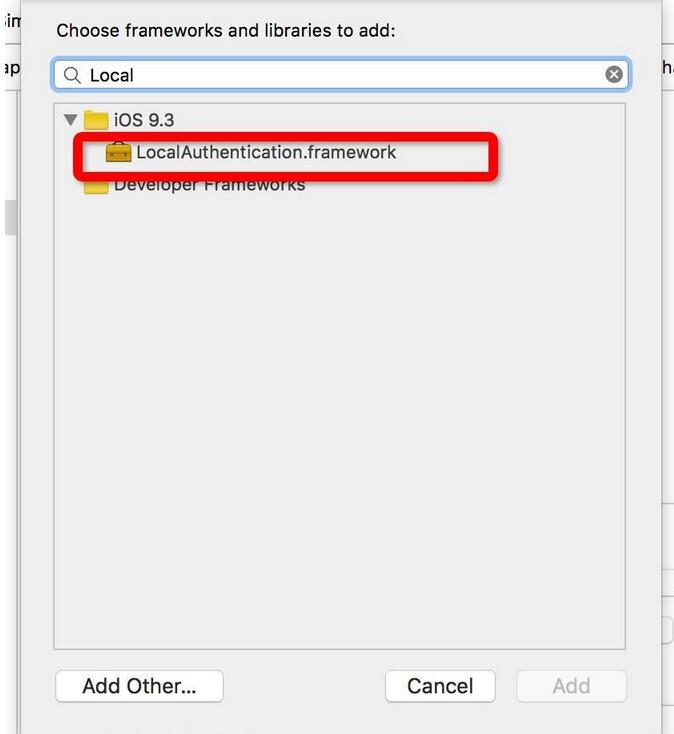
第一步:添加localauthentication.framework库 。


第二步:在appdelegate.m中添加代码 这个不说其实大家也都知道的吧.
|
1
2
3
4
5
6
7
8
9
10
11
12
13
14
15
16
|
#import "appdelegate.h"
#import "viewcontroller.h"
@interface appdelegate ()
@end
@implementation appdelegate
- (
bool
)application:(uiapplication *)application didfinishlaunchingwithoptions:(nsdictionary *)launchoptions {
//appdelegate
_window = [[uiwindow alloc]initwithframe:[uiscreen mainscreen].bounds];
_window.backgroundcolor = [uicolor whitecolor];
[_window makekeyandvisible];
viewcontroller *vc = [[viewcontroller alloc]init];
uinavigationcontroller *na = [[uinavigationcontroller alloc]initwithrootviewcontroller:vc];
_window.rootviewcontroller = na;
return
yes;
}
|
第三步 引入头文件 。
#import <localauthentication/localauthentication.h> 。
第四步:实现指纹验证 。
这一步就是很重要的地方了,在- (void)viewdidload中写入验证实现的代码,这里只有两步,因为lacontext在官方文档中只有两个方法
|
1
2
3
4
5
|
-canevaluatepolicy:error:
//-(bool)canevaluatepolicy:(lapolicy)policy error:(nserror * __autoreleasing *)error __attribute__((swift_error(none)));
-evaluatepolicy:localizedreason:reply:
//- (void)evaluatepolicy:(lapolicy)policy localizedreason:(nsstring *)localizedreason reply:(void(^)(bool success, nserror * __nullable error))reply;
|
一个是判断设备是否支持touchid,一个是进行验证返回不同的结果,之前在网上经常可以一些文章中写了,指纹验证的第一步都是先判断设备的系统版本等等,现在似乎都不需要了,只要调用该方法就可以了。全部的代码 如下:
|
1
2
3
4
5
6
7
8
9
10
11
12
13
14
15
16
17
18
19
20
21
22
23
24
25
26
27
28
29
30
31
32
33
34
35
36
37
38
39
40
41
42
43
44
45
46
47
48
49
50
51
52
53
54
55
56
57
58
59
60
61
62
63
64
65
66
67
68
69
70
71
72
73
74
75
76
77
78
79
80
81
82
|
- (
void
)viewdidload {
[super viewdidload];
self.title = @
"touchidsimpledemoone"
;
lacontext *context = [[lacontext alloc]init];
nserror *error;
nsstring *result = @
"需要你身份验证呢"
;
if
([context canevaluatepolicy:lapolicydeviceownerauthenticationwithbiometrics error:&error])
{
[context evaluatepolicy:lapolicydeviceownerauthenticationwithbiometrics localizedreason:result reply:^(
bool
success, nserror *error)
{
if
(success)
{
//验证成功,主线程处理ui
//这个地方呢就是写一些验证成功之后需要做些什么事情的代码。
nslog(@
"验证成功"
);
}
else
{
//以下是一些验证失败的原因啥的
nslog(@
"%@"
,error.localizeddescription);
switch
(error.code) {
case
laerrorsystemcancel:
{
nslog(@
"切换到其他app,系统取消验证touch id"
);
//切换到其他app,系统取消验证touch id
break
;
}
case
laerrorusercancel:
{
nslog(@
"用户取消验证touch id"
);
//用户取消验证touch id
break
;
}
case
laerroruserfallback:
{
nslog(@
"用户选择输入密码"
);
[[nsoperationqueue mainqueue] addoperationwithblock:^{
//用户选择其他验证方式,切换主线程处理
}];
break
;
}
default
:
{
nslog(@
"laerrorauthenticationfailed,授权失败"
);
//授权失败
[[nsoperationqueue mainqueue] addoperationwithblock:^{
//其他情况,切换主线程处理
}];
break
;
}
}
}
}];
}
else
{
//不支持指纹识别,log出错误详情
switch
(error.code) {
case
laerrortouchidnotenrolled:
{
nslog(@
"设备touch id不可用,用户未录入"
);
break
;
}
case
laerrorpasscodenotset:
{
nslog(@
"系统未设置密码"
);
break
;
}
case
laerrortouchidnotavailable:
{
nslog(@
"设备touch id不可用,例如未打开"
);
break
;
}
default
:
{
nslog(@
"系统未设置密码"
);
break
;
}
}
nslog(@
"%@"
,error.localizeddescription);
}
}
|
|
1
2
3
4
5
6
7
8
9
10
11
12
13
14
15
16
17
18
19
20
21
22
23
24
25
26
27
28
29
30
31
32
33
34
35
36
|
//指纹验证返回值
typedef
ns_enum(nsinteger, laerror)
{
/// authentication was not successful, because user failed to provide valid credentials.
laerrorauthenticationfailed = klaerrorauthenticationfailed,
/// authentication was canceled by user (e.g. tapped cancel button).
laerrorusercancel = klaerrorusercancel,
/// authentication was canceled, because the user tapped the fallback button (enter password).
laerroruserfallback = klaerroruserfallback,
/// authentication was canceled by system (e.g. another application went to foreground).
laerrorsystemcancel = klaerrorsystemcancel,
/// authentication could not start, because passcode is not set on the device.
laerrorpasscodenotset = klaerrorpasscodenotset,
/// authentication could not start, because touch id is not available on the device.
laerrortouchidnotavailable = klaerrortouchidnotavailable,
/// authentication could not start, because touch id has no enrolled fingers.
laerrortouchidnotenrolled = klaerrortouchidnotenrolled,
/// authentication was not successful, because there were too many failed touch id attempts and
/// touch id is now locked. passcode is required to unlock touch id, e.g. evaluating
/// lapolicydeviceownerauthenticationwithbiometrics will ask for passcode as a prerequisite.
laerrortouchidlockout ns_enum_available(10_11, 9_0) = klaerrortouchidlockout,
/// authentication was canceled by application (e.g. invalidate was called while
/// authentication was in progress).
laerrorappcancel ns_enum_available(10_11, 9_0) = klaerrorappcancel,
/// lacontext passed to this call has been previously invalidated.
laerrorinvalidcontext ns_enum_available(10_11, 9_0) = klaerrorinvalidcontext
} ns_enum_available(10_10, 8_0);
|
以上呢,就是一个简单的demo了,可能有些小问题,到时候需要的话可以自调整。这里附上这个demo的guithub链接看这里看这里,链接在这呢.
第二部分:利用现有的第三方组件实现 。
这个部分可以好好学习一下.
在这里呢,我要推荐一个别人写的一个第三方的组件,就是[wjtouchid](https://github.com/hu670014125/wjtouchid);这个控件的话,在这个链接上其实已经有写出怎么用了,其实不需要我再都说什么,但是我还是要说下吧。 。
调用时只需要一两行代码调用,但是回调函数还是需要写不少东西的.
1:复制文件进去 。

2:引入头文件 。
#import "wjtouchid.h" 。
3:遵守协议 。
@interface viewcontroller ()<wjtouchiddelegate> 。
4: 创建对象 。
@property (nonatomic, strong) wjtouchid *touchid,
5:调用 。
|
1
2
3
4
5
6
7
|
- (
void
)viewdidload {
[super viewdidload];
//初始化
wjtouchid *touchid = [[wjtouchid alloc]init];
[touchid startwjtouchidwithmessage:wjnotice(@
"自定义信息"
, @
"the custom message"
) fallbacktitle:wjnotice(@
""
, @
"fallback title"
) delegate:self];
self.touchid = touchid;
}
|
6:实现回调函数 。
|
1
2
3
4
5
6
7
8
9
10
11
12
13
14
15
16
17
18
19
20
21
22
23
24
25
26
27
28
29
30
31
32
33
34
35
36
37
38
39
|
@required
//touchid验证成功
- (
void
)wjtouchidauthorizesuccess;
//touchid验证失败
- (
void
)wjtouchidauthorizefailure;
@optional
//当前设备不支持指纹识别
- (
void
)wjtouchidisnotsupport;
//当前软件被挂起取消了授权(如突然来了电话,应用进入前台)
- (
void
)wjtouchidauthorizeerrorappcancel;
//取消touchid验证 (用户点击了取消)
- (
void
)wjtouchidauthorizeerrorusercancel;
//在touchid对话框中点击输入密码按钮
- (
void
)wjtouchidauthorizeerroruserfallback;
//在验证的touchid的过程中被系统取消 例如突然来电话、按了home键、锁屏...
- (
void
)wjtouchidauthorizeerrorsystemcancel;
//无法启用touchid,设备没有设置密码
- (
void
)wjtouchidauthorizeerrorpasscodenotset;
//多次连续使用touch id失败,touch id被锁,需要用户输入密码解锁
- (
void
)wjtouchidauthorizeerrortouchidlockout;
//当前软件被挂起取消了授权 (授权过程中,lacontext对象被释)
- (
void
)wjtouchidauthorizeerrorinvalidcontext;
//设备没有录入touchid,无法启用touchid
- (
void
)wjtouchidauthorizeerrortouchidnotenrolled;
//该设备的touchid无效
- (
void
)wjtouchidauthorizeerrortouchidnotavailable;
|
这些方法实现结束后呢,这个功能也基本上算是完成了。因为好像篇幅太长了,看得人肯定也嫌烦,所以我准备另写一篇做一个在app被唤醒的时候启动指纹验证,分别用弹出控制器和弹出自定义view这两个方式来实现,感兴趣的话可以看下.
以上就是本文的全部内容,希望对大家的学习有所帮助,也希望大家多多支持我.
最后此篇关于iOS指纹验证TouchID应用学习教程的文章就讲到这里了,如果你想了解更多关于iOS指纹验证TouchID应用学习教程的内容请搜索CFSDN的文章或继续浏览相关文章,希望大家以后支持我的博客! 。
我正在创建一个应用程序,用户必须登录并可以使用 FaceID 或 TouchID 来加快登录过程。 可以在应用程序的内部设置中启用或禁用使用 FaceID 或 TouchID 登录。 首次使用 Tou
本文实例为大家分享了iOS指纹解锁的具体代码,供大家参考,具体内容如下 1、首先,引入依赖框架 LocalAuthentication.framework #import <LocalAu
我想使用 TouchID 验证我自己的应用程序。 1.我希望用户可以点击“输入密码”来调用系统内置密码屏幕进行身份验证,如果成功则进入我自己的应用程序。 但我不知道如何在“case LAErrorUs
我有一个安全 Controller ,当应用程序激活时触发 Touch ID。如果用户取消 Touch ID 框,则会显示一个键盘以输入数字代码。但是我的键盘已加载(inputAccessoryVie
如何解决 TouchId 错误:Domain=com.apple.LocalAuthentication Code=-2“已被用户取消。” 我尝试再次添加本地上下文: let myContext =
关闭。这个问题需要更多focused .它目前不接受答案。 想改进这个问题吗? 更新问题,使其只关注一个问题 editing this post . 关闭 6 年前。 Improve this qu
我正在使用 TouchID 帮助用户登录我的应用程序。每当应用程序启动时,用户首先看到的是 TouchID 对话框。 我的问题是,如果用户在他的手指已经放在主页按钮上时启动我的应用程序 - 用户会立即
我正在研究 Apple 的 Touch ID,更准确地说是 Local Authenticator。截至目前,文档非常稀少。主要是这样的: LAContext *myContext = [[LACon
我需要我的应用程序使用 TouchId 登录,但我不希望用户选择或回退到密码选项。换句话说,我想隐藏下图中的“输入密码”标签。谢谢。 最佳答案 答案是“是”。您可以隐藏“输入密码”... 试试下面的代
touchid指纹识别是iphone 5s设备中增加的一项重大功能.苹果的后续移动设备也相继添加了指纹功能,在实际使用中还是相当方便的,比如快捷登录,快捷支付等等.系统提供了相应框架,使用起来还是比
LocalAuthentication 将让您回退到需要手动输入密码,但如果您使用钥匙串(keychain) touchid 工作流程,则回退是密码。 要么他们没有将它存储在钥匙串(keychain)
在我的应用程序 IOS 中,我在 ViewController 中添加了一个 Switch 元素来允许用户启用或不启用 TouchId 身份验证。但我不明白是否有“isEnableToutchId”属
我想用 Passcode 或 TouchID 锁定特定应用程序,如 facebook、whatsapp 等,这样未经授权的用户就无法访问我想保护的应用程序。 我在网上没有找到任何方法,不确定是否可以锁
在进行身份验证后,如果我按取消并设置 [buttonTouch setHidden:NO]; 出现,按钮不会立即出现,需要很长时间才能出现,尽管按钮事件正在运行。 我的代码: if ([context
我们的应用程序有以下要求。 如果用户在应用安装后添加/更新任何指纹,我们应该限制用户登录。 最佳答案 如果您的应用将某些凭据保存到钥匙串(keychain),然后使用 TouchID 访问该保存的凭据
如果我有一个我们想要使用 TouchID 的公司应用程序,但需要防止在员工的设备上注册了另一个家庭成员的指纹的情况下未经授权的访问,可以做什么? 最佳答案 不支持您想要的内容。 LAContext 功
我的一个应用程序具有带电子邮件和密码的登录功能,并且按预期工作正常。 现在,我的客户在这里想要什么 email + TouchID (没有密码) 需要登录到应用程序。 所以我的第一个问题是,我可以同时
我已经在 View Controller 上实现了密码/TouchID/FaceID,当我遇到成功案例时,我希望提示停止触发,但它只是一遍又一遍地触发。 在我的 VC 中: var context:
我的 iOS 应用程序使用 TouchID 来解锁一些安全服务。设计者不希望“取消”按钮的文本显示为“取消”,而是显示为“稍后设置”。我可以看到如何更改默认“输入密码”按钮的文本,这很简单: LACo
有没有办法确定是否已注册指纹但 Touch ID 由于指纹验证失败次数过多而当前处于“暂停”状态? 最佳答案 错误代码可以与 LAError 类进行比较。 func errorMessageForLA

我是一名优秀的程序员,十分优秀!