- ubuntu12.04环境下使用kvm ioctl接口实现最简单的虚拟机
- Ubuntu 通过无线网络安装Ubuntu Server启动系统后连接无线网络的方法
- 在Ubuntu上搭建网桥的方法
- ubuntu 虚拟机上网方式及相关配置详解
CFSDN坚持开源创造价值,我们致力于搭建一个资源共享平台,让每一个IT人在这里找到属于你的精彩世界.
这篇CFSDN的博客文章Asp.Net Core WebAPI使用Swagger时API隐藏和分组详解由作者收集整理,如果你对这篇文章有兴趣,记得点赞哟.
1、前言 。
为什么我们要隐藏部分接口?
因为我们在用swagger代替接口的时候,难免有些接口会直观的暴露出来,比如我们结合Consul一起使用的时候,会将健康检查接口以及报警通知接口暴露出来,这些接口有时候会出于方便考虑,没有进行加密,这个时候我们就需要把接口隐藏起来,只有内部的开发者知道.
为什么要分组?
通常当我们写前后端分离的项目的时候,难免会遇到编写很多接口供前端页面进行调用,当接口达到几百个的时候就需要区分哪些是框架接口,哪些是业务接口,这时候给swaggerUI的接口分组是个不错的选择.

swagger的基本使用这里将不再赘述,可以阅读微软官方文档,即可基本使用 。
2、swaggerUI中加入授权请求 。
新建HttpHeaderOperationFilter操作过滤器,继承Swashbuckle.AspNetCore.SwaggerGen.IOperationFilter接口,实现Apply方法 。
|
1
2
3
4
5
6
7
8
9
10
11
12
13
14
15
16
17
18
19
20
21
22
23
24
25
26
27
28
29
30
31
32
33
34
35
36
37
38
39
40
41
42
43
44
45
46
47
48
49
50
51
52
53
54
55
56
57
|
/// <summary>
/// swagger请求头
/// </summary>
public
class
HttpHeaderOperationFilter : IOperationFilter
{
public
void
Apply(Operation operation, OperationFilterContext context)
{
#region 新方法
if
(operation.Parameters ==
null
)
{
operation.Parameters =
new
List<IParameter>();
}
if
(context.ApiDescription.TryGetMethodInfo(
out
MethodInfo methodInfo))
{
if
(!methodInfo.CustomAttributes.Any(t => t.AttributeType ==
typeof
(AllowAnonymousAttribute))
&&!(methodInfo.ReflectedType.CustomAttributes.Any(t => t.AttributeType ==
typeof
(AuthorizeAttribute))))
{
operation.Parameters.Add(
new
NonBodyParameter
{
Name =
"Authorization"
,
In =
"header"
,
Type =
"string"
,
Required =
true
,
Description =
"请输入Token,格式为bearer XXX"
});
}
}
#endregion
#region 已过时
//if (operation.Parameters == null)
//{
// operation.Parameters = new List<IParameter>();
//}
//var actionAttrs = context.ApiDescription.ActionAttributes().ToList();
//var isAuthorized = actionAttrs.Any(a => a.GetType() == typeof(AuthorizeAttribute));
//if (isAuthorized == false)
//{
// var controllerAttrs = context.ApiDescription.ControllerAttributes();
// isAuthorized = controllerAttrs.Any(a => a.GetType() == typeof(AuthorizeAttribute));
//}
//var isAllowAnonymous = actionAttrs.Any(a => a.GetType() == typeof(AllowAnonymousAttribute));
//if (isAuthorized && isAllowAnonymous == false)
//{
// operation.Parameters.Add(new NonBodyParameter
// {
// Name = "Authorization",
// In = "header",
// Type = "string",
// Required = true,
// Description = "请输入Token,格式为bearer XXX"
// });
//}
#endregion
}
}
|
然后修改Startup.cs中的ConfigureServices方法,添加我们自定义的HttpHeaderOperationFilter过滤器 。
|
1
2
3
4
5
6
7
8
9
10
|
public
IServiceProvider ConfigureServices(IServiceCollection services)
{
...
services.AddSwaggerGen(c =>
{
...
c.OperationFilter<HttpHeaderOperationFilter>();
});
...
}
|
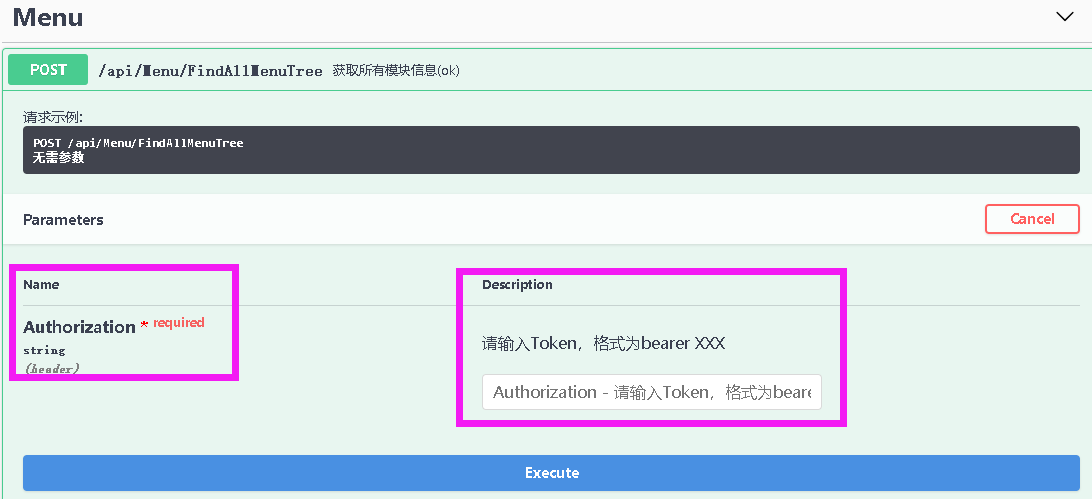
这时候我们再访问swaggerUI就可以输入Token了 。

3、API分组 。
修改Startup.cs中的ConfigureServices方法,添加多个swagger文档 。
|
1
2
3
4
5
6
7
8
9
10
11
12
13
14
15
16
17
18
19
20
21
22
23
24
25
26
27
28
29
30
31
32
33
34
35
36
37
38
39
40
41
42
43
44
|
public
IServiceProvider ConfigureServices(IServiceCollection services)
{
...
services.AddSwaggerGen(c =>
{
c.SwaggerDoc(
"v1"
,
new
Info
{
Version =
"v1"
,
Title =
"接口文档"
,
Description =
"接口文档-基础"
,
TermsOfService =
""
,
Contact =
new
Contact
{
Name =
"XXX1111"
,
Email =
"XXX1111@qq.com"
,
Url =
""
}
});
c.SwaggerDoc(
"v2"
,
new
Info
{
Version =
"v2"
,
Title =
"接口文档"
,
Description =
"接口文档-基础"
,
TermsOfService =
""
,
Contact =
new
Contact
{
Name =
"XXX2222"
,
Email =
"XXX2222@qq.com"
,
Url =
""
}
});
//反射注入全部程序集说明
GetAllAssemblies().Where(t => t.CodeBase.EndsWith(
"Controller.dll"
)).ToList().ForEach(assembly =>
{
c.IncludeXmlComments(assembly.CodeBase.Replace(
".dll"
,
".xml"
));
});
c.OperationFilter<HttpHeaderOperationFilter>();
//c.DocumentFilter<HiddenApiFilter>();
});
...
}
|
修改Startup.cs中的Configure方法,加入 。
|
1
2
3
4
5
6
7
8
9
10
11
12
13
|
public
void
Configure(IApplicationBuilder app, ILoggerFactory loggerFactory)
{
...
app.UseSwagger();
app.UseSwaggerUI(c =>
{
c.SwaggerEndpoint(
"/swagger/v2/swagger.json"
,
"接口文档-基础"
);
//业务接口文档首先显示
c.SwaggerEndpoint(
"/swagger/v1/swagger.json"
,
"接口文档-业务"
);
//基础接口文档放后面后显示
c.RoutePrefix =
string
.Empty;
//设置后直接输入IP就可以进入接口文档
});
...
}
|
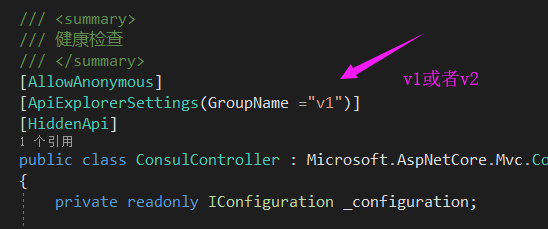
然后还要在我们的控制器上面标注swagger文档的版本 。

这时候我们就可以将接口文档进行分组显示了 。

4、API隐藏 。
创建自定义隐藏特性HiddenApiAttribute.cs 。
|
1
2
3
4
5
6
7
|
/// <summary>
/// 隐藏swagger接口特性标识
/// </summary>
[AttributeUsage(AttributeTargets.Method | AttributeTargets.Class)]
public
class
HiddenApiAttribute:System.Attribute
{
}
|
创建API隐藏过滤器HiddenApiFilter继承Swashbuckle.AspNetCore.SwaggerGen.IDocumentFilter接口,实现Apply方法 。
|
1
2
3
4
5
6
7
8
9
10
11
12
13
14
15
16
17
18
19
20
21
22
23
24
25
26
|
/// <summary>
/// 自定义Swagger隐藏过滤器
/// </summary>
public
class
HiddenApiFilter : IDocumentFilter
{
public
void
Apply(SwaggerDocument swaggerDoc, DocumentFilterContext context)
{
foreach
(ApiDescription apiDescription
in
context.ApiDescriptions)
{
if
(apiDescription.TryGetMethodInfo(
out
MethodInfo method))
{
if
(method.ReflectedType.CustomAttributes.Any(t=>t.AttributeType==
typeof
(HiddenApiAttribute))
|| method.CustomAttributes.Any(t => t.AttributeType ==
typeof
(HiddenApiAttribute)))
{
string
key =
"/"
+ apiDescription.RelativePath;
if
(key.Contains(
"?"
))
{
int
idx = key.IndexOf(
"?"
, System.StringComparison.Ordinal);
key = key.Substring(0, idx);
}
swaggerDoc.Paths.Remove(key);
}
}
}
}
}
|
在Startup.cs中使用HiddenApiFilter 。
|
1
2
3
4
5
6
7
8
9
10
11
12
13
14
15
16
17
18
19
20
21
22
23
24
25
26
27
28
29
30
31
32
33
34
35
36
37
38
39
40
41
42
43
44
45
|
public
IServiceProvider ConfigureServices(IServiceCollection services)
{
...
services.AddSwaggerGen(c =>
{
c.SwaggerDoc(
"v1"
,
new
Info
{
Version =
"v1"
,
Title =
"接口文档"
,
Description =
"接口文档-基础"
,
TermsOfService =
""
,
Contact =
new
Contact
{
Name =
"XXX1111"
,
Email =
"XXX1111@qq.com"
,
Url =
""
}
});
c.SwaggerDoc(
"v2"
,
new
Info
{
Version =
"v2"
,
Title =
"接口文档"
,
Description =
"接口文档-基础"
,
TermsOfService =
""
,
Contact =
new
Contact
{
Name =
"XXX2222"
,
Email =
"XXX2222@qq.com"
,
Url =
""
}
});
//反射注入全部程序集说明
GetAllAssemblies().Where(t => t.CodeBase.EndsWith(
"Controller.dll"
)
&& !t.CodeBase.Contains(
"Common.Controller.dll"
)).ToList().ForEach(assembly =>
{
c.IncludeXmlComments(assembly.CodeBase.Replace(
".dll"
,
".xml"
));
});
c.OperationFilter<HttpHeaderOperationFilter>();
c.DocumentFilter<HiddenApiFilter>();
});
...
}
|
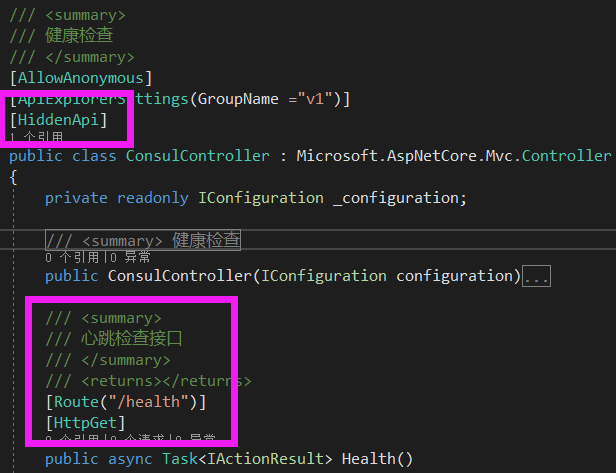
示例:
我这里提供了Consul的心跳检车接口 。

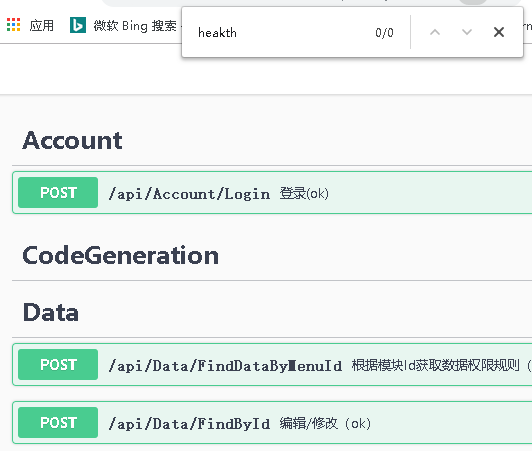
但是在接口文档中并没有显示出来 。

总结 。
以上就是这篇文章的全部内容了,希望本文的内容对大家的学习或者工作具有一定的参考学习价值,谢谢大家对我的支持.
原文链接:http://www.cnblogs.com/wyt007/p/10650974.html 。
最后此篇关于Asp.Net Core WebAPI使用Swagger时API隐藏和分组详解的文章就讲到这里了,如果你想了解更多关于Asp.Net Core WebAPI使用Swagger时API隐藏和分组详解的内容请搜索CFSDN的文章或继续浏览相关文章,希望大家以后支持我的博客! 。
代码如下: http://jsfiddle.net/t2nite/KCY8g/ 我正在使用 jquery 创建这些隐藏框。 每个框都有一些文本和一个“显示”和“隐藏”按钮。我正在尝试创建一个“显示/隐
我正在尝试做某事。如果单击一个添加 #add-conferance 然后菜单将显示.add-contact。当点击隐藏然后它显示隐藏。我也将 setTimeout 设置为 7sec,但我希望当我的鼠标
我有一个多步骤(多页?)表单,只要用户按下“下一步”或“上一步”按钮,表单字段就会通过 div 显示和隐藏。 我只想禁用第一个 div (div id="page1"class="pageform")
我有一个使用 IIS 6 和 7 的当前系统,用 ASP.NET 和 .NET 4 中的 C# 编写。 My purpose is to hide the url completely (as per
我正在建立一个网站,并有一个幻灯片。幻灯片有标题和索引,覆盖整个页面。当覆盖被激活时,标题需要消失。当覆盖层被停用时,通过单击退出按钮、缩略图链接或菜单链接,字幕必须返回。 这就是我目前所拥有的
我正在尝试为显示/隐藏功能制作简单的 jquery 代码。但我仍然做错了什么。 $(document).ready(function(){ $('.arrow').click(function
我有一个自定义对话框并使用它来代替 optionMenu。所以我希望 myDialog 表现得像菜单,即在按下菜单时显示/隐藏。我尝试了很多变体,但结果相同: 因为我为 myDialog 设置了一个
在我的项目中,我通过 ViewPager 创建我的 tabBar,如下所示: MainActivity.java mViewPager = (ViewPager) findViewById(R.id.
我目前正在使用一个 Excel 表,我将第 1-17 行分组并在单元格 B18 中写入了一个单元格值。我想知道当我在展开/折叠行时单击 +/- 符号时是否有办法更改 B18 中的值。 例如:我希望 B
我想创建一个按钮来使用 VBA 隐藏和取消隐藏特定组。我拥有的代码将隐藏或取消隐藏指定级别中的所有组: Sub Macro1() ActiveSheet.Outline.ShowLevels RowL
我是 VBA 新手。我想隐藏从任何行到工作表末尾的所有行。 我遇到的问题是我不知道如何编程以隐藏最后写入的行。 我使用下一个函数知道最后写入的单元格,但我不知道在哪里放置隐藏函数。 last = Ra
我想根据另一个字段的条件在 UI 上隐藏或更新一个字段。 例如,如果我有一个名为 Color 的字段: [PXUIField(DisplayName="Color")] [PXStringList("
这是我尝试开始收集通常不会遇到的 GCC 特殊功能。这是@jlebedev 在另一个问题中提到g++的“有效C++”选项之后, -Weffc++ This option warns about C++
我开发了一个 Flutter 应用程序,我使用了 ProgressDialog小部件 ( progress_dialog: ^1.2.0 )。首先,我展示了 ProgressDialog小部件和一些代
我需要在 API 17+ 的同一个 Activity(Fragment) 中显示/隐藏状态栏。假设一个按钮将隐藏它,另一个按钮将显示它: 节目: getActivity().getWindow().s
是否可以通过组件的 ts 代码以编程方式控制下拉列表的显示/隐藏(使用 Angular2 清楚)- https://vmware.github.io/clarity/documentation/dro
我想根据 if 函数的结果隐藏/显示 NiceScroll。 在我的html中有三个部分,从左到右逐一滚动。 我的脚本如下: var section2 = $('#section2').offset(
我有这个 jquery 代码: $(document).ready(function(){ //global vars var searchBoxes = $(".box"); var searchB
这个问题已经有答案了: Does something like jQuery.toggle(boolean) exist? (5 个回答) 已关闭 6 年前。 在 jQuery 中(我当前使用的是 1
我在这样的选择标签上使用 jQuery 的 selectMenu。 $('#ddlReport').selectmenu() 在某些情况下我想隐藏它,但我不知道如何隐藏。 这不起作用: $('#ddl

我是一名优秀的程序员,十分优秀!