- ubuntu12.04环境下使用kvm ioctl接口实现最简单的虚拟机
- Ubuntu 通过无线网络安装Ubuntu Server启动系统后连接无线网络的方法
- 在Ubuntu上搭建网桥的方法
- ubuntu 虚拟机上网方式及相关配置详解
CFSDN坚持开源创造价值,我们致力于搭建一个资源共享平台,让每一个IT人在这里找到属于你的精彩世界.
这篇CFSDN的博客文章Python WXPY实现微信监控报警功能的代码由作者收集整理,如果你对这篇文章有兴趣,记得点赞哟.
概述
本文主要分享一下博主在学习wxpy 的过程中开发的一个小程序。博主在最近有一个监控报警的需求需要完成,然后刚好在学习wxpy 这个东西,因此很巧妙的将工作和学习联系在一起.
博文中主要使用到的技术设计到Python,Redis,以及Java。涉及到的技术看似很多,但是主要的语言是基于Python进行开发的.
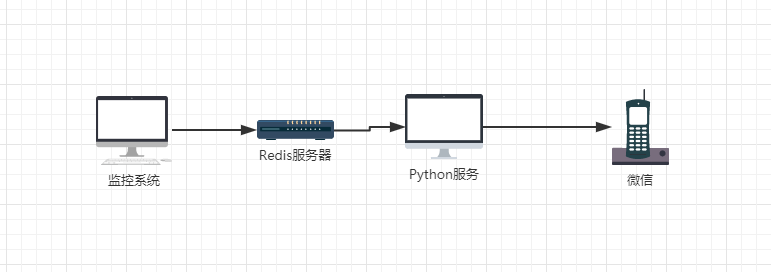
架构涉及主要采用了 生产者消费者的涉及模式,使用Redis作为消息队列进行解耦操作.
主要架构涉及如下:

接下来开始介绍一下程序的实现过程,主要讲解wxpy -> python.redis -> Java.redis 。
1、Wxpy初体验 。
项目使用的python 是3.5版本的,因此语法会和2.x版本有所区别,wxpy 支持python3.4-3.6 以及python2.7版本 ,因此在python版本上不用太过于纠结 。
1.1 安装wxpy 。
在这里默认大家以及安装好了pip,我们需要安装wxpy 以及wechat_sender 两个包,这里推荐使用国内的豆瓣源,如果大家网速过硬 请忽略。。。.
|
1
2
3
|
pip install wxpy
-
i
"https://pypi.doubanio.com/simple/"
pip install wechat_sender
-
i
"https://pypi.doubanio.com/simple/"
|
1.2 wxpy 登陆 。
wxpy 使用起来非常简单,我们只需要创建一个bot 对象,程序运行后,会弹出二维码,扫描二维码后显示登陆成功.
下述代码在登陆完成后,会向我们的文件传输助手发送一个“hello world!”。(每个程序都需要一个hello world) 。
|
1
2
3
4
5
6
7
|
from
wxpy
import
*
bot
=
Bot()
bot.file_helper.send(
'hello world!'
)
print
(
"ending"
)
|
关于Bot()对象的相关参数说明,我们可以在源码中的注释中看到:
:param cache_path: * 设置当前会话的缓存路径,并开启缓存功能;为 `None` (默认) 则不开启缓存功能。 * 开启缓存后可在短时间内避免重复扫码,缓存失效时会重新要求登陆。 * 设为 `True` 时,使用默认的缓存路径 'wxpy.pkl'.
:param console_qr: * 在终端中显示登陆二维码,需要安装 pillow 模块 (`pip3 install pillow`)。 * 可为整数(int),表示二维码单元格的宽度,通常为 2 (当被设为 `True` 时,也将在内部当作 2)。 * 也可为负数,表示以反色显示二维码,适用于浅底深字的命令行界面。 * 例如: 在大部分 Linux 系统中可设为 `True` 或 2,而在 macOS Terminal 的默认白底配色中,应设为 -2.
:param qr_path: 保存二维码的路径 。
:param qr_callback: 获得二维码后的回调,可以用来定义二维码的处理方式,接收参数: uuid, status, qrcode 。
:param login_callback: 登陆成功后的回调,若不指定,将进行清屏操作,并删除二维码文件 。
:param logout_callback: 登出时的回调 。
这里介绍一下两个主要使用到的参数:
1.3 wxpy 好友与聊天群 。
如代码所示,我们可以通过Bot.friends 以及Bot.groups 来获取到所有的好友以及聊天群,这里需要注意的是,聊天群需要保存到通讯录中,不然可能会出现找不到聊天群的情况.
在搜索方法中,可以提供的参数有:姓名,city,province,sex 等相关变量.
关于好友的详细API文档,可以参考---》 微信好友API 。
|
1
2
3
4
5
6
7
8
9
10
11
12
13
14
15
16
17
18
19
20
21
22
23
24
25
26
|
from
wxpy
import
*
bot
=
Bot()
# 获取所有好友
friends
=
bot.friends()
# 遍历输出好友名称
for
friend
in
friends:
print
(friend)
# 找到好友
friend
=
bot.friends.search(
'被单'
)[
0
]
print
(friend)
friend.send(
"hello world!"
)
# 获取所有聊天群
groups
=
bot.groups()
for
group
in
groups:
print
(group)
# 找到目标群
group
=
groups.search(
"409"
)[
0
]
group.send(
"hello world!"
)
|
1.4 wxpy 消息处理 。
接下来主要介绍一下用户发送消息的类型,目前wxpy 支持发送文本,图片,视频以及文件。主要的发送方式如代码所示:
这里比较重要的就是关于 @bot.register() 的使用,该注释主要用于注册消息接收器,我们可以根据特定的需求,配置不一样的消息接收器.
Bot.register(chats=None, msg_types=None, except_self=True, run_async=True, enabled=True) 详情可以查看源码中的介绍 。
关于消息处理API,读者可以在该地址下查看详细的配置,这里不做过多的描述.
代码中有使用到:embed() 这个方法, 主要用于阻塞进程,避免由于程序运行结束导致无法接收消息.
|
1
2
3
4
5
6
7
8
9
10
11
12
13
14
15
16
17
18
19
20
21
22
23
24
25
26
27
28
29
30
31
32
33
34
35
36
37
38
39
40
41
42
|
from
wxpy
import
*
bot
=
Bot()
# 获取好友
my_friend
=
bot.friends().search(
'被单'
)[
0
]
# 搜索信息
messages
=
bot.messages.search(keywords
=
'测试'
, sender
=
bot.
self
)
for
message
in
messages:
print
(message)
# 发送文本
my_friend.send(
'Hello, WeChat!'
)
# 发送图片
my_friend.send_image(
'my_picture.png'
)
# 发送视频
my_friend.send_video(
'my_video.mov'
)
# 发送文件
my_friend.send_file(
'my_file.zip'
)
# 以动态的方式发送图片
my_friend.send(
'@img@my_picture.png'
)
# 发送公众号
my_friend.send_raw_msg(
# 名片的原始消息类型
raw_type
=
42
,
# 注意 `username` 在这里应为微信 ID,且被发送的名片必须为自己的好友
raw_content
=
'<msg username="wxpy_bot" nickname="wxpy 机器人"/>'
)
# 消息接收监听器
@bot
.register()
def
print_others(msg):
# 输出监听到的消息
print
(msg)
# 回复消息
msg.reply(
"hello world"
)
embed()
|
1.4 wxpy 图灵机器人 。
wxpy 接入图灵机器人相当方便,我们首先需要到图灵近期人官网进行注册,哆啦A梦的任意门.
通过注册Tuling 对象,当我们接收到消息的时候,可以直接使用tuling机器人来帮我们进行答复。其他的业务需求各位可以根据自己的需求来完成相应的逻辑.
|
1
2
3
4
5
6
7
8
9
10
11
12
13
14
15
16
17
18
19
20
21
|
from
wxpy
import
*
bot
=
Bot()
# 获取好友
dear
=
bot.friends().search(
'被单'
)[
0
]
# 注册获得个人的图灵机器人key 填入
tuling
=
Tuling(api_key
=
'******'
)
# 使用图灵机器人自动与指定好友聊天
@bot
.register(dear)
def
reply_my_friend(msg):
print
(msg)
tuling.do_reply(msg)
embed()
|
1.5 wechat_sender 。
在熟悉了wxpy 的相关操作后,我们接下来介绍一下一个主要使用到的工具。由于wxpy 的设计,导致了一些业务操作并不好进行实现。因此我们在这里引入一个工具类:wechat_sender .
首先我们需要像往常一样进行微信登陆,然后使用 listen() 进行对我们的 bot() 对象进行监听.
在这里我们可以看到了和上面代码的区别,这里使用的是listen(),上面是使用embed()进行监听。 我们再这里使用listen 进行监听对象后,可以设置相应的配置。监听默认设置的接收对象为self.file_helper,通过设置receivers 可以配置消息的接收者.
|
1
2
3
4
5
6
7
8
9
|
# login.py
from
wxpy
import
*
from
wechat_sender
import
*
bot
=
Bot()
friend
=
bot.friends().search(
'被单'
)[
0
]
listen(bot, token
=
'test'
, receivers
=
[friend])
|
|
1
2
3
4
5
6
|
# sender.py coding: utf-8
from
wechat_sender
import
Sender
sender
=
Sender(token
=
'test'
)
sender.send(
'hello world!'
)
|
在别的python 文件中,我们只需要创建一个Sender() 对象,然后调用Sender.send()方法,即可对我们设定好的消息接收者发送消息.
Sender()在创建的时候可以通过特定的参数设定,比如这里使用了 token 用于避免多个listen 导致sender 混淆。还可以在sender中设置receiver 从listen 中选取需要接收消息的对象.
1.6 wxpy 在监控模块的代码实现 。
微信登陆模块:
|
1
2
3
4
5
6
7
8
9
10
11
12
|
from
wechat_sender
import
*
from
wxpy
import
*
bot
=
Bot(qr_path
=
"qr.png"
)
group
=
bot.groups().search(
'监控报警'
)[
0
]
print
(
"微信登陆成功!进行监控报警功能!"
)
print
(group)
#
listen(bot, token
=
'test'
, receivers
=
[group])
|
业务处理模块:
|
1
2
3
4
5
6
7
8
9
10
11
12
13
|
import
redis
from
wechat_sender
import
*
sender
=
Sender(token
=
'test'
, receivers
=
'监控报警'
)
while
true:
# do anything
sender.send(message
=
data)
# do anything
p.unsubscribe(
'cardniu-monitor'
)
print
(
'取消订阅'
)
|
2、Python-Redis 。
这一模块我们将简单描述一下python 对于Redis 的支持,首先我们需要安装python-redis相关模块:
2.1 Python-redis安装 。
2.2 Python 简单操作Redis 。
由于Python 操作Redis 并不是我们这里的主要内容,所以这里简单的过一下Python 对Redis 的支持.
|
1
2
3
4
5
6
7
8
9
|
import
redis
r
=
redis.Redis(host
=
'ip'
, port
=
6379
, db
=
15
, password
=
'****'
)
r.
set
(
'name'
,
'Jaycekon'
)
value
=
r.get(
'name'
)
print
(value)
|
2.3 Redis的发布订阅模式 。
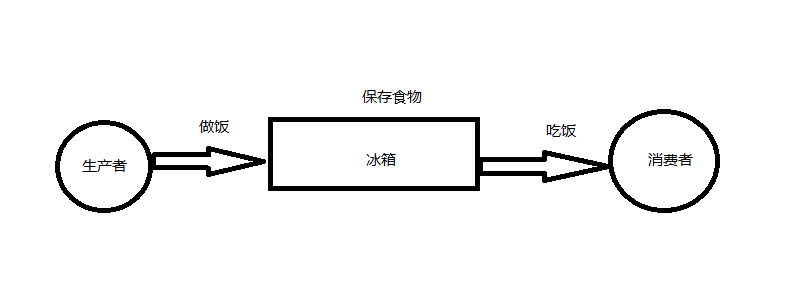
在为大家讲解Redis 的发布订阅模式前,先为大家科普一下生产者消费者模式:
大家来领略一下我的灵魂画图,生产者消费者的核心思想是通过一个冰箱来进行解耦,就是我们的厨师不需要出厨房,顾客也不需要去厨房拿饭吃。通过一个冰箱来进行中间的解耦合.

下面是我们通过python 实现的一个生产者消费者模式,厨师不停的做饭,顾客不停的吃。。大家相互不影响.
|
1
2
3
4
5
6
7
8
9
10
11
12
13
14
15
16
17
18
19
20
21
22
23
24
25
26
27
28
29
30
31
32
33
|
from
threading
import
Thread
queues
=
queue.Queue(
10
)
class
Producer(Thread):
def
run(
self
):
while
True
:
elem
=
random.randrange(
9
)
queues.put(elem)
print
(
"厨师 {} 做了 {} 饭 --- 还剩 {} 饭没卖完"
.
format
(
self
.name, elem, queues.qsize()))
time.sleep(random.random())
class
Consumer(Thread):
def
run(
self
):
while
True
:
elem
=
queues.get()
print
(
"吃货{} 吃了 {} 饭 --- 还有 {} 饭可以吃"
.
format
(
self
.name, elem, queues.qsize()))
time.sleep(random.random())
def
main():
for
i
in
range
(
3
):
p
=
Producer()
p.start()
for
i
in
range
(
2
):
c
=
Consumer()
c.start()
if
__name__
=
=
'__main__'
:
main()
|
再来说一下为什么使用到Redis 的发布订阅模式.
Redis在当前程序中,主要担当了一个消息队列的角色,我们并没有使用目前较为热门的RabbitMq,ActiveMq来消息队列进行解耦。主要原因在于我们的服务不大,消息量也比较小,因此在不影响程序的架构基础上,采用了Redis 作为消息队列.
消息队列的关键点在于,当生产者发布消息后,要确保消费者能够快速的接收消息。发布订阅模式能够很好的帮我们解决,当有消息到达的时候,程序马上能够做出响应操作.
Redis消息发布:
|
1
2
3
4
5
6
7
8
9
10
|
import
redis
pool
=
redis.ConnectionPool(host
=
'ip'
, port
=
6379
, db
=
4
, password
=
'****'
)
r
=
redis.StrictRedis(connection_pool
=
pool)
while
True
:
inputs
=
input
(
"publish:"
)
r.publish(
'spub'
, inputs)
if
inputs
=
=
'over'
:
print
(
'停止发布'
)
break
|
Redis消息订阅:
|
1
2
3
4
5
6
7
8
9
10
11
12
13
|
import
redis
pool
=
redis.ConnectionPool(host
=
'ip'
, port
=
6379
, db
=
4
, password
=
'***'
)
r
=
redis.StrictRedis(connection_pool
=
pool)
p
=
r.pubsub()
p.subscribe(
'cardniu-monitor'
)
for
item
in
p.listen():
print
(item)
if
item[
'type'
]
=
=
'message'
:
data
=
item[
'data'
]
print
(
"消息队列中接收到信息:"
, data)
if
item[
'data'
]
=
=
'over'
:
break
p.unsubscribe(
'cardniu-monitor'
)
print
(
'取消订阅'
)
|
2.4 wxpy+Redis 实现监控系统的消费者 。
最终,在python 这边实现的监控系统消费者如下
微信登陆模块:
|
1
2
3
4
5
6
7
8
9
10
11
12
|
from
wechat_sender
import
*
from
wxpy
import
*
bot
=
Bot(qr_path
=
"qr.png"
)
group
=
bot.groups().search(
'监控报警'
)[
0
]
print
(
"微信登陆成功!进行监控报警功能!"
)
print
(group)
#
listen(bot, token
=
'test'
, receivers
=
[group])
|
Redis消息订阅模块:
|
1
2
3
4
5
6
7
8
9
10
11
12
13
14
15
16
17
18
19
20
|
import
redis
from
wechat_sender
import
*
sender
=
Sender(token
=
'test'
, receivers
=
'监控报警'
)
pool
=
redis.ConnectionPool(host
=
'10.201.3.18'
, port
=
6379
, db
=
4
, password
=
'kntest%pw_@dk2'
)
r
=
redis.StrictRedis(connection_pool
=
pool)
p
=
r.pubsub()
p.subscribe(
'cardniu-monitor'
)
for
item
in
p.listen():
print
(item)
if
item[
'type'
]
=
=
'message'
:
data
=
item[
'data'
]
print
(
"消息队列中接收到信息:"
, data)
sender.send(message
=
data)
if
item[
'data'
]
=
=
'over'
:
break
p.unsubscribe(
'cardniu-monitor'
)
print
(
'取消订阅'
)
|
3、Java-Redis 。
最后,在生产者这块,即是我们监控系统的核心部分,当我们的Java系统出现异常时,我们即可向Redis发送消息,最后由消费者那一边完成消息的发送.
在下面会跟大家简单讲解一下生产者这边的代码,但是由于代码设计公司内容,因此不做过多的描述.
Spring-redis.xml 。
|
1
2
3
4
5
6
7
8
9
10
11
12
13
14
15
16
17
18
19
20
21
22
23
24
25
26
27
28
29
30
31
32
33
34
35
36
|
<?
xml
version
=
"1.0"
encoding
=
"UTF-8"
?>
<
beans
xmlns
=
"http://www.springframework.org/schema/beans"
xmlns:xsi
=
"http://www.w3.org/2001/XMLSchema-instance"
xmlns:context
=
"http://www.springframework.org/schema/context"
xmlns:util
=
"http://www.springframework.org/schema/util"
xmlns:aop
=
"http://www.springframework.org/schema/aop"
xsi:schemaLocation="
http://www.springframework.org/schema/beans
http://www.springframework.org/schema/beans/spring-beans-3.1.xsd
http://www.springframework.org/schema/context
http://www.springframework.org/schema/context/spring-context-3.1.xsd
http://www.springframework.org/schema/util
http://www.springframework.org/schema/util/spring-util-3.1.xsd
http://www.springframework.org/schema/aop
http://www.springframework.org/schema/aop/spring-aop-3.1.xsd">
<!-- redis连接池的配置 -->
<
bean
id
=
"jedisPoolConfig"
class
=
"redis.clients.jedis.JedisPoolConfig"
>
<
property
name
=
"maxTotal"
value
=
"${redis.pool.maxTotal}"
/>
<
property
name
=
"maxIdle"
value
=
"${redis.pool.maxIdle}"
/>
<
property
name
=
"minIdle"
value
=
"${redis.pool.minIdle}"
/>
<
property
name
=
"maxWaitMillis"
value
=
"${redis.pool.maxWaitMillis}"
/>
<
property
name
=
"testOnBorrow"
value
=
"${redis.pool.testOnBorrow}"
/>
<
property
name
=
"testOnReturn"
value
=
"${redis.pool.testOnReturn}"
/>
</
bean
>
<
bean
id
=
"sentinelJedisPool"
class
=
"redis.clients.jedis.JedisSentinelPool"
>
<
constructor-arg
index
=
"0"
value
=
"${redis.sentinel.masterName}"
/>
<
constructor-arg
index
=
"1"
value
=
"#{'${redis.sentinels}'.split(',')}"
/>
<
constructor-arg
index
=
"2"
ref
=
"jedisPoolConfig"
/>
<
constructor-arg
index
=
"3"
value
=
"${redis.sentinel.timeout}"
type
=
"int"
/>
<
constructor-arg
index
=
"4"
value
=
"${redis.sentinel.password}"
/>
<
constructor-arg
index
=
"5"
value
=
"${redis.sentinel.database}"
type
=
"int"
/>
</
bean
>
</
beans
>
|
JedisUtils.java 。
|
1
2
3
4
5
6
7
8
9
10
11
12
13
14
15
16
17
18
19
20
21
22
23
24
25
26
27
28
29
30
31
32
33
34
35
36
37
38
39
40
41
42
43
44
45
46
47
48
|
@Autowired
private
JedisSentinelPool jedisPool;
@PostConstruct
private
void
init()
throws
Exception {
/* 缓存初始化 */
JedisUtils.setJedisPool(jedisPool);
}
public
static
void
setJedisPool(Pool<Jedis> jedisPool)
throws
Exception {
JedisCache.jedisPool = jedisPool;
Jedis jedis =
null
;
try
{
jedis = jedisPool.getResource();
isInitSuc =
true
;
logger.info(
"redis start success!"
);
}
catch
(Exception e) {
if
(
null
!= jedis)
jedisPool.returnBrokenResource(jedis);
logger.error(
"redis start exception!!!error:{}"
, e.getMessage(), e);
if
(e
instanceof
redis.clients.jedis.exceptions.JedisConnectionException) {
throw
e;
}
}
finally
{
if
(
null
!= jedis)
jedisPool.returnResource(jedis);
}
}
public
static
Long publish(String chanel, String value) {
Jedis jedis =
null
;
try
{
jedis = jedisPool.getResource();
return
jedis.publish(chanel,value);
}
catch
(Exception e) {
if
(
null
!= jedis) {
jedisPool.returnBrokenResource(jedis);
jedis =
null
;
}
logger.error(
"redis exception:{}"
, e.getMessage(), e);
return
0L;
}
finally
{
if
(
null
!= jedis)
jedisPool.returnResource(jedis);
}
}
|
NoticeTask.java 。
|
1
2
3
4
5
6
7
8
9
10
11
12
13
14
15
16
17
18
19
20
|
@Scheduled
(cron =
"*/5 * * * * ? "
)
public
void
runMonitor() {
try
{
List<T> notices;
List<EbankNotice> result;
while
((notices = QueueHolder.noticeBlockingQueue.take()) !=
null
) {
//消费
if
(notices.isEmpty()) {
continue
;
}
result = service.calculateNotice(notices);
result.forEach(notice -> {
JedisUtils.publish(
"cardniu-monitor"
, notice.getTitle() +
","
+
DateUtils.format(notice.getPostTime(),
"yyyy-MM-dd hh:mm:ss"
) +
","
+ notice.getLinkAddress());
});
}
}
catch
(InterruptedException e) {
logger.error(
"发送邮件定时任务异常,{}"
, e.getMessage(), e);
}
}
|
4、总结 。
这个项目的核心在于wxpy 的运用,以及生产者消费者的设计思想。语言的话,核心的python这一块的wxpy,在生产者这边,无论是其他的什么语言,都可以作为我们的生产者.
项目github地址:https://github.com/jaycekon/WxpyDemo 。
参考:
wxpy API:http://wxpy.readthedocs.io/zh/latest/messages.html 。
wechat_sender Api:https://pypi.python.org/pypi/wechat-sender/0.1.3 。
python-redis :https://pypi.python.org/pypi/redis 。
Java-Redis:http://docs.spring.io/spring-data/redis/docs/2.0.0.M4/reference/html/ 。
以上就是本文的全部内容,希望对大家的学习有所帮助,也希望大家多多支持我.
原文链接:http://www.cnblogs.com/jaycekon/p/WxpyRedis.html 。
最后此篇关于Python WXPY实现微信监控报警功能的代码的文章就讲到这里了,如果你想了解更多关于Python WXPY实现微信监控报警功能的代码的内容请搜索CFSDN的文章或继续浏览相关文章,希望大家以后支持我的博客! 。
我已经在 ubuntu 14.0 上成功安装了 Zabbix 3.2 服务器主机上的 Z 是绿色的。不幸的是,JMX 是红色的。 Zabbix 服务器:192.168.1.112 带有 tomcat
我想制作一个仪表板,显示我们的 Azure 服务总线队列的状态,并显示“添加到队列的消息”、“队列长度”和“已处理的消息”等的历史记录。使用 Azure 管理门户,我可以看到,这些统计信息大部分是手动
我的 MYSQL 每天晚上都有事件,但我不太确定发生了什么,因为即使我将其设置得早于其他事件,它仍然在早上运行。 问题是,我如何检查运行事件的历史记录或日志,哪一个晚上锁了,哪一个是跑了没跑? 谢谢
1、监控log文件大小超过10g的server 和db 复制代码代码如下: create procedure db_sendmail_mssqllogsize as&n
本教程讨论如何使用 AspectJ 开源框架监控 Spring 应用程序在方法执行方面的性能。 传统上,监控每个 Java 方法所花费的时间的最简单方法是在方法的开头和结尾包含一些跟踪行: publi
有什么可以帮助 msmq 监控的吗?当消息出现在队列中并且在休假时相同时,我想获得一些事件/监视器。 最佳答案 查看 Windows 管理性能计数器。 如果您查看管理工具并找到“性能计数器”,您将能够
我的 Tomcat 中的一个巨大的 web 应用程序有时会开始使用过多的 DBCP 连接,从而导致问题。 为了进行调查,我想在每个时间点准确地知道什么线程/方法持有池的连接。不需要是实时的,事后分析就
在浏览器的整个页面生命周期中监视 cookie 并在 cookie 更改时触发事件的最佳 JS 或 JQuery 特定方法是什么? 最佳答案 据我所知,不可能将 change (或类似)事件直接绑定(
我想尽可能详细地报告我的笔记本的执行情况。简而言之,我想实时查看我的笔记本正在执行的每个操作。例如,我的一个函数有一个 sleep 周期为 5 秒的循环,我希望看到程序实际上正在 sleep 并且循环
Azure 容器服务是否与 Azure Monitor 集成?想知道对 kubernetes 集群进行日志记录/监控的最佳方法是什么? 最佳答案 如果您正在 Azure 上寻找监视工具,您可能需要使用
我一直在尝试使用 erlang:monitor/2 来监视 gen_server。不幸的是,每次我尝试这个时,Erlang shell 都会进入无限循环。 这是我为测试这一点而编写的测试程序。 -mo
Azure 容器服务是否与 Azure Monitor 集成?想知道对 kubernetes 集群进行日志记录/监控的最佳方法是什么? 最佳答案 如果您正在 Azure 上寻找监视工具,您可能需要使用
我想使用 编写一个 shell 脚本来监控集群中的消费者滞后 bin/kafka-run-class.sh kafka.tools.ConsumerOffsetChecker --zkconnect
在 .NET 中,假设 thread A 锁定了一个对象。同时,线程B和线程C被阻塞,等待线程A解锁对象。 现在,线程 A 解锁了对象。接下来将选择哪个线程(B 或 C)?它是如何确定的? 最佳答案
我搜索过这个主题,但发现很少有有用的细节。有了这些细节,我尝试编写一些代码如下。 注意:在将此帖子标记为重复之前,请将此帖子中共享的详细信息与其他帖子进行比较,而不仅仅是按主题。 - (NSArray
目录 1、指标监控 2、常用的监控端点 3、定制EndPoint 4、spring boot admin(可以使用)
我们使用 Prometheus 和 Grafana 来监控我们的 Kafka 集群。 在我们的应用程序中,我们使用 Kafka 流,Kafka 流有可能因异常而停止。我们正在记录事件 setUnCau
我正在建立一个复杂的网络仿真,并试图捕捉一些重要的性能测量。 我在服务器上运行了 mininet,并且我将视频从一个 mininet 主机流式传输到另一个(使用 -nodisp 选项,因为我没有 GU
Jenkins 的 openstack-plugin 使用 openstack4j 与 openstack 云对话。我正在寻找一种方法,我们可以从客户端的角度监控 openstack4j 所做的 ht
我正在处理一项需要监控 Thunderbolt 端口连接变化的要求。 (当连接或断开 Thunderbolt 电缆时)。 我尝试使用 IOServiceMatching(kIOUSBInterface

我是一名优秀的程序员,十分优秀!