- ubuntu12.04环境下使用kvm ioctl接口实现最简单的虚拟机
- Ubuntu 通过无线网络安装Ubuntu Server启动系统后连接无线网络的方法
- 在Ubuntu上搭建网桥的方法
- ubuntu 虚拟机上网方式及相关配置详解
CFSDN坚持开源创造价值,我们致力于搭建一个资源共享平台,让每一个IT人在这里找到属于你的精彩世界.
这篇CFSDN的博客文章使用zabbix监控mongodb的方法由作者收集整理,如果你对这篇文章有兴趣,记得点赞哟.
MongoDB 是一个基于分布式文件存储的数据库。由 C++ 语言编写。旨在为 WEB 应用提供可扩展的高性能数据存储解决方案.
MongoDB 是一个介于关系数据库和非关系数据库之间的产品,是非关系数据库当中功能最丰富,最像关系数据库的.
Mongodb如今越来越火,要做好对mongodb的监控就需要从它的安装配置,到简单的command语句使用,再到对它运行机制以及状态获取方法的掌握.
mongodb有三种基本的状态获取方式:
1.mongostat 。
2.开启28017的监听端口,curl http://127.0.0.1:28017/_status 。
3.进入mongo执行db.serverStatus命令 。
我用的是第三种方法:
|
1
2
3
4
5
6
7
8
9
10
11
12
13
14
15
16
17
18
19
20
21
22
23
24
25
26
27
28
29
30
31
32
33
34
35
36
37
38
39
40
41
42
43
44
45
46
47
48
49
50
51
52
53
54
55
56
57
58
59
60
61
62
63
64
65
66
67
68
69
70
71
72
73
74
75
76
77
78
79
80
81
82
83
84
85
86
87
88
89
90
91
92
93
94
95
96
97
98
99
100
|
echo
"db.serverStatus()"
|/usr/
local
/mongodb/bin/mongo 192.168.1.123:27017/foo
--quiet
{
"host"
:
"TENCENT64.site"
,
--server的hostname
"version"
:
"2.0.5"
,
--mongo版本
"process"
:
"mongod"
,
--进程名
"uptime"
: 1238418,
--启动时间(单位:S)
"uptimeEstimate"
: 1230730,
--基于MongoDB内部粗粒度定时器的运行时间
"localTime"
: ISODate(
"2012-09-14T09:09:52.657Z"
),
--server的本地时间
"globalLock"
: {
"totalTime"
: 1238418105923,
--全局锁创建的时间(单位:ms 微秒)
"lockTime"
: 75055831911,
--全局锁保持的时间(单位:ms 微秒)
"ratio"
: 0.06060621332329477,
--lockTime和totalTime的比
"currentQueue"
: {
"total"
: 0,
--等待全局锁的队列中操作数目
"readers"
: 0,
--等待读锁的队列中操作数目
"writers"
: 0
--等待写锁的队列中操作数目
},
"activeClients"
: {
"total"
: 1,
--连接到server的当前活动client数目
"readers"
: 1,
--执行读操作的当前活动client数目
"writers"
: 0
--执行写操作的当前活动client数目
}
},
"mem"
: {
"bits"
: 64,
--64位机器
"resident"
: 18363,
--占用物理内存量。
"virtual"
: 478810,
--占用的虚拟内存量
"supported"
:
true
,
--是否支持扩展内存
"mapped"
: 233311,
--映射到内存的数据文件大小,很接近于你的所有数据库大小。
"mappedWithJournal"
: 466622,
"note"
:
"virtual minus mapped is large. could indicate a memory leak"
},
"connections"
: {
"current"
: 737,
--当前活动连接量。连接到server的当前活跃连接数目
"available"
: 82
--剩余空闲连接量。剩余的可用连接数目
},
"extra_info"
: {
"note"
:
"fields vary by platform"
,
"heap_usage_bytes"
: 3838448,
--此过程中所有的堆字节数目。仅适用于Linux
"page_faults"
: 31058356
--此过程中访问内存中页面失败的总次数。仅适用于Linux
},
"indexCounters"
: {
"btree"
: {
"accesses"
: 68229146,
--Btree索引的访问次数(索引被访问量)
"hits"
: 68229146,
--内存中的Btree页的数目。(索引命中量)
"misses"
: 0,
--内存中不存在的Btree也数目。(索引偏差量)(索引内存访问失败次数)
"resets"
: 0,
--索引计数器被重置为0的次数
"missRatio"
: 0
--索引偏差率(未命中率)
}
},
"backgroundFlushing"
: {
"flushes"
: 20640,
--数据库刷新写到磁盘的次数
"total_ms"
: 2453287,
--数据库刷新数据到磁盘花费的微秒数
"average_ms"
: 118.8608042635659,
--执行单次刷新花费的平均微秒数
"last_ms"
: 1,
--最后一次执行完成刷新数据到磁盘花费的微秒数
"last_finished"
: ISODate(
"2012-09-14T09:09:35.656Z"
)
--当最后一次刷新数据完成时的时间戳
},
"cursors"
: {
"totalOpen"
: 0,
--server为client保持的游标(cursor)总数
"clientCursors_size"
: 0,
--
"timedOut"
: 24
--server启动以来游标(cursor)超时的总数
},
"network"
: {
"bytesIn"
: NumberLong(
"1929833164782"
),
--发送到数据库的数据总量(bytes)
"bytesOut"
: 553137147925,
--数据库发出的数据总量(bytes)
"numRequests"
: 2475184328
--发送到数据库的请求量
},
"opcounters"
: {
"insert"
: 687531883,
--server启动以来总的insert数据量
"query"
: 711010343,
--server启动以来总的query数据量
"update"
: 0,
--server启动以来总的update数据量
"delete"
: 0,
--server启动以来总的delete数据量
"getmore"
: 6484,
--server启动以来调用任何游标的getMore总次数
"command"
: 1287537
--server启动以来执行其他命令的总次数
},
"asserts"
: {
"regular"
: 0,
--server启动以来抛出正规断言(assert 类似于异常处理的形式)总数目
"warning"
: 1,
--server启动以来抛出的告警总数目
"msg"
: 0,
--消息断言数目。服务器内部定义的良好字符串错误
"user"
: 4,
--用户断言数目。用户产生的错误,譬如:磁盘空间满;重复键。
"rollovers"
: 0
--server启动以来,assert counters have rolled over的次数
},
"writeBacksQueued"
:
false
,
--是否有从mongos执行的retry操作
"dur"
: {
"commits"
: 30,
--上一间隔journal日志发生commit的次数
"journaledMB"
: 0,
--上一间隔写到journal日志的数据量(单位:MB)
"writeToDataFilesMB"
: 0,
--上一间隔journal日志写到数据文件的数据量(单位:MB)
"compression"
: 0,
--
"commitsInWriteLock"
: 0,
--写锁期间发生commits的次数
"earlyCommits"
: 0,
--schedule时间前请求commit的次数
"timeMs"
: {
"dt"
: 3064,
"prepLogBuffer"
: 0,
--准备写journal日志花费的时间
"writeToJournal"
: 0,
--写journal日志花费的实际时间
"writeToDataFiles"
: 0,
--journal日志后写数据文件花费的时间
"remapPrivateView"
: 0
--The amount of time spent remapping copy-on-write memory mapped views
}
},
"ok"
: 1
--serverStatus是否返回正确
}
|
以上,我们把所需要的参数抽取出来就可以做成监控项了.
先定义键值:
|
1
2
3
|
#mongodb.conf
UserParameter=mongodb_port_discovery,/usr/
local
/zabbix/
exec
/mongo_discovery.py
UserParameter=mongodb_stats[*],/usr/
local
/zabbix/
exec
/mongo_status.sh $1 $2 $3 $4 $5
|
写mongo_discovery.py脚本(用于端口发现) 。
|
1
2
3
4
5
6
7
8
9
10
11
12
13
14
15
16
17
|
#!/usr/bin/env python
# -*- coding:utf-8 -*-
import json
import subprocess
json_data = {
"data"
:[]}
net_cmd =
''
'sudo netstat -nlpt|awk '
/mongo/{print $4}
'
'
''
p = subprocess.Popen(net_cmd, shell=
True
, stdout=subprocess.PIPE)
net_result = p.stdout.readlines()
for
server
in
net_result:
dic_content = {
"{#MONGO_PORT}"
: server.split(
':'
)[1].strip(),
"{#MONGO_IPADDR}"
: server.split(
':'
)[0].strip()
}
json_data[
'data'
].append(dic_content)
result = json.dumps(json_data,sort_keys=
True
,indent=4)
print result
|
写mongo_status.sh状态检测脚本 。
|
1
2
3
4
5
6
7
8
9
10
11
12
13
14
15
16
17
18
19
|
#!/bin/bash
##mongo_status.sh##
##wuhf##
case
$#
in
3)
output
=$(/bin/echo
"db.serverStatus().$3"
|/usr/
local
/mongodb/bin/mongo $1:$2/foo
--quiet)
;;
4)
output
=$(/bin/echo
"db.serverStatus().$3.$4"
|/usr/
local
/mongodb/bin/mongo $1:$2/foo
--quiet)
;;
5)
output
=$(/bin/echo
"db.serverStatus().$3.$4.$5"
|/usr/
local
/mongodb/bin/mongo $1:$2/foo
--quiet)
;;
esac
if [[
"$output"
=~
"NumberLong"
]];
then
echo $
output
|sed -n
's/NumberLong(//p'
|sed -n
's/)//p'
else
echo $
output
fi
|
权限设置 。
|
1
2
3
4
5
|
chmod 755 /usr/
local
/zabbix/
exec
/*
chown zabbix.zabbix /usr/
local
/zabbix/
exec
/*
chown zabbix.zabbix /usr/
local
/zabbix/etc/zabbix_agentd.conf.d/*
echo
"zabbix ALL=(root) NOPASSWD:ALL"
>> /etc/sudoers
sed -i
's/^Defaults.*.requiretty/#Defaults requiretty/'
/etc/sudoers
|
做MongoDB模板 。
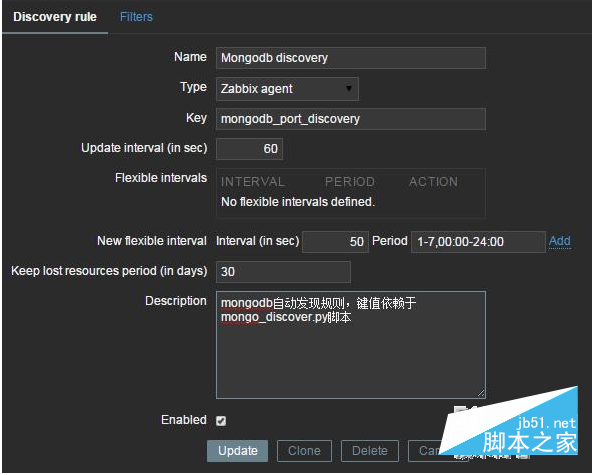
定义自动发现规则 。

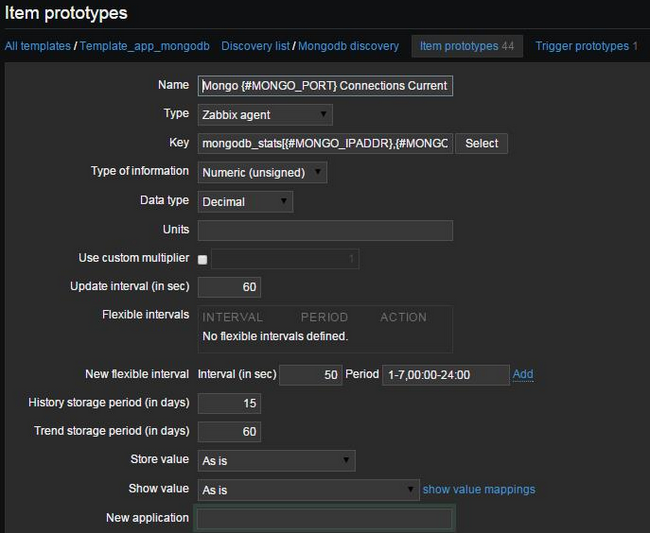
定义监控项 。

最后添加触发器和图就完成了 。
注意:在mongodb.conf配置文件里定义了键值对应关系后要重启zabbix服务才能生效 。
最后此篇关于使用zabbix监控mongodb的方法的文章就讲到这里了,如果你想了解更多关于使用zabbix监控mongodb的方法的内容请搜索CFSDN的文章或继续浏览相关文章,希望大家以后支持我的博客! 。
我在网上搜索但没有找到任何合适的文章解释如何使用 javascript 使用 WCF 服务,尤其是 WebScriptEndpoint。 任何人都可以对此给出任何指导吗? 谢谢 最佳答案 这是一篇关于
我正在编写一个将运行 Linux 命令的 C 程序,例如: cat/etc/passwd | grep 列表 |剪切-c 1-5 我没有任何结果 *这里 parent 等待第一个 child (chi
所以我正在尝试处理文件上传,然后将该文件作为二进制文件存储到数据库中。在我存储它之后,我尝试在给定的 URL 上提供文件。我似乎找不到适合这里的方法。我需要使用数据库,因为我使用 Google 应用引
我正在尝试制作一个宏,将下面的公式添加到单元格中,然后将其拖到整个列中并在 H 列中复制相同的公式 我想在 F 和 H 列中输入公式的数据 Range("F1").formula = "=IF(ISE
问题类似于this one ,但我想使用 OperatorPrecedenceParser 解析带有函数应用程序的表达式在 FParsec . 这是我的 AST: type Expression =
我想通过使用 sequelize 和 node.js 将这个查询更改为代码取决于在哪里 select COUNT(gender) as genderCount from customers where
我正在使用GNU bash,版本5.0.3(1)-发行版(x86_64-pc-linux-gnu),我想知道为什么简单的赋值语句会出现语法错误: #/bin/bash var1=/tmp
这里,为什么我的代码在 IE 中不起作用。我的代码适用于所有浏览器。没有问题。但是当我在 IE 上运行我的项目时,它发现错误。 而且我的 jquery 类和 insertadjacentHTMl 也不
我正在尝试更改标签的innerHTML。我无权访问该表单,因此无法编辑 HTML。标签具有的唯一标识符是“for”属性。 这是输入和标签的结构:
我有一个页面,我可以在其中返回用户帖子,可以使用一些 jquery 代码对这些帖子进行即时评论,在发布新评论后,我在帖子下插入新评论以及删除 按钮。问题是 Delete 按钮在新插入的元素上不起作用,
我有一个大约有 20 列的“管道分隔”文件。我只想使用 sha1sum 散列第一列,它是一个数字,如帐号,并按原样返回其余列。 使用 awk 或 sed 执行此操作的最佳方法是什么? Accounti
我需要将以下内容插入到我的表中...我的用户表有五列 id、用户名、密码、名称、条目。 (我还没有提交任何东西到条目中,我稍后会使用 php 来做)但由于某种原因我不断收到这个错误:#1054 - U
所以我试图有一个输入字段,我可以在其中输入任何字符,但然后将输入的值小写,删除任何非字母数字字符,留下“。”而不是空格。 例如,如果我输入: 地球的 70% 是水,-!*#$^^ & 30% 土地 输
我正在尝试做一些我认为非常简单的事情,但出于某种原因我没有得到想要的结果?我是 javascript 的新手,但对 java 有经验,所以我相信我没有使用某种正确的规则。 这是一个获取输入值、检查选择
我想使用 angularjs 从 mysql 数据库加载数据。 这就是应用程序的工作原理;用户登录,他们的用户名存储在 cookie 中。该用户名显示在主页上 我想获取这个值并通过 angularjs
我正在使用 autoLayout,我想在 UITableViewCell 上放置一个 UIlabel,它应该始终位于单元格的右侧和右侧的中心。 这就是我想要实现的目标 所以在这里你可以看到我正在谈论的
我需要与 MySql 等效的 elasticsearch 查询。我的 sql 查询: SELECT DISTINCT t.product_id AS id FROM tbl_sup_price t
我正在实现代码以使用 JSON。 func setup() { if let flickrURL = NSURL(string: "https://api.flickr.com/
我尝试使用for循环声明变量,然后测试cols和rols是否相同。如果是,它将运行递归函数。但是,我在 javascript 中执行 do 时遇到问题。有人可以帮忙吗? 现在,在比较 col.1 和
我举了一个我正在处理的问题的简短示例。 HTML代码: 1 2 3 CSS 代码: .BB a:hover{ color: #000; } .BB > li:after {

我是一名优秀的程序员,十分优秀!