- ubuntu12.04环境下使用kvm ioctl接口实现最简单的虚拟机
- Ubuntu 通过无线网络安装Ubuntu Server启动系统后连接无线网络的方法
- 在Ubuntu上搭建网桥的方法
- ubuntu 虚拟机上网方式及相关配置详解
CFSDN坚持开源创造价值,我们致力于搭建一个资源共享平台,让每一个IT人在这里找到属于你的精彩世界.
这篇CFSDN的博客文章Pytorch使用MNIST数据集实现CGAN和生成指定的数字方式由作者收集整理,如果你对这篇文章有兴趣,记得点赞哟.
CGAN的全拼是Conditional Generative Adversarial Networks,条件生成对抗网络,在初始GAN的基础上增加了图片的相应信息.
这里用传统的卷积方式实现CGAN.
|
1
2
3
4
5
6
7
8
9
10
11
12
13
14
15
16
17
18
19
20
21
22
23
24
25
26
27
28
29
30
31
32
33
34
35
36
37
38
39
40
41
42
43
44
45
46
47
48
49
50
51
52
53
54
55
56
57
58
59
60
61
62
63
64
65
66
67
68
69
70
71
72
73
74
75
76
77
78
79
80
81
82
83
84
85
86
87
88
89
90
91
92
93
94
95
96
97
98
99
100
101
102
103
104
105
106
107
108
109
110
111
112
113
114
115
116
117
118
119
120
121
122
123
124
125
126
127
128
129
130
131
132
133
134
135
136
137
138
139
140
141
142
143
144
145
146
147
148
149
150
151
152
153
154
155
156
157
158
159
160
161
162
163
164
165
166
167
168
169
170
171
172
173
174
175
176
177
178
179
180
181
182
183
184
|
import
torch
from
torch.utils.data
import
DataLoader
from
torchvision.datasets
import
MNIST
from
torchvision
import
transforms
from
torch
import
optim
import
torch.nn as nn
import
matplotlib.pyplot as plt
import
numpy as np
from
torch.autograd
import
Variable
import
pickle
import
copy
import
matplotlib.gridspec as gridspec
import
os
def
save_model(model, filename):
#保存为CPU中可以打开的模型
state
=
model.state_dict()
x
=
state.copy()
for
key
in
x:
x[key]
=
x[key].clone().cpu()
torch.save(x, filename)
def
showimg(images,count):
images
=
images.to(
'cpu'
)
images
=
images.detach().numpy()
images
=
images[[
6
,
12
,
18
,
24
,
30
,
36
,
42
,
48
,
54
,
60
,
66
,
72
,
78
,
84
,
90
,
96
]]
images
=
255
*
(
0.5
*
images
+
0.5
)
images
=
images.astype(np.uint8)
grid_length
=
int
(np.ceil(np.sqrt(images.shape[
0
])))
plt.figure(figsize
=
(
4
,
4
))
width
=
images.shape[
2
]
gs
=
gridspec.GridSpec(grid_length,grid_length,wspace
=
0
,hspace
=
0
)
for
i, img
in
enumerate
(images):
ax
=
plt.subplot(gs[i])
ax.set_xticklabels([])
ax.set_yticklabels([])
ax.set_aspect(
'equal'
)
plt.imshow(img.reshape(width,width),cmap
=
plt.cm.gray)
plt.axis(
'off'
)
plt.tight_layout()
# plt.tight_layout()
plt.savefig(r
'./CGAN/images/%d.png'
%
count, bbox_inches
=
'tight'
)
def
loadMNIST(batch_size):
#MNIST图片的大小是28*28
trans_img
=
transforms.Compose([transforms.ToTensor()])
trainset
=
MNIST(
'./data'
,train
=
True
,transform
=
trans_img,download
=
True
)
testset
=
MNIST(
'./data'
,train
=
False
,transform
=
trans_img,download
=
True
)
# device = torch.device("cuda:0" if torch.cuda.is_available() else "cpu")
trainloader
=
DataLoader(trainset,batch_size
=
batch_size,shuffle
=
True
,num_workers
=
10
)
testloader
=
DataLoader(testset, batch_size
=
batch_size, shuffle
=
False
, num_workers
=
10
)
return
trainset,testset,trainloader,testloader
class
discriminator(nn.Module):
def
__init__(
self
):
super
(discriminator,
self
).__init__()
self
.dis
=
nn.Sequential(
nn.Conv2d(
1
,
32
,
5
,stride
=
1
,padding
=
2
),
nn.LeakyReLU(
0.2
,
True
),
nn.MaxPool2d((
2
,
2
)),
nn.Conv2d(
32
,
64
,
5
,stride
=
1
,padding
=
2
),
nn.LeakyReLU(
0.2
,
True
),
nn.MaxPool2d((
2
,
2
))
)
self
.fc
=
nn.Sequential(
nn.Linear(
7
*
7
*
64
,
1024
),
nn.LeakyReLU(
0.2
,
True
),
nn.Linear(
1024
,
10
),
nn.Sigmoid()
)
def
forward(
self
, x):
x
=
self
.dis(x)
x
=
x.view(x.size(
0
),
-
1
)
x
=
self
.fc(x)
return
x
class
generator(nn.Module):
def
__init__(
self
,input_size,num_feature):
super
(generator,
self
).__init__()
self
.fc
=
nn.Linear(input_size,num_feature)
#1*56*56
self
.br
=
nn.Sequential(
nn.BatchNorm2d(
1
),
nn.ReLU(
True
)
)
self
.gen
=
nn.Sequential(
nn.Conv2d(
1
,
50
,
3
,stride
=
1
,padding
=
1
),
nn.BatchNorm2d(
50
),
nn.ReLU(
True
),
nn.Conv2d(
50
,
25
,
3
,stride
=
1
,padding
=
1
),
nn.BatchNorm2d(
25
),
nn.ReLU(
True
),
nn.Conv2d(
25
,
1
,
2
,stride
=
2
),
nn.Tanh()
)
def
forward(
self
, x):
x
=
self
.fc(x)
x
=
x.view(x.size(
0
),
1
,
56
,
56
)
x
=
self
.br(x)
x
=
self
.gen(x)
return
x
if
__name__
=
=
"__main__"
:
criterion
=
nn.BCELoss()
num_img
=
100
z_dimension
=
110
D
=
discriminator()
G
=
generator(z_dimension,
3136
)
#1*56*56
trainset, testset, trainloader, testloader
=
loadMNIST(num_img)
# data
D
=
D.cuda()
G
=
G.cuda()
d_optimizer
=
optim.Adam(D.parameters(),lr
=
0.0003
)
g_optimizer
=
optim.Adam(G.parameters(),lr
=
0.0003
)
'''
交替训练的方式训练网络
先训练判别器网络D再训练生成器网络G
不同网络的训练次数是超参数
也可以两个网络训练相同的次数,
这样就可以不用分别训练两个网络
'''
count
=
0
#鉴别器D的训练,固定G的参数
epoch
=
119
gepoch
=
1
for
i
in
range
(epoch):
for
(img, label)
in
trainloader:
labels_onehot
=
np.zeros((num_img,
10
))
labels_onehot[np.arange(num_img),label.numpy()]
=
1
# img=img.view(num_img,-1)
# img=np.concatenate((img.numpy(),labels_onehot))
# img=torch.from_numpy(img)
img
=
Variable(img).cuda()
real_label
=
Variable(torch.from_numpy(labels_onehot).
float
()).cuda()
#真实label为1
fake_label
=
Variable(torch.zeros(num_img,
10
)).cuda()
#假的label为0
#compute loss of real_img
real_out
=
D(img)
#真实图片送入判别器D输出0~1
d_loss_real
=
criterion(real_out,real_label)
#得到loss
real_scores
=
real_out
#真实图片放入判别器输出越接近1越好
#compute loss of fake_img
z
=
Variable(torch.randn(num_img,z_dimension)).cuda()
#随机生成向量
fake_img
=
G(z)
#将向量放入生成网络G生成一张图片
fake_out
=
D(fake_img)
#判别器判断假的图片
d_loss_fake
=
criterion(fake_out,fake_label)
#假的图片的loss
fake_scores
=
fake_out
#假的图片放入判别器输出越接近0越好
#D bp and optimize
d_loss
=
d_loss_real
+
d_loss_fake
d_optimizer.zero_grad()
#判别器D的梯度归零
d_loss.backward()
#反向传播
d_optimizer.step()
#更新判别器D参数
#生成器G的训练compute loss of fake_img
for
j
in
range
(gepoch):
z
=
torch.randn(num_img,
100
)
# 随机生成向量
z
=
np.concatenate((z.numpy(),labels_onehot),axis
=
1
)
z
=
Variable(torch.from_numpy(z).
float
()).cuda()
fake_img
=
G(z)
# 将向量放入生成网络G生成一张图片
output
=
D(fake_img)
# 经过判别器得到结果
g_loss
=
criterion(output, real_label)
#得到假的图片与真实标签的loss
#bp and optimize
g_optimizer.zero_grad()
#生成器G的梯度归零
g_loss.backward()
#反向传播
g_optimizer.step()
#更新生成器G参数
temp
=
real_label
if
(i
%
10
=
=
0
)
and
(i!
=
0
):
print
(i)
torch.save(G.state_dict(),r
'./CGAN/Generator_cuda_%d.pkl'
%
i)
torch.save(D.state_dict(), r
'./CGAN/Discriminator_cuda_%d.pkl'
%
i)
save_model(G, r
'./CGAN/Generator_cpu_%d.pkl'
%
i)
#保存为CPU中可以打开的模型
save_model(D, r
'./CGAN/Discriminator_cpu_%d.pkl'
%
i)
#保存为CPU中可以打开的模型
print
(
'Epoch [{}/{}], d_loss: {:.6f}, g_loss: {:.6f} '
'D real: {:.6f}, D fake: {:.6f}'
.
format
(
i, epoch, d_loss.data[
0
], g_loss.data[
0
],
real_scores.data.mean(), fake_scores.data.mean()))
temp
=
temp.to(
'cpu'
)
_,x
=
torch.
max
(temp,
1
)
x
=
x.numpy()
print
(x[[
6
,
12
,
18
,
24
,
30
,
36
,
42
,
48
,
54
,
60
,
66
,
72
,
78
,
84
,
90
,
96
]])
showimg(fake_img,count)
plt.show()
count
+
=
1
|
和基础GAN Pytorch使用MNIST数据集实现基础GAN 里面的卷积版网络比较起来,这里修改的主要是这几个地方:
生成网络的输入值增加了真实图片的类标签,生成网络的初始向量z_dimension之前用的是100维,由于MNIST有10类,Onehot以后一张图片的类标签是10维,所以将类标签放在后面z_dimension=100+10=110维; 。
训练生成器的时候,由于生成网络的输入向量z_dimension=110维,而且是100维随机向量和10维真实图片标签拼接,需要做相应的拼接操作; 。
|
1
2
3
|
z
=
torch.randn(num_img,
100
)
# 随机生成向量
z
=
np.concatenate((z.numpy(),labels_onehot),axis
=
1
)
z
=
Variable(torch.from_numpy(z).
float
()).cuda()
|
由于计算Loss和生成网络的输入向量都需要用到真实图片的类标签,需要重新生成real_label,对label进行onehot。其中real_label就是真实图片的标签,当num_img=100时,real_label的维度是(100,10); 。
|
1
2
3
4
5
|
labels_onehot
=
np.zeros((num_img,
10
))
labels_onehot[np.arange(num_img),label.numpy()]
=
1
img
=
Variable(img).cuda()
real_label
=
Variable(torch.from_numpy(labels_onehot).
float
()).cuda()
#真实label为1
fake_label
=
Variable(torch.zeros(num_img,
10
)).cuda()
#假的label为0
|
real_label的维度是(100,10),计算Loss的时候也要有对应的维度,判别网络的输出也不再是标量,而是要修改为10维; 。
|
1
|
nn.Linear(
1024
,
10
)
|
在输出图片的同时输出期望的类标签.
|
1
2
3
4
|
temp
=
temp.to(
'cpu'
)
_,x
=
torch.
max
(temp,
1
)
#返回值有两个,第一个是按列的最大值,第二个是相应最大值的列标号
x
=
x.numpy()
print
(x[[
6
,
12
,
18
,
24
,
30
,
36
,
42
,
48
,
54
,
60
,
66
,
72
,
78
,
84
,
90
,
96
]])
|
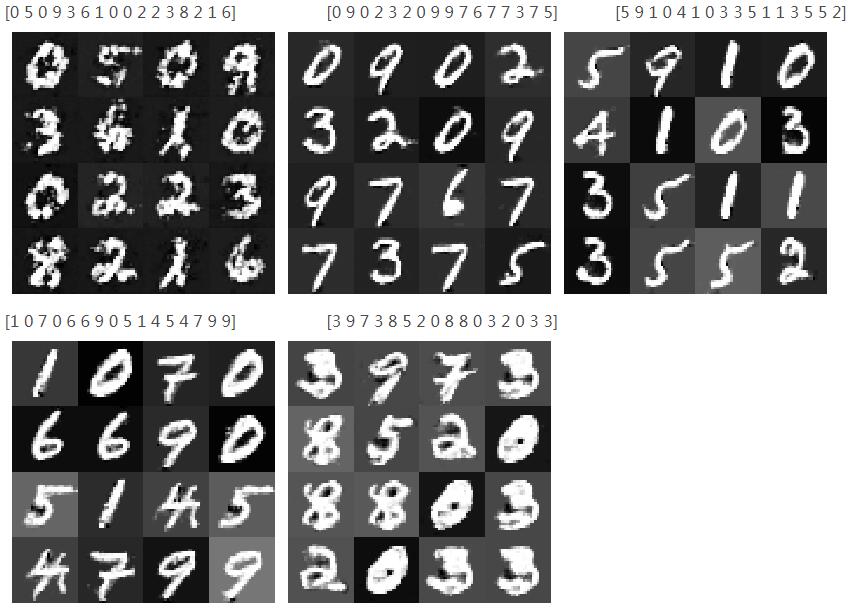
epoch等于0、25、50、75、100时训练的结果:

可以看到训练到后面图像反而变模糊可能是训练过拟合 。
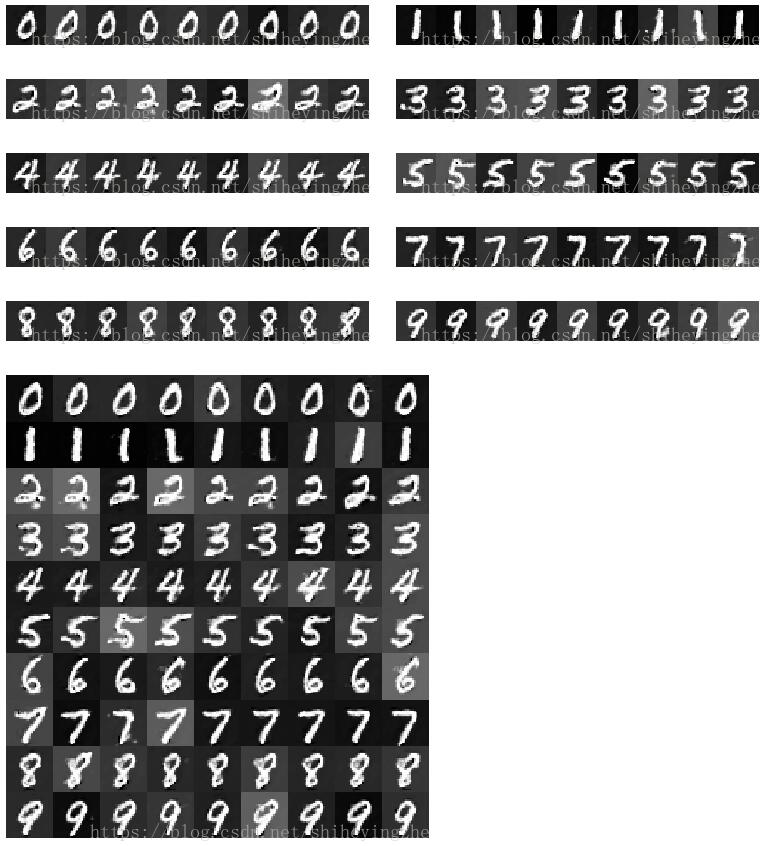
用模型生成指定的数字:
在训练的过程中保存了训练好的模型,根据输出图片的清晰度,用清晰度较高的模型,使用随机向量和10维类标签来指定生成的数字.
|
1
2
3
4
5
6
7
8
9
10
11
12
13
14
15
16
17
18
19
20
21
22
23
24
25
26
27
28
29
30
31
32
33
34
35
36
37
38
39
40
41
42
43
44
45
46
47
48
49
50
51
52
53
54
55
56
57
58
59
60
61
62
63
64
65
66
67
68
69
70
71
72
73
74
75
76
77
78
79
80
81
82
83
84
85
86
87
88
89
90
91
92
93
94
95
96
97
98
99
100
101
102
103
104
105
106
107
108
109
110
111
112
113
114
115
116
117
118
119
120
121
122
123
124
125
|
import
torch
import
torch.nn as nn
import
pickle
import
numpy as np
import
matplotlib.pyplot as plt
import
matplotlib.gridspec as gridspec
num_img
=
9
class
discriminator(nn.Module):
def
__init__(
self
):
super
(discriminator,
self
).__init__()
self
.dis
=
nn.Sequential(
nn.Conv2d(
1
,
32
,
5
, stride
=
1
, padding
=
2
),
nn.LeakyReLU(
0.2
,
True
),
nn.MaxPool2d((
2
,
2
)),
nn.Conv2d(
32
,
64
,
5
, stride
=
1
, padding
=
2
),
nn.LeakyReLU(
0.2
,
True
),
nn.MaxPool2d((
2
,
2
))
)
self
.fc
=
nn.Sequential(
nn.Linear(
7
*
7
*
64
,
1024
),
nn.LeakyReLU(
0.2
,
True
),
nn.Linear(
1024
,
10
),
nn.Sigmoid()
)
def
forward(
self
, x):
x
=
self
.dis(x)
x
=
x.view(x.size(
0
),
-
1
)
x
=
self
.fc(x)
return
x
class
generator(nn.Module):
def
__init__(
self
, input_size, num_feature):
super
(generator,
self
).__init__()
self
.fc
=
nn.Linear(input_size, num_feature)
# 1*56*56
self
.br
=
nn.Sequential(
nn.BatchNorm2d(
1
),
nn.ReLU(
True
)
)
self
.gen
=
nn.Sequential(
nn.Conv2d(
1
,
50
,
3
, stride
=
1
, padding
=
1
),
nn.BatchNorm2d(
50
),
nn.ReLU(
True
),
nn.Conv2d(
50
,
25
,
3
, stride
=
1
, padding
=
1
),
nn.BatchNorm2d(
25
),
nn.ReLU(
True
),
nn.Conv2d(
25
,
1
,
2
, stride
=
2
),
nn.Tanh()
)
def
forward(
self
, x):
x
=
self
.fc(x)
x
=
x.view(x.size(
0
),
1
,
56
,
56
)
x
=
self
.br(x)
x
=
self
.gen(x)
return
x
def
show(images):
images
=
images.detach().numpy()
images
=
255
*
(
0.5
*
images
+
0.5
)
images
=
images.astype(np.uint8)
plt.figure(figsize
=
(
4
,
4
))
width
=
images.shape[
2
]
gs
=
gridspec.GridSpec(
1
, num_img, wspace
=
0
, hspace
=
0
)
for
i, img
in
enumerate
(images):
ax
=
plt.subplot(gs[i])
ax.set_xticklabels([])
ax.set_yticklabels([])
ax.set_aspect(
'equal'
)
plt.imshow(img.reshape(width, width), cmap
=
plt.cm.gray)
plt.axis(
'off'
)
plt.tight_layout()
plt.tight_layout()
# plt.savefig(r'drive/深度学习/DCGAN/images/%d.png' % count, bbox_inches='tight')
return
width
def
show_all(images_all):
x
=
images_all[
0
]
for
i
in
range
(
1
,
len
(images_all),
1
):
x
=
np.concatenate((x,images_all[i]),
0
)
print
(x.shape)
x
=
255
*
(
0.5
*
x
+
0.5
)
x
=
x.astype(np.uint8)
plt.figure(figsize
=
(
9
,
10
))
width
=
x.shape[
2
]
gs
=
gridspec.GridSpec(
10
, num_img, wspace
=
0
, hspace
=
0
)
for
i, img
in
enumerate
(x):
ax
=
plt.subplot(gs[i])
ax.set_xticklabels([])
ax.set_yticklabels([])
ax.set_aspect(
'equal'
)
plt.imshow(img.reshape(width, width), cmap
=
plt.cm.gray)
plt.axis(
'off'
)
plt.tight_layout()
# 导入相应的模型
z_dimension
=
110
D
=
discriminator()
G
=
generator(z_dimension,
3136
)
# 1*56*56
D.load_state_dict(torch.load(r
'./CGAN/Discriminator.pkl'
))
G.load_state_dict(torch.load(r
'./CGAN/Generator.pkl'
))
# 依次生成0到9
lis
=
[]
for
i
in
range
(
10
):
z
=
torch.randn((num_img,
100
))
# 随机生成向量
x
=
np.zeros((num_img,
10
))
x[:,i]
=
1
z
=
np.concatenate((z.numpy(), x),
1
)
z
=
torch.from_numpy(z).
float
()
fake_img
=
G(z)
# 将向量放入生成网络G生成一张图片
lis.append(fake_img.detach().numpy())
output
=
D(fake_img)
# 经过判别器得到结果
show(fake_img)
plt.savefig(
'./CGAN/generator/%d.png'
%
i, bbox_inches
=
'tight'
)
show_all(lis)
plt.savefig(
'./CGAN/generator/all.png'
, bbox_inches
=
'tight'
)
plt.show()
|
生成的结果是:

以上这篇Pytorch使用MNIST数据集实现CGAN和生成指定的数字方式就是小编分享给大家的全部内容了,希望能给大家一个参考,也希望大家多多支持我.
原文链接:https://blog.csdn.net/shiheyingzhe/article/details/83141027 。
最后此篇关于Pytorch使用MNIST数据集实现CGAN和生成指定的数字方式的文章就讲到这里了,如果你想了解更多关于Pytorch使用MNIST数据集实现CGAN和生成指定的数字方式的内容请搜索CFSDN的文章或继续浏览相关文章,希望大家以后支持我的博客! 。
我一直在阅读有关汇编函数的内容,但对于是使用进入和退出还是仅使用调用/返回指令来快速执行,我感到很困惑。一种方式快而另一种方式更小吗?例如,在不内联函数的情况下,在汇编中执行此操作的最快(stdcal
我正在处理一个元组列表,如下所示: res = [('stori', 'JJ'), ('man', 'NN'), ('unnatur', 'JJ'), ('feel', 'NN'), ('pig',
最近我一直在做很多网络或 IO 绑定(bind)操作,使用线程有助于加快代码速度。我注意到我一直在一遍又一遍地编写这样的代码: threads = [] for machine, user, data
假设我有一个名为 user_stats 的资源,其中包含用户拥有的帖子、评论、喜欢和关注者的数量。是否有一种 RESTful 方式只询问该统计数据的一部分(即,对于 user_stats/3,请告诉我
我有一个简单的 api,它的工作原理是这样的: 用户创建一个请求 ( POST /requests ) 另一个用户检索所有请求 ( GET /requests ) 然后向请求添加报价 ( POST /
考虑以下 CDK Python 中的示例(对于这个问题,不需要 AWS 知识,这应该对基本上任何构建器模式都有效,我只是在这个示例中使用 CDK,因为我使用这个库遇到了这个问题。): from aws
Scala 中管理对象池的首选方法是什么? 我需要单线程创建和删除大规模对象(不需要同步)。在 C++ 中,我使用了静态对象数组。 在 Scala 中处理它的惯用和有效方法是什么? 最佳答案 我会把它
我有一个带有一些内置方法的类。这是该类的抽象示例: class Foo: def __init__(self): self.a = 0 self.b = 0
返回和检查方法执行的 Pythonic 方式 我目前在 python 代码中使用 golang 编码风格,决定移动 pythonic 方式 例子: import sys from typing imp
我正在开发一个 RESTful API。其中一个 URL 允许调用者通过 id 请求特定人员的记录。 返回该 id 不存在的记录的常规值是什么?服务器是否应该发回一个空对象或者一个 404,或者其他什
我正在使用 pathlib.Path() 检查文件是否存在,并使用 rasterio 将其作为图像打开. filename = pathlib.Path("./my_file-name.tif") 但
我正在寻找一种 Pythonic 方式来从列表和字典创建嵌套字典。以下两个语句产生相同的结果: a = [3, 4] b = {'a': 1, 'b': 2} c = dict(zip(b, a))
我有一个正在操裁剪理设备的脚本。设备有时会发生物理故障,当它发生时,我想重置设备并继续执行脚本。我有这个: while True: do_device_control() device
做组合别名的最pythonic和正确的方法是什么? 这是一个假设的场景: class House: def cleanup(self, arg1, arg2, kwarg1=False):
我正在开发一个小型客户端服务器程序来收集订单。我想以“REST(ful)方式”来做到这一点。 我想做的是: 收集所有订单行(产品和数量)并将完整订单发送到服务器 目前我看到有两种选择: 将每个订单行发
我知道在 Groovy 中您可以使用字符串调用类/对象上的方法。例如: Foo."get"(1) /* or */ String meth = "get" Foo."$meth"(1) 有没有办法
在 ECMAScript6 中,您可以使用扩展运算符来解构这样的对象 const {a, ...rest} = obj; 它将 obj 浅拷贝到 rest,不带属性 a。 有没有一种干净的方法可以在
我有几个函数返回数字或None。我希望我的包装函数返回第一个不是 None 的结果。除了下面的方法之外,还有其他方法吗? def func1(): return None def func2(
假设我想设计一个 REST api 来讨论歌曲、专辑和艺术家(实际上我就是这样做的,就像我之前的 1312414 个人一样)。 歌曲资源始终与其所属专辑相关联。相反,专辑资源与其包含的所有歌曲相关联。
这是我认为必须经常出现的问题,但我一直无法找到一个好的解决方案。假设我有一个函数,它可以作为参数传递一个开放资源(如文件或数据库连接对象),或者需要自己创建一个。如果函数需要自己打开文件,最佳实践通常

我是一名优秀的程序员,十分优秀!