- ubuntu12.04环境下使用kvm ioctl接口实现最简单的虚拟机
- Ubuntu 通过无线网络安装Ubuntu Server启动系统后连接无线网络的方法
- 在Ubuntu上搭建网桥的方法
- ubuntu 虚拟机上网方式及相关配置详解
CFSDN坚持开源创造价值,我们致力于搭建一个资源共享平台,让每一个IT人在这里找到属于你的精彩世界.
这篇CFSDN的博客文章nginx+keepalived 高可用主从配置详解由作者收集整理,如果你对这篇文章有兴趣,记得点赞哟.
本文介绍了nginx+keepalived 高可用主从配置详解,分享给大家,具体如下:
1、系统环境及软件版本 。
CentOS 6.6 x64 keepalived-1.2.18.tar.gz nginx-1.6.2.tar.gz 。
主服务器:192.168.38.64 。
从服务器:192.168.38.66 。
VIP :192.168.38.100 。
2、nginx安装 (主从安装一致) 。
1.安装依赖环境 。
。
。
2.上传nginx到 opt 目录 。
3.解压安装 。
|
1
2
3
4
5
|
# tar -zxvf nginx-1.6.2.tar.gz
# cd nginx-1.6.2
# ./configure --prefix=/opt/nginx (prefix=/opt/nginx 这个指定的是 nginx目录)
# make && make install
|
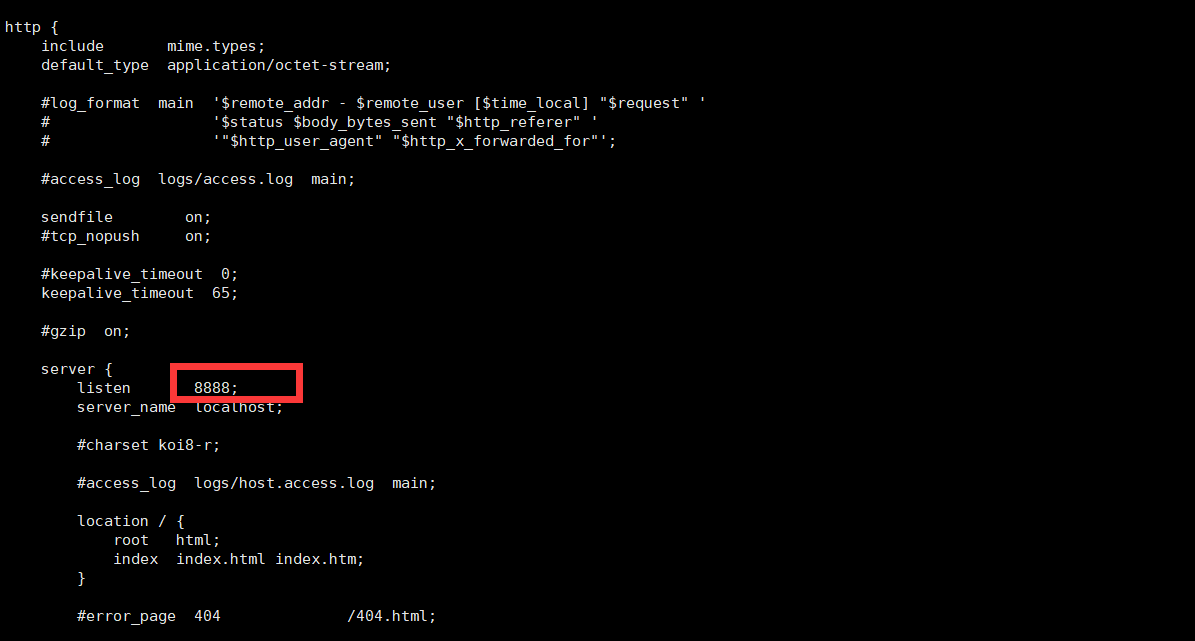
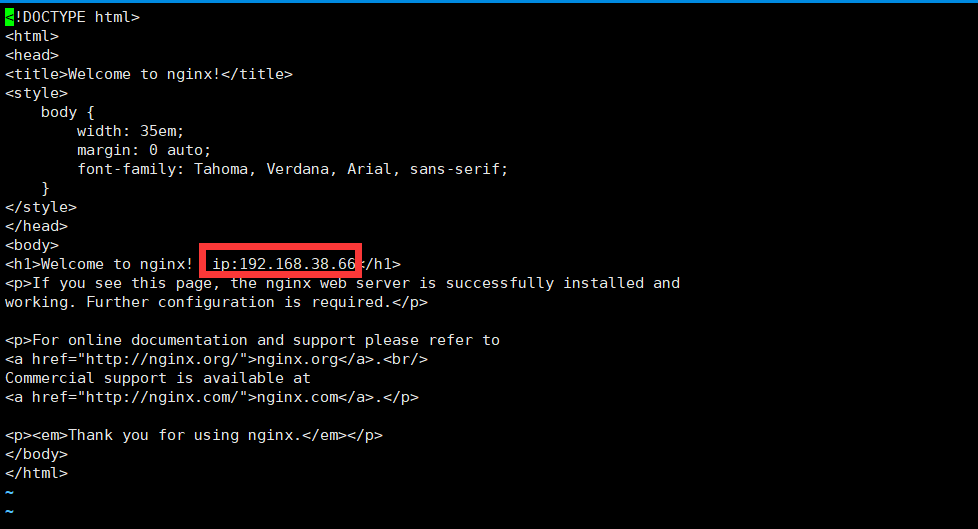
4.修改 nginx监听端口 及 index.html 。
# vi /opt/nginx/conf/nginx.conf 。

vi /opt/nginx/html/index.html 。

5. nginx 启动及常用命令 。
配置测试: /opt/nginx/sbin/nginx -t 出现如下界面说明配置没问题 。

启动 : /opt/nginx/sbin/nginx 。
重启 : /opt/nginx/sbin/nginx -s reload 。
停止 : /opt/nginx/sbin/nginx -s stop 。
6.开机启动 nginx 。
vi /etc/rc.local 。
加入: /opt/nginx/sbin/nginx 。
7.修改防火墙开放端口 。
vi /etc/sysconfig/iptables 。
添加 : -A INPUT -p tcp -m state --state NEW -m tcp --dport 8888 -j ACCEPT 。
重启防火墙 : service iptables restart 。
8.问题 。
启动 nginx遇到的问题 。

vi /etc/ld.so.conf 。
添加: /opt/nginx/lib/ 。
9.nginx的负载均衡 。
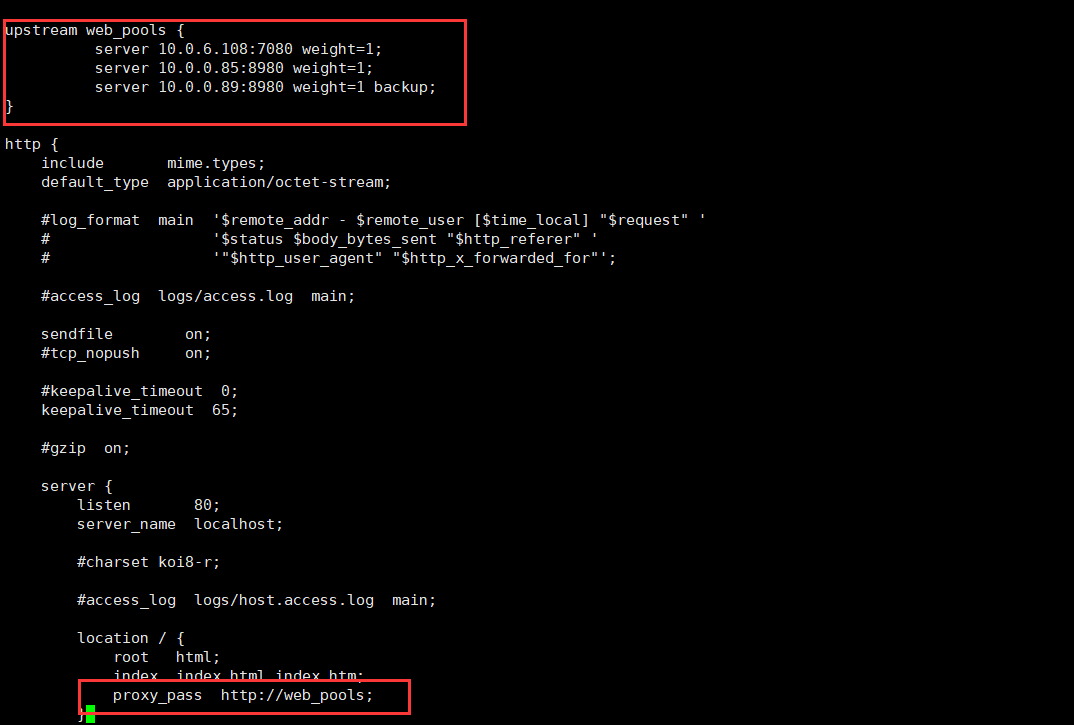
nginx的负载均衡主要是 由upstream 这一模块完成 。
修改 nginx的配置文件 。
vi /data/nginx/conf/nginx.conf 。
添加如下内容:(web_pools 这个名称可变) 。
|
1
2
3
4
|
upstream web_pools {
server 10.0.6.108:7080weight=1;
server 10.0.0.85:8980weight=1;
}
|
将server节点下的location节点中的proxy_pass配置为:http:// + upstream名称即可 。
结果如下:

其中 weight是权重 backup是备用服务器 ,只有其它服务器宕机后,备用服务器才会启动.
3、keepalived 安装 。
1.keepalived上传到 opt目录下 。
2.解压 安装 。
|
1
2
3
4
|
tar
-zxvf keepalived-1.2.18.
tar
.gz
cd
keepalived-1.2.18
.
/configure
--prefix=
/opt/keepalived
make
&&
make
install
|
3.将keepalived 安装成 linux服务 。
|
1
2
3
4
|
cp
/opt/keepalived/etc/rc
.d
/init
.d
/keepalived
/etc/init
.d/
cp
/opt/keepalived/etc/sysconfig/keepalived
/etc/sysconfig/
ln
-s
/opt/sbin/keepalived
/usr/sbin/
ln
-s
/opt/keepalived/sbin/keepalived
/sbin/
|
4.设置 keepalived 服务开机启动 。
|
1
|
chkconfig keepalived on
|
5.修改 Keepalived 配置文件 。
vi /etc/keepalived/keepalived.conf 。
|
1
2
3
4
5
6
7
8
9
10
11
12
13
14
15
16
17
18
19
20
21
22
23
24
25
26
27
28
29
30
31
32
33
34
35
36
37
38
39
40
|
! Configuration File for keepalived (!、#都是注释)
global_defs { #全局配置
notification_email {
acassen@firewall.loc
failover@firewall.loc
sysadmin@firewall.loc
}
notification_email_from Alexandre.Cassen@firewall.loc
smtp_server 192.168.200.1
smtp_connect_timeout 30
router_id LVS_01 #这个配置要唯一
}
vrrp_script chk_nginx {
script "/etc/keepalived/nginx_check.sh" ## 检测 nginx 状态的脚本路径
interval 2 ## 检测时间间隔
weight -20 ## 如果条件成立,权重-20
}
vrrp_instance VI_1 { #实例 VI_1 名字可以随意 但是不建议修改
state MASTER # 主服务器MASTER 从服务器 BACKUP
interface em1 # em1 网卡
virtual_router_id 51 #virtual_router_id 主备要一致
priority 100 # 优先级 数字越大 优先级越高 priority 的值 主服务器要大于 从服务器
advert_int 1 #设定MASTER与BACKUP负载均衡器之间同步检查的时间间隔,单位是秒
authentication { # 主从通信 验证类型及密码
auth_type PASS #设置vrrp验证类型,主要有PASS和AH两种
auth_pass 1111 #设置vrrp验证密码,在同一个vrrp_instance下,MASTER与BACKUP必须使用相同的密码才能正常通信
}
## 将 track_script 块加入 instance 配置块
track_script {
chk_nginx ## 执行 Nginx 监控的服务
}
virtual_ipaddress {
192.168.38.100/24 #VRRP HA 虚拟地址 如果有多个VIP,继续换行填写
}
}
|
6.编写 Nginx 状态检测脚本 。
vi /etc/keepalived/nginx_check.sh 。
内容如下:
|
1
2
3
4
5
6
7
8
9
10
11
|
#!/bin/bash
A=`
ps
-C nginx –no-header |
wc
-l`
if
[ $A -
eq
0 ];
then
/opt/nginx/sbin/nginx
sleep
2
if
[ `
ps
-C nginx --no-header |
wc
-l` -
eq
0 ];
then
killall keepalived
fi
fi
|
保存后,给脚本赋执行权限:chmod +x/etc/keepalived/nginx_check.sh 。
7.注意点:Keepalived主从配置文件不同点 。
a.router_id 不一致 。
b.state 主服务器是MASTER ,从服务器是 BACKUP 。
c.priority 主服务器 大于 从服务器 。
8.keepalived 命令 。
启动 : servicekeepalived start 。
停止: servicekeepalived stop 。
重启: servicekeepalived restart 。
9.注意的问题 。
a.vip没绑定成功 。
解决方案:ip addr 查看 本地ip所在网卡的名称 ,然后修改 配置文件 。

vi /etc/keepalived/keepalived.conf 。

保存后 servicekeepalived restart 重启 keepalived服务即可 。
10.测试 。
启动主从nginx和keepalived 服务 。
主从服务器分别: ip add | grep 192.168.38.100 。
在192.168.38.64 可看到 。

同时 在192.168.38.66 。

当杀死 主服务器上的keepalived 则 从服务器 。

当再次启动主服务器上的keepalived则结果主服务器上有结果,从服务器上没结果.
当杀死 nginx后,keepalived则会自动启动 nginx服务 。
11. keepalived脑裂 (ip add | grep 192.168.38.100 在主从都有结果) 。
解决方案:防火墙问题 。
|
1
2
3
4
5
|
iptables-IINPUT4-pvrrp-jACCEPT
service iptables save
service iptables restart
|

以上就是本文的全部内容,希望对大家的学习有所帮助,也希望大家多多支持我.
原文链接:https://www.cnblogs.com/liulangzhizi/p/7050260.html 。
最后此篇关于nginx+keepalived 高可用主从配置详解的文章就讲到这里了,如果你想了解更多关于nginx+keepalived 高可用主从配置详解的内容请搜索CFSDN的文章或继续浏览相关文章,希望大家以后支持我的博客! 。
我只是不喜欢 Logback 的 XML 或 Groovy 配置,而更喜欢用 Java 进行配置(这也是因为我将在初始化后的不同时间在运行时更改配置)。 似乎对 Logback 进行 Java 配置的
我的 sphinx 配置是: ================================ config/sphinx.yml development: bin_path: "/usr/loc
我们计划在生产服务器中部署我们的系统。我有兴趣了解更多有关优化网站性能的信息。 Sitecore 有哪些优化建议? (缓存,网络配置中的其他设置) 我们可以在 IIS 中做哪些优化? 找不到关于这些主
我有一个 Django 应用程序,可以处理网站的两个(或更多)部分,例如网站的“admin”和“api”部分。我还为网站的其余部分提供了普通的 html 页面,其中不需要 Django。 例如,我希望
我刚刚开始研究Docker。我有一个 Node 应用程序,可以调整大小和图像,然后在完成后向 aws 发送 SQS 消息。我已成功创建应用程序的 docker 镜像,并从本地计算机复制它,但遇到了无法
如何配置 checkstyle(在 Ant nt Maven 中)任务?我尝试了一点,但没有正确收到报告。这是我的 Ant 脚本。
我正在使用 Quartz 和 Spring 框架重写一个遗留项目。原始配置是 XML 格式,现在我将其转换为 Java Config。 xml 配置使用 jobDetail 设置触发器 bean 的作
tl;rd: 使用主键对数据库进行分区 索引大小问题。 数据库大小每天增长约 1-3 GB 突袭设置。 您有使用 Hypertable 的经验吗? 长版: 我刚刚建立/购买了一个家庭服务器: 至强 E
在安装 gcp 应用程序后,我们尝试使用 GCP 的图形 api 配置 Azure Active Directory saml 配置。我们正在遵循相同的 AWS graph api saml 设置 U
我刚刚了解了 spring security 并想使用 java hibernate 配置连接到数据库,但我发现的示例或教程很少。我通过使用 xml 配置找到了更多。我在这里使用 Spring 4.0
我们最近切换到 Java 8 以使用 java.time API(LocalDate、LocalDateTime,...)。因此,我们将 Hibernate 依赖项更新到版本 4.3.10。我们编写了
欢迎访问我的GitHub 这里分类和汇总了欣宸的全部原创(含配套源码):https://github.com/zq2599/blog_demos 本篇概览 本文是《quarkus实战》系列的第六篇,咱
我是 NGINX 的新手,我正在尝试对我们的 ERP 网络服务器进行负载平衡。我有 3 个网络服务器在由 websphere 提供支持的端口 80 上运行,这对我来说是一个黑盒子: * web01.e
我们想使用 gerrit 进行代码审查,但我们在 webview 中缺少一些设置。 是否可以禁止提交者审查/验证他们自己的 提交? 是否有可能两个审稿人给 +1 一个累积它 到+2,以便可以提交? 谢
配置根据运行模式应用于 AEM 实例。在多个运行模式和多个配置的情况下,AEM 如何确定要选择的配置文件?假设以下配置在 AEM 项目中可用, /apps /myproject - con
我正在使用 Neo4j 服务器。我遇到了负载相对较低的问题。但是,响应时间相当长。我认为为请求提供服务的线程数太少了。有没有办法调整为 HTTP 请求提供服务的线程池的大小。那可能吗? 最佳答案 线程
我在/etc/default/celeryd 中有以下配置 CELERYD_NODES = "worker1 worker2 worker3" CELERYD_CHDIR = "path to pro
Plone 在其页面中显示来 self 的母语(巴西葡萄牙语)的特殊字符。但是,当我使用我创建的 spt 页面时,它会显示转义序列,例如: Educa\xc3\xa7\xc3\xa3o 代替 Educ
我正在尝试开始使用 Emacs/Clojure。安装 emacs 扩展的正确方法是什么。我正在尝试安装以下插件: https://bitbucket.org/kotarak/vimclojure 我已
我有一个简单的 C 项目结构: proj/ src/ docs/ build/ tests/ lib/ 尝试编写合适的 CMake 文件。 到目前为止我的尝试:http://pas

我是一名优秀的程序员,十分优秀!