CFSDN坚持开源创造价值,我们致力于搭建一个资源共享平台,让每一个IT人在这里找到属于你的精彩世界.
这篇CFSDN的博客文章Java Swing中的JButton、JComboBox、JList和JColorChooser组件使用案例由作者收集整理,如果你对这篇文章有兴趣,记得点赞哟.
Swing 的组件与AWT 组件相似,但又为每一个组件增添了新的方法,并提供了更多的高级组件. 。
Swing 的基本组件
1.按钮(JButton)
Swing 中的按钮可以显示图像,并且可以将按钮设置为窗口的默认图标,而且还可以将多个图像指定给一个按钮.
(1).JButton 常用的构造方法.
JButton(String text):按钮上显示字符。 JButton(Icon icon) :按钮上显示图标。 JButton(String text, Icon icon):按钮上既显示图标又显示字符.
(2).常用方法
b1.setEnabled(false); //使按钮当前不可用 b1.setToolTipText("..."): //设置按钮提示文本 b1.setMnemonic(KeyEvent.VK_D);// 将b1邦定alt+D键 。
(3).案例代码
复制代码代码如下:
public class JButtonExample3 extends JPanel implements ActionListener {
protected JButton b1, b2, b3;
public JButtonExample3() {
ImageIcon leftButtonIcon = createImageIcon("right.gif");
ImageIcon middleButtonIcon = createImageIcon("middle.gif");
ImageIcon rightButtonIcon = createImageIcon("left.gif");
b1 = new JButton("失效中间按钮(D)", leftButtonIcon);
b1.setVerticalTextPosition(AbstractButton.CENTER);// 水平中间对齐
b1.setHorizontalTextPosition(AbstractButton.LEADING);// 相当于LEFT
b1.setMnemonic(KeyEvent.VK_D);// 将b1邦定alt+D键
b1.setActionCommand("disable");
b2 = new JButton("M中间按钮", middleButtonIcon);
b2.setVerticalTextPosition(AbstractButton.BOTTOM);
b2.setHorizontalTextPosition(AbstractButton.CENTER);
b2.setMnemonic(KeyEvent.VK_M);// 将b2邦定alt+M键
b3 = new JButton("E激活中间按钮", rightButtonIcon);
b3.setMnemonic(KeyEvent.VK_E);// 将b3邦定alt+E键
b3.setActionCommand("enable");
b3.setEnabled(false);
// 给1和3添加事件监听
b1.addActionListener(this);
b3.addActionListener(this);
// 设置按钮提示文本
b1.setToolTipText("点击这个按钮,将使中间的按钮失效!");
b2.setToolTipText("点击这个按钮,没有任何的事件发生!");
b3.setToolTipText("点击这个按钮,将使中间的按钮有效");
// 将按钮添加到JPanel中
add(b1);
add(b2);
add(b3);
}
public void actionPerformed(ActionEvent e) {
if ("disable".equals(e.getActionCommand())) {
b2.setEnabled(false);
b1.setEnabled(false);
b3.setEnabled(true);
} else {
b2.setEnabled(true);
b1.setEnabled(true);
b3.setEnabled(false);
}
}
protected static ImageIcon createImageIcon(String path) {
java.net.URL imgURL = JButtonExample3.class.getResource(path);
if (imgURL != null) {
return new ImageIcon(imgURL);
} else {
System.err.println("Couldn′t find file: " + path);
return null;
}
}
public static void main(String[] args) {
// 设置使用新的swing界面
//提供一个关于新创建的 JFrame 是否应该具有当前外观为其提供的 Window 装饰(如边框、关闭窗口的小部件、标题等等)的提示。
JFrame.setDefaultLookAndFeelDecorated(true);
// 创建一个窗体
JFrame frame = new JFrame("小龙按钮");
frame.setDefaultCloseOperation(JFrame.EXIT_ON_CLOSE);
// 创建一个面板
JButtonExample3 newContentPane = new JButtonExample3();
newContentPane.setOpaque(true);
frame.setContentPane(newContentPane);
// 显示窗体
frame.pack();
frame.setLocation(300, 200);
frame.setVisible(true);
}
}
。
运行截图

2.组合框(JComboBox)
组合框(下拉列表JComboBox)使用方法及示例详解
构造方法: * JComboBox() 建立一个JComboBox组件. * JComboBox(ComboBoxModel model) 根据model建立一个JComboBox组件. * JComboBox(Objext[] items) 利用数组对象建立一个JComboBox组件. * JComboBox(Vector items) 利用Vector对象建立一个JComboBox组件. 。
常用方法
.... 。
综合示例
复制代码代码如下:
import java.awt.*; /* 包含用于创建用户界面和绘制图形图像的所有类。 */
import javax.swing.*; /* 提供一组"轻量级"组件,尽量让这些组件在所有平台上的工作方式都相同 */
public class JComboBoxDemo extends JFrame {
public JComboBoxDemo() {
/*
* Container是所有容器的父类,又是Java语言的组件类Component的子类. 容器是一种具有容纳其他组件和容器的功能的组件
* 一个Java的图形用户界面的最基本元素是组件,组件是可以以图形化的方式显示在屏幕上并能与用户进行交互的对象,如一个按钮,一个文本框等.
* 在Java中,通常将组件放在一定的容器内使用 this.getContentPane()方法返回此窗体的 contentPane 对象
*/
Container contentPane = this.getContentPane();
/* 创建一个面板对象,指定布局管理器为GridLayout,1行2列.Jpanel的默认版面管理为FlowLayout */
JPanel jPanel1 = new JPanel(new GridLayout(1, 2));
// 利用String数组建立JComboBox
String[] fruit = { "苹果", "香蕉", "桔子", "梨", "芒果" };
JComboBox jComboBox1 = new JComboBox(fruit);
jComboBox1.addItem("其他"); // 在列表框选项的最后再添加一个"其他"选项
// 设置jList1对象的带标题边框
jComboBox1.setBorder(BorderFactory.createTitledBorder("您最喜欢的水果:"));
// 添加列表框jComboBox1至面板
jPanel1.add(jComboBox1);
// 利用ComboBoxModel建立JComboBox
ComboBoxModel myModel = new MyModel();
JComboBox jComboBox2 = new JComboBox(myModel);
// 设置jList1对象的带标题边框
jComboBox2.setBorder(BorderFactory.createTitledBorder("您最喜欢的水果:"));
// 添加列表框jComboBox2至面板
jPanel1.add(jComboBox2);
// 添加面板至父容器
contentPane.add(jPanel1);
// 设置本窗体的标题
this.setTitle("JComboBoxDemo");
// 设置本窗体显示的初始大小
this.setSize(350, 90);
this.setLocation(300, 200);
// 设置本窗体初始可见
this.setVisible(true);
}
class MyModel extends DefaultComboBoxModel {
String[] fruit = { "苹果", "香蕉", "桔子", "梨", "芒果" };
MyModel() {
for (int i = 0; i < fruit.length; i++) {
/* addElement()方法用于向列表框添加选项元素 */
this.addElement(fruit[i]);
}
}
}
public static void main(String args[]) {
JComboBoxDemo test = new JComboBoxDemo();
}
}
。
截图

3.列表框(JList)
列表框的功能与下拉列表框相似,也是让用户在几个条目中做出选择,但又有一些区别,它提供给用户的选择模式更为多样,分别是单一选择、连续选择、多项选择,对应于 ListSelectionModel 中的3个常量:
(1) static int SINGLE_SELECTION 只能选择一条.
(2) static int SINGLE_INTERVAL_SELECTION 按住[Shift]键可选择联系的区间.
(3) static int MULTIPLE_INTERVAL_SELECTION 按住[Ctrl]键可选择多条.
构造函数如下:
(1) JList() 建立一个 JList 组件.
(2) JList(ListModel model) 根据 model 建立一个 JList 组件.
(3) JList(Object[] items) 利用数组对象建立一个 JList 组件.
(4) JList(Vector items) 利用 Vector 对象建立一个 JList 组件.
将列表框JList添加到JScrollPane中可以实现列表框的滚动. 。
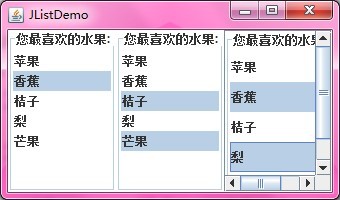
列表(JList)组件使用示例1如下:
。
复制代码代码如下:
public class JListDemo1 extends JFrame{
Container contentPane;
JPanel jp;
JList jList1,jList2,jList3;
public JListDemo1(){
contentPane = this.getContentPane();
jp = new JPanel(new GridLayout(1,3));
//利用String数组建立JList对象
String[] fruit={"苹果","香蕉","桔子","梨","芒果"};
jList1=new JList(fruit);
//设置jList1对象的带标题边框
jList1.setBorder(BorderFactory.createTitledBorder("您最喜欢的水果: "));
//设置jList1对象的选择模式为单一选择
jList1.setSelectionMode(ListSelectionModel.SINGLE_SELECTION);
jp.add(jList1);
//利用ListModel建立JList对象,可实现列表内容的动态
ListModel myModel=new MyModel(); //创建一个列表模型对象
jList2=new JList(myModel); //根据列表模型对象创建列表
jList2.setBorder(BorderFactory.createTitledBorder("您最喜欢的水果: "));
//设置jList2对象的选择模式为按住[Ctrl]可多项选择
jList2.setSelectionMode(ListSelectionModel.MULTIPLE_INTERVAL_SELECTION);
jp.add(jList2);
jList3=new JList(fruit);
jList3.setBorder(BorderFactory.createTitledBorder("您最喜欢的水果: "));
jList3.setSelectionMode(ListSelectionModel.MULTIPLE_INTERVAL_SELECTION);
jList3.setVisibleRowCount(3);
jList3.setFixedCellWidth(120);
jList3.setFixedCellHeight(30);
JScrollPane jScrollPane = new JScrollPane(jList3);
jp.add(jScrollPane);
contentPane.add(jp);
this.setTitle("JListDemo");
this.setSize(340,200);
//pack();
this.setLocation(400, 300);
this.setVisible(true);
}
//通过继承DefaultListModel类可实现动态内容的列表选择
class MyModel extends DefaultListModel{
String[] fruit={"苹果","香蕉","桔子","梨","芒果"};
MyModel(){
for(int i=0;i<fruit.length;i++){
/* void addElement(Object obj)
* 将指定组件添加到此类表的末尾。*/
this.addElement(fruit[i]);
}
}
}
public static void main(String[] args){
JListDemo1 test=new JListDemo1();
}
}
。
运行结果如下图所示:
列表框示例2代码
。
复制代码代码如下:
public class JListDemo2 extends JFrame {
Container contentPane;
JPanel jp;
JList jListFont, jListSize;
// 构造函数
public JListDemo2() {
contentPane = this.getContentPane();
jp = new JPanel(new GridLayout());
setJListFont();
setJListFontSize();
contentPane.add(jp);
this.setTitle("JListDemo");
this.setSize(240, 200);
this.setLocation(400, 300);
this.setVisible(true);
} // End of JListDemo2
public void setJListFont() {
GraphicsEnvironment ge = GraphicsEnvironment
.getLocalGraphicsEnvironment();
final String fontName[] = ge.getAvailableFontFamilyNames(); // 获取系统的本地字体
jListFont = new JList(fontName);
// 设置jList1对象的带标题边框
jListFont.setBorder(BorderFactory.createTitledBorder("系统字体: "));
// 设置jList1对象的选择模式为单一选择
jListFont.setSelectionMode(ListSelectionModel.SINGLE_SELECTION);
jListFont.setVisibleRowCount(3);
jListFont.setFixedCellWidth(120);
jListFont.setFixedCellHeight(20);
JScrollPane jScrollPane1 = new JScrollPane(jListFont);
jp.add(jScrollPane1);
}
public void setJListFontSize() {
final String fontSize[] = { "8", "9", "10", "12", "14", "15", "16",
"18", "20", "21", "22", "24", "26", "28", "30", "36", "48",
"54", "72", "89" };
// 创建字号的列表框listSize
jListSize = new JList(fontSize);
jListSize.setBorder(BorderFactory.createTitledBorder("字体大小: "));
// 设置jList2对象的选择模式为按住[Ctrl]可多项选择
jListSize
.setSelectionMode(ListSelectionModel.MULTIPLE_INTERVAL_SELECTION);
jListSize.setVisibleRowCount(3);
jListSize.setFixedCellWidth(120);
jListSize.setFixedCellHeight(20);
JScrollPane jScrollPane2 = new JScrollPane(jListSize);
jp.add(jScrollPane2);
}
public static void main(String[] args) {
JListDemo2 test = new JListDemo2();
}
}
。
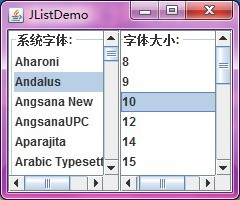
程序运行示意图
4.javax.swing 。
类 JColorChooser: JColorChooser (颜色选择对话框)提供一个用于允许用户操作和选择颜色的控制器窗格.
JColorChooser构造函数: JColorChooser():建立一个JColorChooer对象,默认颜色为白色. JColorChooser(Color initialColor):建立一个JColorChooer对象,并设置初始颜色. JColorChooser(ColorSelectionModel modal):以ColorSelectionModel构造JColorChooser对象. 。
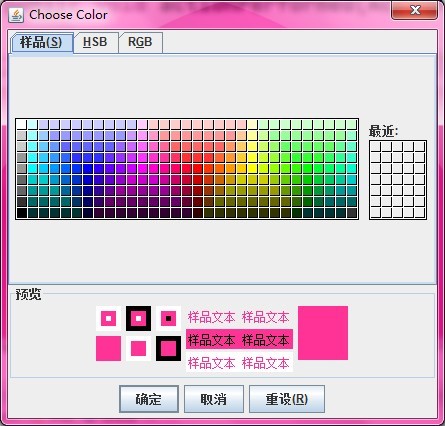
最常使用JColorChooser的方式是使用JColorChooser的静态方法showDialog().也就是说在大部份的情况下,我们不会new一个JColorChooser对象,而是直接使用JColorChooser的静态方法(showDialog())来输出颜色选择对话框.利用这个方法我们亦可以得到用户所选择的颜色,若用户没有选择则返回null值. 。
颜色选择对话框的简单案例1代码
复制代码代码如下:
public class JColorChooserDemo {
public static void main(String[] args) {
JFrame frame = new JFrame("JColorChooserDemo");
MyPanel panel = new MyPanel();
frame.getContentPane().add(panel);
frame.pack();
frame.setLocation(300, 200);
frame.setVisible(true);
frame.setDefaultCloseOperation(JFrame.EXIT_ON_CLOSE);
}
}
class MyPanel extends JPanel implements ActionListener {
private static final long serialVersionUID = 1L;
private JButton button,rgb,red,green,blue;
private Color color = new Color(255, 51, 150);
public MyPanel() {
button = new JButton("Get Color");
rgb = new JButton("RGB: ");
red = new JButton("Red: ");
green = new JButton("Green: ");
blue = new JButton("Blue: ");
button.addActionListener(this);
setPreferredSize(new Dimension(550, 250));
setLayout(new FlowLayout(FlowLayout.CENTER, 5, 5));
setBackground(color);
add(button);
add(rgb);
add(red);
add(green);
add(blue);
}
public void actionPerformed(ActionEvent e) {
color = JColorChooser.showDialog(this, "Choose Color", color);
if (color != null) {
setBackground(color);
button.setText("Get again");
rgb.setText("RGB: " + color.getRGB());
red.setText("Red: " + color.getRed());
green.setText("Green: " + color.getGreen());
blue.setText("Blue: " + color.getBlue());
}
}
}
。
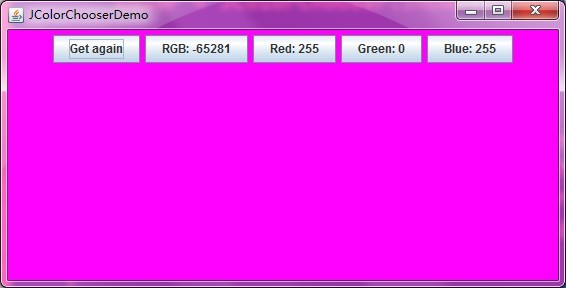
运行结果示意图如下
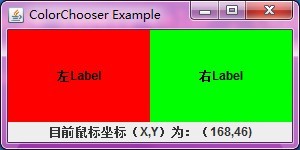
另外还有一个使用JColorChooser常用的方式,那就是使用createDialog()静态方法.使用这个静态方法后会得到一个JDialog对象,我们可以利用这个JDialog对象对颜色选择对话框做更多的设置.不过利用这个方法必须配合JColorChooser对象才行,也就是必须new出一个JColorChooser对象来.下面范例介绍最简单的也是最实用JColorChooser,选择颜色完毕后就能更改JLabel上的背景颜色. 。
颜色选择对话框的简单案例2代码
。
复制代码代码如下:
import java.awt.*;
import java.awt.event.*;
import javax.swing.*;
public class ColorChooserDemo1 extends MouseAdapter {
JFrame f = null;
JLabel label = null;
JLabel label1 = null;
JLabel label2 = null;
Rectangle rec1 = null;
Rectangle rec2 = null;
public ColorChooserDemo1() {
f = new JFrame("ColorChooser Example");
Container contentPane = f.getContentPane();
contentPane.addMouseListener(this);
label = new JLabel(" ", JLabel.CENTER);
label.setPreferredSize(new Dimension(300, 20));
JPanel panel = new JPanel();
panel.setLayout(new GridLayout(1, 2));
label1 = new JLabel("左Label", JLabel.CENTER);
label1.setBackground(Color.red);
label1.setForeground(Color.black);
label1.setOpaque(true);
label1.setBounds(0, 0, 150, 150);
panel.add(label1);
label2 = new JLabel("右Label", JLabel.CENTER);
label2.setBackground(Color.green);
label2.setForeground(Color.black);
label2.setOpaque(true);
label2.setBounds(150, 0, 150, 150);
panel.add(label2);
rec1 = label1.getBounds();
rec2 = label2.getBounds();
contentPane.add(panel, BorderLayout.CENTER);
contentPane.add(label, BorderLayout.SOUTH);
f.setSize(new Dimension(300, 150));
f.setVisible(true);
f.addWindowListener(new WindowAdapter() {
public void windowClosing(WindowEvent e) {
System.exit(0);
}
});
}
// 实现MouseAdapter中的mousePressed()与mouseClicked()方法.当按下鼠标时,就能知道鼠标光标目前的位置.当连续键击鼠标
// 两次时,若光标所在位置在label中,就会出现颜色选择对话框,用户可选择任一颜色更改label的颜色.
public void mousePressed(MouseEvent e) {
label.setText("目前鼠标坐标(X,Y)为:(" + e.getX() + "," + e.getY() + ")");
}
public void mouseClicked(MouseEvent e) {
Point point = e.getPoint();
if (e.getClickCount() == 2) {
if (rec1.contains(point)) {
/*
* 利用JColorChooser的showDialog()静态方法输出颜色选择对话框
* ,showDialog()中的3个参数依次是: 对话框的父组件,颜色选择对话框标题
* ,与对话框默认颜色.当用户选择完颜色之后,按下"OK"按钮则返回
* Color对象,若按下"Cancel"按钮则返回null值.
*/
Color color = JColorChooser.showDialog(f,
"Change label1 Color", Color.white);
if (color != null) // 若为null值表示用户按下Cancel按钮
label1.setBackground(color);
}
if (rec2.contains(point)) {
Color color = JColorChooser.showDialog(f,
"Change label2 Color", Color.yellow);
if (color != null) // 若为null值表示用户按下Cancel按钮
label2.setBackground(color);
}
}
}
public static void main(String[] arg) {
new ColorChooserDemo1();
}
}
。
程序运行示意图
最后此篇关于Java Swing中的JButton、JComboBox、JList和JColorChooser组件使用案例的文章就讲到这里了,如果你想了解更多关于Java Swing中的JButton、JComboBox、JList和JColorChooser组件使用案例的内容请搜索CFSDN的文章或继续浏览相关文章,希望大家以后支持我的博客! 。

我是一名优秀的程序员,十分优秀!