- ubuntu12.04环境下使用kvm ioctl接口实现最简单的虚拟机
- Ubuntu 通过无线网络安装Ubuntu Server启动系统后连接无线网络的方法
- 在Ubuntu上搭建网桥的方法
- ubuntu 虚拟机上网方式及相关配置详解
CFSDN坚持开源创造价值,我们致力于搭建一个资源共享平台,让每一个IT人在这里找到属于你的精彩世界.
这篇CFSDN的博客文章springboot自定义starter启动器的具体使用实践由作者收集整理,如果你对这篇文章有兴趣,记得点赞哟.
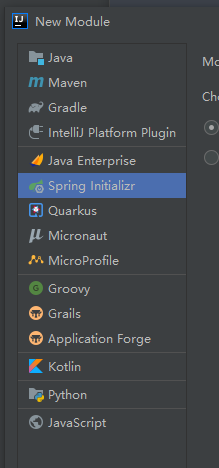
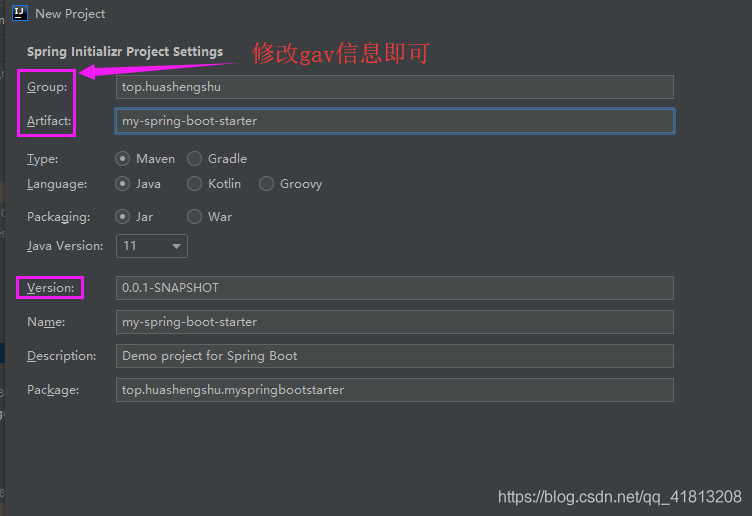
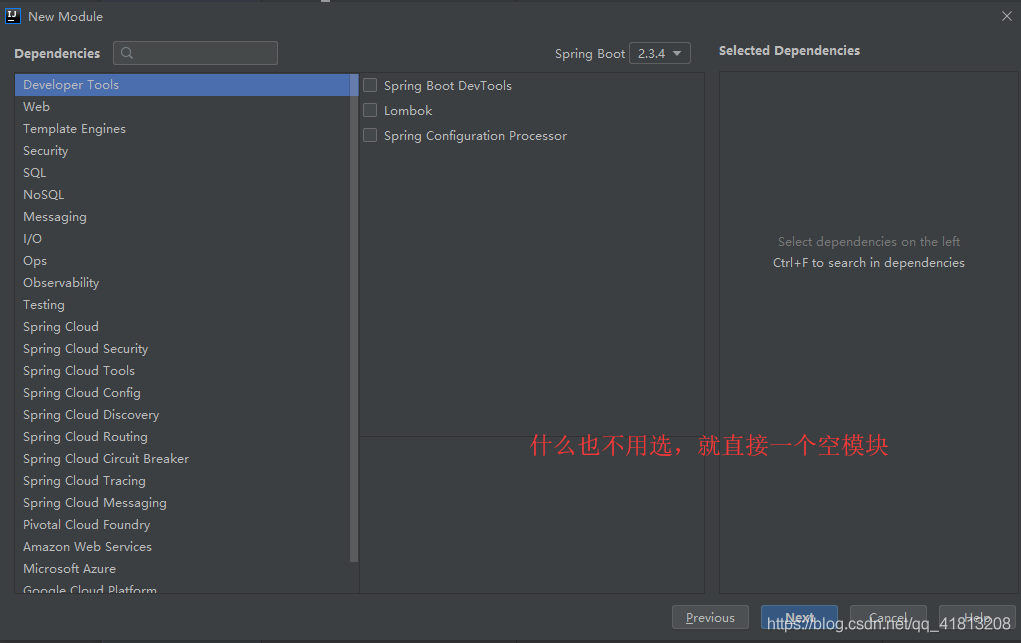
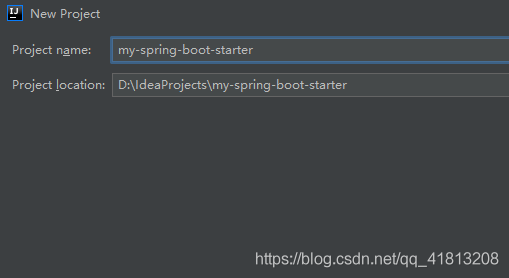
。
<dependency> <groupId>org.springframework.boot</groupId> <artifactId>spring-boot-starter</artifactId></dependency>
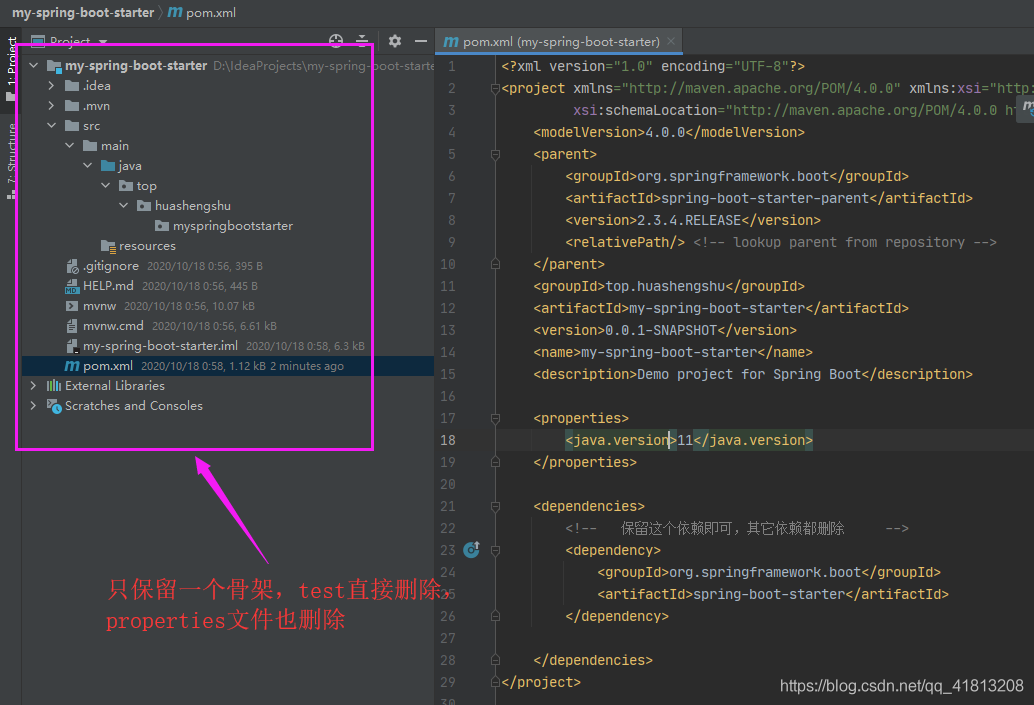
如下是完整的pom.xml 实际上如果当前starter需要引用其它依赖加入到dependences里面即可,这里只做演示项目 。
<?xml version="1.0" encoding="UTF-8"?><project xmlns="http://maven.apache.org/POM/4.0.0" xmlns:xsi="http://www.w3.org/2001/XMLSchema-instance" xsi:schemaLocation="http://maven.apache.org/POM/4.0.0 https://maven.apache.org/xsd/maven-4.0.0.xsd"> <modelVersion>4.0.0</modelVersion> <parent> <groupId>org.springframework.boot</groupId> <artifactId>spring-boot-starter-parent</artifactId> <version>2.3.4.RELEASE</version> <relativePath/> <!-- lookup parent from repository --> </parent> <groupId>top.huashengshu</groupId> <artifactId>my-spring-boot-starter</artifactId> <version>0.0.1-SNAPSHOT</version> <name>my-spring-boot-starter</name> <description>Demo project for Spring Boot</description> <properties> <java.version>11</java.version> </properties> <dependencies> <!-- 保留这个依赖即可,其它依赖都删除 --> <dependency> <groupId>org.springframework.boot</groupId> <artifactId>spring-boot-starter</artifactId> </dependency> </dependencies></project>
项目结构截图 。
。
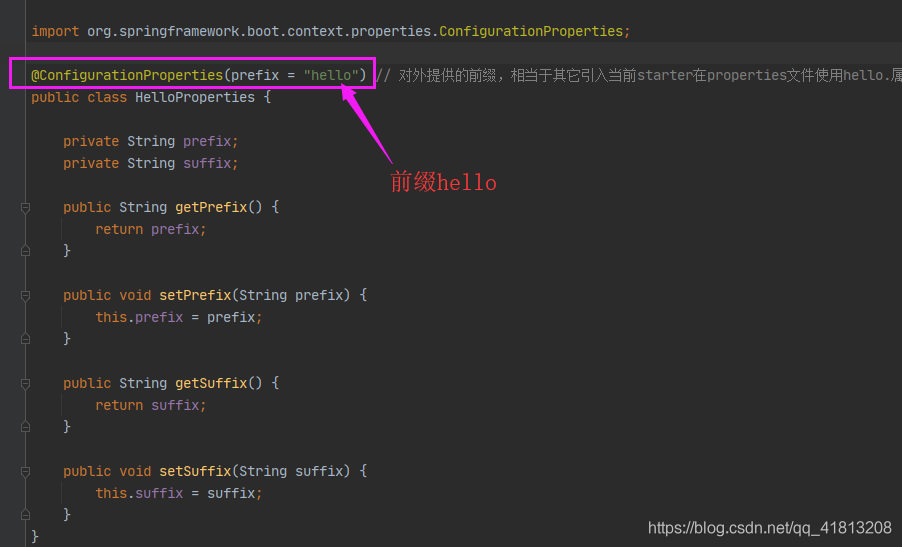
创建HelloProperties.java,直接复制下面代码,然后选择包进行粘贴,Idea会自动创建对应类代码设置好包名 。
import org.springframework.boot.context.properties.ConfigurationProperties;@ConfigurationProperties(prefix = "hello") // 对外提供的前缀,相当于其它引入当前starter在properties文件使用hello.属性即可对下面属性进行赋值public class HelloProperties { private String prefix; // 成员属性,意思是前缀名 private String suffix; // 成员属性,意思是后缀名 public String getPrefix() { return prefix; } public void setPrefix(String prefix) { this.prefix = prefix; } public String getSuffix() { return suffix; } public void setSuffix(String suffix) { this.suffix = suffix; }}
创建HelloService.java直接复制下面代码,选择包进行粘贴即可生成 。
public class HelloService { HelloProperties helloProperties; public HelloProperties getHelloProperties() { return helloProperties; } public void setHelloProperties(HelloProperties helloProperties) { this.helloProperties = helloProperties; } public String sayHello(String name){ return helloProperties.getPrefix() +" "+name +" "+helloProperties.getSuffix(); }}
创建配置类(和前面一样复制粘贴即可)HelloServiceAutoConfiguration.java,将HelloService注入到IOC容器中 。
import org.springframework.beans.factory.annotation.Autowired;import org.springframework.boot.autoconfigure.condition.ConditionalOnWebApplication;import org.springframework.boot.context.properties.EnableConfigurationProperties;import org.springframework.context.annotation.Bean;import org.springframework.context.annotation.Configuration;@Configuration@ConditionalOnWebApplication // 条件配置类,该注解表示在web环境下才生效,相关的其它条件可以使用@ConditionXXX@EnableConfigurationProperties(HelloProperties.class) // 表示HelloProperties作为配置类使用public class HelloServiceAutoConfiguration { @Autowired HelloProperties helloProperties; // 作为配置类目的就是想在sayHello方法返会的字符串加上前缀和后缀 @Bean public HelloService helloService() { // 将HelloService注入到IOC容器 HelloService service = new HelloService(); service.setHelloProperties(helloProperties); return service; }}
。
META-INF文件夹,并创建一个spring.factories文件如下面截图 。
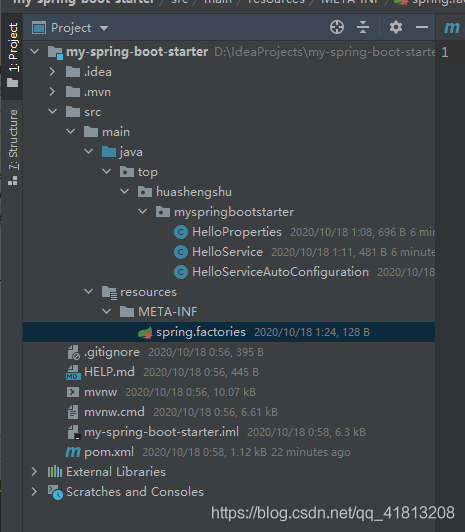
内容则是将@Configuration配置类加入,目的是将配置加入到外部的IOC容器中 。
org.springframework.boot.autoconfigure.EnableAutoConfiguration=
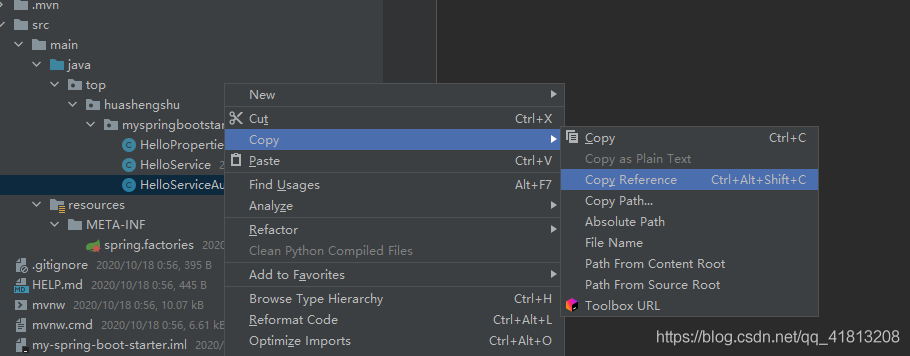
idea中右键copyC》copy reference,将复制的值填入上面=右边 。
注意:如果有多个AutoConfiguration则用逗号分开,还有回车小心前面的空格,最好没有其它字符.
例如
org.springframework.boot.autoconfigure.EnableAutoConfiguration=\top.huashengshu.myspringbootstarter.HelloServiceAutoConfiguration,\top.yumbo.music.starter.configuration.YumboMusicAutoConfiguration
。
本地安装为例:
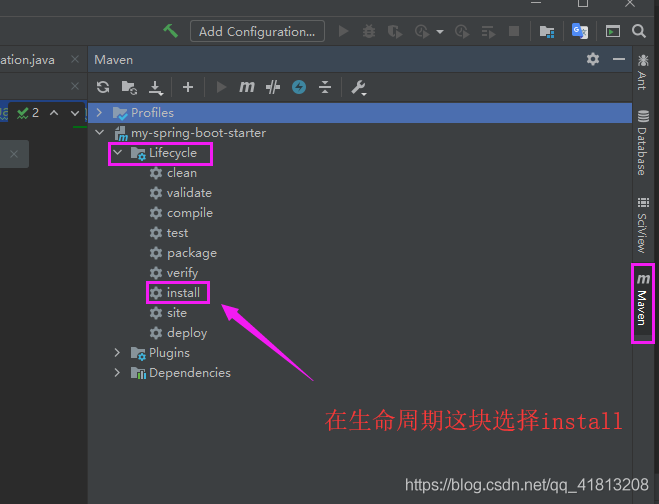
成功后即可 。

。
创建一个springboot项目 勾选web模块即可,然后加入自定义启动器的gav依赖 在启动类中加入内部类(这里为了方便演示不按照规范创建包) 如下示例代码 。
启动类 。
import org.springframework.beans.factory.annotation.Autowired;import org.springframework.boot.SpringApplication;import org.springframework.boot.autoconfigure.SpringBootApplication;import org.springframework.web.bind.annotation.GetMapping;import org.springframework.web.bind.annotation.RestController;import top.huashengshu.myspringbootstarter.HelloService;@SpringBootApplicationpublic class DemoApplication { @RestController public class HelloController { @Autowired HelloService helloService; // 注入HelloService @GetMapping("/hello") // 暴露一个/hello 请求路径对外提供服务 public String hello(){ return helloService.sayHello("zhang san"); // 返回带有前缀和后缀中间是 "zhang san"的字符串 } } public static void main(String[] args) { SpringApplication.run(DemoApplication.class, args); }}
properties文件 。
因为使用了@ConfigurationProperties(prefix = "hello")注解所以在当前项目的properties文件中使用hello前缀调用即可对成员属性赋值 。
如下 。
hello.prefix=HUASHENGSHUhello.suffix=Hello World
运行当前项目,访问/hello验证是否有效 。
如下:

说明自定义starter成功.
其它业务代码,根据自己的需求自己加入依赖,也就是说可以自己定义starter提供给其它人用! 。
到此这篇关于springboot自定义starter启动器的具体使用实践的文章就介绍到这了,更多相关springboot自定义starter启动器内容请搜索我以前的文章或继续浏览下面的相关文章希望大家以后多多支持我! 。
原文链接:https://blog.csdn.net/qq_41813208/article/details/109139783 。
最后此篇关于springboot自定义starter启动器的具体使用实践的文章就讲到这里了,如果你想了解更多关于springboot自定义starter启动器的具体使用实践的内容请搜索CFSDN的文章或继续浏览相关文章,希望大家以后支持我的博客! 。
Ubuntu的启动器,相当于win系统的任务栏,有的同学习惯了隐藏,因为这可以节省大量的显示空间,特别是多浏览器并列的情况下,这点空间显示很重要,但更多的是个人习惯,下面图文说一下Ubuntu的启动
在我的 Mac 上,我尝试在 Python Launcher 中默认打开一个 Python 脚本。 我左键单击脚本并选择“打开方式”,然后选择启动器。每次我执行此操作时,都会弹出Terminal,启动
我创建了一个用作启动器的应用程序。在该应用程序中,我打开了各种其他应用程序。在该应用程序中,我想清除其他应用程序的所有数据(即登录详细信息、搜索历史记录),单击按钮即可删除。 PackageManag
我用 C# 编写了一个可移植程序,它具有某些依赖项(.NET Framework、Visual C++ 可再发行版等),可以在 Windows XP SP3 及更高版本上运行。 正因为如此,该程序需要
我的目标是将我的应用程序设置为华为设备上的默认启动器。 1 - 说明: 1.1 - 当前情况: 我已经能够: 检查我的应用是否是默认启动器 显示“启动器选择器”(带有“使用一次”/“始终”选项) 这一
我正在构建一个 Android 启动器,但在尝试将已安装的应用程序添加到 GridView 时不断崩溃。 我正在尝试在 GridView 中添加已安装应用程序的网格。 我的 GridView 代码是
启动器 Activity 未启动,在 Android Studio 中按下“运行”按钮时会崩溃。虽然那里没有太多代码,但仍然如此。我已将 logcat 粘贴到其下方,将我带到 setContentVi
我最近为 LWJGL 程序创建了一个启动器,它下载 LWJGL JAR 和 native 、Slick JAR 以及该程序的主 JAR(所有这些都可以在全局变量中配置),并且我想分发它,以便其他人开发
我正在为 Android 开发主屏幕启动器应用程序。 现在,如果用户已经在主屏幕上, 当用户按下主页按钮时,我想要一个自定义操作。 我知道一些其他的启动器,可以覆盖主页按钮, 例如 Go Launch
我想使用我正在使用的普通应用程序作为启动器,因为它是唯一在设备上运行的应用程序。我必须向我的应用添加什么? 谢谢,雅尼克 最佳答案 使用这个 intent 过滤器:
假设有两个 Activity : 1. Activity A(启动器 Activity ) 2. Activity B 当从 Activity A启动 Activity B时,我完成了 Activit
我正在开发一个 Android 业务应用程序,它将托管在私有(private) channel 上。我们想使用自动更新应用程序,问题是: 这是一个 laucher(安装后设置为默认值) 有kiosk功
历史上一直存在“如何在没有主方法的情况下启动应用程序”问题,大多数问题的表述都是“你不能”。我注意到现在只需扩展 Application 即可启动 JavaFX 应用程序。我一直在使用类似于 Appl
“如何在没有 main 方法的情况下启动应用程序”问题的历史一直存在,大多数都是“你不能”这样的问题。我注意到现在如何通过扩展 Application 即可启动 JavaFX 应用程序。我一直在使用类
我想学习自定义 android 启动器,我不知道如何开始,你能给我一些建议,一些博客链接或其他示例等等。 最佳答案 最好的办法是先查看 Google 提供的示例启动器。您可以在 SDK 文件夹中找到它
我只是在制作一个演示应用程序,我需要为启动器 activity 和应用程序名称的标签设置不同的文本。 当我将启动器 Activity 标签名称设置为 Login 时,它会显示相同的应用程序名称。是否可
我正在编写 angular 2 应用程序并尝试使用 phantomJS 启动器在 Gitlab CI 上设置测试。在所有测试通过后,确定 phantomJS 启动器将永远保持事件状态(http://i
如果您要安装的主屏幕应用程序不允许您访问系统设置屏幕(转到管理应用程序),也不允许您启动应用程序(例如市场应用程序或第 3 方安装/unistallers),有没有办法卸载这样的应用程序? 我知道 A
我遇到了这个问题。我创建了一个新的 xml 布局(启动画面)并在 list 中将其设置为 Launcher 类别。我之前做过很多次,但以前从未发生过。 当 MainActivity 是 LAUNCHE
我想在我的 JupyterLab Launcher 中添加一些自定义内容。这是新用户看到的第一个页面,我想告诉他们这个环境的细节和内容的链接。有点像这样: Launcher's code很简单,我可以

我是一名优秀的程序员,十分优秀!