- ubuntu12.04环境下使用kvm ioctl接口实现最简单的虚拟机
- Ubuntu 通过无线网络安装Ubuntu Server启动系统后连接无线网络的方法
- 在Ubuntu上搭建网桥的方法
- ubuntu 虚拟机上网方式及相关配置详解
CFSDN坚持开源创造价值,我们致力于搭建一个资源共享平台,让每一个IT人在这里找到属于你的精彩世界.
这篇CFSDN的博客文章Python机器学习之决策树和随机森林由作者收集整理,如果你对这篇文章有兴趣,记得点赞哟.
决策树属于经典的十大数据挖掘算法之一,是通过类似于流程图的数形结构,其规则就是iif…then…的思想.,可以用于数值型因变量的预测或离散型因变量的分类,该算法简单直观,通俗易懂,不需要研究者掌握任何领域的知识或者复杂的数学逻辑,而且算法的输出结果具有很强的解释性,通常情况下决策术用作分类器会有很好的预测准确率,目前越来越多的行业,将此算法用于实际问题的解决.
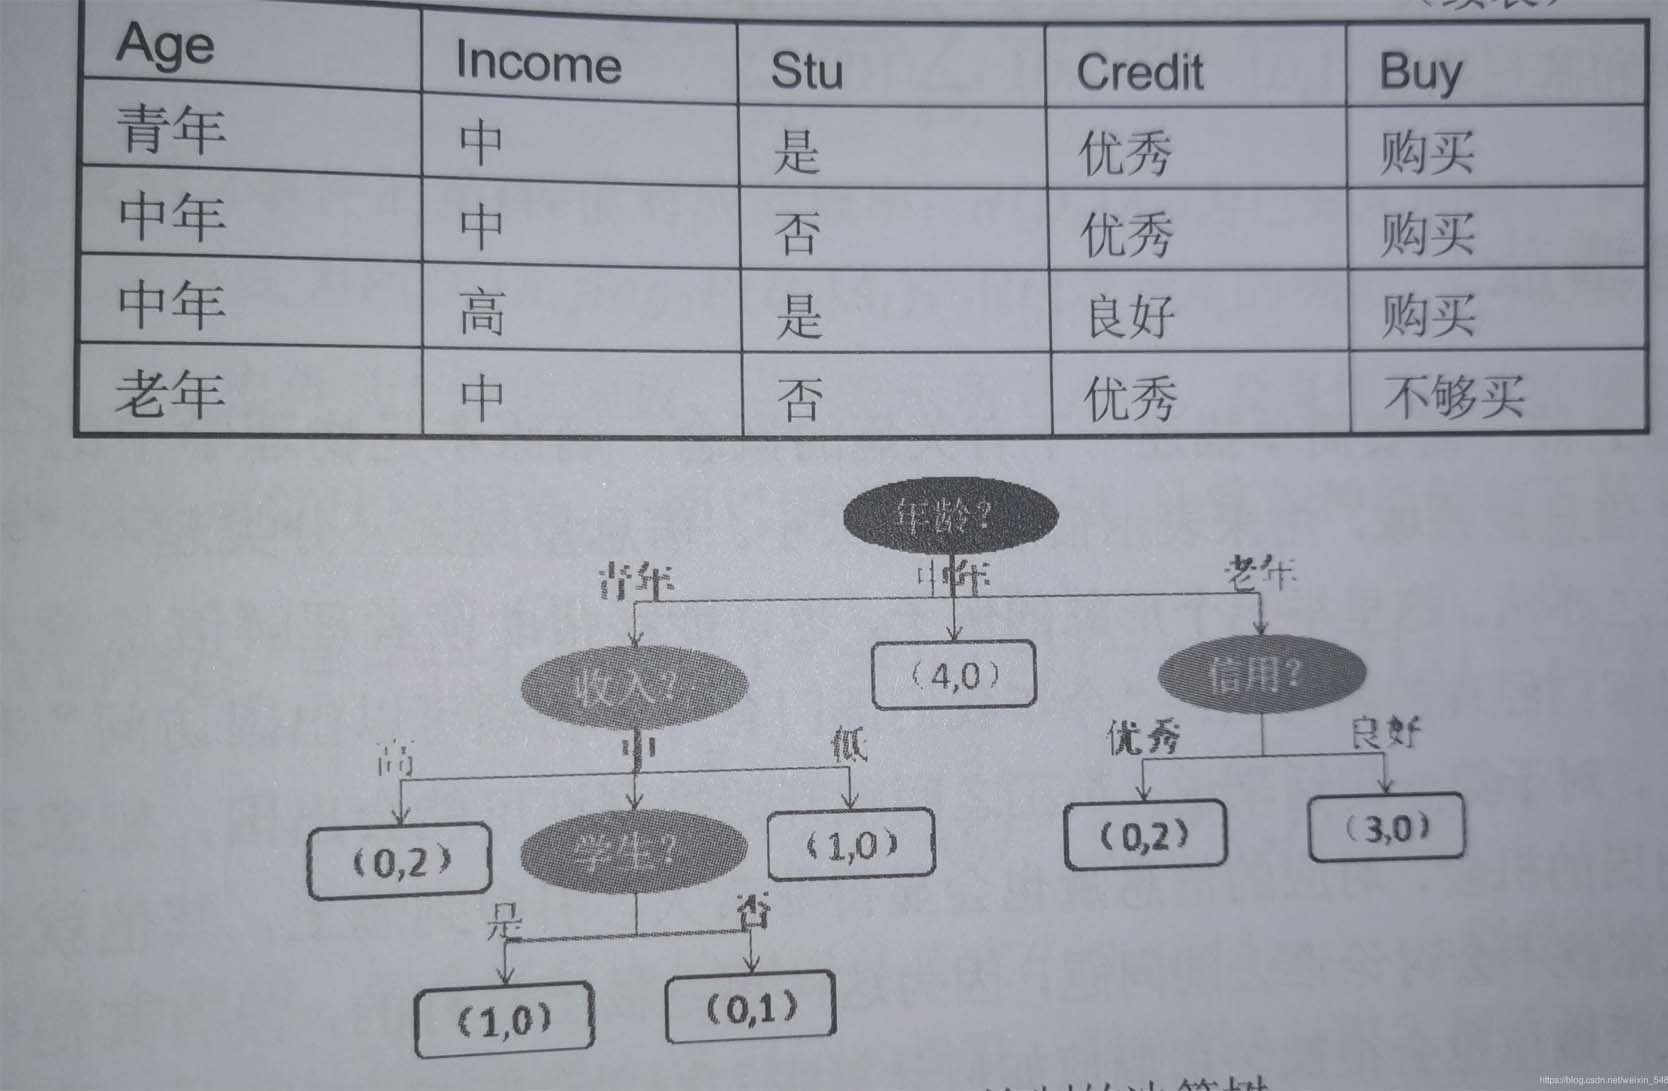
这就是一个典型的决策树,其呈现字顶向下生长的过程,通过树形结构可以将数据中的隐藏的规律,直观的表现出来,图中深色的椭圆表示树的根节点检测的为椭圆表示树的中间节点,方框表示数的叶子节点,对于所有非叶子节点来说都是用于条件判断,叶节点则表示最终储存的分类结果.
那么对于所有的非叶子节点的字段的选择,可以直接决定我们分类结果的好和坏,那么如何使这些非叶子节点分类使结果更好和效率更高,也就是我们所说的纯净度,对于纯净度的衡量,我们有三个衡量指标信息增益,信息增益率和基尼系数.
比起基尼系数,信息熵对不纯度更加敏感,对不纯度的惩罚最强。但是在实际使用中,信息熵和基尼系数的效果基本相同。信息熵的计算比基尼系数缓慢一些,因为基尼系数的计算不涉及对数。另外,因为信息熵对不纯度更加敏感,所以信息熵作为指标时,决策树的生长会更加“精细”,因此对于高维数据或者噪音很多的数据,信息熵很容易过拟合,基尼系数在这种情况下效果往往比较好.

他会循环次过程,直到没有更多的特征可用,或整体的不纯度指标已经最优,决策树就会停止生长。但是在建模的过程中可能会由于这种高精度的训练,使得模型在训练基础上有很高的预测精度,但是在测试集上效果并不够理想,为了解决过拟合的问题,通常会对于决策树进行剪枝操作。 对于决策树的剪枝操作有三种:误差降低剪枝法,悲观剪枝法,代价复杂度剪枝法,但是在这里我们只涉及sklearn中,给我们提供的限制决策树生长的参数.
|
1
2
3
4
5
6
7
8
9
10
11
12
13
14
15
16
17
18
19
20
21
22
23
|
decisiontreeclassifier(criterion
=
"gini"
# criterion用于指定选择节点字段的评价指标。对于分类决策树默认gini,表示采用基尼系数指标进行叶子节点的最佳选择。可有“entropy”,但是容易过拟合,用于拟合不足
# 对于回归决策数,默认“mse”,表示均方误差选择节点的最佳分割手段。
,random_state
=
none
# 用于指定随机数生成器的种子,默认none表示使用默认的随机数生成器。
,splitter
=
"best"
# 用于指定节点中的分割点的选择方法,默认best表示从所有的分割点中选出最佳分割点,
# 也可以是random,表示随机选择分割点
#以下参数均为防止过拟合
,max_depth
=
none
# 用于指定决策树的最大深度,默认none,表示树的生长过程中对于深度不做任何限制。
,min_samples_leaf
=
1
# 用于指定叶节点的最小样本量默认为1。
,min_samples_split
=
2
# 用于指定根节点或中间节点能够继续分割的最小样本量默认为2。
,max_features
=
none
# 用于指定决策树包含的最多分隔字段数,默认none表示分割时使用所有的字段。如果为具体的整数,则考虑使用对应的分割手段数,如果为0~1的浮点数,则考虑对于对应百分比的字段个数。
,min_impurity_decrease
=
0
# 用于指定节点是否继续分割的最小不纯度值,默认为0
,class_weight
=
none
# 用于指定因变量中类别之间的权重。默认none表示每个类别的权重都相同。
)
|
|
1
2
3
4
5
6
7
8
9
10
11
12
13
14
15
16
17
18
19
20
21
22
23
24
25
26
27
28
29
30
31
32
33
34
35
36
37
38
39
40
41
42
43
44
45
46
47
|
import
pandas as pd
from
sklearn
import
tree
from
sklearn.model_selection
import
train_test_split
from
sklearn.model_selection
import
cross_val_score
from
sklearn.datasets
import
load_wine
import
graphviz
# 实例化数据集,为字典格式
wine
=
load_wine()
datatarget
=
pd.concat([pd.dataframe(wine.data),pd.dataframe(wine.target)],axis
=
1
)
# 通过数据集的数据和标签进行训练和测试集的分类。
xtrain,xtest,ytrain,ytest
=
train_test_split(wine.data
# 数据集的数据。
,wine.target
# 数据集标签。
,test_size
=
0.3
#表示训练集为70%测试集为30%。
)
# 创建一个树的模型。
clf
=
tree.decisiontreeclassifier(criterion
=
"gini"
)
# 这里只使用了基尼系数作为参数,其他没有暂时使用
# 将训练集数据放在模型中进行训练,clf就是我们训练好的模型,可以用来进行测试剂的决策。
clf
=
clf.fit(xtrain,ytrain)
# 那么对于我们训练好的模型来说,怎么样才能够说明他是一个比较好的模型,那么我们就要引入模型中的一个函数score进行模型打分
clf.score(xtest,ytest)
#测试集打分
# 也可以使用交叉验证的方式,对于数据进行评估更具有稳定性。
cross_val_score(clf
# 填入想要打分的模型。
,wine.data
# 打分的数据集
,wine.target
# 用于打分的标签。
,cv
=
10
# 交叉验证的次数
#,scoring="neg_mean_squared_error"
#只有在回归中有该参数,表示以负均方误差输出分数
).mean()
# 将决策树以树的形式展现出来
dot
=
tree.export_graphviz(clf
#,feature_names #特征名
#,class_names #结果名
,filled
=
true
#颜色自动填充
,rounded
=
true)
#弧线边界
graph
=
graphviz.source(dot)
# 模型特征重要性指标
clf.feature_importances_
#[*zip(wine.feature_name,clf.feature_importances_)]特征名和重要性结合
#apply返回每个测试样本所在的叶子节点的索引
clf.
apply
(xtest)
#predict返回每个测试样本的分类/回归结果
clf.predict(xtest)
|
决策树不同max_depth的学习曲线 。
|
1
2
3
4
5
6
7
8
9
10
11
12
13
14
15
16
17
18
19
20
21
22
23
24
25
26
27
28
29
30
31
32
|
from
sklearn
import
tree
from
sklearn.model_selection
import
train_test_split
from
sklearn.model_selection
import
cross_val_score
from
sklearn.datasets
import
load_wine
import
matplotlib.pyplot as plt、
wine
=
load_wine()
xtrain,xtest,ytrain,ytest
=
train_test_split(wine.data,wine.target,test_size
=
0.3
)
trainscore
=
[]
testscore
=
[]
for
i
in
range
(
10
):
clf
=
tree.decisiontreeclassifier(criterion
=
"gini"
,random_state
=
0
,max_depth
=
i
+
1
,min_samples_split
=
5
,max_features
=
5
).fit(xtrain,ytrain)
# 下面这这两句代码本质上结果是一样的。第2种比较稳定,但是费时间
once1
=
clf.score(xtrain,ytrain)
once2
=
cross_val_score(clf,wine.data,wine.target,cv
=
10
).mean()
#也可用clf.score(xtest,ytest)
trainscore.append(once1)
testscore.append(once2)
#画图像
plt.plot(
range
(
1
,
11
),trainscore,color
=
"red"
,label
=
"train"
)
plt.plot(
range
(
1
,
11
),testscore,color
=
"blue"
,label
=
"test"
)
#显示范围
plt.xticks(
range
(
1
,
11
))
plt.legend()
plt.show()
|
result
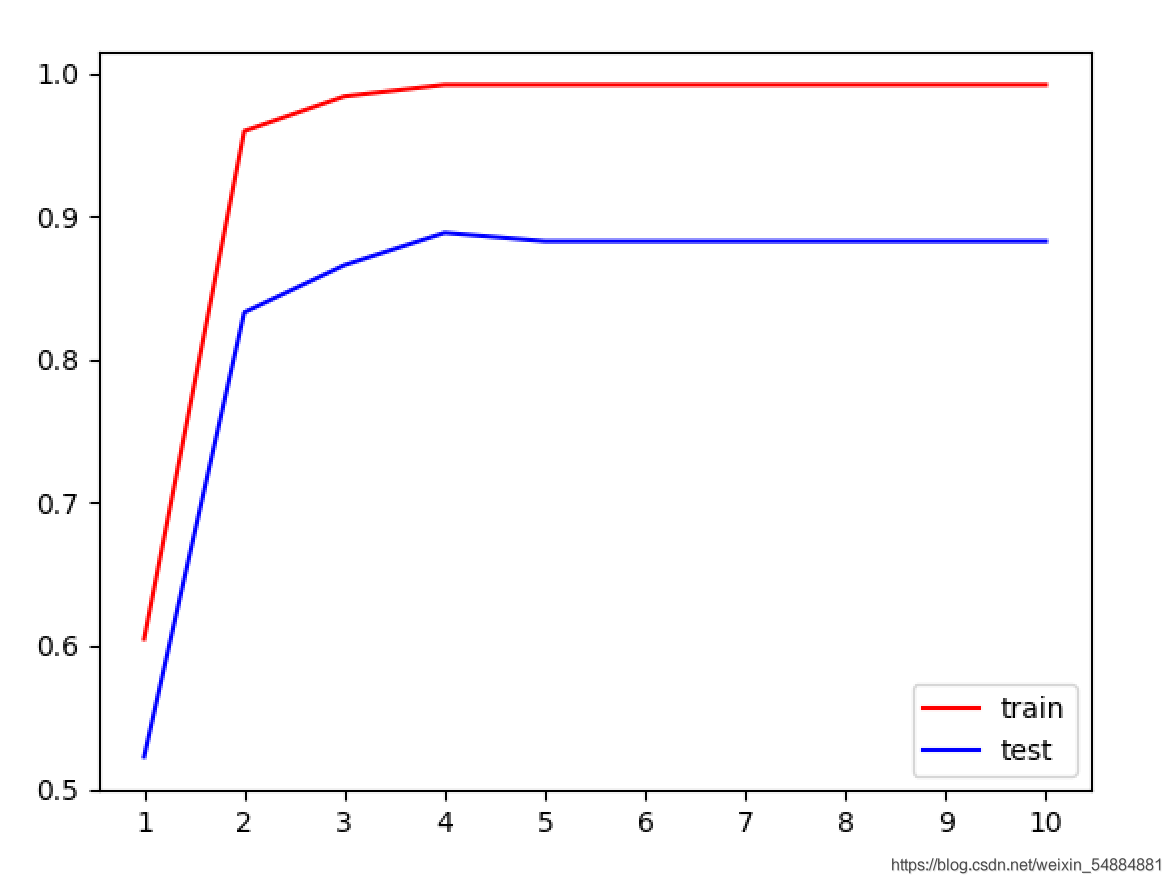
一般情况下,随着max_depth的升高训练集和测试集得分就相对越高,但是由于红酒数据集的数据量比较少,并没有特别明显的体现出来。但是我们依旧可以看出:在最大深度为4的时候到达了测试级的效果巅峰.
我们发现对于这个模型的参数比较多,如果我们想要得到一个相对来说分数比较高的效果比较好的模型的话,我们需要对于每一个参数都要进行不断的循环遍历,最后才能够得出最佳答案。但是这对于我们人为的实现来说比较困难,所以我们有了这样一个工具:网格搜索可以自动实现最佳效果的各种参数的确定。(但是比较费时间) 。
|
1
2
3
4
5
6
7
8
9
10
11
12
13
14
15
16
17
18
19
20
21
22
23
24
25
26
27
|
from
sklearn.tree
import
decisiontreeclassifier
from
sklearn.model_selection
import
train_test_split
from
sklearn.datasets
import
load_wine
from
sklearn.model_selection
import
gridsearchcv
# 网格搜索的导入
wine
=
load_wine()
xtrain, xtest, ytrain, ytest
=
train_test_split(wine.data, wine.target, test_size
=
0.3
)
clf
=
decisiontreeclassifier(random_state
=
0
)
# 确定random_state,就会在以后多次运行的情况下结果相同
# parameters为网格搜索的主要参数,它是以字典的形式存在。键为指定模型的参数名称,值为参数列表
parameters
=
{
"criterion"
: [
"gini"
,
"entropy"
]
,
"splitter"
: [
"best"
,
"random"
]
,
"max_depth"
: [
*
range
(
1
,
10
)]
# ,"min_samples_leaf":[*range(5,10)]
}
# 使用网络搜索便利查询,返回建立好的模型,网格搜索包括交叉验证cv为交叉次数
gs
=
gridsearchcv(clf, cv
=
10
, param_grid
=
parameters)
# 进行数据训练
gs
=
gs.fit(xtrain, ytrain)
# best_params_接口可以查看最佳组合
# 最佳组合,(不一定最好,可能有些参数不涉及结果更好)
best_choice
=
gs.best_params_
print
(best_choice)
# best_score_接口可以查看最佳组合的得分
best_score
=
gs.best_score_
print
(best_score)
|
回归树中不同max_depth拟合正弦函数数据 。
|
1
2
3
4
5
6
7
8
9
10
11
12
13
14
15
16
17
18
19
20
21
22
23
24
25
26
27
28
29
30
31
32
33
34
35
36
37
38
|
import
numpy as np
from
sklearn.tree
import
decisiontreeregressor
import
matplotlib.pyplot as plt
#随机数生成器的实例化
rng
=
np.random.randomstate(
0
)
# rng.rand(80, 1)在0到1之间生成80个数,axis=0,纵向排序作为自变量
x
=
np.sort(
5
*
rng.rand(
80
,
1
), axis
=
0
)
# 因变量的生成
y
=
np.sin(x).ravel()
# 添加噪声
y[::
5
]
+
=
3
*
(
0.5
-
rng.rand(
16
))
#建立不同树模型,回归树除了criterion其余和分类树参数相同
regr_1
=
decisiontreeregressor(max_depth
=
2
)
regr_2
=
decisiontreeregressor(max_depth
=
5
)
# 训练数据
regr_1.fit(x, y)
regr_2.fit(x, y)
# 生成测试数据
x_test
=
np.arange(
0.0
,
5.0
,
0.01
)[:, np.newaxis]
# 预测x_test数据在不同数上的表现
y_1
=
regr_1.predict(x_test)
y_2
=
regr_2.predict(x_test)
#画图
plt.figure()
plt.scatter(x, y, s
=
20
, edgecolor
=
"black"
,
c
=
"red"
, label
=
"data"
)
plt.plot(x_test, y_1, color
=
"blue"
,
label
=
"max_depth=2"
, linewidth
=
2
)
plt.plot(x_test, y_2, color
=
"green"
, label
=
"max_depth=5"
, linewidth
=
2
)
plt.xlabel(
"data"
)
plt.ylabel(
"target"
)
plt.title(
"decision tree regression"
)
plt.legend()
plt.show()
|
结果:
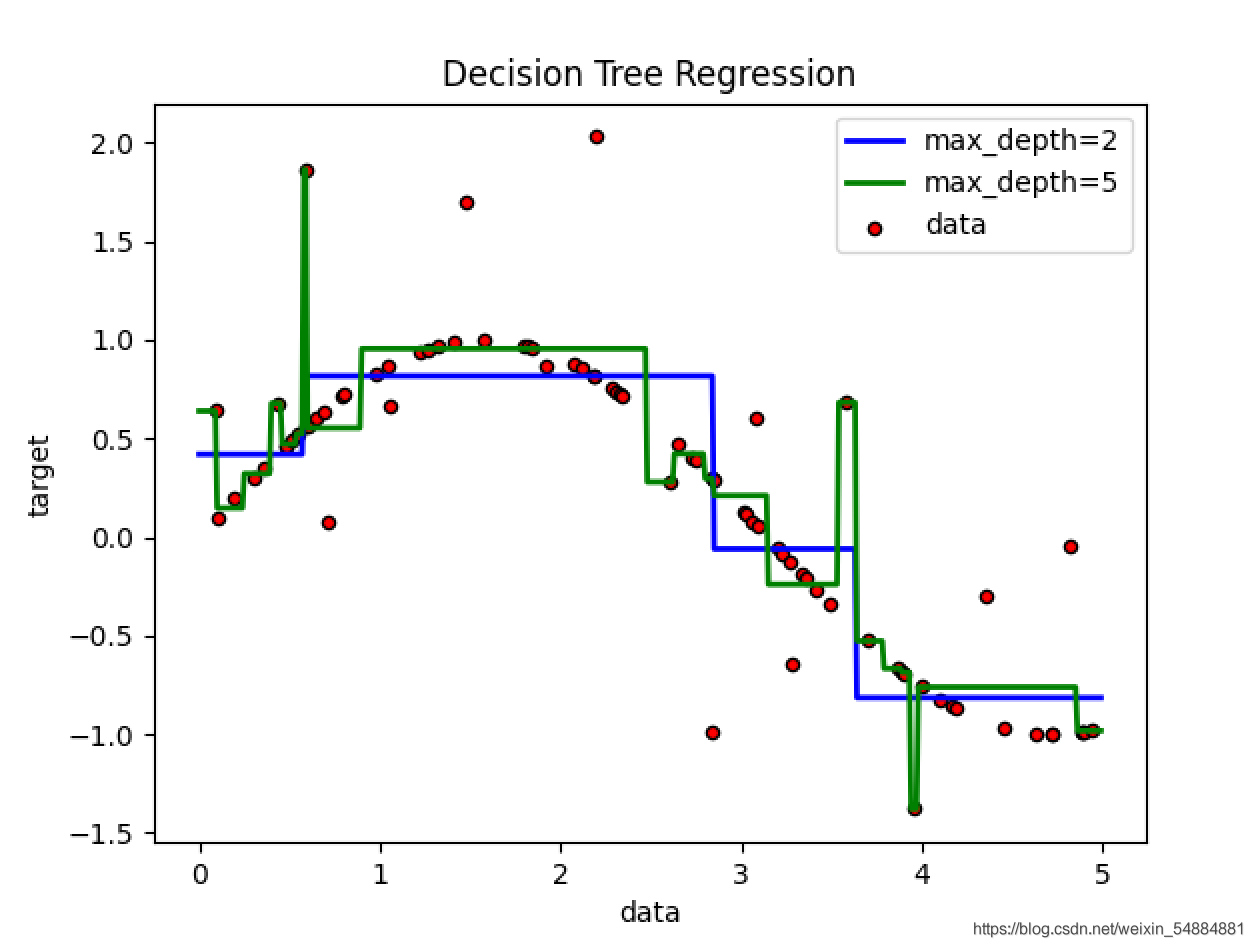
从图像可以看出对于不同深度的节点来说,有优点和缺点。对于max_depth=5的时候,一般情况下很贴近原数据结果,但是对于一些特殊的噪声来说,也会非常贴近噪声,所以在个别的点的地方会和真实数据相差比较大,也就是过拟合现象(对于训练数据集能够很好地判断出出,但是对于测试数据集来说结果并不理想)。对于max_depth=2的时候,虽然不能够特别贴近大量的数据集,但是在处理一些噪声的时候,往往能够很好的避免.
|
1
2
3
4
5
6
7
8
9
10
11
12
13
14
15
16
17
18
19
20
21
22
23
24
25
26
27
28
29
30
31
32
33
34
35
36
37
38
39
40
41
42
43
44
45
46
47
48
49
50
51
52
53
54
55
56
57
58
59
60
61
62
63
64
65
66
67
68
69
70
71
72
73
74
75
76
77
78
79
80
81
82
83
84
85
86
87
88
89
90
91
92
93
94
95
96
97
98
99
100
101
102
103
104
105
106
107
108
109
110
111
112
113
114
115
|
import
numpy as np
import
matplotlib.pyplot as plt
from
matplotlib.colors
import
listedcolormap
from
sklearn.model_selection
import
train_test_split
from
sklearn.preprocessing
import
standardscaler
from
sklearn.datasets
import
make_moons, make_circles, make_classification
from
sklearn.tree
import
decisiontreeclassifier
######生成三种数据集######
# 二分类数据集
x, y
=
make_classification(n_samples
=
100
,
#生成100个样本
n_features
=
2
,
#有两个特征
n_redundant
=
0
,
#添加冗余特征0个
n_informative
=
2
,
#包含信息的特征是2个
random_state
=
1
,
#随机模式1
n_clusters_per_class
=
1
#每个簇内包含的标签类别有1个
)
rng
=
np.random.randomstate(
2
)
#生成一种随机模式
x
+
=
2
*
rng.uniform(size
=
x.shape)
#加减0~1之间的随机数
linearly_separable
=
(x, y)
#生成了新的x,依然可以画散点图来观察一下特征的分布
#plt.scatter(x[:,0],x[:,1])
#用make_moons创建月亮型数据,make_circles创建环形数据,并将三组数据打包起来放在列表datasets中
moons
=
make_moons(noise
=
0.3
, random_state
=
0
)
circles
=
make_circles(noise
=
0.2
, factor
=
0.5
, random_state
=
1
)
datasets
=
[moons,circles,linearly_separable]
figure
=
plt.figure(figsize
=
(
6
,
9
))
i
=
1
#设置用来安排图像显示位置的全局变量i i = 1
#开始迭代数据,对datasets中的数据进行for循环
for
ds_index, ds
in
enumerate
(datasets):
x, y
=
ds
# 对数据进行标准化处理
x
=
standardscaler().fit_transform(x)
#划分数据集
x_train, x_test, y_train, y_test
=
train_test_split(x, y, test_size
=
0.4
,
random_state
=
42
)
#定数据范围,以便后续进行画图背景的确定
#注意x[:,0]指横坐标,x[:,1]指纵坐标
x1_min, x1_max
=
x[:,
0
].
min
()
-
.
5
, x[:,
0
].
max
()
+
.
5
x2_min, x2_max
=
x[:,
1
].
min
()
-
.
5
, x[:,
1
].
max
()
+
.
5
#使画板上每个点组成坐标的形式(没间隔0.2取一个),array1表示横坐标,array2表示纵坐标
array1,array2
=
np.meshgrid(np.arange(x1_min, x1_max,
0.2
), np.arange(x2_min, x2_max,
0.2
))
# 颜色列表
cm_bright
=
listedcolormap([
'#ff0000'
,
'#0000ff'
])
########## 原始数据的现实 #########
# 用画板上六个图片位置(3,2)的第i个
ax
=
plt.subplot(
len
(datasets),
2
, i)
# 便签添加
if
ds_index
=
=
0
:
ax.set_title(
"input data"
)
#画出训练数据集散点图
ax.scatter(x_train[:,
0
],
#横坐标
x_train[:,
1
],
#纵坐标
c
=
y_train,
#意思是根据y_train标签从cm_bright颜色列表中取出对应的颜色,也就是说相同的标签有相同的颜色。
cmap
=
cm_bright,
#颜色列表
edgecolors
=
'k'
#生成散点图,每一个点边缘的颜色
)
#画出测试数据集的散点图,其中比训练集多出alpha = 0.4参数,以分辨训练测试集
ax.scatter(x_test[:,
0
], x_test[:,
1
], c
=
y_test,cmap
=
cm_bright, alpha
=
0.4
, edgecolors
=
'k'
)
#显示的坐标范围
ax.set_xlim(array1.
min
(), array1.
max
())
ax.set_ylim(array2.
min
(), array2.
max
())
#不显示坐标值
ax.set_xticks(())
ax.set_yticks(())
#i+1显示在下一个子图版上画图
i
+
=
1
####### 经过决策的数据显示 #######
ax
=
plt.subplot(
len
(datasets),
2
, i)
#实例化训练模型
clf
=
decisiontreeclassifier(max_depth
=
5
).fit(x_train, y_train)
score
=
clf.score(x_test, y_test)
# np.c_是能够将两个数组组合起来的函数
# ravel()能够将一个多维数组转换成一维数组
#通过对画板上每一个点的预测值确定分类结果范围,并以此为依据通,通过不同的颜色展现出来范围
z
=
clf.predict(np.c_[array1.ravel(), array2.ravel()])
z
=
z.reshape(array1.shape)
cm
=
plt.cm.rdbu
# 自动选取颜色的实例化模型。
ax.contourf(array1
#画板横坐标。
, array2
#画板纵坐标
, z
# 画板每个点对应的预测值m,并据此来确定底底板的颜色。
, cmap
=
cm
#颜颜色选取的模型,由于z的值只有两个,也可以写出一个颜色列表,指定相应颜色,不让其自动生成
, alpha
=
0.8
)
#和原始数据集一样,画出每个训练集和测试集的散点图
ax.scatter(x_train[:,
0
], x_train[:,
1
], c
=
y_train, cmap
=
cm_bright, edgecolors
=
'k'
)
ax.scatter(x_test[:,
0
], x_test[:,
1
], c
=
y_test, cmap
=
cm_bright, edgecolors
=
'k'
, alpha
=
0.4
)
ax.set_xlim(array1.
min
(), array1.
max
())
ax.set_ylim(array2.
min
(), array2.
max
())
ax.set_xticks(())
ax.set_yticks(())
if
ds_index
=
=
0
:
ax.set_title(
"decision tree"
)
#在右下角添加模型的分数
ax.text(array1.
max
()
-
.
3
, array2.
min
()
+
.
3
, (
'{:.1f}%'
.
format
(score
*
100
)),
size
=
15
, horizontalalignment
=
'right'
)
i
+
=
1
#自动调整子画板与子画板之间的的距离
plt.tight_layout()
plt.show()
|
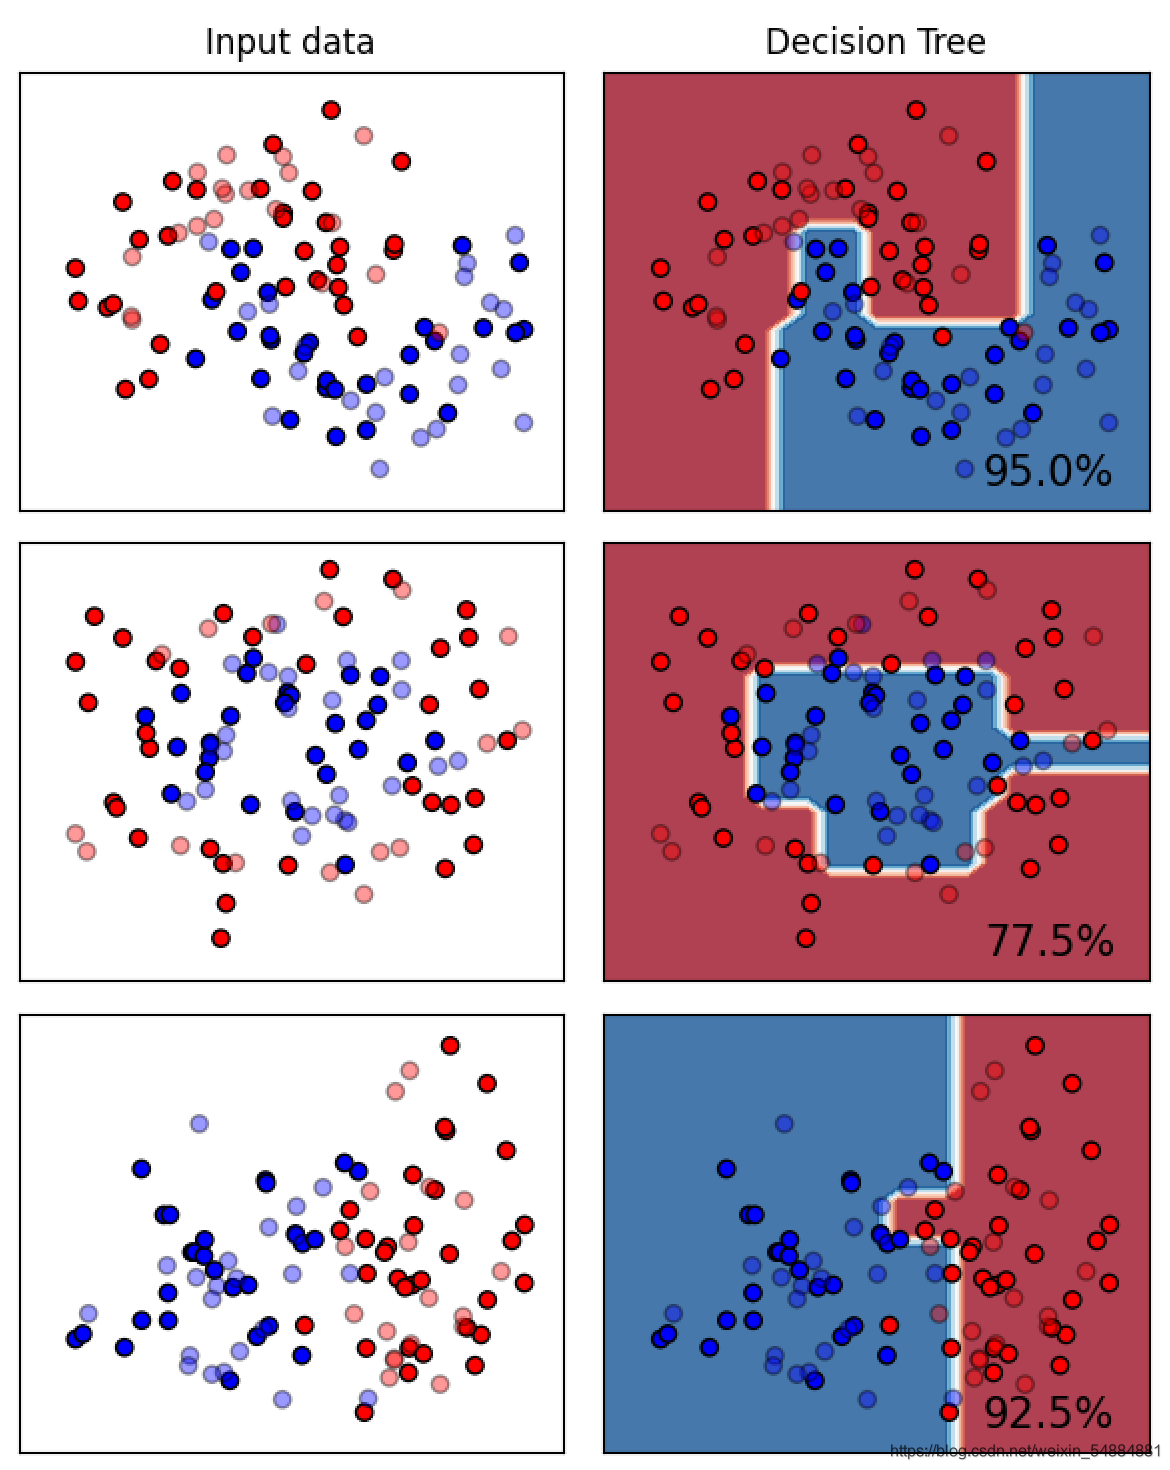
从这里可以看出决策树,对于月亮型数据和二分类数据有比较好的分类效果,但是对于环形的数据的分类效果就不是那么理想.
随机森林属于集成算法,森林从字面理解就是由多颗决策树构成的集合,而且这些子树都是经过充分生长的cart树,随机则表示构成多颗随机树是随机生成的,生成过程采用的是bossstrap抽样法,该算法有两大优点,一是运行速度快,二是预测准确率高,被称为最好用的算法之一.
该算法的核心思想就是采用多棵决策树的投票机制,完成分类或预测问题的解决。对于分类的问题,将多个数的判断结果用做投票,根据根据少数服从多数的原则,最终确定样本所属的类型,对于预测性的问题,将多棵树的回归结果进行平均,最终确定样本的预测.
将随机森林的建模过程,形象地描绘出来就是这样:
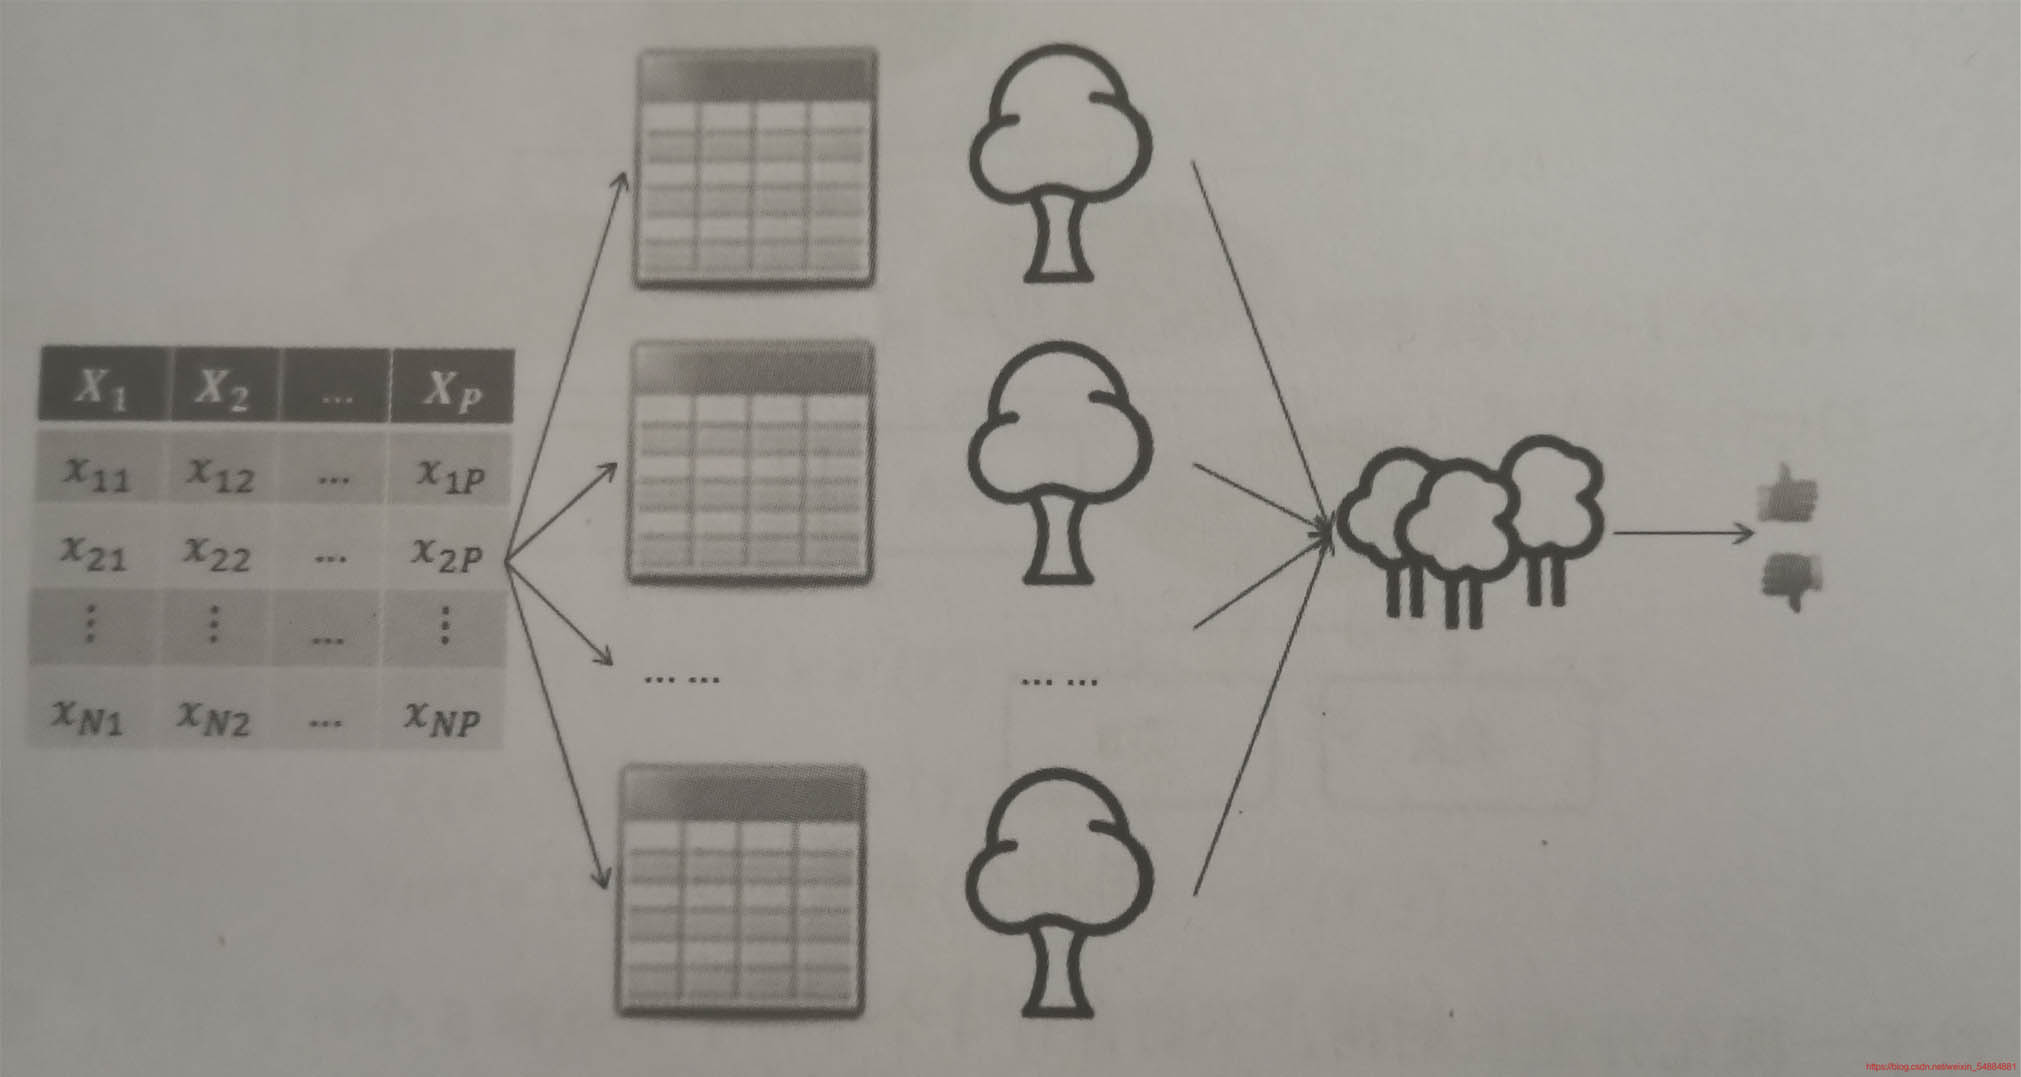
流程:
用分类的随机森林举例 。
|
1
2
3
4
5
6
7
8
9
10
11
12
13
14
|
randomforestclassifier(n_estimators
=
10
# 用于对于指定随机森林所包含的决策树个数
,criterion
=
"gini"
# 用于每棵树分类节点的分割字段的度量指标。和决策树含义相同。
,max_depth
=
none
# 用于每颗决策树的最大深度,默认不限制其生长深度。
,min_samples_split
=
2
# 用于指定每颗决策数根节点或者中间节点能够继续分割的最小样本量,默认2。
,min_samples_leaf
=
1
# 用于指定每个决策树叶子节点的最小样本量,默认为1
,max_features
=
"auto"
# 用于指定每个决策树包含的最多分割字段数(特征数)默认none。表示分割时涉及使用所有特征
,bootstrap
=
true
# #是否开启带外模式(有放回取值,生成带外数据)若不开启,需要自己划分train和test数据集,默认true
,oob_score
=
false
# #是否用带外数据检测 即是是否使用带外样本计算泛化,误差默认为false,袋外样本是指每一个bootstrap抽样时没有被抽中的样本
,random_state
=
none
# 用于指定随机数生成器的种子,默认none,表示默认随机生成器
,calss_weight
# 用于因变量中类别的权重,默认每个类别权重相同
)
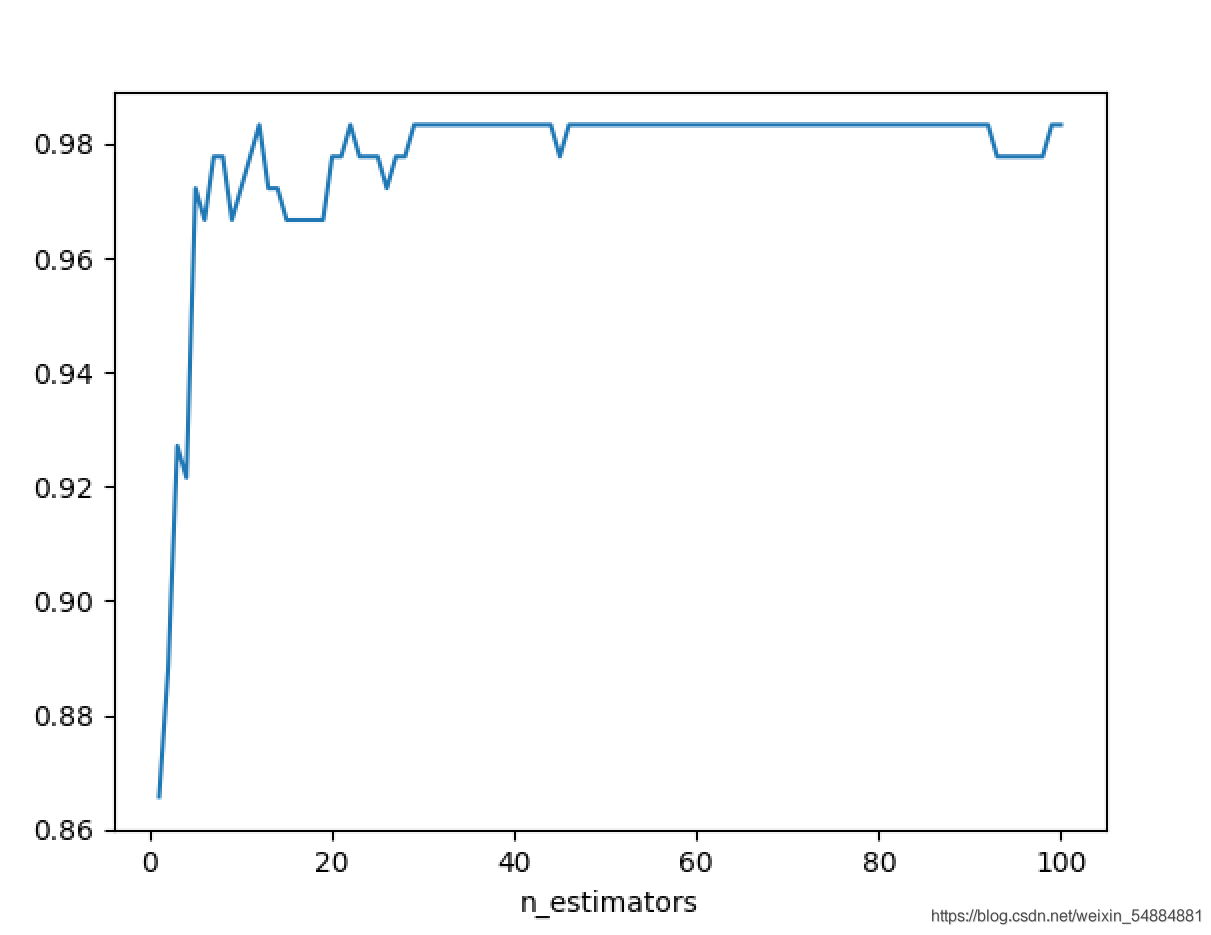
注:一般n_estimators越大,模型的效果往往越好。但是相应的,任何模型都有决策边界
n_estimators达到一定的程度之后,随机森林的精确性往往不在上升或开始波动
并且n_estimators越大,需要的计算量和内存也越大,训练的时间也会越来越长
|
随机森林应用示例 。
|
1
2
3
4
5
6
7
8
9
10
11
12
13
14
|
from
sklearn.datasets
import
load_wine
from
sklearn.ensemble
import
randomforestclassifier
wine
=
load_wine()
xtrain,xtest,ytrain,ytest
=
train_test_split(wine.data ,wine.target,test_size
=
0.3
)
rfc
=
randomforestclassifier(random_state
=
0
,n_estimators
=
10
#生成树的数量
,bootstrap
=
true
,oob_score
=
true
#开启袋外数据检测
).fit(xtrain,ytrain)
rfc.score(xtest,ytest)
rfc.oob_score_
#带外数据作为检测数据集
rfc.predict_proba(wine.data)
#输出所有数据在target上的概率
rfc.estimators_
#所有树情况
rfc.estimators_[
1
].random_state
#某个树random——state值
|
参数n_estimators对随机森林的影响 。
|
1
2
3
4
5
6
7
8
9
10
11
12
13
14
15
16
17
18
19
|
from
sklearn.model_selection
import
cross_val_score
import
matplotlib.pyplot as plt
from
sklearn.datasets
import
load_wine
from
sklearn.ensemble
import
randomforestclassifier
wine
=
load_wine()
score
=
[]
for
i
in
range
(
100
):
rfc
=
randomforestclassifier(random_state
=
0
,n_estimators
=
i
+
1
,bootstrap
=
true
,oob_score
=
false
)
once
=
cross_val_score(rfc,wine.data,wine.target,cv
=
10
).mean()
score.append(once)
plt.plot(
range
(
1
,
101
),score)
plt.xlabel(
"n_estimators"
)
plt.show()
print
(
"best srore = "
,
max
(score),
"\nbest n_estimators = "
,score.index(
max
(score))
+
1
)
|
输出: best srore = 0.9833333333333334 best n_estimators = 12 。
|
1
2
3
4
5
6
7
8
9
10
11
12
13
14
15
16
17
18
19
|
from
sklearn.tree
import
decisiontreeclassifier
from
sklearn.model_selection
import
cross_val_score
import
matplotlib.pyplot as plt
from
sklearn.datasets
import
load_wine
from
sklearn.ensemble
import
randomforestclassifier
wine
=
load_wine()
score1
=
[]
score2
=
[]
for
i
in
range
(
10
):
rfc
=
randomforestclassifier(n_estimators
=
12
)
once1
=
cross_val_score(rfc,wine.data,wine.target,cv
=
10
).mean()
score1.append(once1)
clf
=
decisiontreeclassifier()
once2
=
cross_val_score(clf,wine.data,wine.target,cv
=
10
).mean()
score2.append(once2)
plt.plot(
range
(
1
,
11
),score1,label
=
"forest"
)
plt.plot(
range
(
1
,
11
),score2,label
=
"singe tree"
)
plt.legend()
plt.show()
|
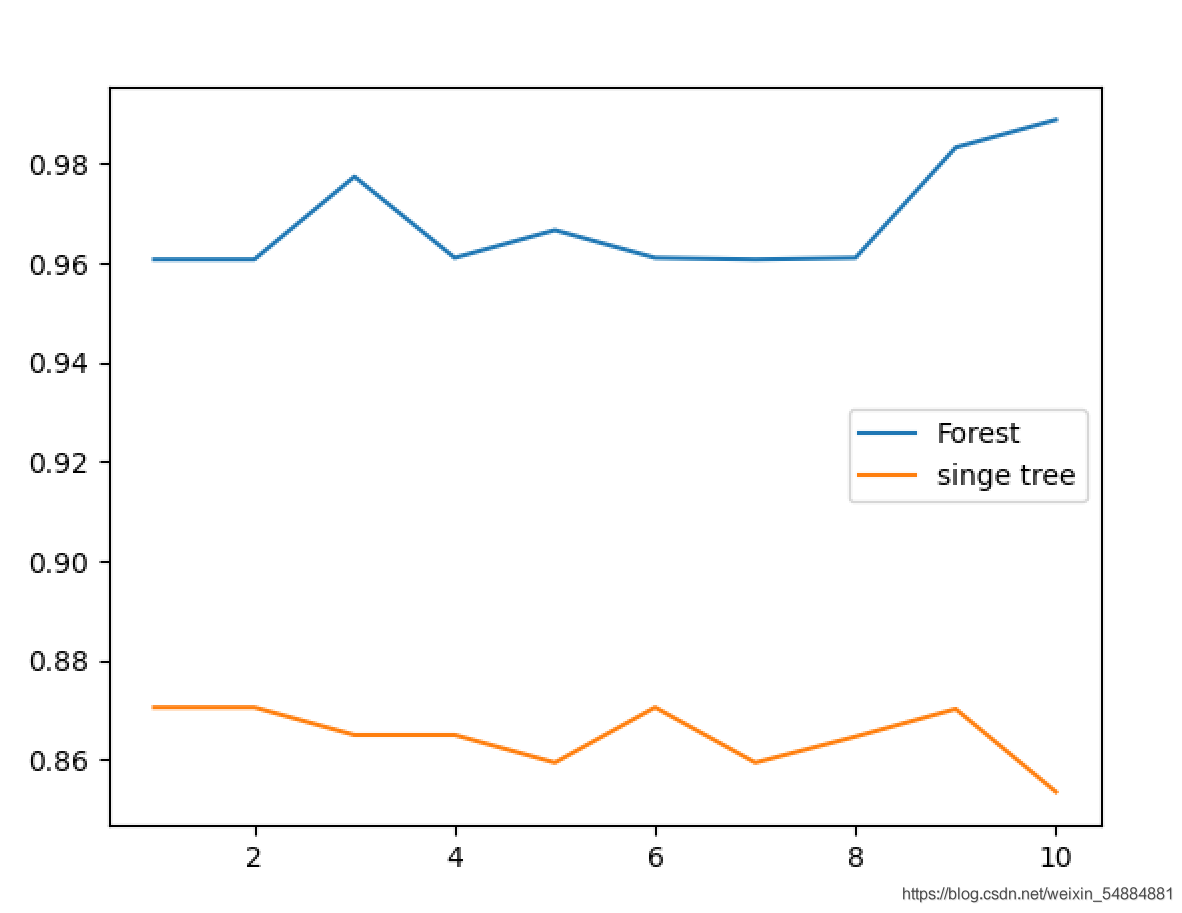
从图像中可以直观的看出:多个决策树组成的随机森林集成算法的模型效果要明显优于单个决策树的效果.
n_estimators 。
|
1
2
3
4
5
6
7
8
9
10
11
12
13
14
|
from
sklearn.datasets
import
load_breast_cancer
from
sklearn.ensemble
import
randomforestclassifier
from
sklearn.model_selection
import
cross_val_score
import
matplotlib.pyplot as plt
cancer
=
load_breast_cancer()
scores
=
[]
for
i
in
range
(
1
,
201
,
10
):
rfc
=
randomforestclassifier(n_estimators
=
i, random_state
=
0
).fit(cancer.data,cancer.target)
score
=
cross_val_score(rfc,cancer.data,cancer.target,cv
=
10
).mean()
scores.append(score)
print
(
max
(scores),(scores.index(
max
(scores))
*
10
)
+
1
)
plt.figure(figsize
=
[
20
,
5
])
plt.plot(
range
(
1
,
201
,
10
),scores)
plt.show()
|
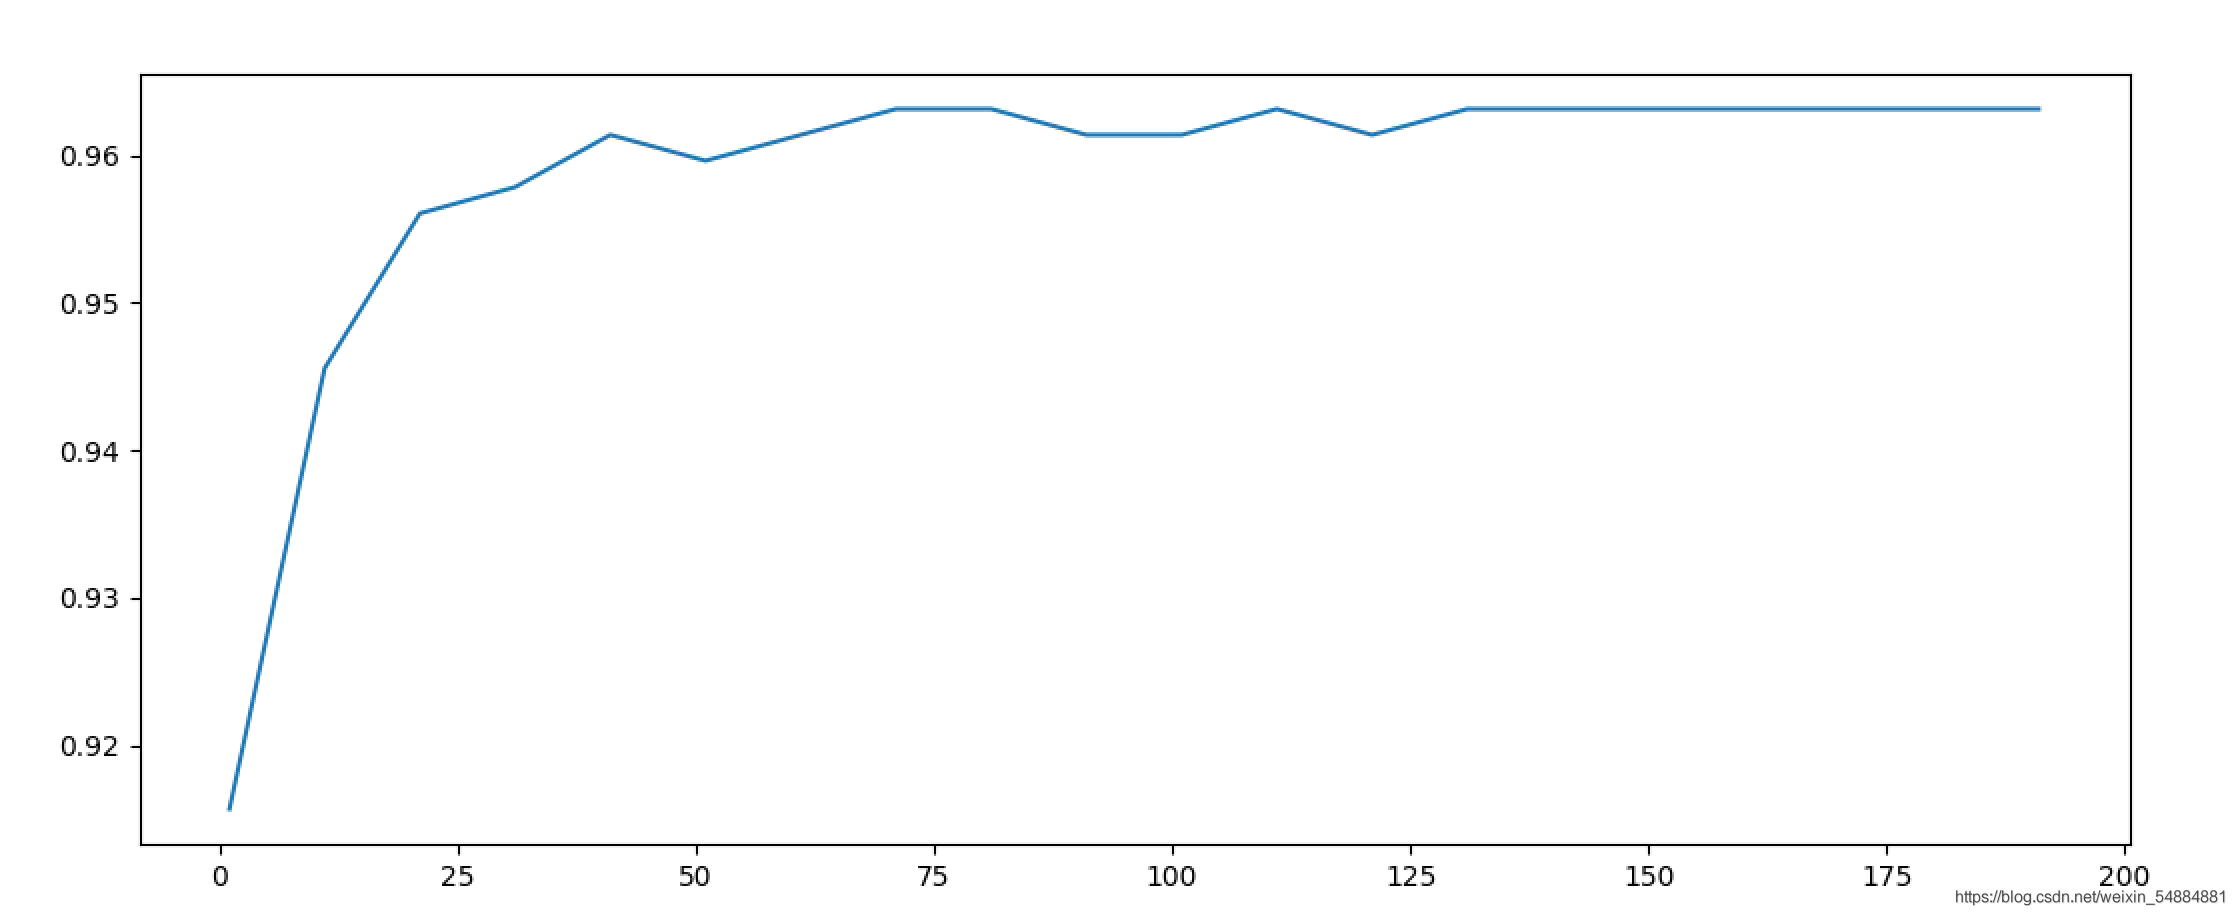
0.9649122807017545 111 。
max_depth 。
|
1
2
3
4
5
6
7
8
9
10
11
12
13
14
|
from
sklearn.datasets
import
load_breast_cancer
from
sklearn.ensemble
import
randomforestclassifier
from
sklearn.model_selection
import
cross_val_score
import
matplotlib.pyplot as plt
cancer
=
load_breast_cancer()
scores
=
[]
for
i
in
range
(
1
,
20
,
2
):
rfc
=
randomforestclassifier(n_estimators
=
111
,max_depth
=
i, random_state
=
0
)
score
=
cross_val_score(rfc,cancer.data,cancer.target,cv
=
10
).mean()
scores.append(score)
print
(
max
(scores),(scores.index(
max
(scores))
*
2
)
+
1
)
plt.figure(figsize
=
[
20
,
5
])
plt.plot(
range
(
1
,
20
,
2
),scores)
plt.show()
|
0.9649122807017545 11 。
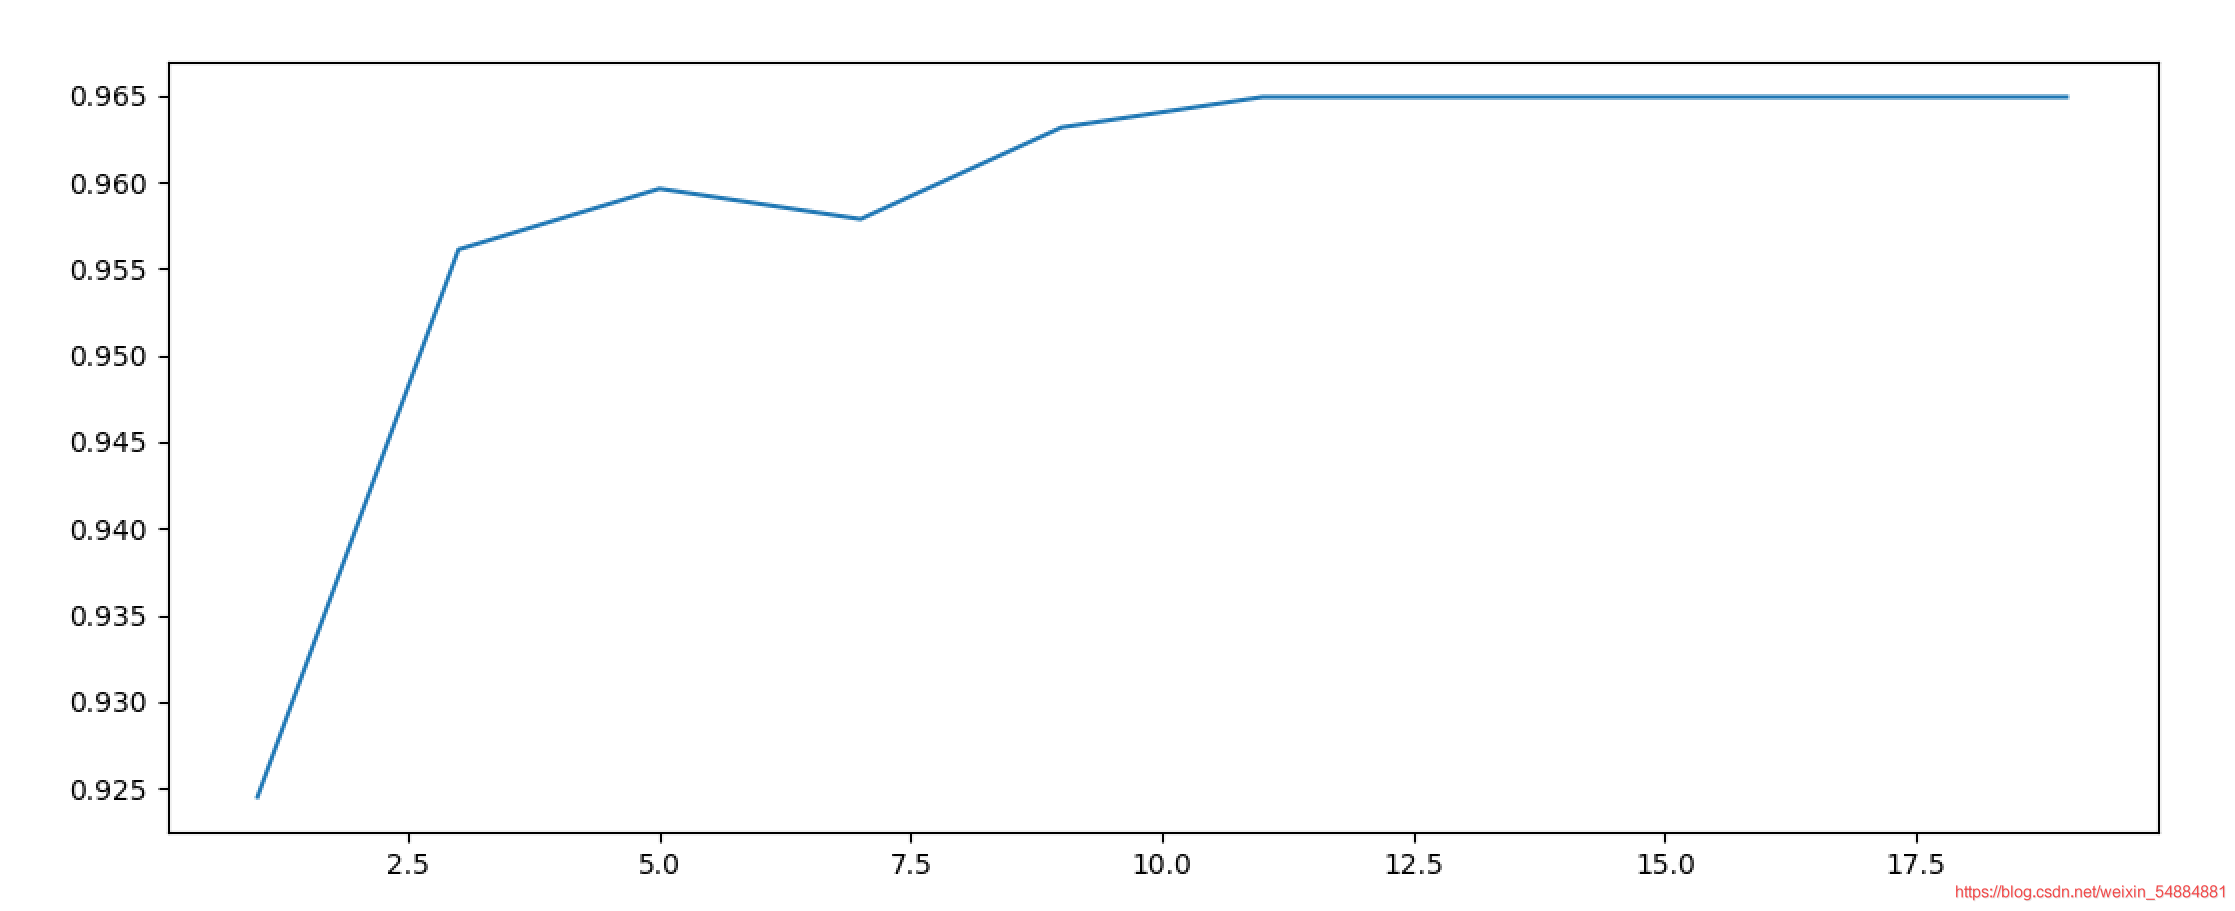
gini改为entropy 。
|
1
2
3
4
5
6
7
8
9
10
11
12
13
14
|
from
sklearn.datasets
import
load_breast_cancer
from
sklearn.ensemble
import
randomforestclassifier
from
sklearn.model_selection
import
cross_val_score
import
matplotlib.pyplot as plt
cancer
=
load_breast_cancer()
scores
=
[]
for
i
in
range
(
1
,
20
,
2
):
rfc
=
randomforestclassifier(n_estimators
=
111
,criterion
=
"entropy"
,max_depth
=
i, random_state
=
0
)
score
=
cross_val_score(rfc,cancer.data,cancer.target,cv
=
10
).mean()
scores.append(score)
print
(
max
(scores),(scores.index(
max
(scores))
*
2
)
+
1
)
plt.figure(figsize
=
[
20
,
5
])
plt.plot(
range
(
1
,
20
,
2
),scores)
plt.show()
|
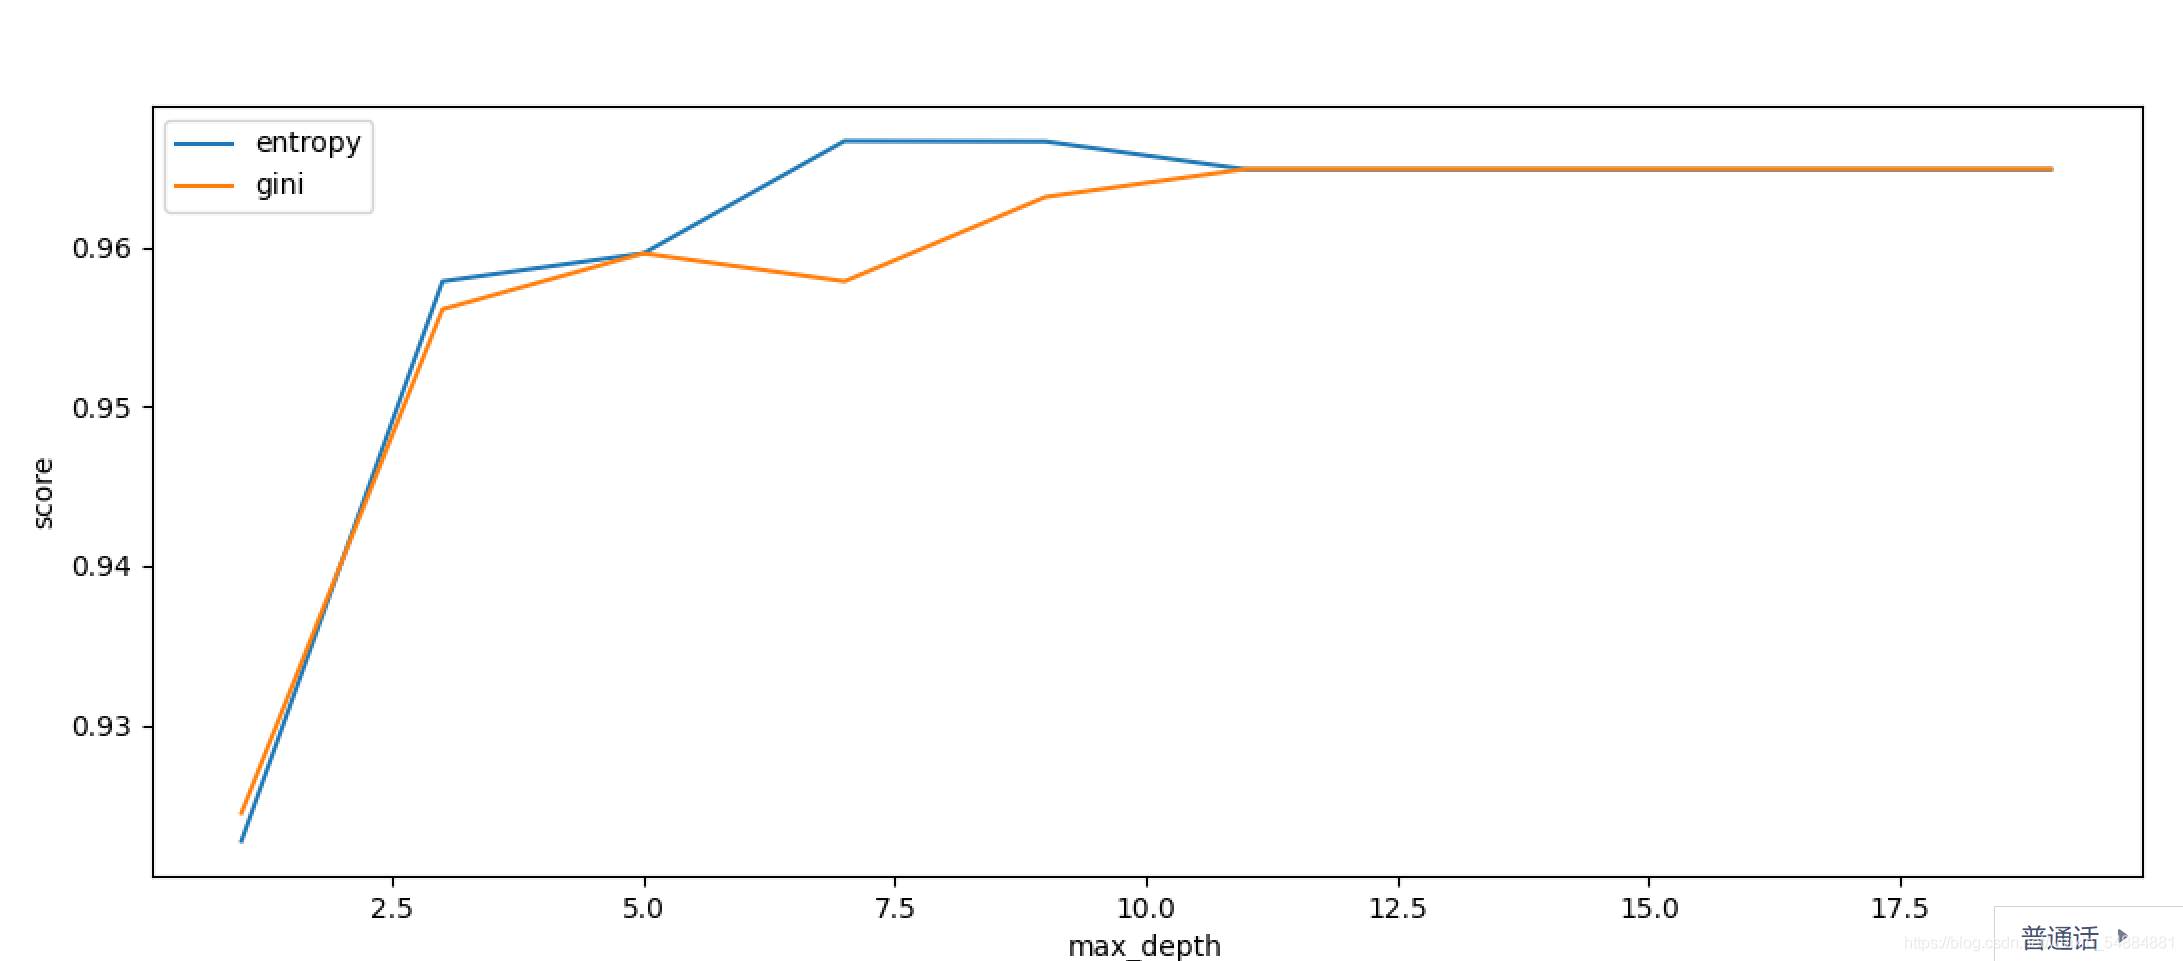
0.9666666666666666 7 。
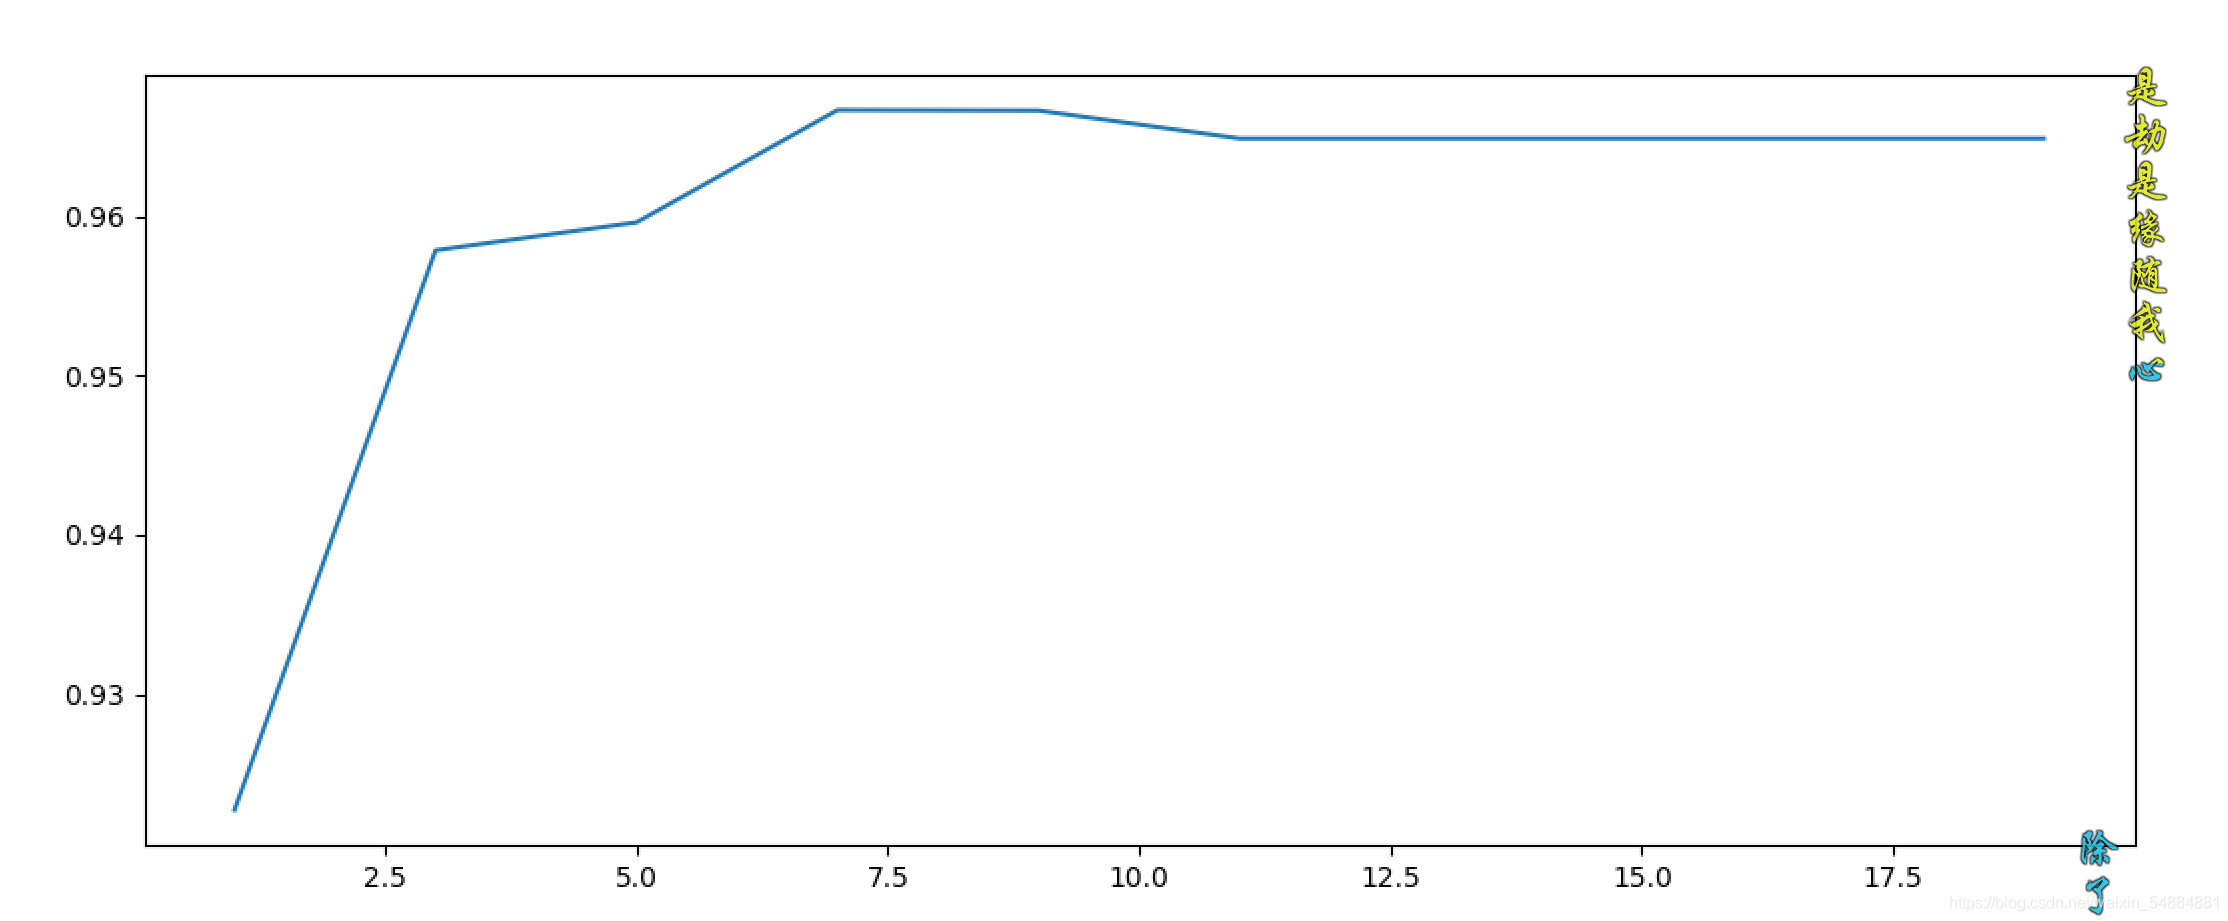
gini和entropy结果图片:
到此这篇关于python机器学习之决策树和随机森林的文章就介绍到这了,更多相关python 决策树和随机森林内容请搜索我以前的文章或继续浏览下面的相关文章希望大家以后多多支持我! 。
原文链接:https://blog.csdn.net/weixin_54884881/article/details/118639000 。
最后此篇关于Python机器学习之决策树和随机森林的文章就讲到这里了,如果你想了解更多关于Python机器学习之决策树和随机森林的内容请搜索CFSDN的文章或继续浏览相关文章,希望大家以后支持我的博客! 。
我正在处理一组标记为 160 个组的 173k 点。我想通过合并最接近的(到 9 或 10 个组)来减少组/集群的数量。我搜索过 sklearn 或类似的库,但没有成功。 我猜它只是通过 knn 聚类
我有一个扁平数字列表,这些数字逻辑上以 3 为一组,其中每个三元组是 (number, __ignored, flag[0 or 1]),例如: [7,56,1, 8,0,0, 2,0,0, 6,1,
我正在使用 pipenv 来管理我的包。我想编写一个 python 脚本来调用另一个使用不同虚拟环境(VE)的 python 脚本。 如何运行使用 VE1 的 python 脚本 1 并调用另一个 p
假设我有一个文件 script.py 位于 path = "foo/bar/script.py"。我正在寻找一种在 Python 中通过函数 execute_script() 从我的主要 Python
这听起来像是谜语或笑话,但实际上我还没有找到这个问题的答案。 问题到底是什么? 我想运行 2 个脚本。在第一个脚本中,我调用另一个脚本,但我希望它们继续并行,而不是在两个单独的线程中。主要是我不希望第
我有一个带有 python 2.5.5 的软件。我想发送一个命令,该命令将在 python 2.7.5 中启动一个脚本,然后继续执行该脚本。 我试过用 #!python2.7.5 和http://re
我在 python 命令行(使用 python 2.7)中,并尝试运行 Python 脚本。我的操作系统是 Windows 7。我已将我的目录设置为包含我所有脚本的文件夹,使用: os.chdir("
剧透:部分解决(见最后)。 以下是使用 Python 嵌入的代码示例: #include int main(int argc, char** argv) { Py_SetPythonHome
假设我有以下列表,对应于及时的股票价格: prices = [1, 3, 7, 10, 9, 8, 5, 3, 6, 8, 12, 9, 6, 10, 13, 8, 4, 11] 我想确定以下总体上最
所以我试图在选择某个单选按钮时更改此框架的背景。 我的框架位于一个类中,并且单选按钮的功能位于该类之外。 (这样我就可以在所有其他框架上调用它们。) 问题是每当我选择单选按钮时都会出现以下错误: co
我正在尝试将字符串与 python 中的正则表达式进行比较,如下所示, #!/usr/bin/env python3 import re str1 = "Expecting property name
考虑以下原型(prototype) Boost.Python 模块,该模块从单独的 C++ 头文件中引入类“D”。 /* file: a/b.cpp */ BOOST_PYTHON_MODULE(c)
如何编写一个程序来“识别函数调用的行号?” python 检查模块提供了定位行号的选项,但是, def di(): return inspect.currentframe().f_back.f_l
我已经使用 macports 安装了 Python 2.7,并且由于我的 $PATH 变量,这就是我输入 $ python 时得到的变量。然而,virtualenv 默认使用 Python 2.6,除
我只想问如何加快 python 上的 re.search 速度。 我有一个很长的字符串行,长度为 176861(即带有一些符号的字母数字字符),我使用此函数测试了该行以进行研究: def getExe
list1= [u'%app%%General%%Council%', u'%people%', u'%people%%Regional%%Council%%Mandate%', u'%ppp%%Ge
这个问题在这里已经有了答案: Is it Pythonic to use list comprehensions for just side effects? (7 个答案) 关闭 4 个月前。 告
我想用 Python 将两个列表组合成一个列表,方法如下: a = [1,1,1,2,2,2,3,3,3,3] b= ["Sun", "is", "bright", "June","and" ,"Ju
我正在运行带有最新 Boost 发行版 (1.55.0) 的 Mac OS X 10.8.4 (Darwin 12.4.0)。我正在按照说明 here构建包含在我的发行版中的教程 Boost-Pyth
学习 Python,我正在尝试制作一个没有任何第 3 方库的网络抓取工具,这样过程对我来说并没有简化,而且我知道我在做什么。我浏览了一些在线资源,但所有这些都让我对某些事情感到困惑。 html 看起来

我是一名优秀的程序员,十分优秀!