- ubuntu12.04环境下使用kvm ioctl接口实现最简单的虚拟机
- Ubuntu 通过无线网络安装Ubuntu Server启动系统后连接无线网络的方法
- 在Ubuntu上搭建网桥的方法
- ubuntu 虚拟机上网方式及相关配置详解
CFSDN坚持开源创造价值,我们致力于搭建一个资源共享平台,让每一个IT人在这里找到属于你的精彩世界.
这篇CFSDN的博客文章python绘制地震散点图由作者收集整理,如果你对这篇文章有兴趣,记得点赞哟.
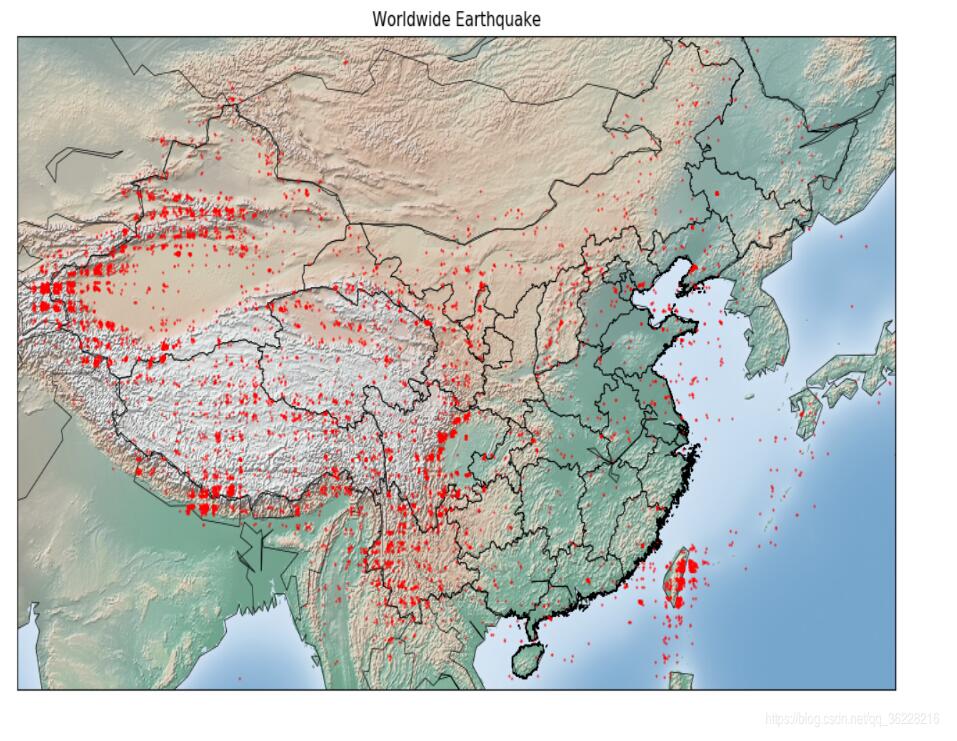
本项目是利用五年左右的世界地震数据,通过python的pandas库、matplotlib库、basemap库等进行数据可视化,绘制出地震散点图。主要代码如下所示 。
|
1
2
3
4
5
6
7
8
9
10
11
12
13
14
15
16
17
18
19
20
21
22
23
24
25
26
27
28
29
30
31
32
33
34
35
36
37
38
39
40
41
42
43
44
45
46
47
48
49
50
51
52
53
54
55
56
57
58
59
60
61
62
63
64
65
66
67
68
69
70
71
72
73
74
75
76
77
78
79
80
81
82
83
84
85
86
87
88
89
90
91
92
93
94
95
96
97
98
99
100
101
|
from
__future__
import
division
import
pandas as pd
from
pandas
import
series,dataframe
import
numpy as np
from
matplotlib.patches
import
polygon
chi_provinces
=
[
'北京'
,
'天津'
,
'上海'
,
'重庆'
,
'河北'
,
'山西'
,
'辽宁'
,
'吉林'
,
'黑龙江'
,
'江苏'
,
'浙江'
,
'安徽'
,
'福建'
,
'江西'
,
'山东'
,
'河南'
,
'湖北'
,
'湖南'
,
'广东'
,
'海南'
,
'四川'
,
'贵州'
,
'云南'
,
'陕西'
,
'甘肃'
,
'青海'
,
'台湾'
,
'内蒙古'
,
'广西'
,
'西藏'
,
'宁夏'
,
'新疆'
,
'香港'
,
'澳门'
]
#list of chinese provinces
def
is_in_china(
str
):
if
str
[:
2
]
in
chi_provinces:
return
true
else
:
return
false
def
convert_data_2014(x):
try
:
return
float
(x.strip())
except
valueerror:
return
x
except
attributeerror:
return
x
def
format_lat_lon(x):
try
:
return
x
/
100
except
(typeerror):
return
np.nan
df
=
pd.read_excel(r
'c:/users/ggws/desktop/shuju/201601-12.xls'
)
df
=
df.append(pd.read_excel(r
'c:/users/ggws/desktop/shuju/201201-12.xls'
),ignore_index
=
true)
df
=
df.append(pd.read_excel(r
'c:/users/ggws/desktop/shuju/shuju.xls'
),ignore_index
=
true)
df
=
df.append(pd.read_excel(r
'c:/users/ggws/desktop/shuju/201501-12.xls'
),ignore_index
=
true)
df_2014
=
pd.read_excel(r
'c:/users/ggws/desktop/shuju/201401-12.xls'
)
#have to introduce statics of 2014 independently because the format and the type of data of specific column in this data set are different from others
df[
'longitude'
]
=
df[
'longitude'
].
apply
(convert_data_2014)
df[
'latitude'
]
=
df[
'latitude'
].
apply
(convert_data_2014)
df_2014[
'longitude'
]
=
df_2014[
'longitude'
].
apply
(convert_data_2014)
df_2014[
'latitude'
]
=
df_2014[
'latitude'
].
apply
(convert_data_2014)
df
=
df.append(df_2014,ignore_index
=
true)
df
=
df[[
'latitude'
,
'longitude'
,
'magnitude'
,
'referenced place'
,
'time'
]]
#only save four columns as valuable statics
df[[
'longitude'
,
'latitude'
]]
=
df[[
'longitude'
,
'latitude'
]].applymap(format_lat_lon)
#use function "applymap" to convert the format of the longitude and latitude statics
df
=
df.dropna(axis
=
0
,how
=
'any'
)
#drop all rows that have any nan values
format_magnitude
=
lambda
x:
float
(
str
(x).strip(
'ml'
))
df[
'magnitude'
]
=
df[
'magnitude'
].
apply
(format_magnitude)
#df = df[df['referenced place'].apply(is_in_china)]
lon_mean
=
(df[
'longitude'
].groupby(df[
'referenced place'
])).mean()
lat_mean
=
(df[
'latitude'
].groupby(df[
'referenced place'
])).mean()
group_counts
=
(df[
'magnitude'
].groupby(df[
'referenced place'
])).count()
after_agg_data
=
pd.concat([lon_mean,lat_mean,group_counts], axis
=
1
)
after_agg_data.rename(columns
=
{
'magnitude'
:
'counts'
} , inplace
=
true)
#aggregate after grouping the data
after_sorted_data
=
after_agg_data.sort_values(by
=
'counts'
,ascending
=
false)
new_index
=
np.arange(
len
(after_sorted_data.index))
after_sorted_data.index
=
new_index
paint_data
=
after_sorted_data[after_sorted_data[
'counts'
]>
=
after_sorted_data[
'counts'
][
80
]]
import
matplotlib.pyplot as plt
from
mpl_toolkits.basemap
import
basemap
plt.figure(figsize
=
(
16
,
8
))
m
=
basemap()
m.readshapefile(r
'c:/users/ggws/desktop/jb/gadm36_chn_1'
,
'states'
, drawbounds
=
true)
ax
=
plt.gca()
'''
for nshape,seg in enumerate (m.states):
poly = polygon(seg,facecolor = 'r')
ax.add_patch(poly)
'''
m.drawcoastlines(linewidth
=
0.5
)
m.drawcountries(linewidth
=
0.5
)
m.shadedrelief()
for
indexs
in
df.index:
lon2,lat2
=
df.loc[indexs].values[
1
],df.loc[indexs].values[
0
]
x,y
=
m(lon2,lat2)
m.plot(x,y,
'ro'
,markersize
=
0.5
)
#获取经度值
'''
for indexs in after_sorted_data.index[:80]:
lon,lat = after_sorted_data.loc[indexs].values[0],after_sorted_data.loc[indexs].values[1]
x,y = m(lon,lat)
m.plot(x,y,'wo',markersize = 10*(after_sorted_data.loc[indexs].values[2]/after_sorted_data.loc[0].values[2]))
'''
plt.title(
"worldwide earthquake"
)
plt.show()
#indexs-len(df.index)+80
|
效果如下 。

以上就是本文的全部内容,希望对大家的学习有所帮助,也希望大家多多支持我.
原文链接:https://blog.csdn.net/qq_36228216/article/details/86680246 。
最后此篇关于python绘制地震散点图的文章就讲到这里了,如果你想了解更多关于python绘制地震散点图的内容请搜索CFSDN的文章或继续浏览相关文章,希望大家以后支持我的博客! 。
我想填充 3D 等高线图 (contour3(X,Y,Z)),就像 2D 等高线填充图 (contourf(X,Y,Z))。但我无法弄清楚如何实现这一目标。 contour3 和 surf 的组合不是
我有一个 c3.js 折线图,表示 2 个值的演变。我需要折线图的工具提示是饼图(工具提示 = 另一个 c3.js 图形)。 这是我成功的: http://jsfiddle.net/owhxgaqm/
我有具有结构的 Pandas 数据框: A B 0 1 1 1 2 1 2 3 4 3 3 7 4 6 8 如何生成 Seaborn Violin 图,每列作为其自己的单独
我正在使用 D3DXSPRITE 方法将我的 map 图 block 绘制到屏幕上,我刚刚添加了一个缩放功能,当您按住向上箭头时会放大,但注意到您现在可以看到图 block 之间的间隙,这是一些屏幕截
1、系统环境如下图: 2、为该系统添加一块新的虚拟硬盘,添加后需重启虚拟机,否则系统不识别;如下图,/dev/sdc 是新添加的硬盘; 3、fdisk /dev/sdc为新硬盘创建分区:
1、nagios简介 nagios是一款开源的电脑系统和网络监视工具,能有效监控windows、linux和unix的主机状态,交换机路由器等网络设置,打印机等。在系统或服务状态异常时发
越来越多人开始习惯用手机上网,浏览网页、查看邮件···移动化已经成为互联网发展必然趋势,包括facebook在内的很多互联网公司都将移动广告作为下一个淘金地
1.图片处理 1.圆角图片 复制代码 代码如下: /** * 转换成圆角 * &n
Microsoft SQL Server Management Studio是SQL SERVER的客户端工具,相信大家都知道。我不知道大伙使用导入数据的情况怎么样,反正我最近是遇到过。主要是因为没
debian6系统: 首先先安装mysql吧: 打开终端(root)用户登入 apt-get purge mysql-server-5.5 安装完成后: 默认情况下Mysql只允许本地登录
fedora16英文环境下支持中文输入法的方法 fedora16英文环境下支持FCITX的中文输入法: $ im-chooser 就会出现选择界面,选择第二个就行了。
Net预编译命令 C:\WINDOWS\Microsoft.NET\Framework\v2.0.50727\aspnet_compiler.exe -? 显示说明 我们需要选择的命令为&n
有的时候电脑出现一些故障有的时候通过将其修改bios设置的方法来解决故障,那么在bios上设置能不能将电脑恢复出厂设置呢?其实也是可以的。方法也很简单的,只要会进入电脑的bios懂的上面英文的意思就
笔者曾介绍过Deepin 将对龙芯进行全面支持,打造最优美龙芯电脑桌面。现在Deepin团队移植工作取得了突破性的成果,Deepin桌面已经在龙芯3A和龙芯3B电脑上成功运行起来了。 以下为龙芯3
在安装一些软件之后,我们的电脑总是会发生一点小变化,不是桌面上多了几个网址图标,就是IE浏览器的默认主页被篡改成乱七八糟的网址。最可气的是,在IE设置中将默认主页改回来后,下次启动Win7后又变了回
“注册表编辑器怎么打开”虽说不是很难的问题,但是对于对电脑常识不是很擅长的网民来说,当电脑出现问题或需要更改设置时,着实还是件头疼的问题。因为需要打开注册表进行操作解决。那么如何打开注册表编辑器呢?
这篇文章重点介绍10个重要的WordPress安全插件和技巧,用来保护WordPress网站或者博客。 1. WP Security 人工帮助你修复被黑客入侵的网站,只要按照他们网站上的联系电话
其实运用object和javascript调用外部文件,也能实现不同栏目调用不同友情链接,即相当于调用不同栏目友情链接文件, {dede:field.typeid/}来获取当前栏目的ID。
我有一个复值矩阵。 如果我发出命令: plot(myMatrix) 然后它在图形设备上显示一种散点图,X 轴标记为 Re(myMatrix),Y 轴标记为 Im(myMatrix)。这显示了我正在寻找
关闭。这个问题需要更多focused .它目前不接受答案。 想改善这个问题吗?更新问题,使其仅关注一个问题 editing this post . 4年前关闭。 Improve this questi

我是一名优秀的程序员,十分优秀!