CFSDN坚持开源创造价值,我们致力于搭建一个资源共享平台,让每一个IT人在这里找到属于你的精彩世界.
这篇CFSDN的博客文章Android进阶之深入理解View的测量(Measure)流程机制由作者收集整理,如果你对这篇文章有兴趣,记得点赞哟.

前言
View 的工作原理中最重要的就是测量、布局、绘制三大过程,而其中测量是最复杂的,
那么我们就来介绍下View 的测量过程,
1、MeasureSpec
测量自身的大小的时候,会执行measure(int widthMeasureSpec, int heightMeasureSpec)方法。注意方法中两个参数,它们其实是一个int 类型的MeasureSpec,
1、specMode 。
测量模式分为三种:
- UNSPECIFIED模式:本质就是不限制模式,父视图不对子View进行任何约束,View想要多大要多大,想要多长要多长;
- EXACTLY模式:该模式其实对应的场景就是match_parent或者是一个具体的数据(50dp或80px),父视图为子View指定一个确切的大小,无论子View的值设置多大,都不能超出父视图的范围;
- AT_MOST模式:这个模式对应的场景就是wrap_content,其内容就是父视图给子View设置一个最大尺寸,子View只要不超过这个尺寸即可;
2、MeasureSpec 。
View的MeasureSpec值是根据子View的布局参数(LayoutParams)和父容器的MeasureSpec至计算而来的,其具体逻辑封装在了getChildMeasureSpec()方法中 。
- publicstaticintgetChildMeasureSpec(
- intspec,intpadding,intchildDimension){
- //1、获取parent的specMode
- intspecMode=MeasureSpec.getMode(spec);
- //2、获取parent的specSize
- intspecSize=MeasureSpec.getSize(spec);
- //3、size=剩余的可用大小
- intsize=Math.max(0,specSize-padding);
- intresultSize=0;
- intresultMode=0;
- //4、通过switch语句判断parent的集中mode,分别处理
- switch(specMode){
- //5、parent为MeasureSpec.EXACTLY时
- caseMeasureSpec.EXACTLY:
- if(childDimension>=0){
- //5.1、当childDimension大于0时,表示child的大小是
- //明确指出的,如layout_width="100dp";
- //此时child的大小=childDimension,
- resultSize=childDimension;
- //child的测量模式=MeasureSpec.EXACTLY
- resultMode=MeasureSpec.EXACTLY;
- }elseif(childDimension==LayoutParams.MATCH_PARENT){
- //5.2、此时为LayoutParams.MATCH_PARENT
- //也就是android:layout_width="match_parent"
- //因为parent的大小是明确的,child要匹配parent的大小
- //那么我们就直接让child=parent的大小就好
- resultSize=size;
- //同样,child的测量模式=MeasureSpec.EXACTLY
- resultMode=MeasureSpec.EXACTLY;
- }elseif(childDimension==LayoutParams.WRAP_CONTENT){
- //5.3、此时为LayoutParams.WRAP_CONTENT
- //也就是android:layout_width="wrap_content"
- //这个模式需要特别对待,child说我要的大小刚好够放
- //需要展示的内容就好,而此时我们并不知道child的内容
- //需要多大的地方,暂时先把parent的size给他
- resultSize=size;
- //自然,child的mode就是MeasureSpec.AT_MOST的了
- resultMode=MeasureSpec.AT_MOST;
- }
- break;
- //5、parent为AT_MOST,此时child最大不能超过parent
- caseMeasureSpec.AT_MOST:
- if(childDimension>=0){
- //同样child大小明确时,
- //大小直接时指定的childDimension
- resultSize=childDimension;
- resultMode=MeasureSpec.EXACTLY;
- }elseif(childDimension==LayoutParams.MATCH_PARENT){
- //child要跟parent一样大,resultSize=可用大小
- resultSize=size;
- //因为parent是AT_MOST,child的大小也还是未定的,
- //所以也是MeasureSpec.AT_MOST
- resultMode=MeasureSpec.AT_MOST;
- }elseif(childDimension==LayoutParams.WRAP_CONTENT){
- //又是特殊情况,先给child可用的大小
- resultSize=size;
- resultMode=MeasureSpec.AT_MOST;
- }
- break;
- //这种模式是很少用的,我们也看下吧
- caseMeasureSpec.UNSPECIFIED:
- if(childDimension>=0){
- //与前面同样的处理
- resultSize=childDimension;
- resultMode=MeasureSpec.EXACTLY;
- }elseif(childDimension==LayoutParams.MATCH_PARENT){
- //Childwantstobeoursize...findouthowbigitshould
- //be
- resultSize=View.sUseZeroUnspecifiedMeasureSpec?0:size;
- resultMode=MeasureSpec.UNSPECIFIED;
- }elseif(childDimension==LayoutParams.WRAP_CONTENT){
- //Childwantstodetermineitsownsize....findouthow
- //bigitshouldbe
- resultSize=View.sUseZeroUnspecifiedMeasureSpec?0:size;
- resultMode=MeasureSpec.UNSPECIFIED;
- }
- break;
- }
- //通过传入resultSize和resultMode生成一个MeasureSpec.返回
- returnMeasureSpec.makeMeasureSpec(resultSize,resultMode);
- }
- ①当子View采用具体数值(dp / px)时:无论父容器的测量模式是什么,子View的测量模式都是EXACTLY且大小等于设置的具体数值;
- ②当子View采用match_parent时:子View的测量模式与父容器的测量模式一致;若测量模式为EXACTLY,则子View的大小为父容器的剩余空间;若测量模式为AT_MOST,则子View的大小不超过父容器的剩余空间;
- ③当子View采用wrap_parent时:如果父容器测量模式为UNSPECIFIED,子View也为UNSPECIFIED,否则子View为AT_MOST且大小不超过父容器的剩余空间;

2、view测量过程

1、performMeasure() 。
加载好系统布局资源后,会触发ViewRootImpl的performTraversals()方法,该方法内容会开始执行测量、布局和绘制的工作,我们来看这个方法的源码关键部分:
- privatevoidperformTraversals(){
- ...
- if(!mStopped){
- //获取顶层布局的childWidthMeasureSpec
- intchildWidthMeasureSpec=getRootMeasureSpec(mWidth,lp.width);
- //获取顶层布局的childHeightMeasureSpec
- intchildHeightMeasureSpec=getRootMeasureSpec(mHeight,lp.height);
- //测量开始测量
- performMeasure(childWidthMeasureSpec,childHeightMeasureSpec);
- }
- }
- if(didLayout){
- //执行布局方法
- performLayout(lp,desiredWindowWidth,desiredWindowHeight);
- ...
- }
- if(!cancelDraw&&!newSurface){
- ...
- //开始绘制了哦
- performDraw();
- }
- }
- }
整个方法内部其实就是做了一些基础的判断后,再顺序的调用测量、布局和绘制的相关方法,从而完成自定义View的整个工作流程,
performTraversals方法,使用的是getRootMeasureSpec方法来获取子View的MeasureSpec,
整个Activity的顶层View其实就是一个DecorView,所以这里获取的其实是DeorView的MeasureSpec,然后将其传入performMeasure方法中去开始测量,现在看看PerformMeasure方法:
- privatevoidperformMeasure(intchildWidthMeasureSpec,
- intchildHeightMeasureSpec){
- Trace.traceBegin(Trace.TRACE_TAG_VIEW,"measure");
- try{
- //mView其实就是我们的顶层DecorView,从DecorView开始测量
- mView.measure(childWidthMeasureSpec,childHeightMeasureSpec);
- }finally{
- Trace.traceEnd(Trace.TRACE_TAG_VIEW);
- }
- }
2、measure() 。
源码中找到了measure方法 。
- publicfinalvoidmeasure(intwidthMeasureSpec,intheightMeasureSpec){
- booleanoptical=isLayoutModeOptical(this);
- if(optical!=isLayoutModeOptical(mParent)){
- Insetsinsets=getOpticalInsets();
- intoWidth=insets.left+insets.right;
- intoHeight=insets.top+insets.bottom;
- widthMeasureSpec=MeasureSpec.adjust(widthMeasureSpec,optical?-oWidth:oWidth);
- heightMeasureSpec=MeasureSpec.adjust(heightMeasureSpec,optical?-oHeight:oHeight);
- }
- //Suppresssignextensionforthelowbytes
- longkey=(long)widthMeasureSpec<<32|(long)heightMeasureSpec&0xffffffffL;
- if(mMeasureCache==null)mMeasureCache=newLongSparseLongArray(2);
- finalbooleanforceLayout=(mPrivateFlags&PFLAG_FORCE_LAYOUT)==PFLAG_FORCE_LAYOUT;
- //OptimizelayoutbyavoidinganextraEXACTLYpasswhentheviewis
- //alreadymeasuredasthecorrectsize.InAPI23andbelow,this
- //extrapassisrequiredtomakeLinearLayoutre-distributeweight.
- finalbooleanspecChanged=widthMeasureSpec!=mOldWidthMeasureSpec
- ||heightMeasureSpec!=mOldHeightMeasureSpec;
- finalbooleanisSpecExactly=MeasureSpec.getMode(widthMeasureSpec)==MeasureSpec.EXACTLY
- &&MeasureSpec.getMode(heightMeasureSpec)==MeasureSpec.EXACTLY;
- finalbooleanmatchesSpecSize=getMeasuredWidth()==MeasureSpec.getSize(widthMeasureSpec)
- &&getMeasuredHeight()==MeasureSpec.getSize(heightMeasureSpec);
- finalbooleanneedsLayout=specChanged
- &&(sAlwaysRemeasureExactly||!isSpecExactly||!matchesSpecSize);
- if(forceLayout||needsLayout){
- //firstclearsthemeasureddimensionflag
- mPrivateFlags&=~PFLAG_MEASURED_DIMENSION_SET;
- resolveRtlPropertiesIfNeeded();
- intcacheIndex=forceLayout?-1:mMeasureCache.indexOfKey(key);
- if(cacheIndex<0||sIgnoreMeasureCache){
- //measureourselves,thisshouldsetthemeasureddimensionflagback
- onMeasure(widthMeasureSpec,heightMeasureSpec);
- mPrivateFlags3&=~PFLAG3_MEASURE_NEEDED_BEFORE_LAYOUT;
- }else{
- longvalue=mMeasureCache.valueAt(cacheIndex);
- //Castingalongtointdropsthehigh32bits,nomaskneeded
- setMeasuredDimensionRaw((int)(value>>32),(int)value);
- mPrivateFlags3|=PFLAG3_MEASURE_NEEDED_BEFORE_LAYOUT;
- }
- //flagnotset,setMeasuredDimension()wasnotinvoked,weraise
- //anexceptiontowarnthedeveloper
- if((mPrivateFlags&PFLAG_MEASURED_DIMENSION_SET)!=PFLAG_MEASURED_DIMENSION_SET){
- thrownewIllegalStateException("Viewwithid"+getId()+":"
- +getClass().getName()+"#onMeasure()didnotsetthe"
- +"measureddimensionbycalling"
- +"setMeasuredDimension()");
- }
- mPrivateFlags|=PFLAG_LAYOUT_REQUIRED;
- }
- mOldWidthMeasureSpec=widthMeasureSpec;
- mOldHeightMeasureSpec=heightMeasureSpec;
- mMeasureCache.put(key,((long)mMeasuredWidth)<<32|
- (long)mMeasuredHeight&0xffffffffL);//suppresssignextension
- }
View的测量是View.onMeasure而ViewGroup的测量则是XXLayout.onMeasure,这两种onMeasure方法的实现是不同的 。
3、View.onMeasure() 。
获取一个建议最小值,
调用getDefaultSize方法定义对View尺寸的测量逻辑,
调用setMeasureDimension()储存测量后的View宽/高,
- protectedvoidonMeasure(intwidthMeasureSpec,
- intheightMeasureSpec){
- setMeasuredDimension(
- getDefaultSize(getSuggestedMinimumWidth(),
- widthMeasureSpec),
- getDefaultSize(getSuggestedMinimumHeight(),
- heightMeasureSpec));
- }
- getSuggestedMinimumWidth()
- protectedintgetSuggestedMinimumWidth(){
- return(mBackground==null)?mMinWidth:max(mMinWidth,mBackground.getMinimumWidth());
- }
- 前View是否有背景?没有就返回android:minWidth设置的值:有就返回android:minWidth和mBackground.getMinimumWidth()中较大的那个值;
- publicintgetMinimumWidth(){
- finalintintrinsicWidth=getIntrinsicWidth();
- //返回背景图Drawable的原始宽度
- returnintrinsicWidth>0?intrinsicWidth:0;
- }
getIntrinsicWidth()获取的是背景图的原始宽度,背景图是BitmapDrawable则有原始宽度,在没有原始宽度的情况下则返回0,
4、getDefaultSize() 。
- publicstaticintgetDefaultSize(intsize,intmeasureSpec){
- intresult=size;
- //1、获得MeasureSpec的mode
- intspecMode=MeasureSpec.getMode(measureSpec);
- //2、获得MeasureSpec的specSize
- intspecSize=MeasureSpec.getSize(measureSpec);
- switch(specMode){
- caseMeasureSpec.UNSPECIFIED:
- //这个我们先不看他
- result=size;
- break;
- caseMeasureSpec.AT_MOST:
- caseMeasureSpec.EXACTLY:
- //3、可以看到,最终返回的size就是我们MeasureSpec中测量得到的size
- result=specSize;
- break;
- }
- returnresult;
- }
测量模式是AT_MOST还是EXACTLY,最终返回的Size是一样的,
5、setMeasureDimension 。
该方法是储存测量后的View的宽和高的,在自定义View的时候,我们自己重写的onMeasure方法最后一定要调用这个方法,否则会报错 。
- protectedfinalvoidsetMeasuredDimension(intmeasuredWidth,intmeasuredHeight){
- //1、判断是否使用视觉边界布局
- booleanoptical=isLayoutModeOptical(this);
- //2、判断view和parentView使用的视觉边界布局是否一致
- if(optical!=isLayoutModeOptical(mParent)){
- //不一致时要做一些边界的处理
- Insetsinsets=getOpticalInsets();
- intopticalWidth=insets.left+insets.right;
- intopticalHeight=insets.top+insets.bottom;
- measuredWidth+=optical?opticalWidth:-opticalWidth;
- measuredHeight+=optical?opticalHeight:-opticalHeight;
- }
- //3、重点来了,经过过滤之后调用了setMeasuredDimensionRaw方法,看来应该是这个方法设置我们的view的大小
- setMeasuredDimensionRaw(measuredWidth,measuredHeight);
- }
- setMeasureDimensionRaw方法:
- privatevoidsetMeasuredDimensionRaw(intmeasuredWidth,intmeasuredHeight){
- //最终将测量好的大小存储到mMeasuredWidth和mMeasuredHeight上,所以在测量之后
- //我们可以通过调用getMeasuredWidth获得测量的宽、getMeasuredHeight获得高
- mMeasuredWidth=measuredWidth;
- mMeasuredHeight=measuredHeight;
- mPrivateFlags|=PFLAG_MEASURED_DIMENSION_SET;
- }
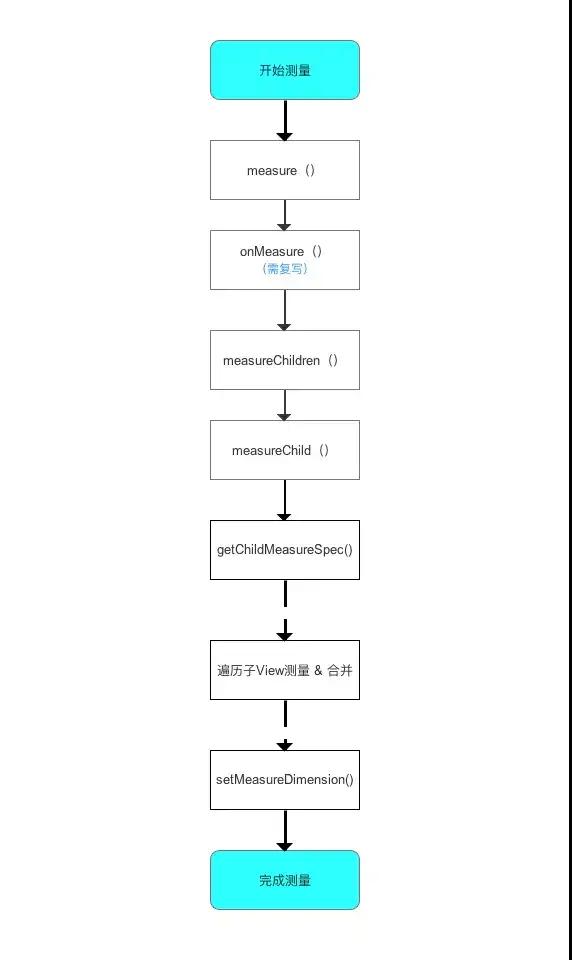
以上就是View的测量过程,其顺序为:
performTraversals->performMeasure->measure->onMeasure-> setMeasuredDimension-> setMeasuredDimensionRaw,由setMeasuredDimensionRaw最终保存测量的数据 。
3、ViewGroup的测量过程详解

1、measureChildren() 。
作用就是遍历子View并调用measureChild()进行下一步测量 。
- protectedvoidmeasureChildren(intwidthMeasureSpec,intheightMeasureSpec){
- //参数说明:父视图的测量规格(MeasureSpec)
- finalintsize=mChildrenCount;
- finalView[]children=mChildren;
- //遍历所有的子view
- for(inti=0;i<size;++i){
- finalViewchild=children[i];
- //如果View的状态不是GONE就调用measureChild()去进行下一步的测量
- if((child.mViewFlags&VISIBILITY_MASK)!=GONE){
- measureChild(child,widthMeasureSpec,heightMeasureSpec);
- }
- }
- }
2、measureChild() 。
作用就是计算单个子View的MeasureSpec,调用子View的measure进行每个子View最后的宽、高的测量 。
- protectedvoidmeasureChild(Viewchild,intparentWidthMeasureSpec,
- intparentHeightMeasureSpec){
- //获取子视图的布局参数
- finalLayoutParamslp=child.getLayoutParams();
- //调用getChildMeasureSpec(),根据父视图的MeasureSpec&布局参数LayoutParams,计算单个子View的MeasureSpec
- //getChildMeasureSpec()请回看上面的解析
- //获取ChildView的widthMeasureSpec
- finalintchildWidthMeasureSpec=getChildMeasureSpec(parentWidthMeasureSpec,
- mPaddingLeft+mPaddingRight,lp.width);
- //获取ChildView的heightMeasureSpec
- finalintchildHeightMeasureSpec=getChildMeasureSpec(parentHeightMeasureSpec,
- mPaddingTop+mPaddingBottom,lp.height);
- //将计算好的子View的MeasureSpec值传入measure(),进行最后的测量
- child.measure(childWidthMeasureSpec,childHeightMeasureSpec);
- }
3、measure() 。
和View的measure一致 。
- publicfinalvoidmeasure(intwidthMeasureSpec,intheightMeasureSpec){
- ...
- intcacheIndex=(mPrivateFlags&PFLAG_FORCE_LAYOUT)==PFLAG_FORCE_LAYOUT?-1:
- mMeasureCache.indexOfKey(key);
- if(cacheIndex<0||sIgnoreMeasureCache){
- //调用onMeasure()计算视图大小
- onMeasure(widthMeasureSpec,heightMeasureSpec);
- mPrivateFlags3&=~PFLAG3_MEASURE_NEEDED_BEFORE_LAYOUT;
- }else{
- ...
- }
4、XXXLayout.onMeasure() 。
- ViewGroup的onMeasure和View的onMeasure是不同的,究其原因其实是因为ViewGroup是一个抽象类,所以即便它继承了View也不用必须实现View中的onMeasure方法,而它的子类不具备通用的布局特性,这导致他们的子View的测量方法各不相同,因此,ViewGroup无法对onMeasure()做统一的实现
- FrameLayout为例,看看它的onMeasure是如何实现的:
- //这里的widthMeasureSpec、heightMeasureSpec
- //其实就是我们frameLayout可用的widthMeasureSpec、
- //heightMeasureSpec
- protectedvoidonMeasure(intwidthMeasureSpec,intheightMeasureSpec){
- //1、获得frameLayout下childView的个数
- intcount=getChildCount();
- //2、看这里的代码我们可以根据前面的Measure图来进行分析,因为只要parent
- //不是EXACTLY模式,以frameLayout为例,假设frameLayout本身还不是EXACTL模式,
- //那么表示他的大小此时还是不确定的,从表得知,此时frameLayout的大小是根据
- //childView的最大值来设置的,这样就很好理解了,也就是childView测量好后还要再
- //测量一次,因为此时frameLayout的值已经可以算出来了,对于child为MATCH_PARENT
- //的,child的大小也就确定了,理解了这里,后面的代码就很容易看懂了
- finalbooleanmeasureMatchParentChildren=
- MeasureSpec.getMode(widthMeasureSpec)!=MeasureSpec.EXACTLY||
- MeasureSpec.getMode(heightMeasureSpec)!=MeasureSpec.EXACTLY;
- //3、清理存储模式为MATCH_PARENT的child的队列
- mMatchParentChildren.clear();
- //4、下面三个值最终会用来设置frameLayout的大小
- intmaxHeight=0;
- intmaxWidth=0;
- intchildState=0;
- //5、开始便利frameLayout下的所有child
- for(inti=0;i<count;i++){
- finalViewchild=getChildAt(i);
- //6、小发现哦,只要mMeasureAllChildren是true,就算child是GONE也会被测量哦,
- if(mMeasureAllChildren||child.getVisibility()!=GONE){
- //7、开始测量childView
- measureChildWithMargins(child,widthMeasureSpec,0,heightMeasureSpec,0);
- //8、下面代码是获取child中的width和height的最大值,后面用来重新设置frameLayout,有需要的话
- finalLayoutParamslp=(LayoutParams)child.getLayoutParams();
- maxWidth=Math.max(maxWidth,
- child.getMeasuredWidth()+lp.leftMargin+lp.rightMargin);
- maxHeight=Math.max(maxHeight,
- child.getMeasuredHeight()+lp.topMargin+lp.bottomMargin);
- childState=combineMeasuredStates(childState,child.getMeasuredState());
- //9、如果frameLayout不是EXACTLY,
- if(measureMatchParentChildren){
- if(lp.width==LayoutParams.MATCH_PARENT||
- lp.height==LayoutParams.MATCH_PARENT){
- //10、存储LayoutParams.MATCH_PARENT的child,因为现在还不知道frameLayout大小,
- //也就无法设置child的大小,后面需重新测量
- mMatchParentChildren.add(child);
- }
- }
- }
- }
- ....
- //11、这里开始设置frameLayout的大小
- setMeasuredDimension(resolveSizeAndState(maxWidth,widthMeasureSpec,childState),
- resolveSizeAndState(maxHeight,heightMeasureSpec,
- childState<
- //12、frameLayout大小确认了,我们就需要对宽或高为LayoutParams.MATCH_PARENTchild重新测量,设置大小
- count=mMatchParentChildren.size();
- if(count>1){
- for(inti=0;i<count;i++){
- finalViewchild=mMatchParentChildren.get(i);
- finalMarginLayoutParamslp=(MarginLayoutParams)child.getLayoutParams();
- finalintchildWidthMeasureSpec;
- if(lp.width==LayoutParams.MATCH_PARENT){
- finalintwidth=Math.max(0,getMeasuredWidth()
- -getPaddingLeftWithForeground()-getPaddingRightWithForeground()
- -lp.leftMargin-lp.rightMargin);
- //13、注意这里,为child是EXACTLY类型的childWidthMeasureSpec,
- //也就是大小已经测量出来了不需要再测量了
- //通过MeasureSpec.makeMeasureSpec生成相应的MeasureSpec
- childWidthMeasureSpec=MeasureSpec.makeMeasureSpec(
- width,MeasureSpec.EXACTLY);
- }else{
- //14、如果不是,说明此时的child的MeasureSpec是EXACTLY的,直接获取child的MeasureSpec,
- childWidthMeasureSpec=getChildMeasureSpec(widthMeasureSpec,
- getPaddingLeftWithForeground()+getPaddingRightWithForeground()+
- lp.leftMargin+lp.rightMargin,
- lp.width);
- }
- //这里是对高做处理,与宽类似
- finalintchildHeightMeasureSpec;
- if(lp.height==LayoutParams.MATCH_PARENT){
- finalintheight=Math.max(0,getMeasuredHeight()
- -getPaddingTopWithForeground()-getPaddingBottomWithForeground()
- -lp.topMargin-lp.bottomMargin);
- childHeightMeasureSpec=MeasureSpec.makeMeasureSpec(
- height,MeasureSpec.EXACTLY);
- }else{
- childHeightMeasureSpec=getChildMeasureSpec(heightMeasureSpec,
- getPaddingTopWithForeground()+getPaddingBottomWithForeground()+
- lp.topMargin+lp.bottomMargin,
- lp.height);
- }
- //最终,再次测量child
- child.measure(childWidthMeasureSpec,childHeightMeasureSpec);
- }
- }
- }
总结
测量始于DecorView,通过不断的遍历子View的measure方法,根据ViewGroup的MeasureSpec及子View的LayoutParams来决定子View的MeasureSpec,进一步获取子View的测量宽高,然后逐层返回,不断保存ViewGroup的测量宽高,
单一View,一般重写此方法,针对wrap_content情况,规定View默认的大小值,避免于match_parent情况一致。ViewGroup,若不重写,就会执行和单子View中相同逻辑,不会测量子View。一般会重写onMeasure()方法,循环测量子View,
原文链接:https://mp.weixin.qq.com/s/egu-869d0KU_89p6OWJoDA 。
最后此篇关于Android进阶之深入理解View的测量(Measure)流程机制的文章就讲到这里了,如果你想了解更多关于Android进阶之深入理解View的测量(Measure)流程机制的内容请搜索CFSDN的文章或继续浏览相关文章,希望大家以后支持我的博客! 。


我是一名优秀的程序员,十分优秀!