- ubuntu12.04环境下使用kvm ioctl接口实现最简单的虚拟机
- Ubuntu 通过无线网络安装Ubuntu Server启动系统后连接无线网络的方法
- 在Ubuntu上搭建网桥的方法
- ubuntu 虚拟机上网方式及相关配置详解
CFSDN坚持开源创造价值,我们致力于搭建一个资源共享平台,让每一个IT人在这里找到属于你的精彩世界.
这篇CFSDN的博客文章一步步教你用python的scrapy编写一个爬虫由作者收集整理,如果你对这篇文章有兴趣,记得点赞哟.
介绍 。
本文将介绍我是如何在python爬虫里面一步一步踩坑,然后慢慢走出来的,期间碰到的所有问题我都会详细说明,让大家以后碰到这些问题时能够快速确定问题的来源,后面的代码只是贴出了核心代码,更详细的代码暂时没有贴出来.
流程一览 。
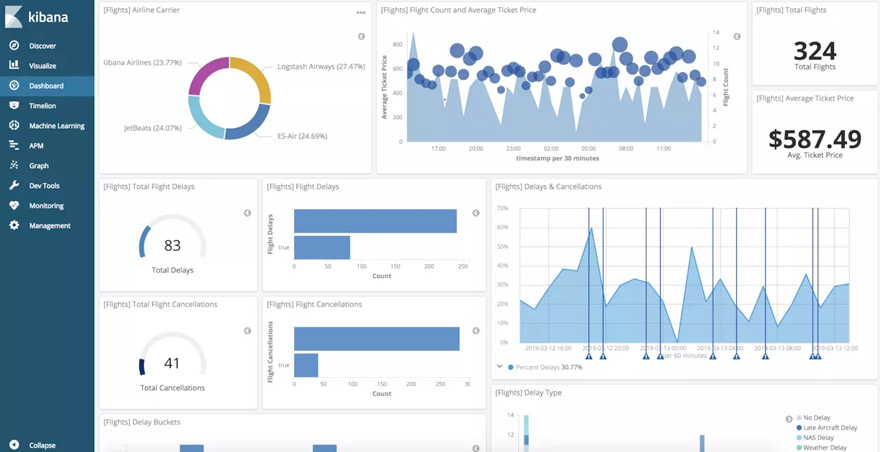
首先我是想爬某个网站上面的所有文章内容,但是由于之前没有做过爬虫(也不知道到底那个语言最方便),所以这里想到了是用python来做一个爬虫(毕竟人家的名字都带有爬虫的含义),我这边是打算先将所有从网站上爬下来的数据放到elasticsearch里面, 选择elasticsearch的原因是速度快,里面分词插件,倒排索引,需要数据的时候查询效率会非常好(毕竟爬的东西比较多),然后我会将所有的数据在elasticsearch的老婆kibana里面将数据进行可视化出来,并且分析这些文章内容,可以先看一下预期可视化的效果(上图了),这个效果图是kibana6.4系统给予的帮助效果图(就是说你可以弄成这样,我也想弄成这样)。后面我会发一个dockerfile上来(现在还没弄).

环境需求 。
这些东西可以去找相应的教程安装,我这里只有elasticsearch的安装 。
第一步,使用python的pip来安装需要的插件(第一个坑在这儿) 。
1.tomd:将html转换成markdown 。
|
1
|
pip3 install tomd
|
2.redis:需要python的redis插件 。
|
1
|
pip3 install redis
|
3.scrapy:框架安装(坑) 。
1、首先我是像上面一样执行了 。
|
1
|
pip3 install scrapy
|
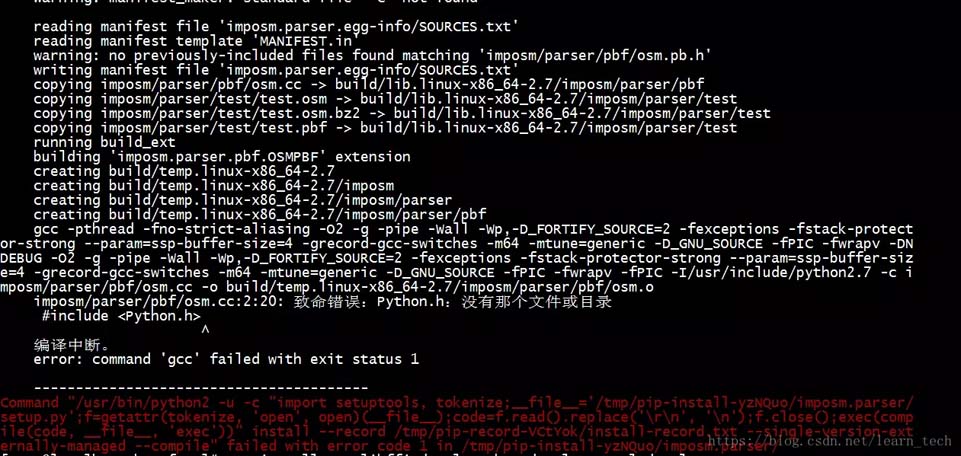
2、然后发现缺少gcc组件 error: command 'gcc' failed with exit status 1 。

3、然后我就找啊找,找啊找,最后终于找到了正确的解决方法(期间试了很多错误答案)。最终的解决办法就是使用yum来安装python34-devel, 这个python34-devel根据你自己的python版本来,可能是python-devel,是多少版本就将中间的34改成你的版本, 我的是3.4.6 。
|
1
|
yum install python34
-
devel
|
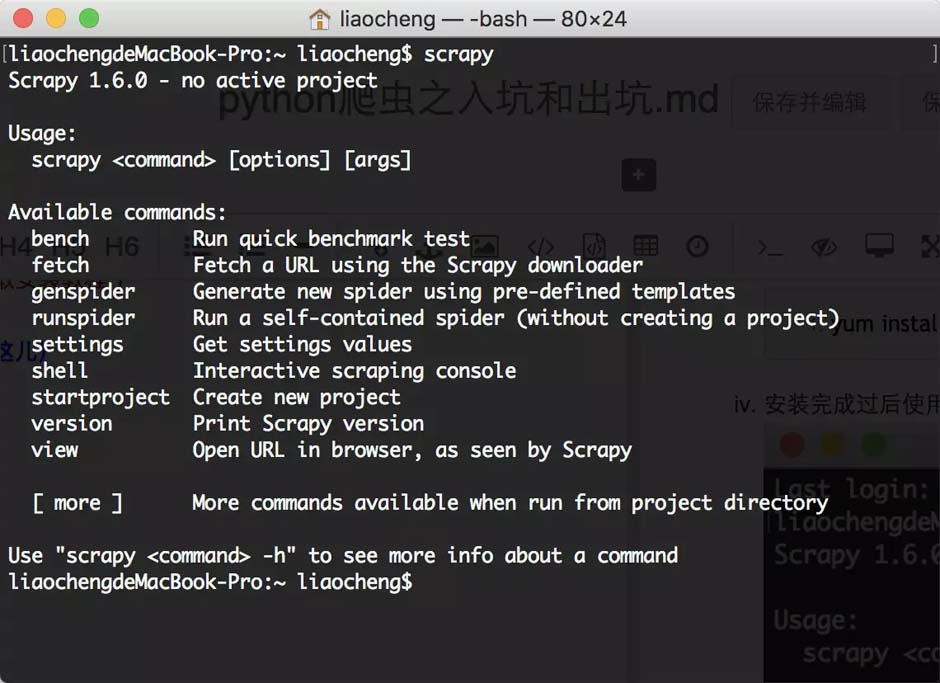
4、安装完成过后使用命令 scrapy 来试试吧.

第二步,使用scrapy来创建你的项目 。
输入命令scrapy startproject scrapydemo, 来创建一个爬虫项目 。
|
1
2
3
4
5
6
7
8
|
liaochengdemacbook
-
pro:scrapy liaocheng$ scrapy startproject scrapydemo
new scrapy project
'scrapydemo'
, using template directory
'/usr/local/lib/python3.7/site-packages/scrapy/templates/project'
, created
in
:
/
users
/
liaocheng
/
script
/
scrapy
/
scrapydemo
you can start your first spider with:
cd scrapydemo
scrapy genspider example example.com
liaochengdemacbook
-
pro:scrapy liaocheng$
|
使用genspider来生成一个基础的spider,使用命令scrapy genspider demo juejin.im, 后面这个网址是你要爬的网站,我们先爬自己家的 。
|
1
2
3
|
liaochengdemacbook
-
pro:scrapy liaocheng$ scrapy genspider demo juejin.im
created spider
'demo'
using template
'basic'
liaochengdemacbook
-
pro:scrapy liaocheng$
|
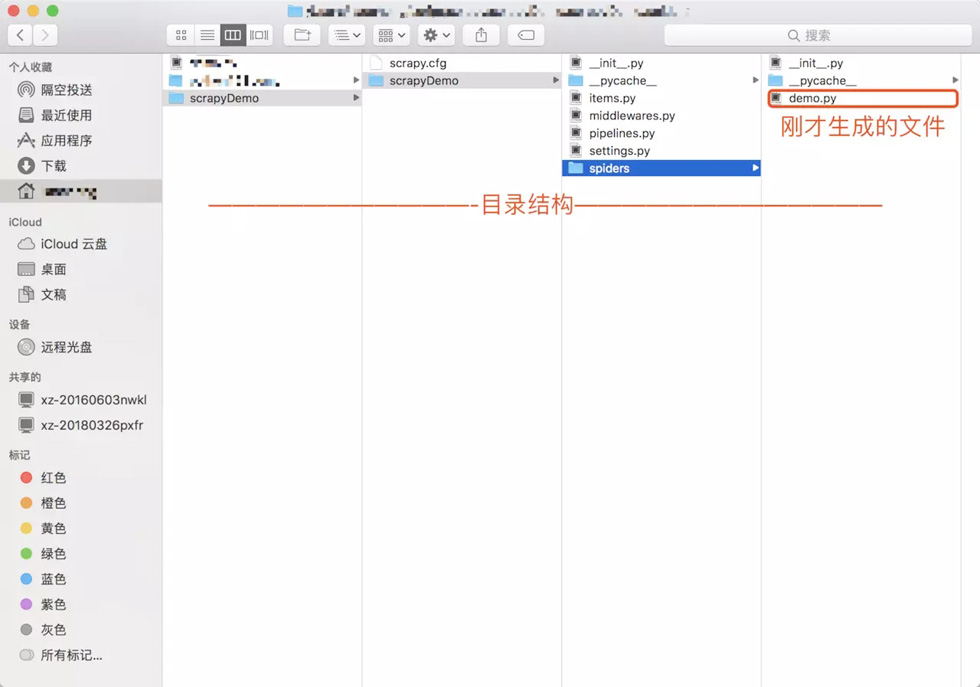
查看生成的目录结构 。

第三步,打开项目,开始编码 。
查看生成的的demo.py的内容 。
|
1
2
3
4
5
6
7
8
9
10
11
|
# -*- coding: utf-8 -*-
import
scrapy
class
demospider(scrapy.spider):
name
=
'demo'
## 爬虫的名字
allowed_domains
=
[
'juejin.im'
]
## 需要过滤的域名,也就是只爬这个网址下面的内容
start_urls
=
[
'https://juejin.im/post/5c790b4b51882545194f84f0'
]
## 初始url链接
def
parse(
self
, response):
## 如果新建的spider必须实现这个方法
pass
|
可以使用第二种方式,将start_urls给提出来 。
|
1
2
3
4
5
6
7
8
9
10
11
12
13
14
15
16
|
# -*- coding: utf-8 -*-
import
scrapy
class
demospider(scrapy.spider):
name
=
'demo'
## 爬虫的名字
allowed_domains
=
[
'juejin.im'
]
## 需要过滤的域名,也就是只爬这个网址下面的内容
def
start_requests(
self
):
start_urls
=
[
'http://juejin.im/'
]
## 初始url链接
for
url
in
start_urls:
# 调用parse
yield
scrapy.request(url
=
url, callback
=
self
.parse)
def
parse(
self
, response):
## 如果新建的spider必须实现这个方法
pass
|
编写articleitem.py文件(item文件就类似java里面的实体类) 。
|
1
2
3
4
5
6
7
8
9
10
11
12
13
14
15
16
17
18
19
20
21
22
23
24
25
26
27
28
29
30
31
32
|
import
scrapy
class
articleitem(scrapy.item):
## 需要实现scrapy.item文件
# 文章id
id
=
scrapy.field()
# 文章标题
title
=
scrapy.field()
# 文章内容
content
=
scrapy.field()
# 作者
author
=
scrapy.field()
# 发布时间
createtime
=
scrapy.field()
# 阅读量
readnum
=
scrapy.field()
# 点赞数
praise
=
scrapy.field()
# 头像
photo
=
scrapy.field()
# 评论数
commentnum
=
scrapy.field()
# 文章链接
link
=
scrapy.field()
|
编写parse方法的代码 。
|
1
2
3
4
5
6
7
8
9
10
11
12
13
14
15
16
17
18
19
20
21
22
23
24
25
26
27
28
29
30
31
32
33
34
35
36
37
38
39
40
41
42
43
44
45
46
47
48
49
50
51
52
53
54
55
56
57
58
59
60
61
62
63
64
|
def
parse(
self
, response):
# 获取页面上所有的url
nextpage
=
response.css(
"a::attr(href)"
).extract()
# 遍历页面上所有的url链接,时间复杂度为o(n)
for
i
in
nextpage:
if
nextpage
is
not
none:
# 将链接拼起来
url
=
response.urljoin(i)
# 必须是掘金的链接才进入
if
"juejin.im"
in
str
(url):
# 存入redis,如果能存进去,就是一个没有爬过的链接
if
self
.insertredis(url)
=
=
true:
# dont_filter作用是是否过滤相同url true是不过滤,false为过滤,我们这里只爬一个页面就行了,不用全站爬,全站爬对对掘金不是很友好,我么这里只是用来测试的
yield
scrapy.request(url
=
url, callback
=
self
.parse,headers
=
self
.headers,dont_filter
=
false)
# 我们只分析文章,其他的内容都不管
if
"/post/"
in
response.url
and
"#comment"
not
in
response.url:
# 创建我们刚才的articleitem
article
=
articleitem()
# 文章id作为id
article[
'id'
]
=
str
(response.url).split(
"/"
)[
-
1
]
# 标题
article[
'title'
]
=
response.css(
"#juejin > div.view-container > main > div > div.main-area.article-area.shadow > article > h1::text"
).extract_first()
# 内容
parameter
=
response.css(
"#juejin > div.view-container > main > div > div.main-area.article-area.shadow > article > div.article-content"
).extract_first()
article[
'content'
]
=
self
.parsetomarkdown(parameter)
# 作者
article[
'author'
]
=
response.css(
"#juejin > div.view-container > main > div > div.main-area.article-area.shadow > article > div:nth-child(6) > meta:nth-child(1)::attr(content)"
).extract_first()
# 创建时间
createtime
=
response.css(
"#juejin > div.view-container > main > div > div.main-area.article-area.shadow > article > div.author-info-block > div > div > time::text"
).extract_first()
createtime
=
str
(createtime).replace(
"年"
,
"-"
).replace(
"月"
,
"-"
).replace(
"日"
,"")
article[
'createtime'
]
=
createtime
# 阅读量
article[
'readnum'
]
=
int
(
str
(response.css(
"#juejin > div.view-container > main > div > div.main-area.article-area.shadow > article > div.author-info-block > div > div > span::text"
).extract_first()).split(
" "
)[
1
])
# 点赞数
article[
'badge'
]
=
response.css(
"#juejin > div.view-container > main > div > div.article-suspended-panel.article-suspended-panel > div.like-btn.panel-btn.like-adjust.with-badge::attr(badge)"
).extract_first()
# 评论数
article[
'commentnum'
]
=
response.css(
"#juejin > div.view-container > main > div > div.article-suspended-panel.article-suspended-panel > div.comment-btn.panel-btn.comment-adjust.with-badge::attr(badge)"
).extract_first()
# 文章链接
article[
'link'
]
=
response.url
# 这个方法和很重要(坑),之前就是由于执行yield article, pipeline就一直不能获取数据
yield
article
# 将内容转换成markdown
def
parsetomarkdown(
self
, param):
return
tomd.tomd(
str
(param)).markdown
# url 存入redis,如果能存那么就没有该链接,如果不能存,那么就存在该链接
def
insertredis(
self
, url):
if
self
.redis !
=
none:
return
self
.redis.sadd(
"articleurllist"
, url)
=
=
1
else
:
self
.redis
=
self
.redisconnection.getclient()
self
.insertredis(url)
|
编写pipeline类,这个pipeline是一个管道,可以将所有yield关键字返回的数据都交给这个管道处理,但是需要在settings里面配置一下pipeline才行 。
|
1
2
3
4
5
6
7
8
9
10
11
12
13
14
15
16
17
18
19
20
21
22
23
24
25
26
27
28
29
30
31
32
33
34
35
36
37
38
39
40
41
42
43
44
45
46
47
48
49
50
51
52
53
54
55
56
57
58
59
60
61
62
63
|
from
elasticsearch
import
elasticsearch
class
articlepipelines(
object
):
# 初始化
def
__init__(
self
):
# elasticsearch的index
self
.index
=
"article"
# elasticsearch的type
self
.
type
=
"type"
# elasticsearch的ip加端口
self
.es
=
elasticsearch(hosts
=
"localhost:9200"
)
# 必须实现的方法,用来处理yield返回的数据
def
process_item(
self
, item, spider):
# 这里是判断,如果是demo这个爬虫的数据才处理
if
spider.name !
=
"demo"
:
return
item
result
=
self
.checkdocumentexists(item)
if
result
=
=
false:
self
.createdocument(item)
else
:
self
.updatedocument(item)
# 添加文档
def
createdocument(
self
, item):
body
=
{
"title"
: item[
'title'
],
"content"
: item[
'content'
],
"author"
: item[
'author'
],
"createtime"
: item[
'createtime'
],
"readnum"
: item[
'readnum'
],
"praise"
: item[
'praise'
],
"link"
: item[
'link'
],
"commentnum"
: item[
'commentnum'
]
}
try
:
self
.es.create(index
=
self
.index, doc_type
=
self
.
type
,
id
=
item[
"id"
], body
=
body)
except
:
pass
# 更新文档
def
updatedocument(
self
, item):
parm
=
{
"doc"
: {
"readnum"
: item[
'readnum'
],
"praise"
: item[
'praise'
]
}
}
try
:
self
.es.update(index
=
self
.index, doc_type
=
self
.
type
,
id
=
item[
"id"
], body
=
parm)
except
:
pass
# 检查文档是否存在
def
checkdocumentexists(
self
, item):
try
:
self
.es.get(
self
.index,
self
.
type
, item[
"id"
])
return
true
except
:
return
false
|
第四步,运行代码查看效果 。
使用scrapy list查看本地的所有爬虫 。
|
1
2
3
|
liaochengdemacbook
-
pro:scrapydemo liaocheng$ scrapy
list
demo
liaochengdemacbook
-
pro:scrapydemo liaocheng$
|
使用scrapy crawl demo来运行爬虫 。
|
1
|
scrapy crawl demo
|
到kibana里面看爬到的数据,执行下面的命令可以看到数据 。
|
1
2
3
4
5
6
|
get
/
article
/
_search
{
"query"
: {
"match_all"
: {}
}
}
|
|
1
2
3
4
5
6
7
8
9
10
11
12
13
14
15
16
17
18
19
20
21
22
23
|
{
"took"
:
7
,
"timed_out"
: false,
"_shards"
: {
"total"
:
5
,
"successful"
:
5
,
"skipped"
:
0
,
"failed"
:
0
},
"hits"
: {
"total"
:
1
,
"max_score"
:
1
,
"hits"
: [
{
"_index"
:
"article2"
,
"_type"
:
"type"
,
"_id"
:
"5c790b4b51882545194f84f0"
,
"_score"
:
1
,
"_source"
: {}
}
]
}
}
|
总结 。
以上就是这篇文章的全部内容了,希望本文的内容对大家的学习或者工作具有一定的参考学习价值,谢谢大家对我的支持.
原文链接:https://juejin.im/post/5c88bb19f265da2d96184df3 。
最后此篇关于一步步教你用python的scrapy编写一个爬虫的文章就讲到这里了,如果你想了解更多关于一步步教你用python的scrapy编写一个爬虫的内容请搜索CFSDN的文章或继续浏览相关文章,希望大家以后支持我的博客! 。
在一个 scrapy 项目中,人们经常使用中间件。在交互式 session 期间是否也有一种通用方法可以在 scrapy shell 中启用中间件? 最佳答案 尽管如此,在 setting.py 中设
我想对网页中向下滚动生成的内容进行反向工程。问题出在url https://www.crowdfunder.com/user/following_page/80159?user_id=80159&li
我需要帮助将相对URL转换为Scrapy Spider中的绝对URL。 我需要将起始页面上的链接转换为绝对URL,以获取起始页面上已草稿的项目的图像。我尝试使用不同的方法来实现此目标失败,但是我陷入了
我在 Scrapy Python 中制作了一个脚本,它在几个月内一直运行良好(没有更改)。最近,当我在 Windows Powershell 中执行脚本时,它引发了下一个错误: scrapy craw
我已经从 docker 启动了 splash。我为 splash 和 scrapy 创建了大的 lua 脚本,然后它运行我看到了问题: Lua error: error in __gc metamet
我正在使用scrapy 来抓取网站,但发生了不好的事情(断电等)。 我想知道我怎样才能从它坏了的地方继续爬行。我不想从种子开始。 最佳答案 这可以通过将预定的请求持久化到磁盘来完成。 scrapy c
有人可以向我解释一下 Scrapy 中的暂停/恢复功能是如何实现的吗?作品? scrapy的版本我正在使用的是 0.24.5 documentation没有提供太多细节。 我有以下简单的蜘蛛: cla
我想将 apscheduler 与 scrapy.but 我的代码是错误的。 我应该如何修改它? settings = get_project_settings() configure_logging
我正在抓取一个网站并解析一些内容和图像,但即使对于 100 页左右的简单网站,完成这项工作也需要数小时。我正在使用以下设置。任何帮助将不胜感激。我已经看过这个问题- Scrapy 's Scrapyd
我正在抓取一个网站并解析一些内容和图像,但即使对于 100 页左右的简单网站,完成这项工作也需要数小时。我正在使用以下设置。任何帮助将不胜感激。我已经看过这个问题- Scrapy 's Scrapyd
我是爬行新手,想知道是否可以使用 Scrapy 逐步爬行网站,例如 CNBC.com?例如,如果今天我从一个站点抓取所有页面,那么从明天开始我只想收集新发布到该站点的页面,以避免抓取所有旧页面。 感谢
我是scrapy的新手。我正在尝试从 here 下载图像.我在关注 Official-Doc和 this article . 我的 settings.py 看起来像: BOT_NAME = 'shop
我在使用 scrapy 时遇到了一些问题。它没有返回任何结果。我试图将以下蜘蛛复制并粘贴到 scrapy shell 中,它确实有效。真的不确定问题出在哪里,但是当我用“scrapy crawl rx
如何使用 Scrapy 抓取多个 URL? 我是否被迫制作多个爬虫? class TravelSpider(BaseSpider): name = "speedy" allowed_d
当我使用splash渲染整个目标页面来爬取整个网站时出现问题。某些页面不是随机成功的,所以我错误地获取了支持渲染工作完成后出现的信息。这意味着我尽管我可以从其他渲染结果中获取全部信息,但仅从渲染结果中
如何使用 Scrapy 抓取多个 URL? 我是否被迫制作多个爬虫? class TravelSpider(BaseSpider): name = "speedy" allowed_d
我的scrapy程序无论如何只使用一个CPU内核CONCURRENT_REQUESTS我做。 scrapy中的某些方法是否可以在一个scrapy爬虫中使用所有cpu核心? ps:好像有争论max_pr
我最近用 python 和 Selenium 做了一个网络爬虫,我发现它做起来非常简单。该页面使用 ajax 调用来加载数据,最初我等待固定的 time_out 来加载页面。这工作了一段时间。之后,我
我想用这个命令运行 scrapy 服务器: scrapy server 它失败了,因为没有项目。然后我创建一个空项目来运行服务器,并成功部署另一个项目。但是,scrapy 服务器无法处理这个项目,并告
我正在创建一个网络应用程序,用于从不同网站抓取一长串鞋子。这是我的两个单独的 scrapy 脚本: http://store.nike.com/us/en_us/pw/mens-clearance-s

我是一名优秀的程序员,十分优秀!