- ubuntu12.04环境下使用kvm ioctl接口实现最简单的虚拟机
- Ubuntu 通过无线网络安装Ubuntu Server启动系统后连接无线网络的方法
- 在Ubuntu上搭建网桥的方法
- ubuntu 虚拟机上网方式及相关配置详解
CFSDN坚持开源创造价值,我们致力于搭建一个资源共享平台,让每一个IT人在这里找到属于你的精彩世界.
这篇CFSDN的博客文章使用qt quick-ListView仿微信好友列表和聊天列表的示例代码由作者收集整理,如果你对这篇文章有兴趣,记得点赞哟.
在qml中、常见的view视图有
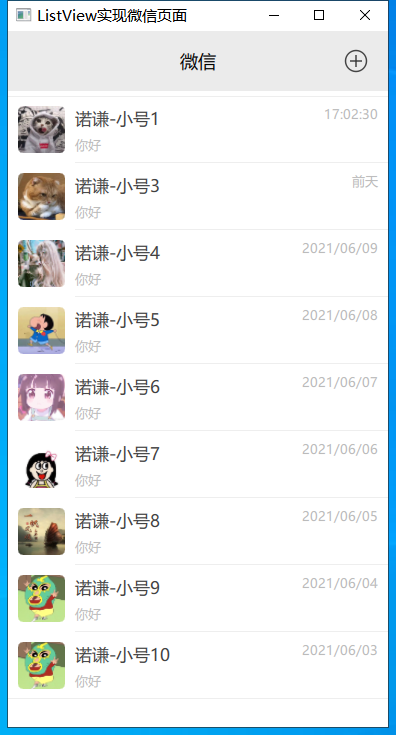
本章首先来学习listview.以微信好友列表为例

里面的每个好友就是由一个个 item 组成的,存在视图中的model里,然后写一个delegate组件,即可通过listview显示出来. 。
由于时间不是很多,所以本章实现的微信好友列表和聊天列表(v1版本)是通过模拟数据实现的,等后面有时间后,再来实现个一个真正的内网聊天工具. 。
好友列表如下图所示

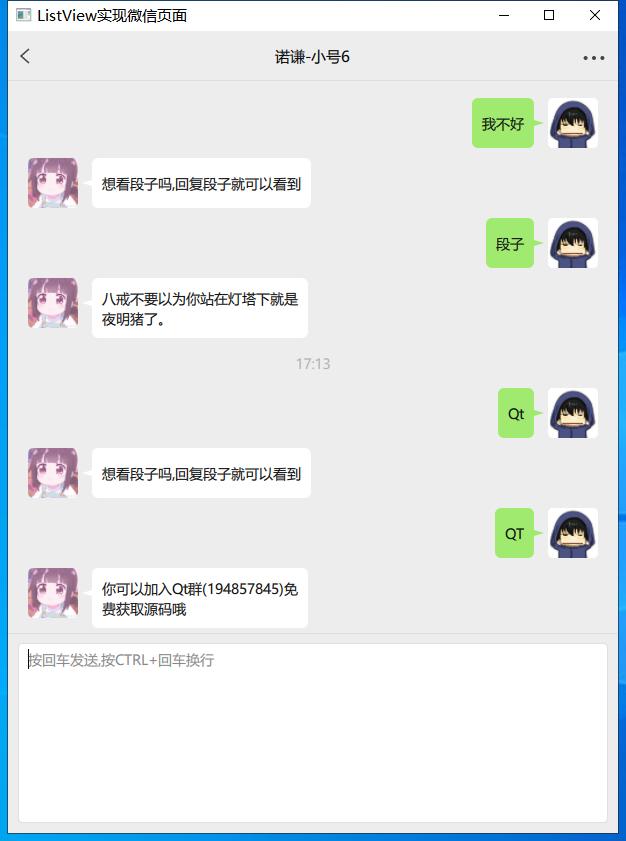
聊天列表如下图所示

整个效果如下所示

觉得gif模糊的话,可以转弯去bilibilihttps://www.bilibili.com/video/bv1z64y1r7kl/ 。
由于代码上传csdn,会导致有些同学可能没积分无法下载,所以已经上传群里了. 。
如果下载后学习有收获,一定要来这里给我点个赞呀,都没动力更新文章了,赞的人太少了 。

|
1
2
3
4
5
6
7
8
9
10
11
12
13
14
15
16
17
18
19
20
21
22
23
24
25
26
27
28
29
30
31
32
33
34
35
36
37
38
39
40
41
42
43
44
45
46
47
48
49
50
51
52
53
54
55
56
|
import qtquick 2.0
import
"bubblenormal.js"
as bubblenormal
import
"bubbleblue.js"
as bubbleblue
import
"bubbleblack.js"
as bubbleblack
item {
id: container
property var bubbleindex: 0
property string msgtext:
""
property
bool
issend:
true
property
int
iconheight: 40
property
int
maxwidth: 100
canvas {
id: canvas
anchors.fill: parent
onpaint: {
bubble().drawbubble(getcontext(
'2d'
));
}
}
text {
id: text
text: msgtext
font.pixelsize: 17
font.family:
"microsoft yahei"
wrapmode: text.wrapanywhere
horizontalalignment: text.alignleft
verticalalignment: text.alignvcenter
anchors.fill: parent
}
component.oncompleted: {
bubble().inittext();
bubble().reupdatesize();
canvas.requestpaint();
}
onbubbleindexchanged: {
bubble().inittext();
bubble().reupdatesize();
canvas.requestpaint();
}
function bubble() {
switch
(bubbleindex) {
case
0 :
return
bubblenormal
case
1 :
return
bubbleblue
case
2 :
return
bubbleblack
default
:
return
bubblenormal
}
}
}
|
代码如上所示,只要用户更改了bubbleindex值,那么我们就会去马上调用替换后对应的气泡js文件的function(),进行初始化消息、重绘气泡背景。这个组件实现后,我们如果想实现其它的气泡,也可以直接往里加就好了 。
4.重要组件-实现聊天列表委托源码 。
|
1
2
3
4
5
6
7
8
9
10
11
12
13
14
15
16
17
18
19
20
21
22
23
24
25
26
27
28
29
30
31
32
33
34
35
36
37
38
39
40
41
42
43
44
45
46
47
48
49
50
51
52
53
54
55
56
57
58
59
60
61
62
63
64
65
66
67
68
69
70
71
72
73
74
75
76
77
78
79
80
81
82
83
84
85
86
87
88
89
90
91
92
93
94
95
96
97
98
99
100
101
102
|
/****************************************************************************
** 聊天列表委托
** author : 诺谦 https://www.cnblogs.com/lifexy/
** create : 2021-6-12
****************************************************************************/
import qtquick 2.12
import qtgraphicaleffects 1.12
import
"./bubble"
as bubble
import
"qrc:/common.js"
as common
item {
id: container
property var headsrc
property var myheadsrc :
"qrc:/head/myhead.jpg"
property var bubbleindex : 0
height: _layout.height + 10
width: listview.view.width
state: msgtype
states: [
state {
name:
"hint"
anchorchanges { target: _layout;
anchors.horizontalcenter: container.horizontalcenter;
anchors.verticalcenter: container.verticalcenter; }
},
state {
name:
"hintdate"
anchorchanges { target: _layout;
anchors.horizontalcenter: container.horizontalcenter;
anchors.verticalcenter: container.verticalcenter; }
},
state {
name:
"recv"
anchorchanges { target: _layout;
anchors.left: container.left;
anchors.verticalcenter: container.verticalcenter; }
},
state {
name:
"send"
anchorchanges { target: _layout;
anchors.right: container.right;
anchors.verticalcenter: container.verticalcenter; }
}
]
row {
id: _layout
anchors.leftmargin: 20
anchors.rightmargin: 20
spacing: 4
layoutdirection : msgtype ==
"send"
? qt.righttoleft : qt.lefttoright
headimage {
id: _head
width : 50
height : 50
headurl: msgtype ==
"recv"
? headsrc : myheadsrc
visible: msgtype ==
"recv"
|| msgtype ==
"send"
}
text {
id: _hint
visible: msgtype ==
"hintdate"
|| msgtype ==
"hint"
text: msgtype ==
"hintdate"
? getchatdate() : msg
color:
"#b0b0b0"
font.pixelsize: 14
font.family:
"microsoft yahei"
wrapmode: text.wrapanywhere
elide: text.elideright
width: container.width - 40
height: 30
horizontalalignment: text.alignhcenter
verticalalignment: text.alignvcenter
}
bubble.chatbubble {
id: _msg
visible: msgtype ==
"recv"
|| msgtype ==
"send"
msgtext: msgtype ==
"recv"
|| msgtype ==
"send"
? msg :
""
issend: msgtype ==
"send"
?
true
:
false
iconheight: _head.height
maxwidth: container.width - _layout.anchors.leftmargin * 2 - _head.width * 2 - _layout.spacing * 2
bubbleindex: container.bubbleindex
}
}
// 判断消息时间,与当前时间间隔多久,来动态显示
function getchatdate () {
var total =
new
date() - date;
if
(total < (1000*60*60*24)) {
return
date.tolocaletimestring(qt.locale(),
"hh:mm"
);
}
else
if
(total < (1000*60*60*24) * 2) {
return
"昨天 "
+date.tolocaletimestring(qt.locale(),
"hh:mm"
);
}
else
if
(total < (1000*60*60*24) * 3) {
return
"前天 "
+date.tolocaletimestring(qt.locale(),
"hh:mm"
);
}
else
{
return
date.tolocalestring(qt.locale(),
"yyyy年m月d日 hh:mm"
);
}
}
}
|
代码如上所示,我们会去判断消息类型:
以上就是qt quick-listview高仿微信好友列表和聊天列表的详细内容,更多关于qt 微信好友列表和聊天列表的资料请关注我其它相关文章! 。
原文链接:https://www.cnblogs.com/lifexy/p/14878664.html 。
最后此篇关于使用qt quick-ListView仿微信好友列表和聊天列表的示例代码的文章就讲到这里了,如果你想了解更多关于使用qt quick-ListView仿微信好友列表和聊天列表的示例代码的内容请搜索CFSDN的文章或继续浏览相关文章,希望大家以后支持我的博客! 。

我是一名优秀的程序员,十分优秀!