- ubuntu12.04环境下使用kvm ioctl接口实现最简单的虚拟机
- Ubuntu 通过无线网络安装Ubuntu Server启动系统后连接无线网络的方法
- 在Ubuntu上搭建网桥的方法
- ubuntu 虚拟机上网方式及相关配置详解
CFSDN坚持开源创造价值,我们致力于搭建一个资源共享平台,让每一个IT人在这里找到属于你的精彩世界.
这篇CFSDN的博客文章Qt实现网络聊天室的示例代码由作者收集整理,如果你对这篇文章有兴趣,记得点赞哟.
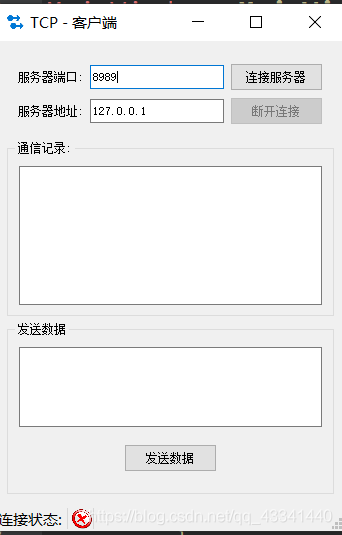
客户端 。

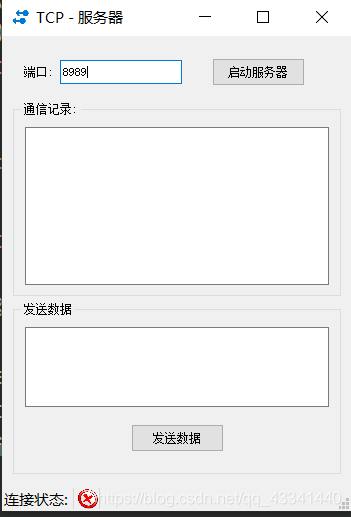
服务器 。

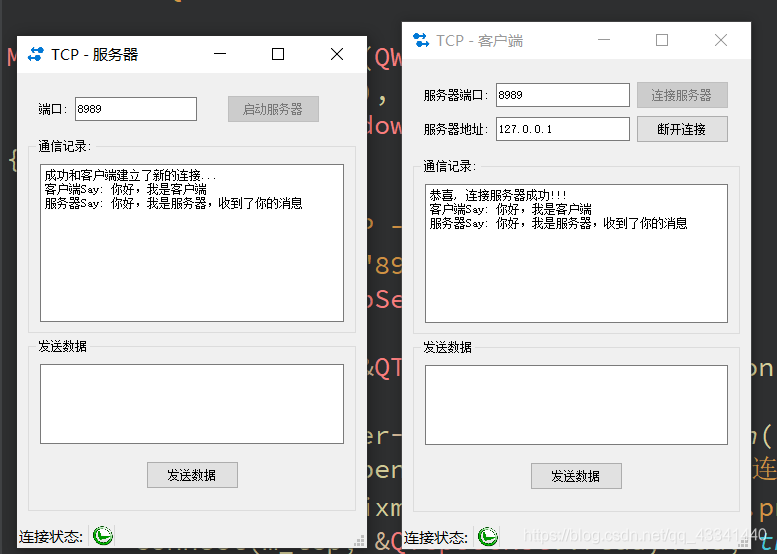
连接成功之后 。

。
在Qt中,实现网络编程的方式比用C++或C实现要方便简单许多,因为Qt已经替我们封装好了,我们会使用就可以了,然后大家还需要了解Qt 的信号槽机制,可以参考我这篇文章,Qt信号槽 。
QTcpServer 类用于监听客户端连接以及和客户端建立连接,在使用之前先介绍一下这个类提供的一些常用 API 函数:
构造函数 。
QTcpServer::QTcpServer(QObject *parent = Q_NULLPTR);
给监听的套接字设置监听 。
bool QTcpServer::listen(const QHostAddress &address = QHostAddress::Any, quint16 port = 0);// 判断当前对象是否在监听, 是返回true,没有监听返回falsebool QTcpServer::isListening() const;// 如果当前对象正在监听返回监听的服务器地址信息, 否则返回 QHostAddress::NullQHostAddress QTcpServer::serverAddress() const;// 如果服务器正在监听连接,则返回服务器的端口; 否则返回0quint16 QTcpServer::serverPort() const
参数: address:通过类 QHostAddress 可以封装 IPv4、IPv6 格式的 IP 地址,QHostAddress::Any 表示自动绑定 port:如果指定为 0 表示随机绑定一个可用端口。 返回值:绑定成功返回 true,失败返回 false 。
得到和客户端建立连接之后用于通信的 QTcpSocket 套接字对象,它是 QTcpServer 的一个子对象,当 QTcpServer 对象析构的时候会自动析构这个子对象,当然也可自己手动析构,建议用完之后自己手动析构这个通信的 QTcpSocket 对象.
QTcpSocket *QTcpServer::nextPendingConnection();
阻塞等待客户端发起的连接请求,不推荐在单线程程序中使用,建议使用非阻塞方式处理新连接,即使用信号 newConnection() .
bool QTcpServer::waitForNewConnection(int msec = 0, bool *timedOut = Q_NULLPTR);
参数: msec:指定阻塞的最大时长,单位为毫秒(ms) timeout:传出参数,如果操作超时 timeout 为 true,没有超时 timeout 为 false 。
当接受新连接导致错误时,将发射如下信号。socketError 参数描述了发生的错误相关的信息 。
[signal] void QTcpServer::acceptError(QAbstractSocket::SocketError socketError);
每次有新连接可用时都会发出 newConnection () 信号.
[signal] void QTcpServer::newConnection();
QTcpSocket 是一个套接字通信类,不管是客户端还是服务器端都需要使用。在 Qt 中发送和接收数据也属于 IO 操作(网络 IO) 。
构造函数 。
QTcpSocket::QTcpSocket(QObject *parent = Q_NULLPTR);
连接服务器,需要指定服务器端绑定的IP和端口信息.
[virtual] void QAbstractSocket::connectToHost(const QString &hostName, quint16 port, OpenMode openMode = ReadWrite, NetworkLayerProtocol protocol = AnyIPProtocol);[virtual] void QAbstractSocket::connectToHost(const QHostAddress &address, quint16 port, OpenMode openMode = ReadWrite);
在 Qt 中不管调用读操作函数接收数据,还是调用写函数发送数据,操作的对象都是本地的由 Qt 框架维护的一块内存。因此,调用了发送函数数据不一定会马上被发送到网络中,调用了接收函数也不是直接从网络中接收数据,关于底层的相关操作是不需要使用者来维护的.
接收数据 。
// 指定可接收的最大字节数 maxSize 的数据到指针 data 指向的内存中qint64 QIODevice::read(char *data, qint64 maxSize);// 指定可接收的最大字节数 maxSize,返回接收的字符串QByteArray QIODevice::read(qint64 maxSize);// 将当前可用操作数据全部读出,通过返回值返回读出的字符串QByteArray QIODevice::readAll();
在使用 QTcpSocket 进行套接字通信的过程中,如果该类对象发射出 readyRead() 信号,说明对端发送的数据达到了,之后就可以调用 read 函数接收数据了.
[signal] void QIODevice::readyRead();
调用 connectToHost() 函数并成功建立连接之后发出 connected() 信号。 在套接字断开连接时发出 disconnected() 信号.
调用 connectToHost() 函数并成功建立连接之后发出 connected() 信号。[signal] void QAbstractSocket::disconnected();
。
头文件 。
class MainWindow : public QMainWindow{ Q_OBJECTpublic: explicit MainWindow(QWidget *parent = 0); ~MainWindow();private slots: void on_startServer_clicked(); void on_sendMsg_clicked();private: Ui::MainWindow *ui; QTcpServer* m_server; QTcpSocket* m_tcp;};
源文件 。
MainWindow::MainWindow(QWidget *parent) : QMainWindow(parent), ui(new Ui::MainWindow){ ui->setupUi(this); setWindowTitle("TCP - 服务器"); // 创建 QTcpServer 对象 m_server = new QTcpServer(this); // 检测是否有新的客户端连接 connect(m_server, &QTcpServer::newConnection, this, [=]() { m_tcp = m_server->nextPendingConnection(); ui->record->append("成功和客户端建立了新的连接..."); m_status->setPixmap(QPixmap(":/connect.png").scaled(20, 20)); // 检测是否有客户端数据 connect(m_tcp, &QTcpSocket::readyRead, this, [=]() { // 接收数据 QString recvMsg = m_tcp->readAll(); ui->record->append("客户端Say: " + recvMsg); }); // 客户端断开了连接 connect(m_tcp, &QTcpSocket::disconnected, this, [=]() { ui->record->append("客户端已经断开了连接..."); m_tcp->deleteLater(); m_status->setPixmap(QPixmap(":/disconnect.png").scaled(20, 20)); }); });}MainWindow::~MainWindow(){ delete ui;}// 启动服务器端的服务按钮void MainWindow::on_startServer_clicked(){ unsigned short port = ui->port->text().toInt(); // 设置服务器监听 m_server->listen(QHostAddress::Any, port); ui->startServer->setEnabled(false);}// 点击发送数据按钮void MainWindow::on_sendMsg_clicked(){ QString sendMsg = ui->msg->toPlainText(); m_tcp->write(sendMsg.toUtf8()); ui->record->append("服务器Say: " + sendMsg); ui->msg->clear();
通信流程 。
头文件 。
class MainWindow : public QMainWindow{ Q_OBJECTpublic: explicit MainWindow(QWidget *parent = 0); ~MainWindow();private slots: void on_connectServer_clicked(); void on_sendMsg_clicked(); void on_disconnect_clicked();private: Ui::MainWindow *ui; QTcpSocket* m_tcp;};
源文件 。
MainWindow::MainWindow(QWidget *parent) : QMainWindow(parent), ui(new Ui::MainWindow){ ui->setupUi(this); setWindowTitle("TCP - 客户端"); // 创建通信的套接字对象 m_tcp = new QTcpSocket(this); // 检测服务器是否回复了数据 connect(m_tcp, &QTcpSocket::readyRead, [=]() { // 接收服务器发送的数据 QByteArray recvMsg = m_tcp->readAll(); ui->record->append("服务器Say: " + recvMsg); }); // 检测是否和服务器是否连接成功了 connect(m_tcp, &QTcpSocket::connected, this, [=]() { ui->record->append("恭喜, 连接服务器成功!!!"); m_status->setPixmap(QPixmap(":/connect.png").scaled(20, 20)); }); // 检测服务器是否和客户端断开了连接 connect(m_tcp, &QTcpSocket::disconnected, this, [=]() { ui->record->append("服务器已经断开了连接, ..."); ui->connectServer->setEnabled(true); ui->disconnect->setEnabled(false); });}MainWindow::~MainWindow(){ delete ui;}// 连接服务器按钮按下之后的处理动作void MainWindow::on_connectServer_clicked(){ QString ip = ui->ip->text(); unsigned short port = ui->port->text().toInt(); // 连接服务器 m_tcp->connectToHost(QHostAddress(ip), port); ui->connectServer->setEnabled(false); ui->disconnect->setEnabled(true);}// 发送数据按钮按下之后的处理动作void MainWindow::on_sendMsg_clicked(){ QString sendMsg = ui->msg->toPlainText(); m_tcp->write(sendMsg.toUtf8()); ui->record->append("客户端Say: " + sendMsg); ui->msg->clear();}// 断开连接按钮被按下之后的处理动作void MainWindow::on_disconnect_clicked(){ m_tcp->close(); ui->connectServer->setEnabled(true); ui->disconnect->setEnabled(false);}
到此这篇关于Qt实现网络聊天室的示例代码的文章就介绍到这了,更多相关Qt 聊天室内容请搜索我以前的文章或继续浏览下面的相关文章希望大家以后多多支持我! 。
原文链接:https://www.cnblogs.com/wanghongyang/p/14921502.html 。
最后此篇关于Qt实现网络聊天室的示例代码的文章就讲到这里了,如果你想了解更多关于Qt实现网络聊天室的示例代码的内容请搜索CFSDN的文章或继续浏览相关文章,希望大家以后支持我的博客! 。
我尝试理解[c代码 -> 汇编]代码 void node::Check( data & _data1, vector& _data2) { -> push ebp -> mov ebp,esp ->
我需要在当前表单(代码)的上下文中运行文本文件中的代码。其中一项要求是让代码创建新控件并将其添加到当前窗体。 例如,在Form1.cs中: using System.Windows.Forms; ..
我有此 C++ 代码并将其转换为 C# (.net Framework 4) 代码。有没有人给我一些关于 malloc、free 和 sprintf 方法的提示? int monate = ee; d
我的网络服务器代码有问题 #include #include #include #include #include #include #include int
给定以下 html 代码,将列表中的第三个元素(即“美丽”一词)以斜体显示的 CSS 代码是什么?当然,我可以给这个元素一个 id 或一个 class,但 html 代码必须保持不变。谢谢
关闭。这个问题不符合Stack Overflow guidelines .它目前不接受答案。 我们不允许提问寻求书籍、工具、软件库等的推荐。您可以编辑问题,以便用事实和引用来回答。 关闭 7 年前。
我试图制作一个宏来避免重复代码和注释。 我试过这个: #define GrowOnPage(any Page, any Component) Component.Width := Page.Surfa
我正在尝试将我的旧 C++ 代码“翻译”成头条新闻所暗示的 C# 代码。问题是我是 C# 中的新手,并不是所有的东西都像 C++ 中那样。在 C++ 中这些解决方案运行良好,但在 C# 中只是不能。我
在 Windows 10 上工作,R 语言的格式化程序似乎没有在 Visual Studio Code 中完成它的工作。我试过R support for Visual Studio Code和 R-T
我正在处理一些报告(计数),我必须获取不同参数的计数。非常简单但乏味。 一个参数的示例查询: qCountsEmployee = ( "select count(*) from %s wher
最近几天我尝试从 d00m 调试网络错误。我开始用尽想法/线索,我希望其他 SO 用户拥有可能有用的宝贵经验。我希望能够提供所有相关信息,但我个人无法控制服务器环境。 整个事情始于用户注意到我们应用程
我有一个 app.js 文件,其中包含如下 dojo amd 模式代码: require(["dojo/dom", ..], function(dom){ dom.byId('someId').i
我对“-gencode”语句中的“code=sm_X”选项有点困惑。 一个例子:NVCC 编译器选项有什么作用 -gencode arch=compute_13,code=sm_13 嵌入库中? 只有
我为我的表格使用 X-editable 框架。 但是我有一些问题。 $(document).ready(function() { $('.access').editable({
我一直在通过本教程学习 flask/python http://blog.miguelgrinberg.com/post/the-flask-mega-tutorial-part-i-hello-wo
我想将 Vim 和 EMACS 用于 CNC、G 代码和 M 代码。 Vim 或 EMACS 是否有任何语法或模式来处理这种类型的代码? 最佳答案 一些快速搜索使我找到了 this vim 和 thi
关闭。这个问题不符合Stack Overflow guidelines .它目前不接受答案。 想改进这个问题?更新问题,使其成为 on-topic对于堆栈溢出。 7年前关闭。 Improve this
这个问题在这里已经有了答案: Enabling markdown highlighting in Vim (5 个回答) 6年前关闭。 当我在 Vim 中编辑包含 Markdown 代码的 READM
我正在 Swift3 iOS 中开发视频应用程序。基本上我必须将视频 Assets 和音频与淡入淡出效果合并为一个并将其保存到 iPhone 画廊。为此,我使用以下方法: private func d
pipeline { agent any stages { stage('Build') { steps { e

我是一名优秀的程序员,十分优秀!