- ubuntu12.04环境下使用kvm ioctl接口实现最简单的虚拟机
- Ubuntu 通过无线网络安装Ubuntu Server启动系统后连接无线网络的方法
- 在Ubuntu上搭建网桥的方法
- ubuntu 虚拟机上网方式及相关配置详解
CFSDN坚持开源创造价值,我们致力于搭建一个资源共享平台,让每一个IT人在这里找到属于你的精彩世界.
这篇CFSDN的博客文章深入学习Spring Cloud-Ribbon由作者收集整理,如果你对这篇文章有兴趣,记得点赞哟.
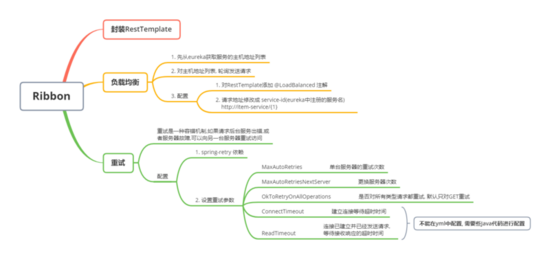
Ribbon 是 Netflix 发布的开源项目,主要功能是提供客户端的 软件负载均衡算法 ,将 Netflix 的中间层服务连接在一起。Ribbon 客户端组件提供一系列完善的配置项如连接超时,重试等。简单的说,就是在配置文件中列出Load Balancer(简称LB)后面所有的机器,Ribbon 会自动的帮助你基于某种规则(如简单轮询,随机连接等)去连接这些机器。我们也很容易使用 Ribbon 实现自定义的负载均衡算法.
ribion=负载均衡+重试 。

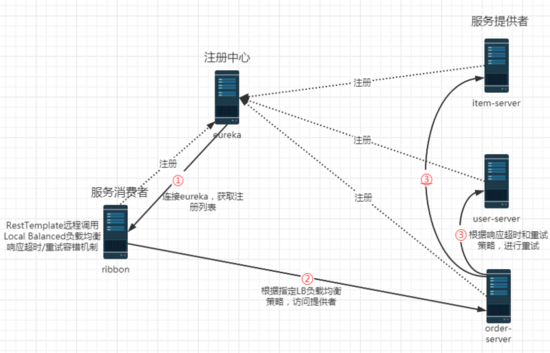
ribbon的工作步骤:
第一步先选择 EurekaServer ,它优先选择在同一个区域内负载较少的server。 第二步再根据用户指定的策略,在从server取到的服务注册列表中选择一个地址。 其中Ribbon提供了多种策略:比如轮询、随机和根据响应时间加权.

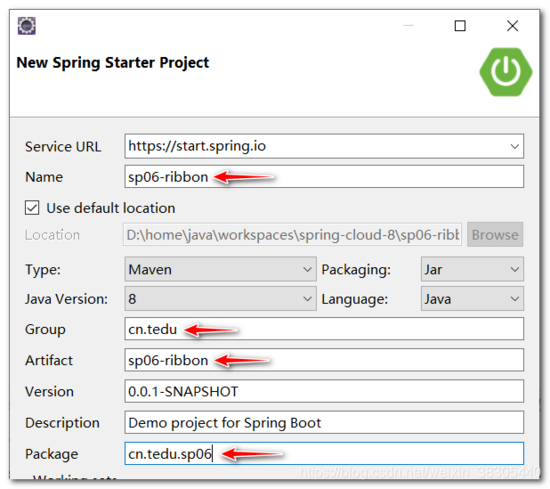
第一步:新建spring项目 。

第二步:添加Eureka Discovery Client,Spring Web依赖 。

第三步:添加sp01-commons工具API依赖;eureka-client 中已经包含 ribbon 依赖 。
<?xml version="1.0" encoding="UTF-8"?><project xmlns="http://maven.apache.org/POM/4.0.0" xmlns:xsi="http://www.w3.org/2001/XMLSchema-instance" xsi:schemaLocation="http://maven.apache.org/POM/4.0.0 https://maven.apache.org/xsd/maven-4.0.0.xsd"> <modelVersion>4.0.0</modelVersion> <parent> <groupId>org.springframework.boot</groupId> <artifactId>spring-boot-starter-parent</artifactId> <version>2.2.1.RELEASE</version> <relativePath/> <!-- lookup parent from repository --> </parent> <groupId>cn.tedu</groupId> <artifactId>sp06-ribbon</artifactId> <version>0.0.1-SNAPSHOT</version> <name>sp06-ribbon</name> <description>Demo project for Spring Boot</description> <properties> <java.version>1.8</java.version> <spring-cloud.version>Hoxton.RELEASE</spring-cloud.version> </properties> <dependencies> <dependency> <groupId>org.springframework.boot</groupId> <artifactId>spring-boot-starter-web</artifactId> </dependency> <dependency> <groupId>org.springframework.cloud</groupId> <artifactId>spring-cloud-starter-netflix-eureka-client</artifactId> </dependency> <dependency> <groupId>org.springframework.boot</groupId> <artifactId>spring-boot-starter-test</artifactId> <scope>test</scope> <exclusions> <exclusion> <groupId>org.junit.vintage</groupId> <artifactId>junit-vintage-engine</artifactId> </exclusion> </exclusions> </dependency> <dependency> <groupId>cn.tedu</groupId> <artifactId>sp01-commons</artifactId> <version>0.0.1-SNAPSHOT</version> </dependency> </dependencies> <dependencyManagement> <dependencies> <dependency> <groupId>org.springframework.cloud</groupId> <artifactId>spring-cloud-dependencies</artifactId> <version>${spring-cloud.version}</version> <type>pom</type> <scope>import</scope> </dependency> </dependencies> </dependencyManagement> <build> <plugins> <plugin> <groupId>org.springframework.boot</groupId> <artifactId>spring-boot-maven-plugin</artifactId> </plugin> </plugins> </build></project>
第四步:添加yml配置 。
spring: application: name: ribbon #服务器命名 server: port: 3001 # 设置服务器端口号 # 配置添加注册中心集群 eureka: client: service-url: defaultZone: http://eureka1:2001/eureka, http://eureka2:2002/eureka
RestTemplate 是SpringBoot提供的一个Rest远程调用工具.
类似于 HttpClient,可以发送 http 请求,并处理响应。RestTemplate简化了Rest API调用,只需要使用它的一个方法,就可以完成请求、响应、Json转换 。
方法:
RestTemplate 和 Dubbo 远程调用的区别:
RestTemplate:
http调用 。
效率低 。
Dubbo:
RPC调用,Java的序列化 。
效率高 。
第一步:创建RestTemplate实例 。
RestTemplate 是用来调用其他微服务的工具类,封装了远程调用代码,提供了一组用于远程调用的模板方法,例如: getForObject() 、 postForObject() 等 。
package cn.tedu.sp06;import org.springframework.boot.SpringApplication;import org.springframework.boot.autoconfigure.SpringBootApplication;import org.springframework.cloud.client.discovery.EnableDiscoveryClient;import org.springframework.context.annotation.Bean;import org.springframework.web.client.RestTemplate;@EnableDiscoveryClient@SpringBootApplicationpublic class Sp06RibbonApplication { //创建 RestTemplate 实例,并存入 spring 容器 @Bean public RestTemplate getRestTemplate() { return new RestTemplate(); } public static void main(String[] args) { SpringApplication.run(Sp06RibbonApplication.class, args); }}
第二步:创建RibbonController 。
package cn.tedu.sp06.controller;import java.util.List;import org.springframework.beans.factory.annotation.Autowired;import org.springframework.web.bind.annotation.GetMapping;import org.springframework.web.bind.annotation.PathVariable;import org.springframework.web.bind.annotation.PostMapping;import org.springframework.web.bind.annotation.RequestBody;import org.springframework.web.bind.annotation.RestController;import org.springframework.web.client.RestTemplate;import cn.tedu.sp01.pojo.Item;import cn.tedu.sp01.pojo.Order;import cn.tedu.sp01.pojo.User;import cn.tedu.web.util.JsonResult;@RestControllerpublic class RibbonController { @Autowired private RestTemplate rt; @GetMapping("/item-service/{orderId}") public JsonResult<List<Item>> getItems(@PathVariable String orderId) { //向指定微服务地址发送 get 请求,并获得该服务的返回结果 //{1} 占位符,用 orderId 填充 return rt.getForObject("http://localhost:8001/{1}", JsonResult.class, orderId); } @PostMapping("/item-service/decreaseNumber") public JsonResult decreaseNumber(@RequestBody List<Item> items) { //发送 post 请求 return rt.postForObject("http://localhost:8001/decreaseNumber", items, JsonResult.class); } / @GetMapping("/user-service/{userId}") public JsonResult<User> getUser(@PathVariable Integer userId) { return rt.getForObject("http://localhost:8101/{1}", JsonResult.class, userId); } @GetMapping("/user-service/{userId}/score") public JsonResult addScore( @PathVariable Integer userId, Integer score) { return rt.getForObject("http://localhost:8101/{1}/score?score={2}", JsonResult.class, userId, score); } / @GetMapping("/order-service/{orderId}") public JsonResult<Order> getOrder(@PathVariable String orderId) { return rt.getForObject("http://localhost:8201/{1}", JsonResult.class, orderId); } @GetMapping("/order-service") public JsonResult addOrder() { return rt.getForObject("http://localhost:8201/", JsonResult.class); }}
第三步:启动服务,进行测试 。
http://localhost:3001/item-service/35 。
等。.

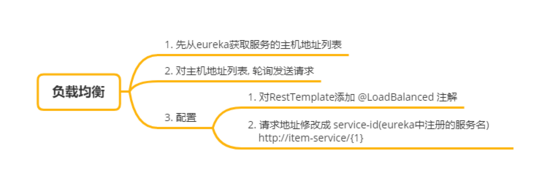
第一步:RestTemplate设置@LoadBalanced 。
@LoadBalanced 负载均衡注解,会对 RestTemplate 实例进行封装,创建动态代理对象,并切入(AOP)负载均衡代码,把请求分发到集群中的服务器 。
package cn.tedu.sp06;import org.springframework.boot.SpringApplication;import org.springframework.boot.autoconfigure.SpringBootApplication;import org.springframework.cloud.client.discovery.EnableDiscoveryClient;import org.springframework.cloud.client.loadbalancer.LoadBalanced;import org.springframework.context.annotation.Bean;import org.springframework.web.client.RestTemplate;@EnableDiscoveryClient@SpringBootApplicationpublic class Sp06RibbonApplication { @LoadBalanced //负载均衡注解 @Bean public RestTemplate getRestTemplate() { return new RestTemplate(); } public static void main(String[] args) { SpringApplication.run(Sp06RibbonApplication.class, args); }}
第二步:访问路径设置为id 。
package cn.tedu.sp06.controller;import java.util.List;import org.springframework.beans.factory.annotation.Autowired;import org.springframework.web.bind.annotation.GetMapping;import org.springframework.web.bind.annotation.PathVariable;import org.springframework.web.bind.annotation.PostMapping;import org.springframework.web.bind.annotation.RequestBody;import org.springframework.web.bind.annotation.RestController;import org.springframework.web.client.RestTemplate;import cn.tedu.sp01.pojo.Item;import cn.tedu.sp01.pojo.Order;import cn.tedu.sp01.pojo.User;import cn.tedu.web.util.JsonResult;@RestControllerpublic class RibbonController { @Autowired private RestTemplate rt; @GetMapping("/item-service/{orderId}") public JsonResult<List<Item>> getItems(@PathVariable String orderId) { //这里服务器路径用 service-id 代替,ribbon 会向服务的多台集群服务器分发请求 return rt.getForObject("http://item-service/{1}", JsonResult.class, orderId); } @PostMapping("/item-service/decreaseNumber") public JsonResult decreaseNumber(@RequestBody List<Item> items) { return rt.postForObject("http://item-service/decreaseNumber", items, JsonResult.class); } / @GetMapping("/user-service/{userId}") public JsonResult<User> getUser(@PathVariable Integer userId) { return rt.getForObject("http://user-service/{1}", JsonResult.class, userId); } @GetMapping("/user-service/{userId}/score") public JsonResult addScore( @PathVariable Integer userId, Integer score) { return rt.getForObject("http://user-service/{1}/score?score={2}", JsonResult.class, userId, score); } / @GetMapping("/order-service/{orderId}") public JsonResult<Order> getOrder(@PathVariable String orderId) { return rt.getForObject("http://order-service/{1}", JsonResult.class, orderId); } @GetMapping("/order-service") public JsonResult addOrder() { return rt.getForObject("http://order-service/", JsonResult.class); }}
第三步:访问测试,ribbon 会把请求分发到 8001 和 8002 两个服务端口上 。
http://localhost:3001/item-service/34 ribbon重试 。

第一步:添加spring-retry依赖 。
<dependency> <groupId>org.springframework.retry</groupId> <artifactId>spring-retry</artifactId></dependency>
第二步:application.yml 配置 ribbon 重试 。
# 06项目用来测试远程调用和ribbon工具# 等功能测试完成后,直接删除spring: application: name: ribbonserver: port: 3001# 连接eureka,从eureka发现其他服务的地址eureka: client: service-url: defaultZone: http://eureka1:2001/eureka,http://eureka2:2002/eureka#配置ribbon 重试次数ribbon: # 次数参数没有提示,并且会有黄色警告 # 重试次数越少越好,一般建议用0,1 MaxAutoRetries: 1 MaxAutoRetriesNextServer: 2
第三步:设置 RestTemplate 的请求工厂的超时属性 。
package cn.tedu.sp06;import org.springframework.boot.SpringApplication;import org.springframework.boot.autoconfigure.SpringBootApplication;import org.springframework.cloud.client.loadbalancer.LoadBalanced;import org.springframework.context.annotation.Bean;import org.springframework.http.client.SimpleClientHttpRequestFactory;import org.springframework.web.client.RestTemplate;@SpringBootApplicationpublic class Sp06RibbonApplication { public static void main(String[] args) { SpringApplication.run(Sp06RibbonApplication.class, args); } /** * 创建RestTemplate实例 * 放入spring容器 * @LoadBalanced-对RestTemplate进行增强,封装RestTemplate,添加负载均衡功能 */ @LoadBalanced @Bean public RestTemplate restTemplate(){ //设置调用超时时间,超时后认为调用失败 SimpleClientHttpRequestFactory f = new SimpleClientHttpRequestFactory(); f.setConnectTimeout(1000);//建立连接等待时间 f.setReadTimeout(1000);//连接建立后,发送请求后,等待接收响应的时间 return new RestTemplate(f); }}
第四步:ItemController 添加延迟代码 。
package cn.tedu.sp02.item.controller;import java.util.List;import java.util.Random;import org.springframework.beans.factory.annotation.Autowired;import org.springframework.beans.factory.annotation.Value;import org.springframework.web.bind.annotation.GetMapping;import org.springframework.web.bind.annotation.PathVariable;import org.springframework.web.bind.annotation.PostMapping;import org.springframework.web.bind.annotation.RequestBody;import org.springframework.web.bind.annotation.RestController;import cn.tedu.sp01.pojo.Item;import cn.tedu.sp01.service.ItemService;import cn.tedu.web.util.JsonResult;import lombok.extern.slf4j.Slf4j;@Slf4j@RestControllerpublic class ItemController { @Autowired private ItemService itemService; //配置文件 application.yml中的server.port=8001注入到这个变量 //是为了后面做负载均衡测试,可以直接看到调用的是那个服务器 @Value("${server.port}") private int port; //获取订单的商品列表 @GetMapping("/{orderId}") public JsonResult<List<Item>> getItems(@PathVariable String orderId) throws InterruptedException { log.info("server.port="+port+", orderId="+orderId); //模拟延迟代码 if (Math.random()<0.9){ long t = new Random().nextInt(5000); log.info("延迟:"+t); Thread.sleep(t); } List<Item> items = itemService.getItems(orderId);//根据订单id获取商品列表 return JsonResult.ok(items).msg("port="+port); } //减少商品库存 /** * @RequestBody 完整接收请求协议体中的数据 * @param items * @return */ @PostMapping("/decreaseNumber") public JsonResult decreaseNumber(@RequestBody List<Item> items) { for (Item item : items){ log.info("减少商品库存:"+item ); } itemService.decreaseNumbers(items); return JsonResult.ok(); }}
第五步:测试 ribbon 重试机制 。
通过 ribbon 访问 item-service,当超时,ribbon 会重试请求集群中其他服务器 。
http://localhost:3001/item-service/35 。
到此这篇关于深入学习Spring Cloud-Ribbon的文章就介绍到这了,更多相关Spring Cloud-Ribbon内容请搜索我以前的文章或继续浏览下面的相关文章希望大家以后多多支持我! 。
原文链接:https://segmentfault.com/a/1190000039323799 。
最后此篇关于深入学习Spring Cloud-Ribbon的文章就讲到这里了,如果你想了解更多关于深入学习Spring Cloud-Ribbon的内容请搜索CFSDN的文章或继续浏览相关文章,希望大家以后支持我的博客! 。
我有一个 Cloud Run 服务,它通过 SQLAlchemy 访问 Cloud SQL 实例.但是,在 Cloud Run 的日志中,我看到 CloudSQL connection failed.
关闭。这个问题是opinion-based .它目前不接受答案。 想改善这个问题吗?更新问题,以便可以通过 editing this post 用事实和引文回答问题. 4年前关闭。 Improve t
在将 docker 容器镜像部署到 Cloud Run 时,我可以选择一个区域,这很好。 Cloud Run 将构建委托(delegate)给 Cloud Build,后者显然会创建两个存储桶来实现这
我正在尝试将 Cloud Functions 用作由 PubSub 触发的异步后台工作程序,并进行更长时间的工作(以分钟为单位)。完整代码在这里https://github.com/zdenulo/c
这是/etc/cloud/cloud.cfg的内容Ubuntu云16.04镜像: # The top level settings are used as module # and system co
如何从 Google Cloud Function 启动 Cloud Dataflow 作业?我想使用 Google Cloud Functions 作为启用跨服务组合的机制。 最佳答案 我已经包含了
我想使用 Cloud Shell 在我的第二代 Cloud Sql 实例上运行数据库迁移。 我找到了一个 example in the docs关于如何使用 gcloud 进行连接.但是当我运行命令时
我正在尝试使用 Google Cloud PubSub和我的 Google Cloud Dataproc群集,我收到如下身份验证范围错误: { "code" : 403, "errors" :
这是我的用例。 我已经有一个以私有(private)模式部署的 Cloud Run 服务。 (与云功能相同的问题) 我正在开发使用此 Cloud Run 的新服务。我在应用程序中使用默认凭据进行身份验
如何连接到 Cloud SQL 上的数据库,而无需在容器中添加我的凭据文件? 最佳答案 使用 UNIX 域套接字 (Java) 从云运行(完全托管)连接到云 SQL At this time Clou
我有一个google-cloud-ml作业,需要从gs存储桶加载numpy .npz文件。我遵循了this example上关于如何从gs加载.npy文件的操作,但是由于.npz文件已压缩,因此它对我
我想创建链接到另一个项目中的 Cloud Source Repository 的 Cloud Build 触发器。但是当我在应该选择存储库的步骤中时,列表是空的。我尝试了不同的许可,但没有运气。谁能告
向 Twilio 发送 SMS 时,Twilio 会向指定的 URL 发送多个请求,以通过 Webhook 提供该 SMS 传送的状态。我想让这个回调异步,所以我开发了一个 Cloud Functio
我需要更改我的项目 ID,因为要验证的 Firebase 身份验证链接在链接上显示了项目 ID,并且由于品牌 reshape ,项目名称已更改。根据我发现的信息,更改项目 ID 似乎不太可能。我正在考
用于部署我的 Angular 应用程序的 CI/CD 管道已关闭,但我看到 Google Cloud Run 在容器镜像更新后没有部署新修订版。 我已将 Cloud Build 设置为在 GitHub
报价https://cloud.google.com/load-balancing/docs/https/setting-up-https-serverless#enabling While Goog
Cloud Spanner 提供了两种不同的 API。 Cloud Spanner 读取与 Cloud Spanner SQL API 之间有什么区别? 最佳答案 在幕后,它们都使用相同的执行机制,因
我是 GCP 堆栈的新手,所以我对用于存储数据的 GCP 技术数量感到非常困惑: https://cloud.google.com/products/storage 虽然上面的文章中没有提到googl
我发现 Google Cloud Functions 的网络出站费用令人惊讶,我正在尝试了解发生这种情况的原因以及如何避免这种情况。 Stackdriver 监控表明有问题的函数是我的 ingest
我使用 Prisma使用 Cloud Run 和 Cloud SQL。在向 prisma.schema 提供 DATABASE_URL 后,它会在运行时抛出一个错误。 Can't reach data

我是一名优秀的程序员,十分优秀!