- ubuntu12.04环境下使用kvm ioctl接口实现最简单的虚拟机
- Ubuntu 通过无线网络安装Ubuntu Server启动系统后连接无线网络的方法
- 在Ubuntu上搭建网桥的方法
- ubuntu 虚拟机上网方式及相关配置详解
CFSDN坚持开源创造价值,我们致力于搭建一个资源共享平台,让每一个IT人在这里找到属于你的精彩世界.
这篇CFSDN的博客文章Python深度学习之使用Albumentations对图像做增强由作者收集整理,如果你对这篇文章有兴趣,记得点赞哟.
import random import cv2from matplotlib import pyplot as plt import albumentations as A
可视化函数参考https://github.com/facebookresearch/Detectron/blob/master/detectron/utils/vis.py 。
BOX_COLOR = (255, 0, 0) # RedTEXT_COLOR = (255, 255, 255) # White def visualize_bbox(img, bbox, class_name, color=BOX_COLOR, thickness=2): """Visualizes a single bounding box on the image""" x_min, y_min, w, h = bbox x_min, x_max, y_min, y_max = int(x_min), int(x_min + w), int(y_min), int(y_min + h) cv2.rectangle(img, (x_min, y_min), (x_max, y_max), color=color, thickness=thickness) ((text_width, text_height), _) = cv2.getTextSize(class_name, cv2.FONT_HERSHEY_SIMPLEX, 0.35, 1) cv2.rectangle(img, (x_min, y_min - int(1.3 * text_height)), (x_min + text_width, y_min), BOX_COLOR, -1) cv2.putText( img, text=class_name, org=(x_min, y_min - int(0.3 * text_height)), fontFace=cv2.FONT_HERSHEY_SIMPLEX, fontScale=0.35, color=TEXT_COLOR, lineType=cv2.LINE_AA, ) return img def visualize(image, bboxes, category_ids, category_id_to_name): img = image.copy() for bbox, category_id in zip(bboxes, category_ids): class_name = category_id_to_name[category_id] img = visualize_bbox(img, bbox, class_name) plt.figure(figsize=(12, 12)) plt.axis("off") plt.imshow(img)
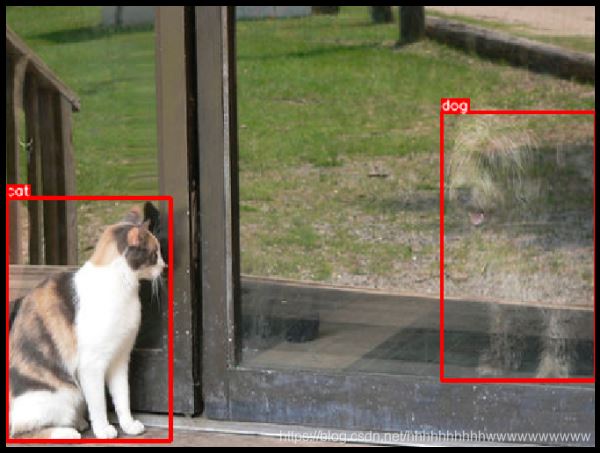
在此示例中,我们将使用来自COCO数据集的图像,该图像具有两个关联的边界框。 该映像位于http://cocodataset.org/#explore?id=386298 。
从磁盘加载图像 。
image = cv2.imread("images/000000386298.jpg")image = cv2.cvtColor(image, cv2.COLOR_BGR2RGB)
用坐标和类标签定义两个边界框 。
这些边界框的坐标使用coco格式声明。 每个边界框使用四个值[x_min, y_min, width, height]进行描述。 有关边界框坐标的不同格式的详细说明,请参阅有关边界框的文档文章-https://albumentations.ai/docs/getting_started/bounding_boxes_augmentation/.
bboxes = [[5.66, 138.95, 147.09, 164.88], [366.7, 80.84, 132.8, 181.84]]category_ids = [17, 18] # We will use the mapping from category_id to the class name# to visualize the class label for the bounding box on the imagecategory_id_to_name = {17: "cat", 18: "dog"}
展示图像的边框 。
visualize(image, bboxes, category_ids, category_id_to_name)

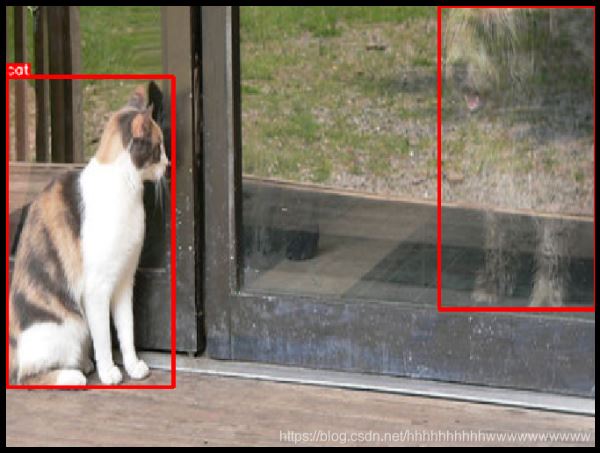
RandomSizedBBoxSafeCrop crops a random part of the image. It ensures that the cropped part will contain all bounding boxes from the original image. Then the transform rescales the crop to height and width specified by the respective parameters. The erosion_rate parameter controls how much area of the original bounding box could be lost after cropping. erosion_rate = 0.2 means that the augmented bounding box"s area could be up to 20% smaller than the area of the original bounding box. 。
RandomSizedBBoxSafeCrop裁剪图像的随机部分。 它确保裁剪的部分将包含原始图像的所有边界框。 然后,变换会将作物重新缩放为相应参数指定的高度和宽度。 erosion_rate参数控制裁剪后可能丢失原始边界框的面积。 frosting_rate = 0.2表示扩充后的边界框的面积可能比原始边界框的面积小20%.
transform = A.Compose( [A.RandomSizedBBoxSafeCrop(width=448, height=336, erosion_rate=0.2)], bbox_params=A.BboxParams(format="coco", label_fields=["category_ids"]),)
我们固定随机种子是为了可视化目的,因此增强将始终产生相同的结果。 在真实的计算机视觉管道中,您不应该在对图像应用转换之前固定随机种子,因为在这种情况下,管道将始终输出相同的图像。 图像增强的目的是每次使用不同的变换.
random.seed(7)transformed = transform(image=image, bboxes=bboxes, category_ids=category_ids)visualize( transformed["image"], transformed["bboxes"], transformed["category_ids"], category_id_to_name,)

random.seed(3)transformed = transform(image=image, bboxes=bboxes, category_ids=category_ids)visualize( transformed["image"], transformed["bboxes"], transformed["category_ids"], category_id_to_name,)

random.seed(444)transformed = transform(image=image, bboxes=bboxes, category_ids=category_ids)visualize( transformed["image"], transformed["bboxes"], transformed["category_ids"], category_id_to_name,)

到此这篇关于Python深度学习之使用Albumentations对目标检测任务做增强的文章就介绍到这了,更多相关用Albumentations对目标做增强内容请搜索我以前的文章或继续浏览下面的相关文章希望大家以后多多支持我! 。
原文链接:https://blog.csdn.net/hhhhhhhhhhwwwwwwwwww/article/details/117077423 。
最后此篇关于Python深度学习之使用Albumentations对图像做增强的文章就讲到这里了,如果你想了解更多关于Python深度学习之使用Albumentations对图像做增强的内容请搜索CFSDN的文章或继续浏览相关文章,希望大家以后支持我的博客! 。
我有一个关于 JavaScript 语法的问题。实际上,我在自学 MEAN 堆栈教程时想出了编码(https://thinkster.io/mean-stack-tutorial#adding-aut
在我的书中它使用了这样的东西: for($ARGV[0]) { Expression && do { print "..."; last; }; ... } for 循环不完整吗?另外,do 的意义何
我已经编写了读取开关状态的代码,如果按 3 次 # 则退出。 void allkeypadTest(void) { static uint8_t modeKeyCount=0; do
因此,对于上周我必须做的作业,我必须使用 4 个 do-while 循环和 if 语句在 Java 中制作一个猜谜游戏。我无法成功完成它,类(class)已经继续,没有为我提供任何帮助。如果有人可以查
int i=1,j=0,n=10,k; do{ j+=i; i<<1; printf("%d\n",i); // printf("%d\n",12<<1); }while
此代码用于基本杂货计算器的按钮。当我按下按钮时,一个输入对话框会显示您输入商品价格的位置。我遇到的问题是我无法弄清楚如何获得 do ... while 循环以使输入对话框在输入后弹出。 我希望它始终恢
当我在循环中修改字符串或另一个变量时,它的条件是否每次都重新计算?或者在循环开始前一次 std::string a("aa"); do { a = "aaaa"; } while(a.size<10)
我刚刚写了这个,但我找不到问题。我使用代码块并编写了这个问题 error: expected 'while' before '{' token === Build finished: 1 errors
do { printf("Enter number (0-6): ", ""); scanf("%d", &Num); }while(Num >= 0 && Num 表示“超过”,<表
我有一个包含 10 个项目的 vector (为简单起见,所有项目都属于同一类,称其为“a”)。我想要做的是检查“A”不是 a) 隐藏墙壁或 b) 隐藏另一个“A”。我有一个碰撞函数可以做到这一点。
嗨,这是我的第二个问题。我有下表 |-----|-------|------|------| |._id.|..INFO.|.DONE.|.LAST.| |..1..|...A...|...N..|.
这个问题在这里已经有了答案: 关闭 12 年前。 Possible Duplicates: Why are there sometimes meaningless do/while and if/e
来自 wikibook在 F# 上有一小部分它说: What does let! do?# let! runs an async object on its own thread, then it i
我在 Real World Haskell 书中遇到了以下函数: namesMatching pat | not (isPattern pat) = do exists do
我有一个类似于下面的用例,我创建了多个图并使用 gridExtra 将它们排列到一些页面布局中,最后使用 ggsave 将其保存为 PDF : p1 % mutate(label2
当我使用具有 for 循环的嵌套 let 语句时,如果没有 (do (html5 ..)),我将无法运行内部 [:tr]。 (defpartial column-settings-layout [&
执行 vagrant up 时出现此错误: anr@anr-Lenovo-G505s ~ $ vagrant up Bringing machine 'default' up with 'virtua
# ################################################# # Subroutine to add data to the table Blas
我想创建一个检查特定日期格式的读取主机。此外,目标是检查用户输入是否正确,如果不正确,则提示应再次弹出。 当我刚接触编程时,发现了这段代码,这似乎很合适。我仍然在努力“直到” do {
我关注这个tutorial在谷歌云机器学习引擎上进行培训。我一步一步地跟着它,但是在将 ml 作业提交到云时我遇到了错误。我运行了这个命令。 sam@sam-VirtualBox:~/models/r

我是一名优秀的程序员,十分优秀!