- ubuntu12.04环境下使用kvm ioctl接口实现最简单的虚拟机
- Ubuntu 通过无线网络安装Ubuntu Server启动系统后连接无线网络的方法
- 在Ubuntu上搭建网桥的方法
- ubuntu 虚拟机上网方式及相关配置详解
CFSDN坚持开源创造价值,我们致力于搭建一个资源共享平台,让每一个IT人在这里找到属于你的精彩世界.
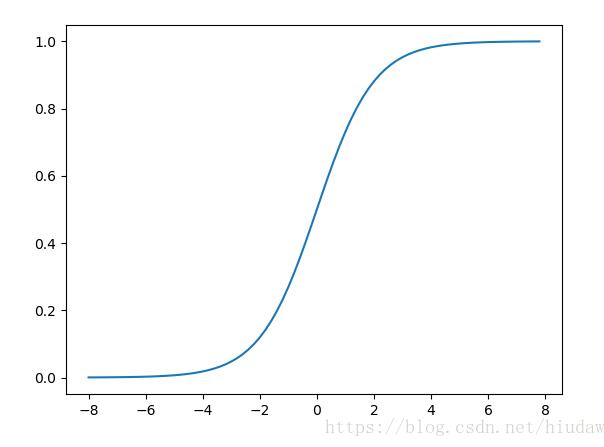
这篇CFSDN的博客文章Python3 用matplotlib绘制sigmoid函数的案例由作者收集整理,如果你对这篇文章有兴趣,记得点赞哟.
我就废话不多说了,大家还是直接看代码吧~ 。
|
1
2
3
4
5
6
7
8
9
10
11
12
13
14
15
|
import
matplotlib.pyplot as plt
import
numpy as np
def
sigmoid(x):
# 直接返回sigmoid函数
return
1.
/
(
1.
+
np.exp(
-
x))
def
plot_sigmoid():
# param:起点,终点,间距
x
=
np.arange(
-
8
,
8
,
0.2
)
y
=
sigmoid(x)
plt.plot(x, y)
plt.show()
if
__name__
=
=
'__main__'
:
plot_sigmoid()
|
如图:

补充知识:python:实现并绘制 sigmoid函数,tanh函数,ReLU函数,PReLU函数 。
如下所示:
|
1
2
3
4
5
6
7
8
9
10
11
12
13
14
15
16
17
18
19
20
21
22
23
24
25
26
27
28
29
30
31
32
33
34
35
36
37
38
39
40
41
42
43
44
45
46
47
48
49
50
51
52
53
54
55
56
57
58
59
60
61
62
63
64
65
66
67
68
69
70
71
72
73
74
75
76
77
78
79
80
81
82
83
84
85
86
87
88
89
90
91
92
93
94
95
96
97
|
# -*- coding:utf-8 -*-
from
matplotlib
import
pyplot as plt
import
numpy as np
import
mpl_toolkits.axisartist as axisartist
def
sigmoid(x):
return
1.
/
(
1
+
np.exp(
-
x))
def
tanh(x):
return
(np.exp(x)
-
np.exp(
-
x))
/
(np.exp(x)
+
np.exp(
-
x))
def
relu(x):
return
np.where(x<
0
,
0
,x)
def
prelu(x):
return
np.where(x<
0
,
0.5
*
x,x)
def
plot_sigmoid():
x
=
np.arange(
-
10
,
10
,
0.1
)
y
=
sigmoid(x)
fig
=
plt.figure()
# ax = fig.add_subplot(111)
ax
=
axisartist.Subplot(fig,
111
)
ax.spines[
'top'
].set_color(
'none'
)
ax.spines[
'right'
].set_color(
'none'
)
# ax.spines['bottom'].set_color('none')
# ax.spines['left'].set_color('none')
ax.axis[
'bottom'
].set_axisline_style(
"-|>"
,size
=
1.5
)
ax.spines[
'left'
].set_position((
'data'
,
0
))
ax.plot(x, y)
plt.xlim([
-
10.05
,
10.05
])
plt.ylim([
-
0.02
,
1.02
])
plt.tight_layout()
plt.savefig(
"sigmoid.png"
)
plt.show()
def
plot_tanh():
x
=
np.arange(
-
10
,
10
,
0.1
)
y
=
tanh(x)
fig
=
plt.figure()
ax
=
fig.add_subplot(
111
)
ax.spines[
'top'
].set_color(
'none'
)
ax.spines[
'right'
].set_color(
'none'
)
# ax.spines['bottom'].set_color('none')
# ax.spines['left'].set_color('none')
ax.spines[
'left'
].set_position((
'data'
,
0
))
ax.spines[
'bottom'
].set_position((
'data'
,
0
))
ax.plot(x, y)
plt.xlim([
-
10.05
,
10.05
])
plt.ylim([
-
1.02
,
1.02
])
ax.set_yticks([
-
1.0
,
-
0.5
,
0.5
,
1.0
])
ax.set_xticks([
-
10
,
-
5
,
5
,
10
])
plt.tight_layout()
plt.savefig(
"tanh.png"
)
plt.show()
def
plot_relu():
x
=
np.arange(
-
10
,
10
,
0.1
)
y
=
relu(x)
fig
=
plt.figure()
ax
=
fig.add_subplot(
111
)
ax.spines[
'top'
].set_color(
'none'
)
ax.spines[
'right'
].set_color(
'none'
)
# ax.spines['bottom'].set_color('none')
# ax.spines['left'].set_color('none')
ax.spines[
'left'
].set_position((
'data'
,
0
))
ax.plot(x, y)
plt.xlim([
-
10.05
,
10.05
])
plt.ylim([
0
,
10.02
])
ax.set_yticks([
2
,
4
,
6
,
8
,
10
])
plt.tight_layout()
plt.savefig(
"relu.png"
)
plt.show()
def
plot_prelu():
x
=
np.arange(
-
10
,
10
,
0.1
)
y
=
prelu(x)
fig
=
plt.figure()
ax
=
fig.add_subplot(
111
)
ax.spines[
'top'
].set_color(
'none'
)
ax.spines[
'right'
].set_color(
'none'
)
# ax.spines['bottom'].set_color('none')
# ax.spines['left'].set_color('none')
ax.spines[
'left'
].set_position((
'data'
,
0
))
ax.spines[
'bottom'
].set_position((
'data'
,
0
))
ax.plot(x, y)
plt.xticks([])
plt.yticks([])
plt.tight_layout()
plt.savefig(
"prelu.png"
)
plt.show()
if
__name__
=
=
"__main__"
:
plot_sigmoid()
plot_tanh()
plot_relu()
plot_prelu()
|
以上这篇Python3 用matplotlib绘制sigmoid函数的案例就是小编分享给大家的全部内容了,希望能给大家一个参考,也希望大家多多支持我.
原文链接:https://blog.csdn.net/hiudawn/article/details/79876726 。
最后此篇关于Python3 用matplotlib绘制sigmoid函数的案例的文章就讲到这里了,如果你想了解更多关于Python3 用matplotlib绘制sigmoid函数的案例的内容请搜索CFSDN的文章或继续浏览相关文章,希望大家以后支持我的博客! 。
我无法在此图中定位轴标签。我喜欢放置顶部标签,使管道与网格对齐,并放置左右标签,以便它们不接触绘图。 我试过了 ax.tick_params(axis='both', which='both'
我使用的是 python 2,下面的代码只是使用了一些示例数据,我的实际数据可能有不同的长度,并且可能不是很细。 import numpy as np import datetime i
给定坐标 [1,5,7,3,5,10,3,6,8]为 matplotlib.pyplot ,如何突出显示或着色线条的不同部分。例如,列表中的坐标 1-3 ( [1,5,7,3] ) 表示属性 a .我
我正在matplotlib中绘制以下图像。 我的问题是,图像看起来像这样,但是,我想使背景变暗,因为当我打印该图像时,灰度部分不会出现在打印物中。有人可以告诉我API进行此更改吗? 我使用简单的API
这是关于matplotlib的一个非常基本的问题,但是我不知道该怎么做: 我想绘制多个图形,并使用绘制窗口中的箭头从一个移到另一个。 目前,我只知道如何创建多个图并将其绘制在不同的窗口中,如下所示:
在 matplotlib 中绘制小块对象时,由于显示分辨率而引入了伪影。使用抗锯齿并不能解决问题。 这个问题有解决方案吗? import matplotlib.pyplot as plt impo
对于直方图,有一个简单的内置选项 histtype='step' .如何制作相同风格的条形图? 最佳答案 [阅读评论后添加答案] 将可选关键字设置为 fill=False对于条形图: import m
我正在尝试在 (6X3) 网格上创建子图。我对图例的位置有疑问。图例对所有子图都是通用的。 lgend 现在与 y 轴标签重叠 我尝试删除 constrained_layout=True 选项。但这在
我有一个带有一些线段( LineCollection )和一些点的图表。这些线和点有一些与它们相关的值,但没有绘制出来。我希望能够添加鼠标悬停工具提示或其他方法来轻松找到点和线的关联值。这对于点或线段
我想创建一个带有对齐不同曲线文本的图例的图。这是一个最小的工作示例: import matplotlib.pyplot as plt import numpy as np x=np.linspace(
可以说我正在用matplotlib绘制一条线并添加一个图例。 在图例中,其显示为------ Label。当绘制较小的图形尺寸以进行打印时,我发现该行的默认水平长度太长。 是否存在将------ La
我正在使用 matplotlib 构建一个 3D 散点图,但无法使生成的图形具有所有 3 个轴的共同原点。我怎样才能做到这一点? 我的代码(到目前为止),我还没有为轴规范实现任何定义,因为我对 Pyt
我有一个我想使用的绘图布局,其中 9 个不同的数据簇被布置在一个方形网格上。网格中的每个框都包含 3 个并排布置的箱线图。 我最初的想法是这将适合 3x3 子图布局,每个单独的子图本身被划分为 3x1
我的图形从y=-1变为y=10 我想在任意位置写一小段文字,例如x=2000,y=5: ax.annotate('MgII', xy=(2000.0, 5.0), xycoords='data')
我想使用LateX格式来构建一个表达式,其中出现一些数字,但这些数字是用LateX表达式中的变量表示的。 实际的目标是在axes.annotate()方法中使用它,但是为了讨论起见,这里是一个原理代码
我需要比较两组的二维分布。 当我使用 matplotlib.pyplot.contourf并覆盖图,每个等高线图的背景颜色填充整个图空间。有没有办法让每个等高线图的最低等高线级别透明,以便更容易看到每
在R中,有一个locator函数,类似于Matlab的ginput,您可以用鼠标单击图形并选择任何x,y坐标。此外,还有一个名为identify(x,y)的函数,如果您给它绘制了一组绘制的点x,y,然
我想用matplotlib生成矢量图。我尽力了-但输出是光栅图像。这是我使用的: import matplotlib matplotlib.use('Agg') import matplotlib.p
我正在尝试使用 matplotlib 制作具有非常小的灰点的散点图。由于点密度的原因,点需要很小。问题是 scatter() 函数的标记似乎既有线条又有填充。当标记很小时,只有线条可见,而看不到填充,
我不太明白为什么我无法在指定的限制内创建水平和垂直线。我想用这个框绑定(bind)数据。然而,双方似乎并没有遵守我的指示。为什么是这样? # CREATING A BOUNDING BOX # BOT

我是一名优秀的程序员,十分优秀!