作者热门文章
- ubuntu12.04环境下使用kvm ioctl接口实现最简单的虚拟机
- Ubuntu 通过无线网络安装Ubuntu Server启动系统后连接无线网络的方法
- 在Ubuntu上搭建网桥的方法
- ubuntu 虚拟机上网方式及相关配置详解
CFSDN坚持开源创造价值,我们致力于搭建一个资源共享平台,让每一个IT人在这里找到属于你的精彩世界.
这篇CFSDN的博客文章Qt自定义控件实现进度仪表盘由作者收集整理,如果你对这篇文章有兴趣,记得点赞哟.
本文实例为大家分享了Qt自定义控件实现进度仪表盘的具体代码,供大家参考,具体内容如下 。
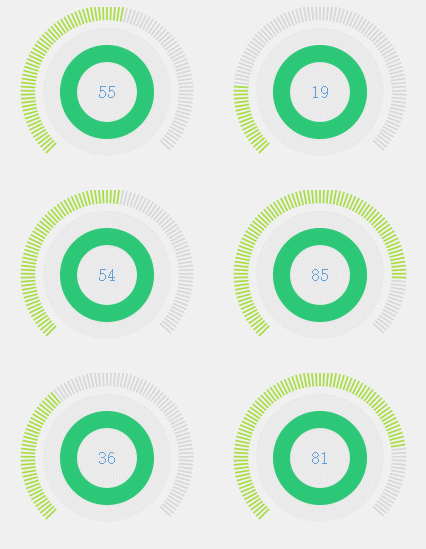
先看效果图:

思路:外围的线共100根(自定义,可改变),总共占270度,然后按照 先画一条线然后旋转坐标系的思路画出完整的线。内部即是一个灰色的背景圆,一个圆弧和中间的value对应的文字.
关键代码:CMPassrate2.cpp 。
。
|
1
2
3
4
5
6
7
8
9
10
11
12
13
14
15
16
17
18
19
20
21
22
23
24
25
26
27
28
29
30
31
32
33
34
35
36
37
38
39
40
41
42
43
44
45
46
47
48
49
50
51
52
53
54
55
56
57
58
59
60
61
62
63
64
65
66
67
68
69
70
71
72
73
74
75
76
|
void
CMPassrate2::paintEvent(QPaintEvent *event){
//界面绘制事件
int
width =
this
->width();
int
height =
this
->height();
int
side = qMin(width, height);
QPainter painter(
this
);
painter.setRenderHints(QPainter::Antialiasing | QPainter::TextAntialiasing);
painter.translate(width / 2, height / 2);
painter.scale(side / 200.0, side / 200.0);
drawBGE(&painter);
//画背景圆
drawTextE(&painter);
//画文字所在圆弧
drawText(&painter);
//画文字
drawLines(&painter);
//画最外部的线
}
void
CMPassrate2::updateValue(
float
value){
//提供给外部的方法,用于更新value
this
->value = value;
update();
//每次更新value后,都重绘界面
}
void
CMPassrate2::drawLines(QPainter* painter){
painter->save();
QPen pen;
pen.setColor(QColor(
"#A7DD42"
));
pen.setWidth(2);
painter->setPen(pen);
float
range = 270.0/lineCount;
//自定义所有的线加起来占270度,100条线
painter->rotate(135);
//旋转135度,开始画线,总共画270度。
QLine line(QPoint(outLineRadius,0),QPoint(innLineRadius,0));
for
(
int
i = 1;i<=lineCount;i++){
if
(i>value){
QPen pen;
pen.setColor(QColor(
"#D7D7D7"
));
pen.setWidth(2);
painter->setPen(pen);
}
painter->drawLine(line);
painter->rotate(range);
}
painter->restore();
}
void
CMPassrate2::drawBGE(QPainter* painter){
painter->save();
painter->setPen(Qt::NoPen);
painter->setBrush(QColor(
"#EAEAEA"
));
QRect rect(-bgERadius,-bgERadius,bgERadius*2,bgERadius*2);
painter->drawEllipse(rect);
painter->restore();
}
void
CMPassrate2::drawTextE(QPainter* painter){
painter->save();
painter->setPen(Qt::NoPen);
painter->setBrush(QColor(
"#2DC877"
));
QPainterPath path;
QRect rectOut(-textOutRadius,-textOutRadius,textOutRadius*2,textOutRadius*2);
path.arcTo(rectOut,0,360);
QPainterPath subPath;
QRect rectInn(-textInnRadius,-textInnRadius,textInnRadius*2,textInnRadius*2);
subPath.addEllipse(rectInn);
path -= subPath;
painter->drawPath(path);
painter->restore();
}
void
CMPassrate2::drawText(QPainter* painter){
painter->save();
painter->setPen(QColor(
"#62A0DB"
));
QRect rectInn(-textInnRadius,-textInnRadius,textInnRadius*2,textInnRadius*2);
QFont font = painter->font();
font.setPixelSize(textSize);
painter->setFont(font);
painter->drawText(rectInn,Qt::AlignCenter,QString::number(value));
painter->restore();
}
|
以上就是本文的全部内容,希望对大家的学习有所帮助,也希望大家多多支持我.
原文链接:https://blog.csdn.net/parkchorong/article/details/102538818 。
最后此篇关于Qt自定义控件实现进度仪表盘的文章就讲到这里了,如果你想了解更多关于Qt自定义控件实现进度仪表盘的内容请搜索CFSDN的文章或继续浏览相关文章,希望大家以后支持我的博客! 。
在我们基于 Swing 构建的桌面应用程序中,我们将实现仪表板功能。我的意思是我们想要类似 iGoogle 的东西(或 Jira 仪表板)。我们希望能够将一些预定义列表中的小部件添加到基于网格的布局、
这是我现在正在做的: 在我的 Windows 笔记本电脑上,我通过 Putty SSH 连接到 Linux 服务器:IP 地址是 11.11.11.111 启动 Jupyter 笔记本:nohup j

我是一名优秀的程序员,十分优秀!