- ubuntu12.04环境下使用kvm ioctl接口实现最简单的虚拟机
- Ubuntu 通过无线网络安装Ubuntu Server启动系统后连接无线网络的方法
- 在Ubuntu上搭建网桥的方法
- ubuntu 虚拟机上网方式及相关配置详解
CFSDN坚持开源创造价值,我们致力于搭建一个资源共享平台,让每一个IT人在这里找到属于你的精彩世界.
这篇CFSDN的博客文章搭建Springboot框架并添加JPA和Gradle组件的方法由作者收集整理,如果你对这篇文章有兴趣,记得点赞哟.
开发工具:intellij idea 。
所需开发环境:jdk gradle 。
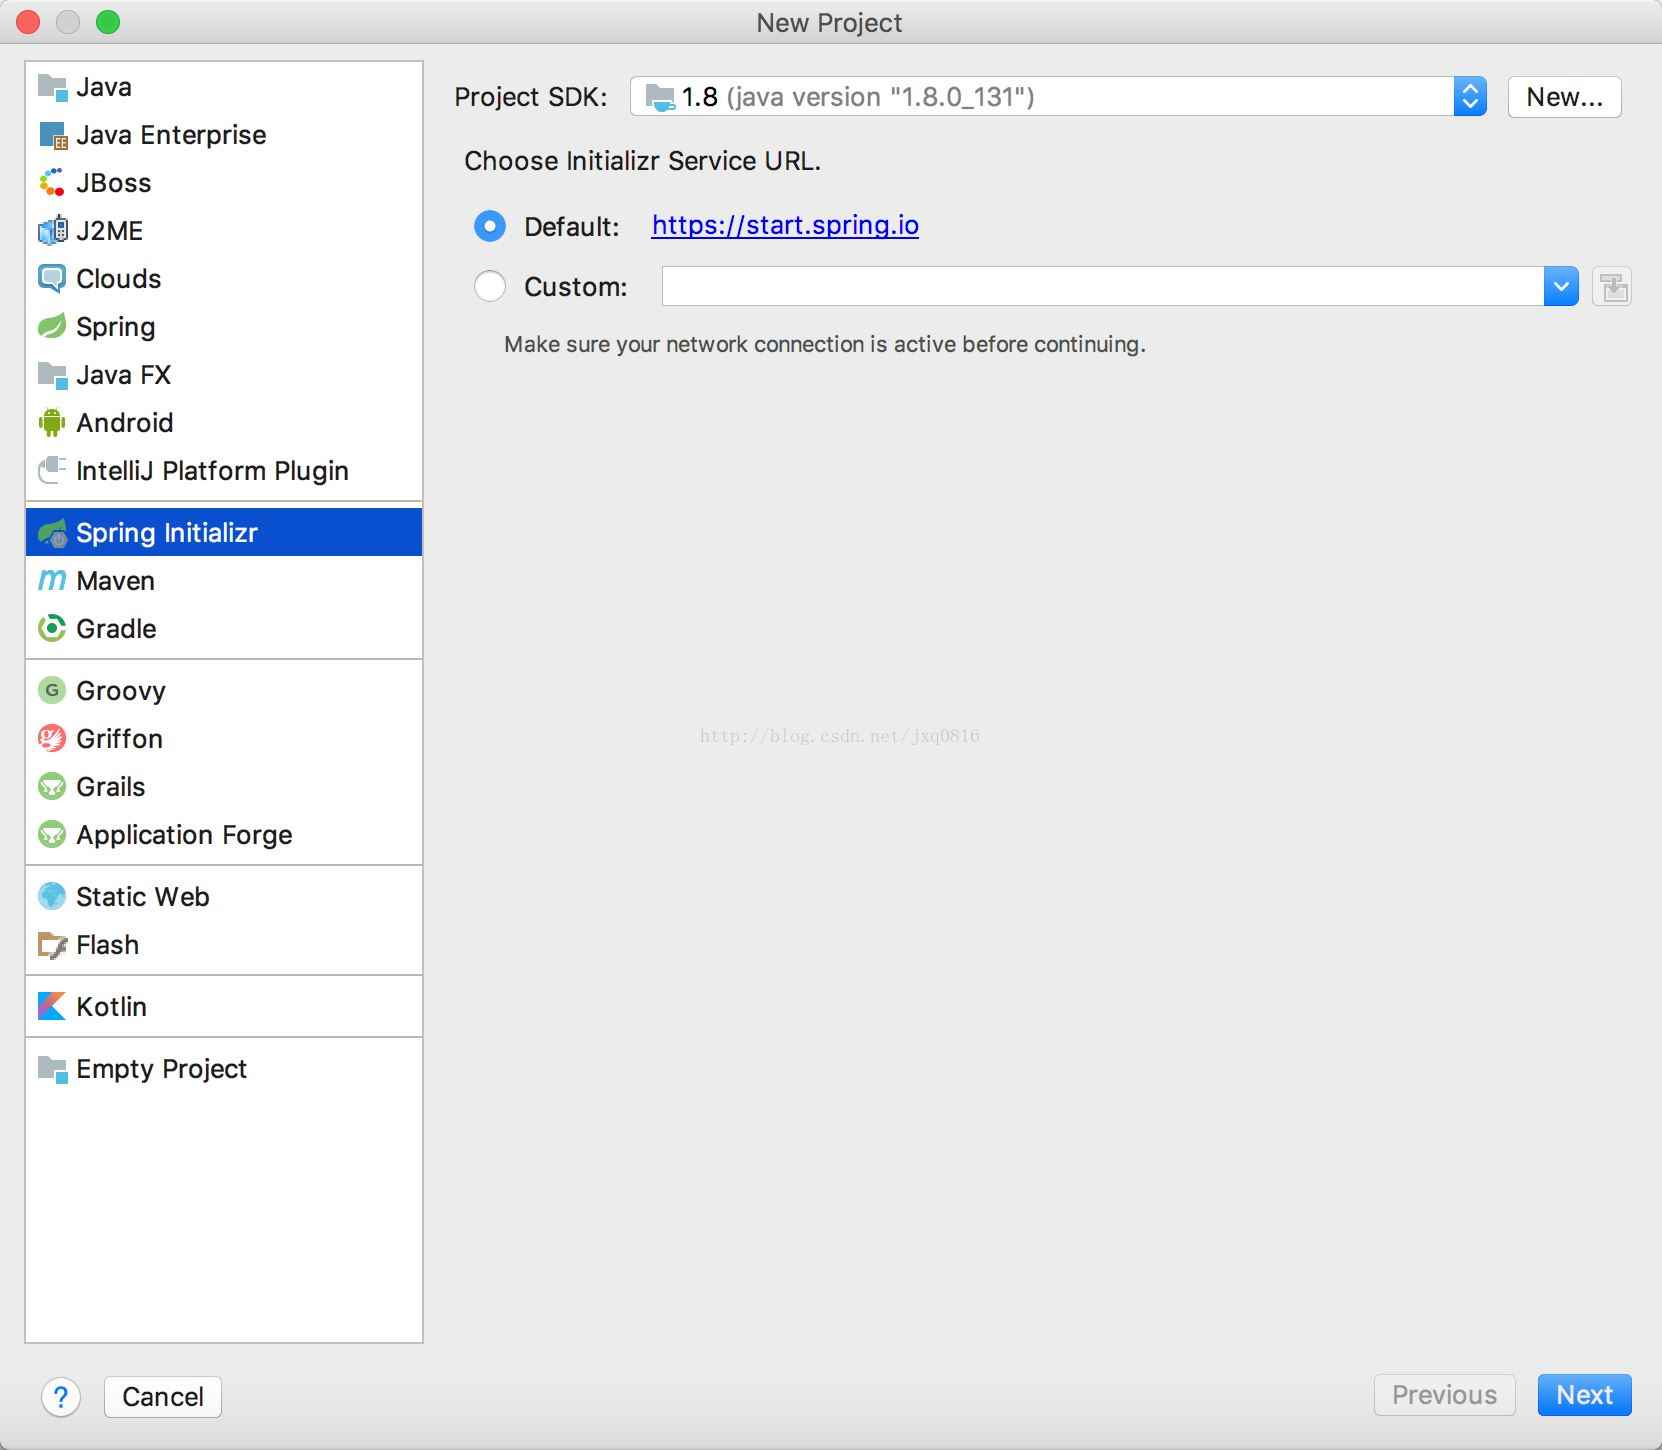
1、新建springboot项目 。
1.new project 。

2. spring initializr 。

3. 填写项目组织 。
group : 项目属于哪个组,这个组往往和项目所在的组织或公司存在关联 。
artifact : 当前项目在组中唯一的id 。
type : jar包管理所使用的工具 。
lauguage : 开发语言 。
packageing : 打包方式 。
java version : jdk 的版本号 。
version :项目当前的版本号 。

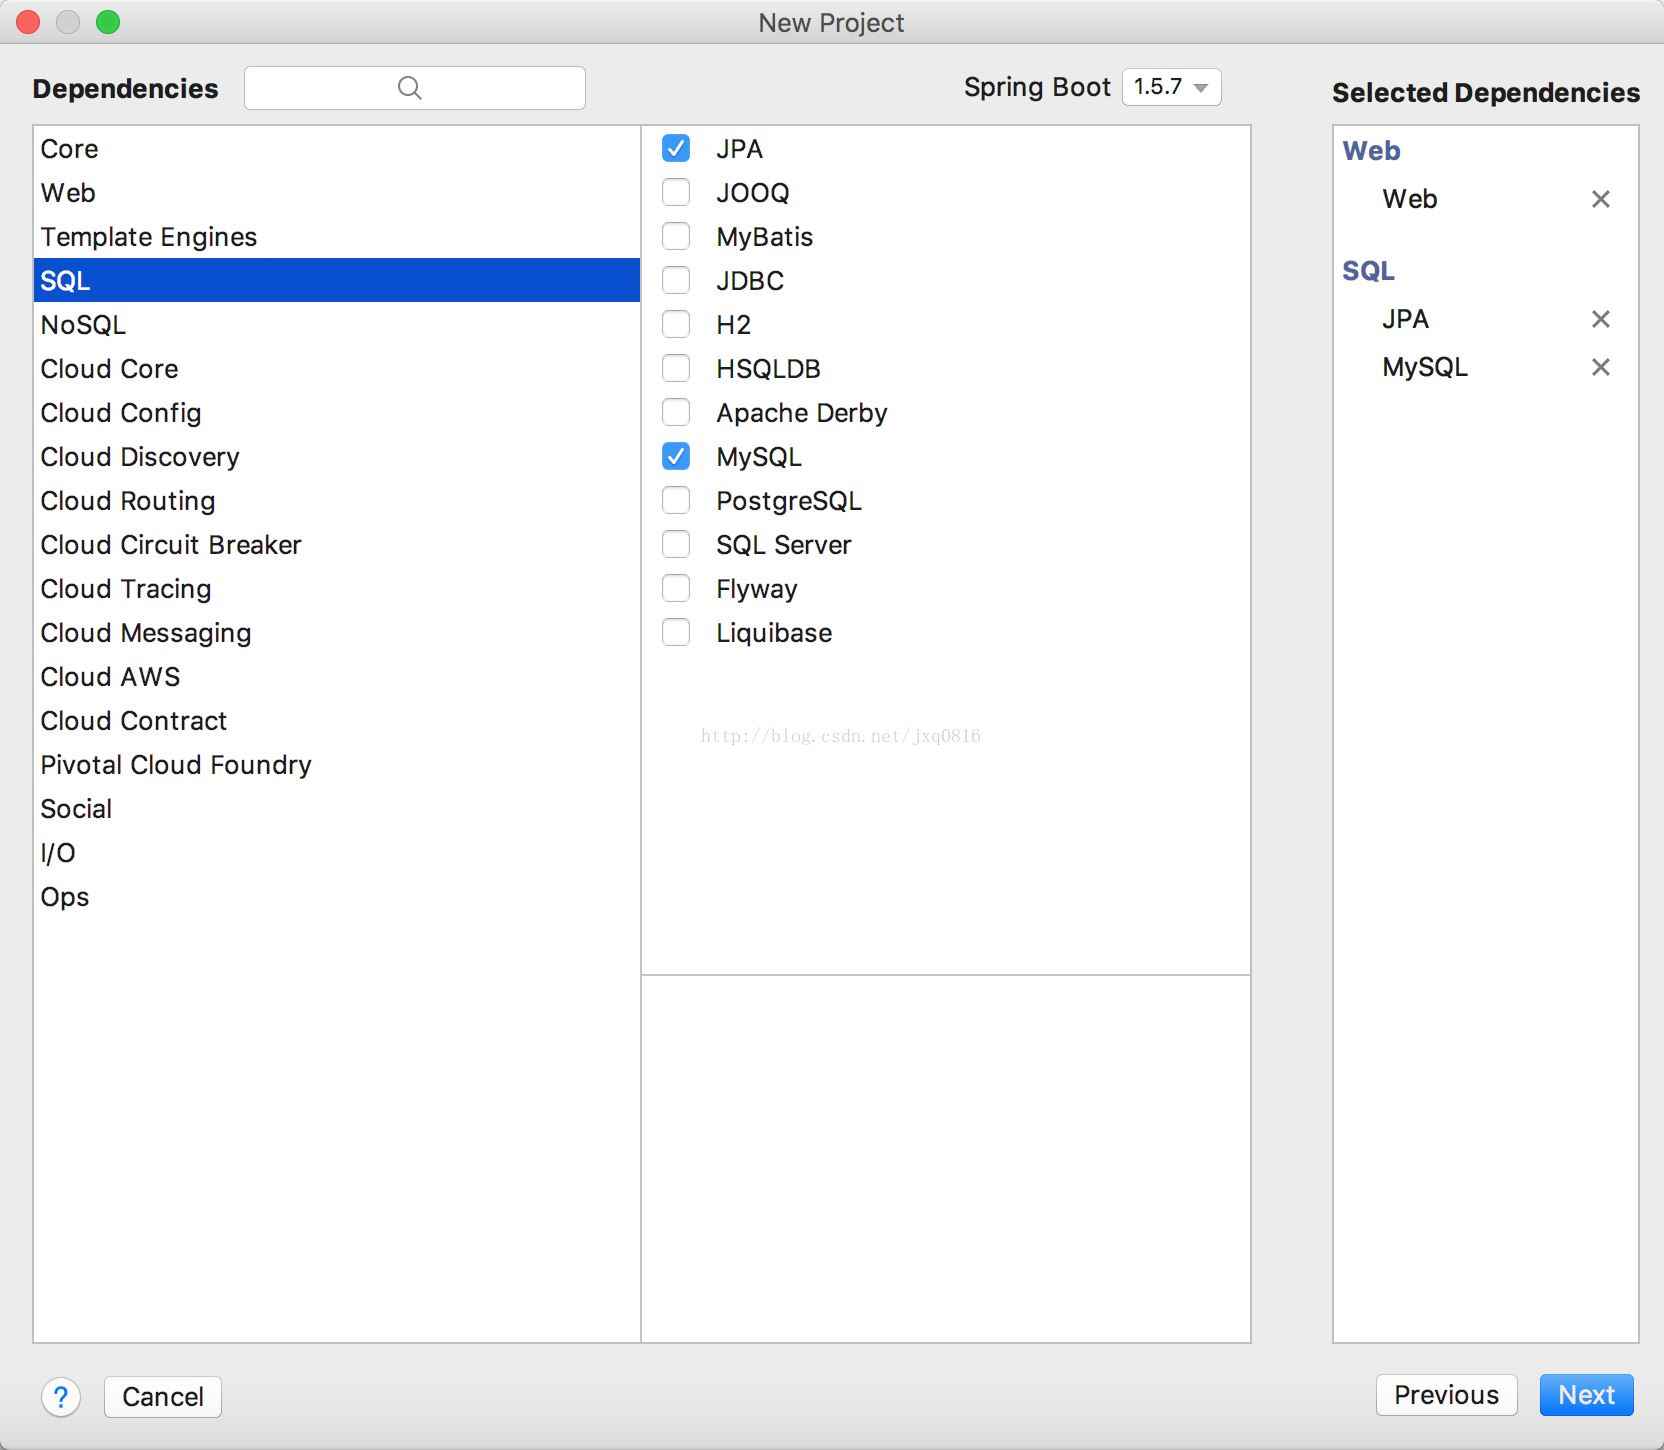
4.选择所需要添加的组件 。


5. 选择项目的保存位置 。

2、目标代码组织 。

1. 配置数据库 。
resource目录下的application.properties 。
|
1
2
3
4
|
spring.jpa.hibernate.ddl-auto=create-drop
spring.datasource.url=jdbc:mysql:
//localhost:3306/test
spring.datasource.username=root
spring.datasource.password=cueb
|
2. 修改build.gradle文件 。
将34行的providedruntime修改为compile,否者项目无法正常启动 。
providedruntime :在运行时提供tomcat jar包 。
compile :在编译时提供tomcat jar包 。
|
1
2
3
4
5
6
7
8
9
10
11
12
13
14
15
16
17
18
19
20
21
22
23
24
25
26
27
28
29
30
31
32
33
34
35
36
|
buildscript {
ext {
springbootversion =
'1.5.7.release'
}
repositories {
mavencentral()
}
dependencies {
classpath(
"org.springframework.boot:spring-boot-gradle-plugin:${springbootversion}"
)
}
}
apply plugin:
'java'
apply plugin:
'eclipse-wtp'
apply plugin:
'org.springframework.boot'
apply plugin:
'war'
group =
'com.example'
version =
'0.0.1-snapshot'
sourcecompatibility =
1.8
repositories {
mavencentral()
}
configurations {
providedruntime
}
dependencies {
compile(
'org.springframework.boot:spring-boot-starter-data-jpa'
)
compile(
'org.springframework.boot:spring-boot-starter-web'
)
runtime(
'mysql:mysql-connector-java'
)
compile(
'org.springframework.boot:spring-boot-starter-tomcat'
)
testcompile(
'org.springframework.boot:spring-boot-starter-test'
)
}
|
3. 新建controller 。
|
1
2
3
4
5
6
7
8
9
10
11
12
13
14
|
package
com.example.demo.control;
import
org.springframework.web.bind.annotation.requestmapping;
import
org.springframework.web.bind.annotation.restcontroller;
@restcontroller
public
class
testcontroller {
@requestmapping
(value =
""
)
public
string test(){
return
"hello cueb"
;
}
}
|
4. 新建model 。
|
1
2
3
4
5
6
7
8
9
10
11
12
13
14
15
16
17
18
19
20
21
22
23
24
25
26
27
28
29
30
31
|
package
com.example.demo.model;
import
javax.persistence.entity;
import
javax.persistence.generatedvalue;
import
javax.persistence.generationtype;
import
javax.persistence.id;
@entity
public
class
user {
@id
@generatedvalue
(strategy= generationtype.auto)
int
id;
public
int
getid() {
return
id;
}
public
void
setid(
int
id) {
this
.id = id;
}
private
string name;
public
string getname() {
return
name;
}
public
void
setname(string name) {
this
.name = name;
}
}
|
3、部署运行 。
1. debug 启动 。

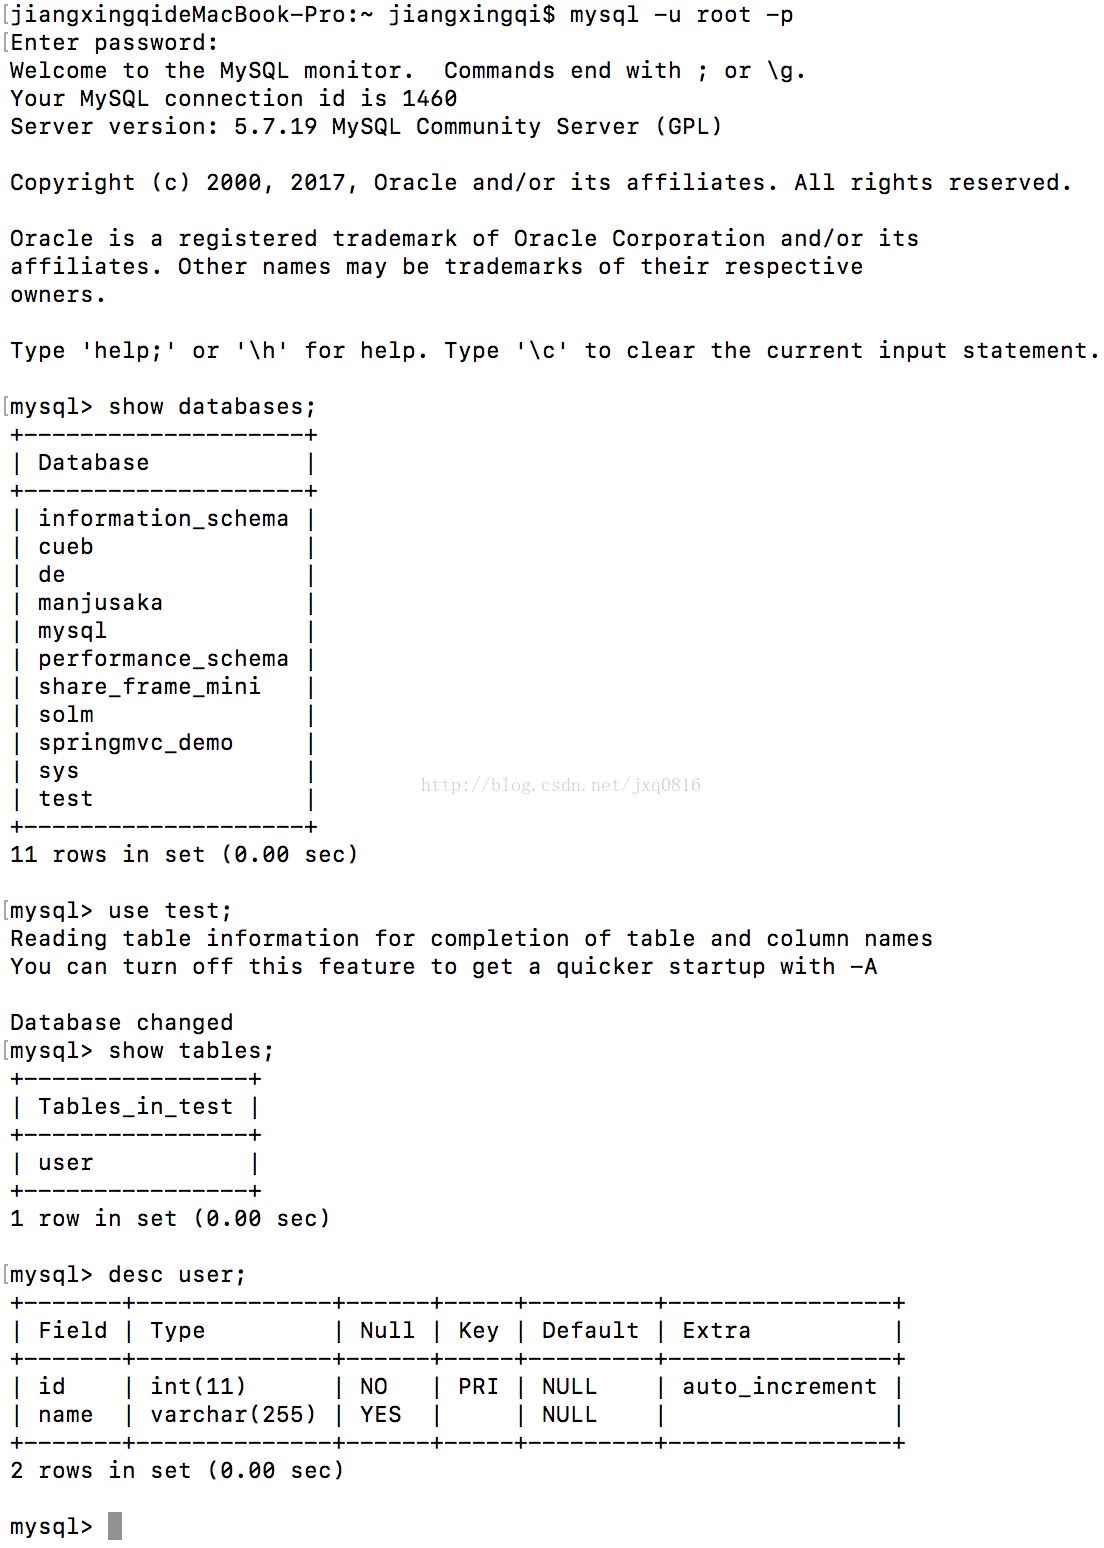
2. 数据库user表新建成功 。

以上就是本文的全部内容,希望对大家的学习有所帮助,也希望大家多多支持我.
原文链接:https://blog.csdn.net/jxq0816/article/details/78240555 。
最后此篇关于搭建Springboot框架并添加JPA和Gradle组件的方法的文章就讲到这里了,如果你想了解更多关于搭建Springboot框架并添加JPA和Gradle组件的方法的内容请搜索CFSDN的文章或继续浏览相关文章,希望大家以后支持我的博客! 。
我创建了一个用户可以添加测试的字段。这一切运行顺利我只希望当用户点击(添加另一个测试)然后上一个(添加另一个测试)删除并且这个显示在新字段中。 所有运行良好的唯一问题是点击(添加另一个字段)之前添加另
String[] option = {"Adlawan", "Angeles", "Arreza", "Benenoso", "Bermas", "Brebant
关闭。这个问题不符合Stack Overflow guidelines .它目前不接受答案。 这个问题似乎不是关于 a specific programming problem, a softwar
我正在努力将 jQuery 滚动功能添加到 nav-tab (Bootstrap 3)。我希望用户能够选择他们想要的选项卡,并在选项卡内容中有一个可以平滑滚动到 anchor 的链接。这是我的代码,可
我正在尝试在用户登录后再添加 2 个 ui 选项卡。首先,我尝试做一个之后。 $('#slideshow').tabs('remove', '4'); $("#slideshow ul li:last
我有一个包含选择元素的表单,我想通过选择添加和删除其中一些元素。这是html代码(这里也有jsfiddle http://jsfiddle.net/txhajy2w/):
正在写这个: view.backgroundColor = UIColor.white.withAlphaComponent(0.9) 等同于: view.backgroundColor = UICo
好的,如果其中有任何信息,我想将这些列添加到一起。所以说我有 账户 1 2 3 . 有 4 个帐户空间,但只有 3 个帐户。我如何创建 java 脚本来添加它。 最佳答案 Live Example H
我想知道是否有一种有效的预制算法来确定一组数字的和/差是否可以等于不同的数字。示例: 5、8、10、2,使用 + 或 - 等于 9。5 - 8 = -3 + 10 = 7 + 2 = 9 如果有一个预
我似乎有一个卡住的 git repo。它卡在所有基本的添加、提交命令上,git push 返回所有内容为最新的。 从其他帖子我已经完成了 git gc 和 git fsck/ 我认为基本的调试步骤是
我的 Oracle SQL 查询如下- Q1- select hca.account_number, hca.attribute3, SUM(rcl.extended_amou
我正在阅读 http://developer.apple.com/iphone/library/documentation/iPhone/Conceptual/iPhoneOSProgrammingG
我正在尝试添加一个“加载更多”按钮并限制下面的结果,这样投资组合页面中就不会同时加载 1000 个内容,如下所示:http://typesetdesign.com/portfolio/ 我对 PHP
我遇到这个问题,我添加了 8 个文本框,它工作正常,但是当我添加更多文本框(如 16 个文本框)时,它不会添加最后一个文本框。有人遇到过这个问题吗?提前致谢。 Live Link: JAVASCRIP
add/remove clone first row default not delete 添加/删除克隆第一行默认不删除&并获取正确的SrNo(例如:添加3行并在看到问题后删除SrNo.2)
我编码this ,但删除按钮不起作用。我在控制台中没有任何错误.. var counter = 0; var dataList = document.getElementById('materi
我有一个类似数组的对象: [1:数组[10]、2:数组[2]、3:数组[2]、4:数组[2]、5:数组[3]、6:数组[1]] 我正在尝试删除前两个元素,执行一些操作,然后将它们再次插入到同一位置。
使用的 Delphi 版本:2007 你好, 我有一个 Tecord 数组 TInfo = Record Name : String; Price : Integer; end; var Info
我使用了基本的 gridster 代码,然后我声明了通过按钮添加和删除小部件的函数它工作正常但是当我将调整大小功能添加到上面的代码中时,它都不起作用(我的意思是调整大小,添加和删除小部件) 我的js代
title 323 323 323 title 323 323 323 title 323 323 323 JS $(document).keydown(function(e){

我是一名优秀的程序员,十分优秀!