- ubuntu12.04环境下使用kvm ioctl接口实现最简单的虚拟机
- Ubuntu 通过无线网络安装Ubuntu Server启动系统后连接无线网络的方法
- 在Ubuntu上搭建网桥的方法
- ubuntu 虚拟机上网方式及相关配置详解
CFSDN坚持开源创造价值,我们致力于搭建一个资源共享平台,让每一个IT人在这里找到属于你的精彩世界.
这篇CFSDN的博客文章实例详解Android Selector和Shape的用法由作者收集整理,如果你对这篇文章有兴趣,记得点赞哟.
shape和selector是android ui设计中经常用到的,比如我们要自定义一个圆角button,点击button有些效果的变化,就要用到shape和selector。可以这样说,shape和selector在美化控件中的作用是至关重要的.
1:selector 。
drawable的item中可以有以下属性:
android:drawable="@[package:]drawable/drawable_resource" android:state_pressed=["true" | "false"] android:state_focused=["true" | "false"] android:state_selected=["true" | "false"] android:state_active=["true" | "false"] android:state_checkable=["true" | "false"] android:state_checked=["true" | "false"] android:state_enabled=["true" | "false"] android:state_window_focused=["true" | "false"] 。
|
1
2
3
4
5
6
7
8
9
10
11
12
13
14
15
|
<?xml version=
"1.0"
encoding=
"utf-8"
?>
<selector xmlns:android=
"http://schemas.android.com/apk/res/android"
>
<item android:state_enabled=
"true"
android:state_checked=
"true"
android:state_pressed=
"true"
android:drawable=
"@drawable/enabled_on_pressed"
/>
<item android:state_enabled=
"true"
android:state_checked=
"false"
android:state_pressed=
"true"
android:drawable=
"@drawable/enabled_off_pressed"
/>
<item android:state_enabled=
"true"
android:state_checked=
"true"
android:drawable=
"@drawable/enabled_on"
/>
<item android:state_enabled=
"true"
android:state_checked=
"false"
android:drawable=
"@drawable/enabled_off"
/>
<item android:state_enabled=
"false"
android:state_checked=
"true"
android:drawable=
"@drawable/disabled_on"
/>
<item android:state_enabled=
"false"
android:state_checked=
"false"
android:drawable=
"@drawable/disabled_off"
/>
</selector>
|
item顺序是有讲究的,条件限定越细致,则应该放到前面。比如这儿如果把1,2行和3,4行的item交换,那么pressed的就永远无法触发了,因为有item已经满足条件返回了。可以理解为代码中的if语句.
。
2:shape 。
|
1
2
3
4
5
6
7
8
9
10
11
12
13
14
15
16
17
18
19
20
21
|
<shape>
<!-- 实心 -->
<solid android:color=
"#ff9d77"
/>
<!-- 渐变 -->
<gradient
android:startcolor=
"#ff8c00"
android:endcolor=
"#ffffff"
android:angle=
"270"
/>
<!-- 描边 -->
<stroke
android:width=
"2dp"
android:color=
"#dcdcdc"
/>
<!-- 圆角 -->
<corners
android:radius=
"2dp"
/>
<padding
android:left=
"10dp"
android:top=
"10dp"
android:right=
"10dp"
android:bottom=
"10dp"
/>
</shape>
|
solid:实心,就是填充的意思 android:color指定填充的颜色 gradient:渐变 。
android:startcolor和android:endcolor分别为起始和结束颜色,ndroid:angle是渐变角度,必须为45的整数倍.
另外渐变默认的模式为android:type="linear",即线性渐变,可以指定渐变为径向渐变,android:type="radial",径向渐变需要指定半径android:gradientradius="50".
stroke:描边 。
android:width="2dp" 描边的宽度,android:color 描边的颜色.
我们还可以把描边弄成虚线的形式,设置方式为:
android:dashwidth="5dp" android:dashgap="3dp" 。
其中android:dashwidth表示'-'这样一个横线的宽度,android:dashgap表示之间隔开的距离.
corners:圆角 。
android:radius为角的弧度,值越大角越圆.
我们还可以把四个角设定成不同的角度,方法为:
|
1
2
3
4
5
6
|
<corners
android:toprightradius=
"20dp"
右上角
android:bottomleftradius=
"20dp"
右下角
android:topleftradius=
"1dp"
左上角
android:bottomrightradius=
"0dp"
左下角
/>
|
这里有个地方需要注意,bottomleftradius是右下角,而不是左下角,这个有点郁闷,不过不影响使用,记得别搞错了就行。 还有网上看到有人说设置成0dp无效,不过我在测试中发现是可以的,我用的是2.2,可能修复了这个问题吧,如果无效的话那就只能设成1dp了.
padding:间隔 。
button_selector.xml
|
1
2
3
4
5
6
7
8
9
10
11
12
13
14
15
16
17
18
19
20
21
22
23
24
25
26
27
28
29
30
31
32
33
34
35
36
37
38
39
40
41
42
43
44
45
46
47
48
49
50
51
52
53
54
55
56
57
58
59
60
61
62
63
64
65
|
<?xml version=
"1.0"
encoding=
"utf-8"
?>
<selector
xmlns:android=
"http://schemas.android.com/apk/res/android"
>
<item android:state_pressed=
"true"
>
<shape>
<!-- 渐变 -->
<gradient
android:startcolor=
"#ff8c00"
android:endcolor=
"#ffffff"
android:type=
"radial"
android:gradientradius=
"50"
/>
<!-- 描边 -->
<stroke
android:width=
"2dp"
android:color=
"#dcdcdc"
android:dashwidth=
"5dp"
android:dashgap=
"3dp"
/>
<!-- 圆角 -->
<corners
android:radius=
"2dp"
/>
<padding
android:left=
"10dp"
android:top=
"10dp"
android:right=
"10dp"
android:bottom=
"10dp"
/>
</shape>
</item>
<item android:state_focused=
"true"
>
<shape>
<gradient
android:startcolor=
"#ffc2b7"
android:endcolor=
"#ffc2b7"
android:angle=
"270"
/>
<stroke
android:width=
"2dp"
android:color=
"#dcdcdc"
/>
<corners
android:radius=
"2dp"
/>
<padding
android:left=
"10dp"
android:top=
"10dp"
android:right=
"10dp"
android:bottom=
"10dp"
/>
</shape>
</item>
<item>
<shape>
<solid android:color=
"#ff9d77"
/>
<stroke
android:width=
"2dp"
android:color=
"#fad3cf"
/>
<corners
android:toprightradius=
"5dp"
android:bottomleftradius=
"5dp"
android:topleftradius=
"0dp"
android:bottomrightradius=
"0dp"
/>
<padding
android:left=
"10dp"
android:top=
"10dp"
android:right=
"10dp"
android:bottom=
"10dp"
/>
</shape>
</item>
</selector>
|
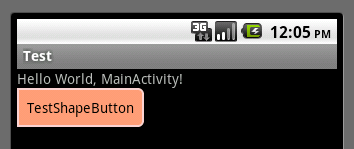
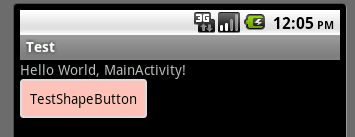
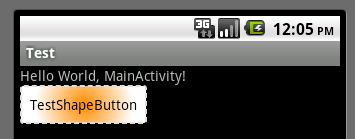
运行效果如下图:
一般状态:

获得焦点状态:

按下状态:

以上所述是小编给大家分享的实例详解android selector和shape的用法 。
最后此篇关于实例详解Android Selector和Shape的用法的文章就讲到这里了,如果你想了解更多关于实例详解Android Selector和Shape的用法的内容请搜索CFSDN的文章或继续浏览相关文章,希望大家以后支持我的博客! 。
我想知道这两者之间有什么不同 .myClass/DomElement .myotherclassinsidethatelement 和 .myClass/DomElement > .myothercl
使用 jQuery on() 版本 1.7。我通常这样绑定(bind)我的事件: $(".foo").on("click", function() { console.log("foo cli
我想找到与选择器匹配的所有元素,但如果它已经包含在匹配元素中则不查找。 $('#container').find('.child').not('.child .child'); 请注意,.child
我有一个看起来像这样的无序列表,但更广泛: Parent Category 2 Parent Category 2 Parent Category 3
这个问题在这里已经有了答案: CSS negation pseudo-class :not() for parent/ancestor elements (2 个答案) 关闭 4 年前。
我希望使用 CSS :not() 来定位 before 选择器。这可能吗? 示例: https://jsfiddle.net/uuq62b8d/ a.button:before { content
这有什么区别: $.each($('#myTable input[name="deleteItem[]"]:checked').do_something()); 还有这个: $('#myTable i
已关闭。这个问题是 not reproducible or was caused by typos 。目前不接受答案。 这个问题是由拼写错误或无法再重现的问题引起的。虽然类似的问题可能是 on-top
我正在使用 UL LI 列表和 jQuery 创建一棵树。我使用了 jQuery 选择器 jQuery(li:has(ul)) 查找所有具有子节点的列表节点,然后向其添加单击事件。 jQuery(li
我真的不知道如何命名这两种方法,所以请原谅我这样调用它们。 字符串选择器 $("#myList li").eq(3); 函数选择器 $("#myList li:eq(3)"); 据我所知,他们都做同样
我有以下代码: .. 我正在使用以下 CSS 来排除具有“main-l tbl”类的表: table:not(.main-l .views-table) { .. } 我注
这个问题已经有答案了: 已关闭12 年前。 Possible Duplicate: What is the difference between $ and jQuery 我注意到使用“jQuery(
我有许多 css 选择器和许多选择器异常,所以我使用 :not 将它们排除在外... 示例(只是一些我不需要的选择器): [class*="-dashboard-"]:not([class$="-bi
CADisplayLink 有这个方法是有道理的,但我很好奇为什么 UIScreen 也会有它。 最佳答案 文档说屏幕提供的显示链接与该屏幕相关联。但是,查看官方文档,与任何屏幕都没有明显的关系;显示
我在这里阅读了关于 toArray() 的文档,并在控制台中对其进行了测试。我找不到在选择器上调用 toArray() 和调用选择器本身之间的区别。 两种方式都得到了完全相同的结果,这是一个与选择器匹
我有一个问题,为什么这两个代码片段不同。 $('#ctl00_DDMenu1_HyperLink1') //jQuery(a#ctl00_DDMenu1_HyperLink1 Default.asp
我想通过以下方式模拟我可以在 jQuery 中实现的目标$('.someClass:not(.hidden)') 我试过下面的代码。 $crawler->filter('someClass:not(.
这个问题不太可能对任何 future 的访客有帮助;它只与一个较小的地理区域、一个特定的时间点或一个非常狭窄的情况相关,通常不适用于全世界的互联网受众。如需帮助使此问题更广泛适用,visit the
我想通过以下方式模拟我可以在 jQuery 中实现的目标$('.someClass:not(.hidden)') 我试过下面的代码。 $crawler->filter('someClass:not(.
我想根据 Iterator::next 中当前枚举变体的某些属性更改枚举变体。我有两次尝试,都没有编译: enum Test { A(Vec), B, } impl Iterator

我是一名优秀的程序员,十分优秀!