- ubuntu12.04环境下使用kvm ioctl接口实现最简单的虚拟机
- Ubuntu 通过无线网络安装Ubuntu Server启动系统后连接无线网络的方法
- 在Ubuntu上搭建网桥的方法
- ubuntu 虚拟机上网方式及相关配置详解
CFSDN坚持开源创造价值,我们致力于搭建一个资源共享平台,让每一个IT人在这里找到属于你的精彩世界.
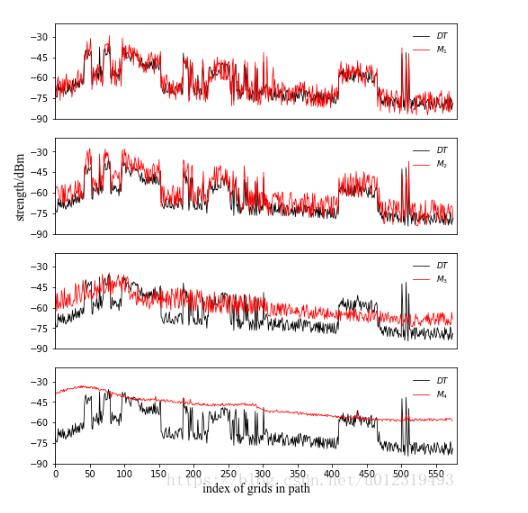
这篇CFSDN的博客文章python 实现将多条曲线画在一幅图上的方法由作者收集整理,如果你对这篇文章有兴趣,记得点赞哟.
如下所示:
|
1
2
3
4
5
6
7
8
9
10
11
12
13
14
15
16
17
18
19
20
21
22
23
24
25
26
27
28
29
30
31
32
33
34
35
36
37
38
39
40
41
42
43
44
45
46
47
48
49
50
51
52
53
54
55
56
57
58
59
60
61
62
63
64
65
66
67
68
69
70
71
72
73
74
75
76
77
78
79
80
81
82
83
84
85
86
87
88
89
90
91
92
93
94
95
96
97
98
99
100
101
102
103
104
105
106
107
108
109
110
111
112
113
114
|
# -*- coding: utf-8 -*-
"""
Created on Thu Jun 07 09:17:40 2018
@author: yjp
"""
import
matplotlib.pyplot as plt
import
numpy as np
from
matplotlib.ticker
import
MultipleLocator, FormatStrFormatter
y0
=
[]
y1
=
[]
y2
=
[]
y3
=
[]
y4
=
[]
f
=
open
(
"y0.txt"
)
lines
=
f.readlines()
for
li
in
lines:
y0.append(li)
f
=
open
(
"y1.txt"
)
lines
=
f.readlines()
for
li
in
lines:
y1.append(li)
f
=
open
(
"y2.txt"
)
lines
=
f.readlines()
for
li
in
lines:
y2.append(li)
f
=
open
(
"y3.txt"
)
lines
=
f.readlines()
for
li
in
lines:
y3.append(li)
f
=
open
(
"y4.txt"
)
lines
=
f.readlines()
for
li
in
lines:
y4.append(li)
font1
=
{
'family'
:
'Times New Roman'
,
'weight'
:
'normal'
,
'size'
:
9
,
}
font2
=
{
'family'
:
'Times New Roman'
,
'weight'
:
'normal'
,
'size'
:
14
,
}
figsize
=
8
,
9
plt.subplots(figsize
=
figsize)
# 设定整张图片大小
ax1
=
plt.subplot(
4
,
1
,
1
)
ax1.yaxis.set_major_locator(MultipleLocator(
15
))
# 设定y轴刻度间距
#第一条线
x
=
range
(
0
,
len
(y0))
plt.plot(x, y0, color
=
'black'
, label
=
'$DT$'
, linewidth
=
0.8
)
# 绘制,指定颜色、标签、线宽,标签采用latex格式
plt.ylim(
-
90
,
-
20
)
# 设定y轴范围
hl
=
plt.legend(loc
=
'upper right'
, prop
=
font1, frameon
=
False
)
# 绘制图例,指定图例位置
#set(hl,'Box','off');
#第二条曲线
x
=
range
(
0
,
len
(y1))
plt.plot(x, y1, color
=
'red'
, label
=
'$M_1$'
, linewidth
=
0.8
)
plt.legend(loc
=
'upper right'
, prop
=
font1, frameon
=
False
)
# 绘制图例,指定图例位置
plt.xticks([])
# 去掉x坐标轴刻度
plt.xlim(
0
,
580
)
# 设定x轴范围
ax2
=
plt.subplot(
4
,
1
,
2
)
ax2.yaxis.set_major_locator(MultipleLocator(
15
))
x
=
range
(
0
,
len
(y0))
plt.plot(x, y0, color
=
'black'
, label
=
'$DT$'
, linewidth
=
0.8
)
plt.ylim(
-
90
,
-
20
)
hl
=
plt.legend(loc
=
'upper right'
, prop
=
font1, frameon
=
False
)
#set(hl,'Box','off');
x
=
range
(
0
,
len
(y2))
plt.plot(x, y2, color
=
'red'
, label
=
'$M_2$'
, linewidth
=
0.8
)
plt.legend(loc
=
'upper right'
, prop
=
font1, frameon
=
False
)
plt.ylabel(
"strength/dBm"
, font2)
plt.xticks([])
plt.xlim(
0
,
580
)
ax3
=
plt.subplot(
4
,
1
,
3
)
ax3.yaxis.set_major_locator(MultipleLocator(
15
))
x
=
range
(
0
,
len
(y0))
plt.plot(x, y0, color
=
'black'
, label
=
'$DT$'
, linewidth
=
0.8
)
hl
=
plt.legend(loc
=
'upper right'
, prop
=
font1, frameon
=
False
)
#set(hl,'Box','off');
plt.ylim(
-
90
,
-
20
)
x
=
range
(
0
,
len
(y3))
plt.plot(x, y3, color
=
'red'
, label
=
'$M_3$'
, linewidth
=
0.8
)
plt.legend(loc
=
'upper right'
, prop
=
font1, frameon
=
False
)
plt.xticks([])
plt.xlim(
0
,
580
)
ax4
=
plt.subplot(
4
,
1
,
4
)
ax4.yaxis.set_major_locator(MultipleLocator(
15
))
ax4.xaxis.set_major_locator(MultipleLocator(
50
))
x
=
range
(
0
,
len
(y0))
plt.plot(x, y0, color
=
'black'
, label
=
'$DT$'
, linewidth
=
0.8
)
plt.ylim(
-
90
,
-
20
)
hl
=
plt.legend(loc
=
'upper right'
, prop
=
font1, frameon
=
False
)
#set(hl,'Box','off');
x
=
range
(
0
,
len
(y4))
plt.plot(x, y4, color
=
'red'
, label
=
'$M_4$'
, linewidth
=
0.8
)
plt.legend(loc
=
'upper right'
, prop
=
font1, frameon
=
False
)
plt.xlabel(
"index of grids in path"
, font2)
plt.xlim(
0
,
580
)
plt.savefig(
"1.png"
, dpi
=
600
))
plt.show()
|

以上这篇python 实现将多条曲线画在一幅图上的方法就是小编分享给大家的全部内容了,希望能给大家一个参考,也希望大家多多支持我.
原文链接:https://blog.csdn.net/u012319493/article/details/80609905 。
最后此篇关于python 实现将多条曲线画在一幅图上的方法的文章就讲到这里了,如果你想了解更多关于python 实现将多条曲线画在一幅图上的方法的内容请搜索CFSDN的文章或继续浏览相关文章,希望大家以后支持我的博客! 。
我想以 headless 模式(屏幕上根本没有 GUI)将 JPanel 绘制到 BufferedImage 中。 final JPanel panel = createPanel(); panel.
我是 Canvas 的新手,正在尝试创建看起来逼真的 float 粒子动画。 目前,我正在创建 400 个随机散布在 400x400 Canvas 上的粒子。 然后,在每个 requestAnimat
有没有办法在悬停时停止悬 float 画? :hover 这是一个显示动画的链接: https://codepen.io/youbiteme/pen/RprPrN 最佳答案 只需为您的 svg 悬停添
我想在谷歌地图上绘制覆盖图,其中除了特定点周围 1.5 公里半径以外的所有内容都被遮蔽了。为此,我尝试使用带有大量边框的圆圈,所以我会在边框中放置透明中心和覆盖颜色来实现这一点,但它无法渲染。
我正在尝试通过扩展类 UIView 来创建自定义 View ,该类可以在自定义 View 的中心显示一个圆圈。为了添加自定义绘图,我重写了 draw(_ rect: CGRect) 方法,如下所示。

我是一名优秀的程序员,十分优秀!