- ubuntu12.04环境下使用kvm ioctl接口实现最简单的虚拟机
- Ubuntu 通过无线网络安装Ubuntu Server启动系统后连接无线网络的方法
- 在Ubuntu上搭建网桥的方法
- ubuntu 虚拟机上网方式及相关配置详解
CFSDN坚持开源创造价值,我们致力于搭建一个资源共享平台,让每一个IT人在这里找到属于你的精彩世界.
这篇CFSDN的博客文章Python matplotlib模块及柱状图用法解析由作者收集整理,如果你对这篇文章有兴趣,记得点赞哟.
代码如下 。
|
1
2
3
4
5
6
7
8
9
10
11
12
13
14
15
16
17
18
19
20
21
22
23
24
25
26
27
28
29
|
import
matplotlib.pyplot as plt
import
numpy as np
def
test4():
names
=
[
'电影1'
,
'电影2'
,
'电影3'
]
real_num1
=
[
7548
,
4013
,
1673
]
real_num2
=
[
5453
,
1840
,
1080
]
real_num3
=
[
4348
,
2345
,
1890
]
x
=
np.arange(
len
(names))
# 绘制柱形图
width
=
0.3
plt.bar(x, real_num1, alpha
=
0.5
, width
=
width, label
=
names[
0
])
plt.bar([i
+
width
for
i
in
x], real_num2, alpha
=
0.5
, width
=
width, label
=
names[
1
])
plt.bar([i
+
2
*
width
for
i
in
x], real_num3, alpha
=
0.5
, width
=
width, label
=
names[
2
])
# 正常显示中文
plt.rcParams[
"font.sans-serif"
]
=
[
"SimHei"
]
# 设置x坐标轴的值
x_label
=
[
"第{}天"
.
format
(i
+
1
)
for
i
in
x]
# 让x坐标轴显示在中间
plt.xticks([i
+
width
for
i
in
x], x_label)
# 添加ylabel
plt.ylabel(
"票房数"
)
# 添加图例
plt.legend()
# 添加标题
plt.title(
"3天3部电影票房数"
)
plt.show()
test4()
|
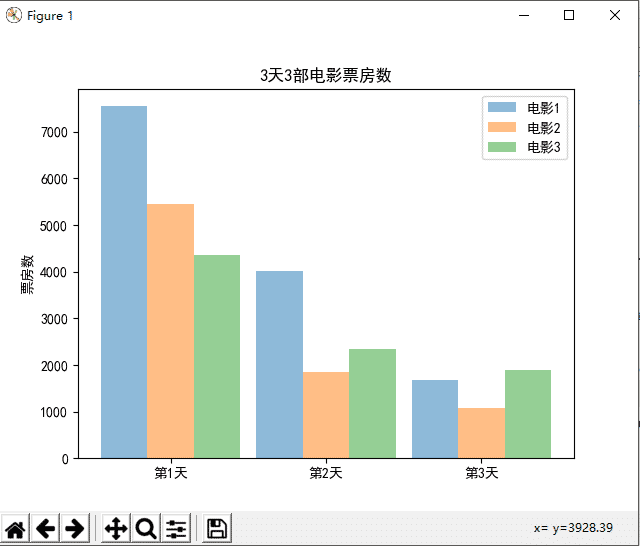
结果显示

代码如下 。
|
1
2
3
4
5
6
7
8
9
10
11
12
13
14
15
16
|
from
mpl_toolkits.mplot3d
import
Axes3Dimport matplotlib.pyplot as pltimport numpy as np
def
test5():
# ax.plot_surface(X, Y, Z, rstride=1, cstride=1, cmap='rainbow') #绘面
# 绘制3D曲面图
fig
=
plt.figure()
ax
=
Axes3D(fig)
# -4 到4 [-4, 4),步长为0.25
X
=
np.arange(
-
4
,
4
,
0.25
)
Y
=
np.arange(
-
4
,
4
,
0.25
)
# meshgrid方法,你只需要构造一个表示x轴上的坐标的向量和一个表示y轴上的坐标的向量;然后作为参数给到meshgrid(),该函数就会返回相应维度的两个矩阵;
X, Y
=
np.meshgrid(X, Y)
R
=
np.sqrt(X
*
*
2
+
Y
*
*
2
)
Z
=
np.sin(R)
ax.plot_surface(X, Y, Z, rstride
=
1
, cstride
=
1
, cmap
=
"rainbow"
)
plt.show()
|
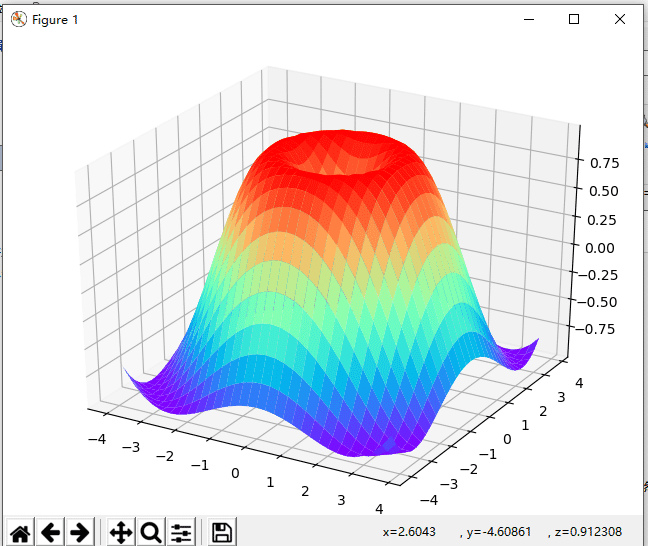
结果如下

代码如下 。
|
1
2
3
4
5
6
7
8
9
10
11
12
13
14
15
16
17
18
|
import
matplotlib.pyplot as plt
import
numpy as np
def
test6():
# 绘制三维散点图
# ax.scatter(x[1000:4000],y[1000:4000],z[1000:4000],c='r') #绘点
data
=
np.random.randint(
0
,
255
, size
=
[
40
,
40
,
40
])
x, y, z
=
data[
0
], data[
1
], data[
2
]
# 创建一个三维的绘图工程
ax
=
plt.subplot(
111
, projection
=
"3d"
)
# 将数据点分成三部分画,在颜色上有区分度
ax.scatter(x[:
10
], y[:
10
], z[:
10
], c
=
'y'
)
# 绘制数据点
ax.scatter(x[
10
:
20
], y[
10
:
20
], z[
10
:
20
], c
=
'r'
)
ax.scatter(x[
30
:
40
], y[
30
:
40
], z[
30
:
40
], c
=
'g'
)
# 坐标轴
ax.set_zlabel(
"Z"
)
ax.set_ylabel(
"Y"
)
ax.set_xlabel(
"X"
)
plt.show()
|
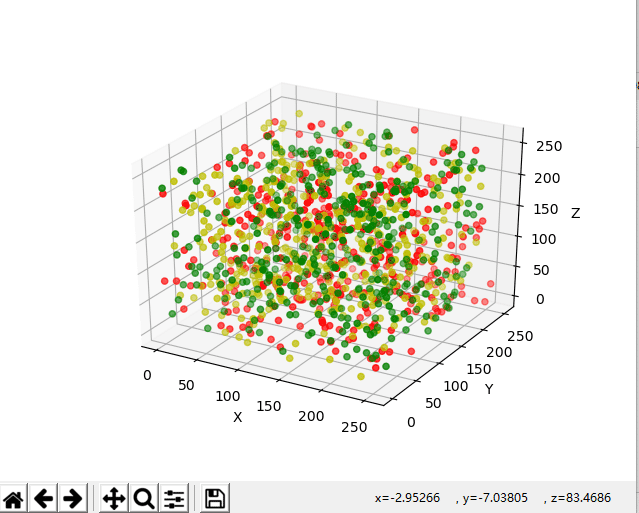
效果如下

以上就是本文的全部内容,希望对大家的学习有所帮助,也希望大家多多支持我.
原文链接:https://www.cnblogs.com/zhouzetian/p/12698465.html 。
最后此篇关于Python matplotlib模块及柱状图用法解析的文章就讲到这里了,如果你想了解更多关于Python matplotlib模块及柱状图用法解析的内容请搜索CFSDN的文章或继续浏览相关文章,希望大家以后支持我的博客! 。
我最近在我的机器上安装了 cx_Oracle 模块,以便连接到远程 Oracle 数据库服务器。 (我身边没有 Oracle 客户端)。 Python:版本 2.7 x86 Oracle:版本 11.
我想从 python timeit 模块检查打印以下内容需要多少时间,如何打印, import timeit x = [x for x in range(10000)] timeit.timeit("
我盯着 vs 代码编辑器上的 java 脚本编码,当我尝试将外部模块包含到我的项目中时,代码编辑器提出了这样的建议 -->(文件是 CommonJS 模块;它可能会转换为 ES6 模块。 )..有什么
我有一个 Node 应用程序,我想在标准 ES6 模块格式中使用(即 "type": "module" in the package.json ,并始终使用 import 和 export)而不转译为
我正在学习将 BlueprintJS 合并到我的 React 网络应用程序中,并且在加载某些 CSS 模块时遇到了很多麻烦。 我已经安装了 npm install @blueprintjs/core和
我需要重构一堆具有这样的调用的文件 define(['module1','module2','module3' etc...], function(a, b, c etc...) { //bun
我是 Angular 的新手,正在学习各种教程(Codecademy、thinkster.io 等),并且已经看到了声明应用程序容器的两种方法。首先: var app = angular.module
我正在尝试将 OUnit 与 OCaml 一起使用。 单元代码源码(unit.ml)如下: open OUnit let empty_list = [] let list_a = [1;2;3] le
我在 Angular 1.x 应用程序中使用 webpack 和 ES6 模块。在我设置的 webpack.config 中: resolve: { alias: { 'angular':
internal/modules/cjs/loader.js:750 return process.dlopen(module, path.toNamespacedPath(filename));
在本教程中,您将借助示例了解 JavaScript 中的模块。 随着我们的程序变得越来越大,它可能包含许多行代码。您可以使用模块根据功能将代码分隔在单独的文件中,而不是将所有内容都放在一个文件
我想知道是否可以将此代码更改为仅调用 MyModule.RED 而不是 MyModule.COLORS.RED。我尝试将 mod 设置为变量来存储颜色,但似乎不起作用。难道是我方法不对? (funct
我有以下代码。它是一个 JavaScript 模块。 (function() { // Object var Cahootsy; Cahootsy = { hello:
关闭。这个问题是 opinion-based 。它目前不接受答案。 想要改进这个问题?更新问题,以便 editing this post 可以用事实和引文来回答它。 关闭 2 年前。 Improve
从用户的角度来看,一个模块能够通过 require 加载并返回一个 table,模块导出的接口都被定义在此 table 中(此 table 被作为一个 namespace)。所有的标准库都是模块。标
Ruby的模块非常类似类,除了: 模块不可以有实体 模块不可以有子类 模块由module...end定义. 实际上...模块的'模块类'是'类的类'这个类的父类.搞懂了吗?不懂?让我们继续看
我有一个脚本,它从 CLI 获取 3 个输入变量并将其分别插入到 3 个变量: GetOptions("old_path=s" => \$old_path, "var=s" =
我有一个简单的 python 包,其目录结构如下: wibble | |-----foo | |----ping.py | |-----bar | |----pong.py 简单的
这种语法会非常有用——这不起作用有什么原因吗?谢谢! module Foo = { let bar: string = "bar" }; let bar = Foo.bar; /* works *
我想运行一个命令: - name: install pip shell: "python {"changed": true, "cmd": "python <(curl https://boot

我是一名优秀的程序员,十分优秀!