- ubuntu12.04环境下使用kvm ioctl接口实现最简单的虚拟机
- Ubuntu 通过无线网络安装Ubuntu Server启动系统后连接无线网络的方法
- 在Ubuntu上搭建网桥的方法
- ubuntu 虚拟机上网方式及相关配置详解
CFSDN坚持开源创造价值,我们致力于搭建一个资源共享平台,让每一个IT人在这里找到属于你的精彩世界.
这篇CFSDN的博客文章一行iOS代码实现图片无限轮播器由作者收集整理,如果你对这篇文章有兴趣,记得点赞哟.
最近一直在找实现图片无限轮播的方法,在网上也看了不少方法,大都不太合适,最终看到某it培训公司一位讲师用 。
uicollectionview:一行代码实现图片无限轮播器的方法,当然想一行代码实现轮播功能,前期还是有一些工作要做。下面就把这个方法分享给大家! 。
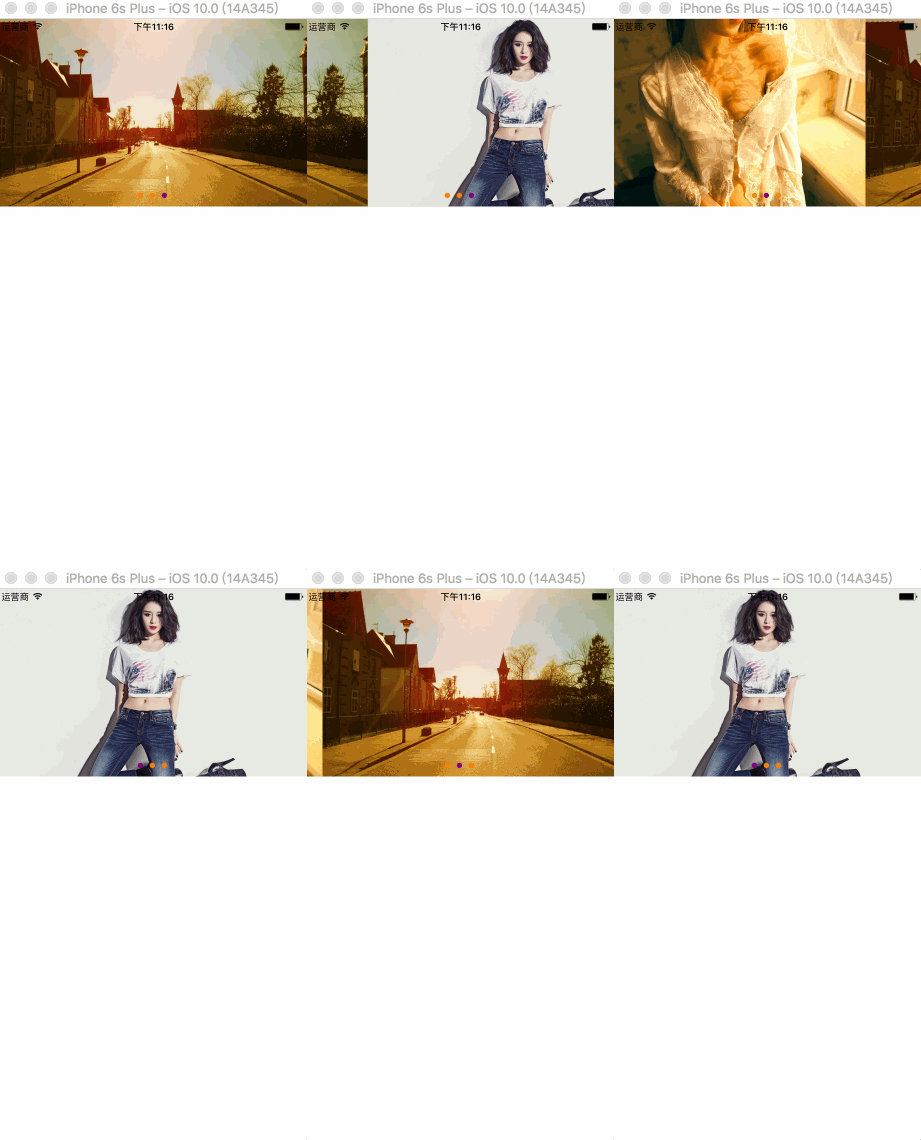
1、图片无限轮播实现效果图:

图片无限轮播.gif 。
2、实现原理与分析:
假设有三张图片0、1、2,想要实现无限轮播,我们可以将uicollectionview的cell个数设为图片的个数 x 3,也就是把三张图片重复添加到9个cell中,可以把无限轮播分解成五种特殊的状态(五个临界点),轮播开始时为初始状态,在定时器的作用下依次滚动到最后一个cell,此时为右临界状态显示的是第2张图片,若想继续无缝滚动到第0图片,我们可以偷偷的将collectionview滚动到第三个cell上,可以看第四幅转态图此时显示的依然是第2张图片,这样再次滚动就是第0张图,这样就实现了cell向左滚动的无限循环轮播;向右滚动的原理一样,就是第三幅图到第五幅图的变化.

初始界状态.png 。

右临界状态.png 。

左临界状态.png 。

paste_image.png 。

paste_image.png 。
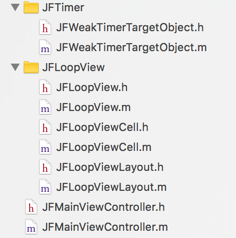
3、代码:

类文件.png 。
jfweaktimertargetobject重写定时器nstimer的+ (nstimer *)scheduledtimerwithtimeinterval:(nstimeinterval)ti target:(id)atarget selector:(sel)aselector userinfo:(nullable id)userinfo repeats:(bool)yesorno;类方法的目的是:避免当定时器强引用jfloopview类,jfloopview无法被释放的问题.
jfweaktimertargetobject.h文件 。
|
1
2
3
4
5
|
#import <foundation/foundation.h>
@interface jfweaktimertargetobject : nsobject
+ (nstimer *)scheduledtimerwithtimeinterval:(nstimeinterval)ti target:(id)atarget selector:(sel)aselector userinfo:(nullable id)userinfo repeats:(
bool
)yesorno;
@end
|
jfweaktimertargetobject.m文件 。
|
1
2
3
4
5
6
7
8
9
10
11
12
13
14
15
16
17
18
19
20
21
22
23
24
|
#import "jfweaktimertargetobject.h"
@interface jfweaktimertargetobject ()
@property (nonatomic, weak) id target;
@property (nonatomic, assign) sel selector;
@end
@implementation jfweaktimertargetobject
+ (nstimer *)scheduledtimerwithtimeinterval:(nstimeinterval)ti target:(id)atarget selector:(sel)aselector userinfo:(nullable id)userinfo repeats:(
bool
)yesorno {
//创建当前类对象
jfweaktimertargetobject *object = [[jfweaktimertargetobject alloc] init];
object.target = atarget;
object.selector = aselector;
return
[nstimer scheduledtimerwithtimeinterval:ti target:object selector:@selector(fire:) userinfo:userinfo repeats:yesorno];
}
- (
void
)fire:(id)obj {
[self.target performselector:self.selector withobject:obj];
}
@end
|
jfloopview.h文件 。
|
1
2
3
4
5
6
7
8
|
#import <uikit/uikit.h>
@interface jfloopview : uiview
//jfloopview初始化方法
- (instancetype)initwithimagearray:(nsarray *)imagearray;
@end
|
jfloopview.m文件 。
。
|
1
2
3
4
5
6
7
8
9
10
11
12
13
14
15
16
17
18
19
20
21
22
23
24
25
26
27
28
29
30
31
32
33
34
35
36
37
38
39
40
41
42
43
44
45
46
47
48
49
50
51
52
53
54
55
56
57
58
59
60
61
62
63
64
65
66
67
68
69
70
71
72
73
74
75
76
77
78
79
80
81
82
83
84
85
86
87
88
89
90
91
92
93
94
95
96
97
98
99
100
101
102
103
104
105
106
107
108
109
110
111
112
113
114
115
116
117
118
119
120
121
122
123
124
125
126
127
128
129
130
131
132
133
|
#import "jfloopview.h"
#import "jfloopviewlayout.h"
#import "jfloopviewcell.h"
#import "jfweaktimertargetobject.h"
@interface jfloopview () <uicollectionviewdelegate, uicollectionviewdatasource>
@property (nonatomic, strong) uicollectionview *collectionview;
@property (nonatomic, strong) uipagecontrol *pagecontrol;
@property (nonatomic, strong) nsarray *imagearray;
@property (nonatomic, weak) nstimer *timer;
@end
static
nsstring *id = @
"loopviewcell"
;
@implementation jfloopview
- (instancetype)initwithimagearray:(nsarray *)imagearray {
if
(self = [super init]) {
uicollectionview *collectionview = [[uicollectionview alloc] initwithframe:cgrectzero collectionviewlayout:[[jfloopviewlayout alloc] init]];
[collectionview registerclass:[jfloopviewcell
class
] forcellwithreuseidentifier:id];
collectionview.datasource = self;
collectionview.delegate = self;
[self addsubview:collectionview];
self.collectionview = collectionview;
self.imagearray = imagearray;
//添加分页器
[self addsubview:self.pagecontrol];
//回到主线程刷新ui
dispatch_async(dispatch_get_main_queue(), ^{
//设置滚动的初始状态在
[self.collectionview scrolltoitematindexpath:[nsindexpath indexpathforitem:self.imagearray.count insection:0] atscrollposition:uicollectionviewscrollpositionleft animated:no];
//添加定时器
[self addtimer];
});
}
return
self;
}
/// 懒加载pagecontrol
- (uipagecontrol *)pagecontrol {
if
(!_pagecontrol) {
_pagecontrol = [[uipagecontrol alloc] initwithframe:cgrectmake(0, 220, 0, 30)];
_pagecontrol.numberofpages = self.imagearray.count;
_pagecontrol.pageindicatortintcolor = [uicolor orangecolor];
_pagecontrol.currentpageindicatortintcolor = [uicolor purplecolor];
}
return
_pagecontrol;
}
#pragma mark --- uicollectionviewdatasource 数据源方法
- (nsinteger)collectionview:(uicollectionview *)collectionview numberofitemsinsection:(nsinteger)section {
return
self.imagearray.count * 3;
}
- (uicollectionviewcell *)collectionview:(uicollectionview *)collectionview cellforitematindexpath:(nsindexpath *)indexpath {
jfloopviewcell *cell = [collectionview dequeuereusablecellwithreuseidentifier:id forindexpath:indexpath];
cell.imagename = self.imagearray[indexpath.item % self.imagearray.count];
return
cell;
}
#pragma mark ---- uicollectionviewdelegate
/// 滚动完毕就会调用(如果不是人为拖拽scrollview导致滚动完毕,才会调用这个方法)
- (
void
)scrollviewdidendscrollinganimation:(uiscrollview *)scrollview {
[self scrollviewdidenddecelerating:scrollview];
}
/// 当滚动减速时调用
- (
void
)scrollviewdidenddecelerating:(uiscrollview *)scrollview {
cgfloat offsetx = scrollview.contentoffset.x;
nsinteger page = offsetx / scrollview.bounds.size.width;
//手动滚动到左边临界状态
if
(page == 0) {
page = self.imagearray.count;
self.collectionview.contentoffset = cgpointmake(page * scrollview.frame.size.width, 0);
//滚动到右临界状态
}
else
if
(page == [self.collectionview numberofitemsinsection:0] - 1) {
page = self.imagearray.count - 1;
self.collectionview.contentoffset = cgpointmake(page * scrollview.frame.size.width, 0);
}
//设置uipagecontrol当前页
nsinteger currentpage = page % self.imagearray.count;
self.pagecontrol.currentpage =currentpage;
//添加定时器
[self addtimer];
}
///手指开始拖动时调用
- (
void
)scrollviewwillbegindragging:(uiscrollview *)scrollview {
//移除定时器
[self removetimer];
}
/// 添加定时器
- (
void
)addtimer {
if
(self.timer)
return
;
self.timer = [jfweaktimertargetobject scheduledtimerwithtimeinterval:1.5 target:self selector:@selector(nextimage) userinfo:nil repeats:yes];
[[nsrunloop currentrunloop] addtimer:self.timer formode:nsrunloopcommonmodes];
}
/// 移除定时器
- (
void
)removetimer {
[self.timer invalidate];
self.timer = nil;
}
/// 切换到下一张图片
- (
void
)nextimage {
cgfloat offsetx = self.collectionview.contentoffset.x;
nsinteger page = offsetx / self.collectionview.bounds.size.width;
[self.collectionview setcontentoffset:cgpointmake((page + 1) * self.collectionview.bounds.size.width, 0) animated:yes];
}
- (
void
)layoutsubviews {
[super layoutsubviews];
self.collectionview.frame = self.bounds;
}
- (
void
)dealloc {
[self removetimer];
}
@end
|
jfloopviewcell.h文件 。
|
1
2
3
4
|
#import <uikit/uikit.h>
@interface jfloopviewcell : uicollectionviewcell
@property (nonatomic, copy) nsstring *imagename;
@end
|
jfloopviewcell.m文件 。
|
1
2
3
4
5
6
7
8
9
10
11
12
13
14
15
16
17
18
19
20
21
22
23
24
25
26
27
28
|
#import "jfloopviewcell.h"
@interface jfloopviewcell ()
@property (nonatomic, weak) uiimageview *iconview;
@end
@implementation jfloopviewcell
- (instancetype)initwithframe:(cgrect)frame {
if
(self = [super initwithframe:frame]) {
uiimageview *iconview = [[uiimageview alloc] init];
[self addsubview:iconview];
self.iconview = iconview;
}
return
self;
}
- (
void
)setimagename:(nsstring *)imagename {
_imagename = imagename;
self.iconview.image = [uiimage imagenamed:imagename];
}
- (
void
)layoutsubviews {
[super layoutsubviews];
self.iconview.frame = self.bounds;
}
@end
|
jfloopviewlayout.h文件 。
|
1
2
3
4
5
|
#import <uikit/uikit.h>
@interface jfloopviewlayout : uicollectionviewflowlayout
@end
|
jfloopviewlayout.m文件 。
|
1
2
3
4
5
6
7
8
9
10
11
12
13
14
15
16
17
18
19
20
21
22
23
24
|
#import "jfloopviewlayout.h"
@implementation jfloopviewlayout
/// 准备布局
- (
void
)preparelayout {
[super preparelayout];
//设置item尺寸
self.itemsize = self.collectionview.frame.size;
//设置滚动方向
self.scrolldirection = uicollectionviewscrolldirectionhorizontal;
//设置分页
self.collectionview.pagingenabled = yes;
//设置最小间距
self.minimumlinespacing = 0;
self.minimuminteritemspacing = 0;
//隐藏水平滚动条
self.collectionview.showshorizontalscrollindicator = no;
}
@end
|
jfmainviewcontroller.h文件 。
|
1
2
3
4
5
|
#import <uikit/uikit.h>
@interface jfmainviewcontroller : uiviewcontroller
@end
|
jfmainviewcontroller.m文件 。
|
1
2
3
4
5
6
7
8
9
10
11
12
13
14
15
16
17
18
19
20
21
22
23
24
25
26
27
28
29
30
31
32
33
34
35
36
37
38
39
40
41
42
43
44
45
|
#import "jfmainviewcontroller.h"
#import "jfloopview.h"
@interface jfmainviewcontroller ()
@property (nonatomic, strong) jfloopview *loopview;
@end
@implementation jfmainviewcontroller
- (
void
)viewdidload {
[super viewdidload];
//关闭自动调整滚动视图
self.automaticallyadjustsscrollviewinsets = no;
}
- (
void
)viewwillappear:(
bool
)animated {
[super viewwillappear:animated];
self.navigationcontroller.navigationbar.hidden = yes;
}
- (
void
)loadview {
[super loadview];
//设置图片数据
nsarray *imagearray = @[@
"srcoll_01"
,@
"srcoll_02"
,@
"srcoll_03"
];
//此行代码实现无限轮播
_loopview = [[jfloopview alloc] initwithimagearray:imagearray];
//设置loopview的frame
_loopview.frame = cgrectmake(0, 0, [uiscreen mainscreen].bounds.size.width, 250);
[self.view addsubview:self.loopview];
}
- (
void
)didreceivememorywarning {
[super didreceivememorywarning];
// dispose of any resources that can be recreated.
}
@end
|
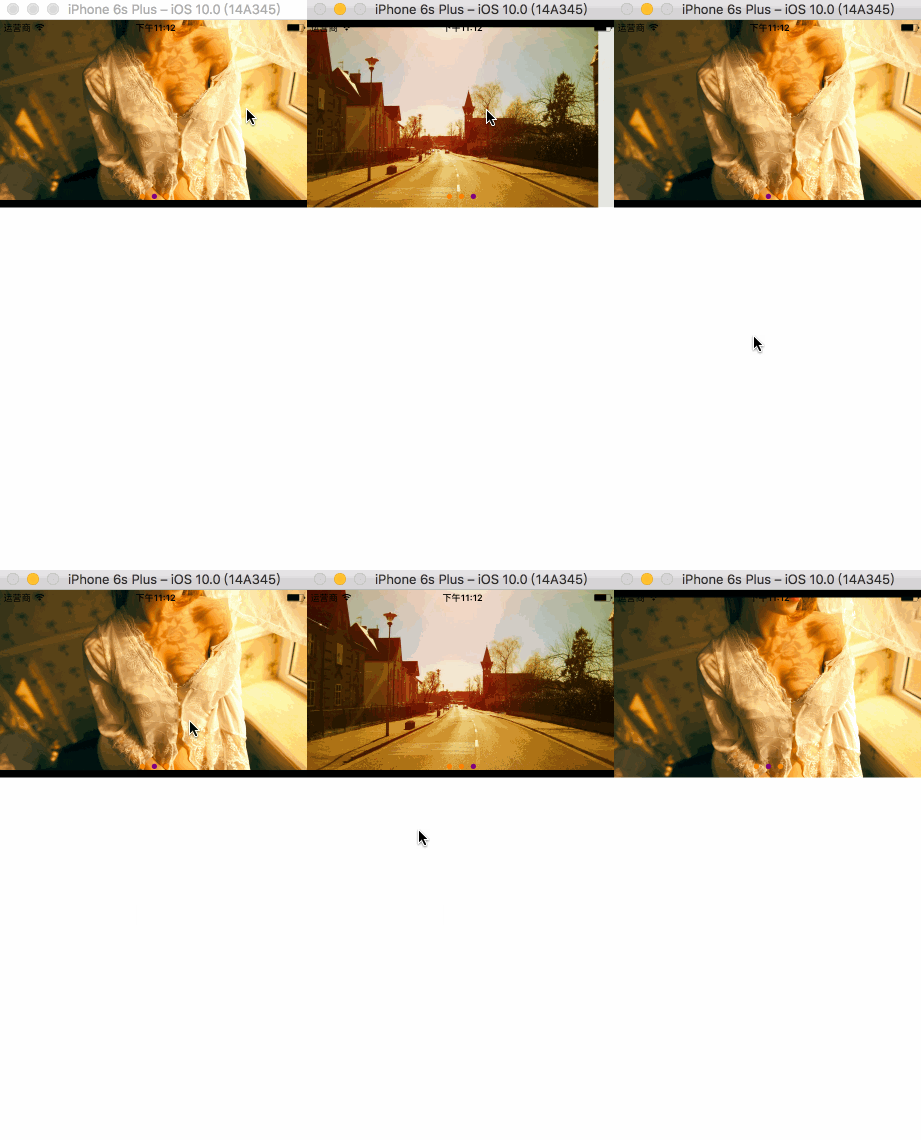
注意:如果你的控制器有uinavigationbar,且隐藏了navigationbar,一定要记得设置self.automaticallyadjustsscrollviewinsets = no; automaticallyadjustsscrollviewinsets是干嘛的呢?简单点说就是automaticallyadjustsscrollviewinsets根据所在界面的status bar、navigationbar、与tabbar的高度,自动调整scrollview的 inset,设置为no,不让viewcontroller调整,我们自己修改布局即可。如果不设置为no就可能出现下面的情况,自动滚动和拖动的时候imageview的位置会变化.

图片无限轮播bug展示.gif 。
4、总结:
1、实现无限轮播器的主要控件是uicollectionview和uipagecontrol, 2、封装好工具类以后再使用时一行_loopview = [[jfloopview alloc] initwithimagearray:imagearray];代码,然后设置frame就可以复用无限轮播器。 3、合理切换图片和图片排列的方法,加上恰当地使用uicollectionview提供的代理方法就可以完美的实现无限轮播器.
写在最后:
下一篇文章讲用uicollectionview实现电商app首页的方法:
电商app的首页展示.gif 。
如果你有好的方法敬请分享,感谢你的阅读!欢迎关注和评论! 。
源码地址:链接: https://pan.baidu.com/s/1nv5fqzj 密码: qz3u 。
以上就是本文的全部内容,希望对大家的学习有所帮助,也希望大家多多支持我.
原文链接:http://www.jianshu.com/p/dd5eef3bc6d0 。
最后此篇关于一行iOS代码实现图片无限轮播器的文章就讲到这里了,如果你想了解更多关于一行iOS代码实现图片无限轮播器的内容请搜索CFSDN的文章或继续浏览相关文章,希望大家以后支持我的博客! 。
我尝试理解[c代码 -> 汇编]代码 void node::Check( data & _data1, vector& _data2) { -> push ebp -> mov ebp,esp ->
我需要在当前表单(代码)的上下文中运行文本文件中的代码。其中一项要求是让代码创建新控件并将其添加到当前窗体。 例如,在Form1.cs中: using System.Windows.Forms; ..
我有此 C++ 代码并将其转换为 C# (.net Framework 4) 代码。有没有人给我一些关于 malloc、free 和 sprintf 方法的提示? int monate = ee; d
我的网络服务器代码有问题 #include #include #include #include #include #include #include int
给定以下 html 代码,将列表中的第三个元素(即“美丽”一词)以斜体显示的 CSS 代码是什么?当然,我可以给这个元素一个 id 或一个 class,但 html 代码必须保持不变。谢谢
关闭。这个问题不符合Stack Overflow guidelines .它目前不接受答案。 我们不允许提问寻求书籍、工具、软件库等的推荐。您可以编辑问题,以便用事实和引用来回答。 关闭 7 年前。
我试图制作一个宏来避免重复代码和注释。 我试过这个: #define GrowOnPage(any Page, any Component) Component.Width := Page.Surfa
我正在尝试将我的旧 C++ 代码“翻译”成头条新闻所暗示的 C# 代码。问题是我是 C# 中的新手,并不是所有的东西都像 C++ 中那样。在 C++ 中这些解决方案运行良好,但在 C# 中只是不能。我
在 Windows 10 上工作,R 语言的格式化程序似乎没有在 Visual Studio Code 中完成它的工作。我试过R support for Visual Studio Code和 R-T
我正在处理一些报告(计数),我必须获取不同参数的计数。非常简单但乏味。 一个参数的示例查询: qCountsEmployee = ( "select count(*) from %s wher
最近几天我尝试从 d00m 调试网络错误。我开始用尽想法/线索,我希望其他 SO 用户拥有可能有用的宝贵经验。我希望能够提供所有相关信息,但我个人无法控制服务器环境。 整个事情始于用户注意到我们应用程
我有一个 app.js 文件,其中包含如下 dojo amd 模式代码: require(["dojo/dom", ..], function(dom){ dom.byId('someId').i
我对“-gencode”语句中的“code=sm_X”选项有点困惑。 一个例子:NVCC 编译器选项有什么作用 -gencode arch=compute_13,code=sm_13 嵌入库中? 只有
我为我的表格使用 X-editable 框架。 但是我有一些问题。 $(document).ready(function() { $('.access').editable({
我一直在通过本教程学习 flask/python http://blog.miguelgrinberg.com/post/the-flask-mega-tutorial-part-i-hello-wo
我想将 Vim 和 EMACS 用于 CNC、G 代码和 M 代码。 Vim 或 EMACS 是否有任何语法或模式来处理这种类型的代码? 最佳答案 一些快速搜索使我找到了 this vim 和 thi
关闭。这个问题不符合Stack Overflow guidelines .它目前不接受答案。 想改进这个问题?更新问题,使其成为 on-topic对于堆栈溢出。 7年前关闭。 Improve this
这个问题在这里已经有了答案: Enabling markdown highlighting in Vim (5 个回答) 6年前关闭。 当我在 Vim 中编辑包含 Markdown 代码的 READM
我正在 Swift3 iOS 中开发视频应用程序。基本上我必须将视频 Assets 和音频与淡入淡出效果合并为一个并将其保存到 iPhone 画廊。为此,我使用以下方法: private func d
pipeline { agent any stages { stage('Build') { steps { e

我是一名优秀的程序员,十分优秀!