- Java锁的逻辑(结合对象头和ObjectMonitor)
- 还在用饼状图?来瞧瞧这些炫酷的百分比可视化新图形(附代码实现)⛵
- 自动注册实体类到EntityFrameworkCore上下文,并适配ABP及ABPVNext
- 基于Sklearn机器学习代码实战
这里分类和汇总了欣宸的全部原创(含配套源码): https://github.com/zq2599/blog_demos 。
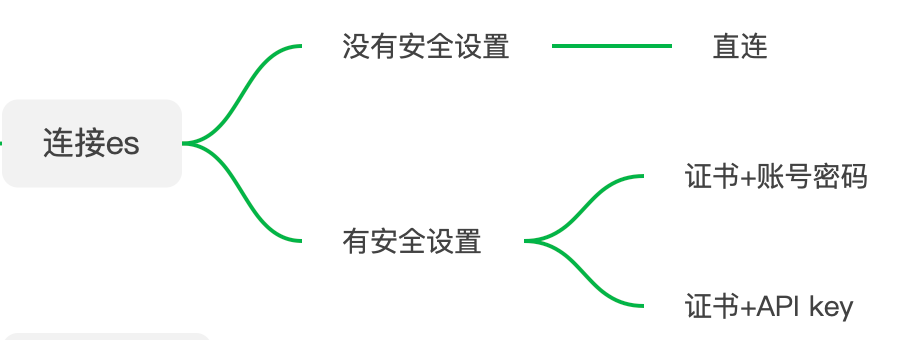
                          curl -X POST "https://localhost:9200/_security/api_key?pretty" \
--cacert es01.crt \
-u elastic:123456 \
-H 'Content-Type: application/json' \
-d'
{
  "name": "my-api-key-10d",
  "expiration": "10d"
}
'
                          {
  "id" : "eUV1V4EBucGIxpberGuJ",
  "name" : "my-api-key-10d",
  "expiration" : 1655893738633,
  "api_key" : "YyhSTh9ETz2LKBk3-Iy2ew",
  "encoded" : "ZVVWMVY0RUJ1Y0dJeHBiZXJHdUo6WXloU1RoOUVUejJMS0JrMy1JeTJldw=="
}
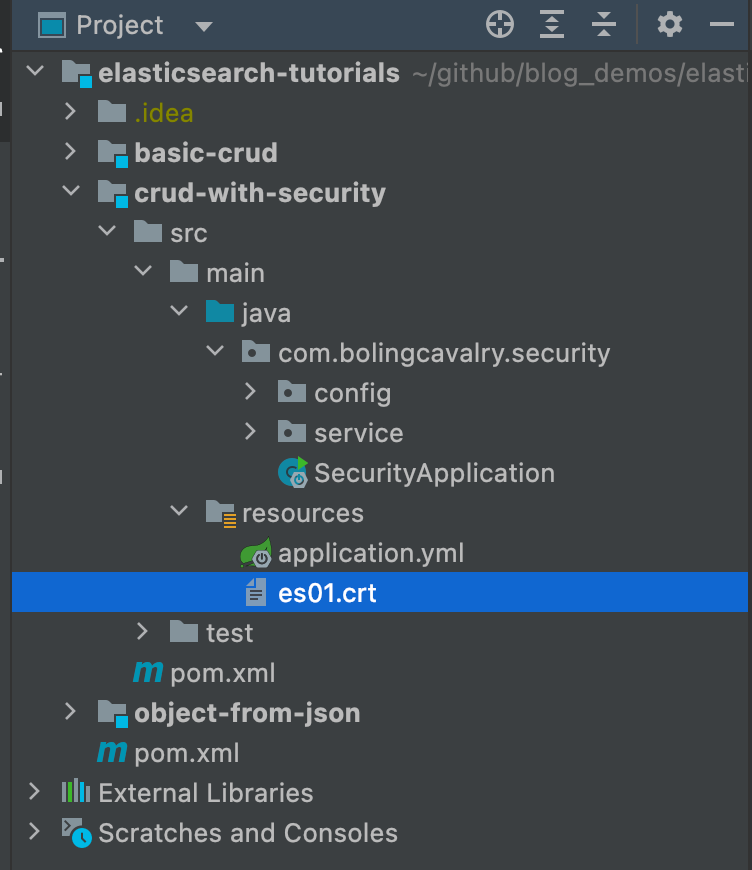
为了便于管理依赖库版本和源码,《java与es8实战》系列的所有代码都以子工程的形式存放在父工程 elasticsearch-tutorials 中 。
《java与es8实战之二:实战前的准备工作》 一文说明了创建父工程的详细过程 。
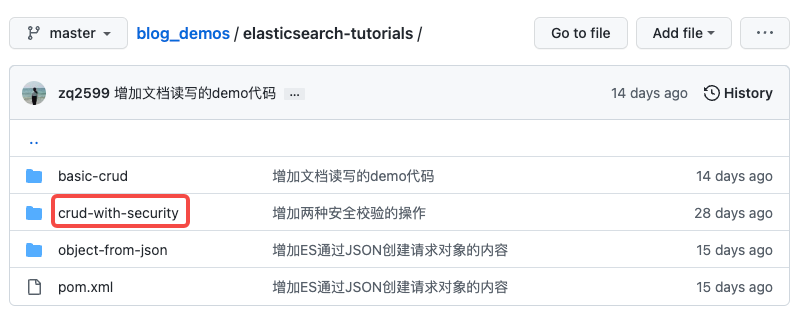
在父工程 elasticsearch-tutorials 中新建名为 crud-with-security 的子工程,其pom.xml内容如下 。
                          <?xml version="1.0" encoding="UTF-8"?>

<project xmlns="http://maven.apache.org/POM/4.0.0" xmlns:xsi="http://www.w3.org/2001/XMLSchema-instance"
         xsi:schemaLocation="http://maven.apache.org/POM/4.0.0 http://maven.apache.org/xsd/maven-4.0.0.xsd">
    <!-- 请改为自己项目的parent坐标 -->
    <parent>
        <artifactId>elasticsearch-tutorials</artifactId>
        <groupId>com.bolingcavalry</groupId>
        <version>1.0-SNAPSHOT</version>
        <relativePath>../pom.xml</relativePath>
    </parent>
    <modelVersion>4.0.0</modelVersion>
    <groupId>com.bolingcavalry</groupId>
    <!-- 请改为自己项目的artifactId -->
    <artifactId>crud-with-security</artifactId>
    <packaging>jar</packaging>
    <!-- 请改为自己项目的name -->
    <name>crud-with-security</name>
    <version>1.0-SNAPSHOT</version>
    <url>https://github.com/zq2599</url>

    <!--不用spring-boot-starter-parent作为parent时的配置-->
    <dependencyManagement>
        <dependencies>
            <dependency>
                <groupId>org.springframework.boot</groupId>
                <artifactId>spring-boot-dependencies</artifactId>

                <version>${springboot.version}</version>
                <type>pom</type>
                <scope>import</scope>
            </dependency>
        </dependencies>
    </dependencyManagement>

    <dependencies>
        <dependency>
            <groupId>org.springframework.boot</groupId>
            <artifactId>spring-boot-starter-actuator</artifactId>
        </dependency>

        <!-- 不加这个,configuration类中,IDEA总会添加一些提示 -->
        <dependency>
            <groupId>org.springframework.boot</groupId>
            <artifactId>spring-boot-configuration-processor</artifactId>
            <optional>true</optional>
        </dependency>

        <dependency>
            <groupId>org.projectlombok</groupId>
            <artifactId>lombok</artifactId>
        </dependency>

        <dependency>
            <groupId>org.springframework.boot</groupId>
            <artifactId>spring-boot-starter-web</artifactId>
        </dependency>

        <dependency>
            <groupId>org.springframework.boot</groupId>
            <artifactId>spring-boot-starter-test</artifactId>
            <scope>test</scope>

            <!-- exclude junit 4 -->
            <exclusions>
                <exclusion>
                    <groupId>junit</groupId>
                    <artifactId>junit</artifactId>
                </exclusion>
            </exclusions>

        </dependency>

        <!-- junit 5 -->
        <dependency>
            <groupId>org.junit.jupiter</groupId>
            <artifactId>junit-jupiter-api</artifactId>
            <scope>test</scope>
        </dependency>

        <dependency>
            <groupId>org.junit.jupiter</groupId>
            <artifactId>junit-jupiter-engine</artifactId>
            <scope>test</scope>
        </dependency>

        <!-- elasticsearch引入依赖  start -->
        <dependency>
            <groupId>co.elastic.clients</groupId>
            <artifactId>elasticsearch-java</artifactId>
        </dependency>

        <dependency>
            <groupId>com.fasterxml.jackson.core</groupId>
            <artifactId>jackson-databind</artifactId>
        </dependency>

        <!-- 使用spring boot Maven插件时需要添加该依赖 -->
        <dependency>
            <groupId>jakarta.json</groupId>
            <artifactId>jakarta.json-api</artifactId>
        </dependency>

        <dependency>
            <groupId>org.springframework.boot</groupId>
            <artifactId>spring-boot-starter-web</artifactId>
        </dependency>
    </dependencies>

    <build>
        <plugins>
            <!-- 需要此插件,在执行mvn test命令时才会执行单元测试 -->
            <plugin>
                <groupId>org.apache.maven.plugins</groupId>
                <artifactId>maven-surefire-plugin</artifactId>
                <version>3.0.0-M4</version>
                <configuration>
                    <skipTests>false</skipTests>
                </configuration>
            </plugin>

            <plugin>
                <groupId>org.springframework.boot</groupId>
                <artifactId>spring-boot-maven-plugin</artifactId>
                <configuration>
                    <excludes>
                        <exclude>
                            <groupId>org.projectlombok</groupId>
                            <artifactId>lombok</artifactId>
                        </exclude>
                    </excludes>
                </configuration>
            </plugin>
        </plugins>

        <resources>
            <resource>
                <directory>src/main/resources</directory>
                <includes>
                    <include>**/*.*</include>
                </includes>
            </resource>
        </resources>
    </build>
</project>
                          elasticsearch:
  username: elastic
  passwd: 123456
  apikey: ZVVWMVY0RUJ1Y0dJeHBiZXJHdUo6WXloU1RoOUVUejJMS0JrMy1JeTJldw==
  # 多个IP逗号隔开
  hosts: 127.0.0.1:9200
                          @SpringBootApplication
public class SecurityApplication {
    public static void main(String[] args) {
        SpringApplication.run(SecurityApplication.class, args);
    }
}
接下来是全文的重点:通过Config类向Spring环境注册服务bean,这里有这两处要注意的地方 。
第一个要注意的地方:向Spring环境注册的服务bean一共有两个,它们都是ElasticsearchClient类型,一个基于账号密码认证,另一个基于apiKey认证 。
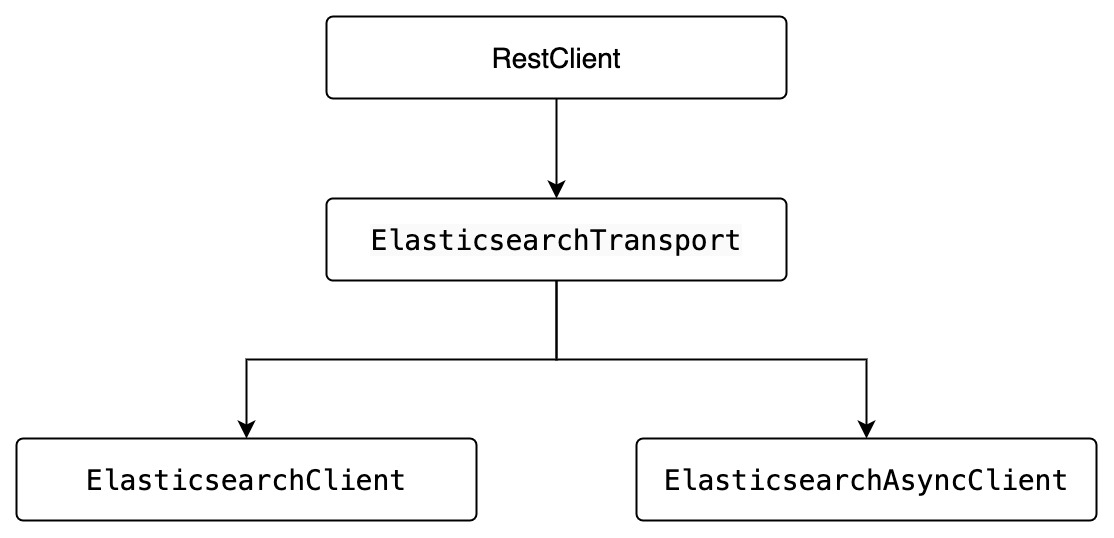
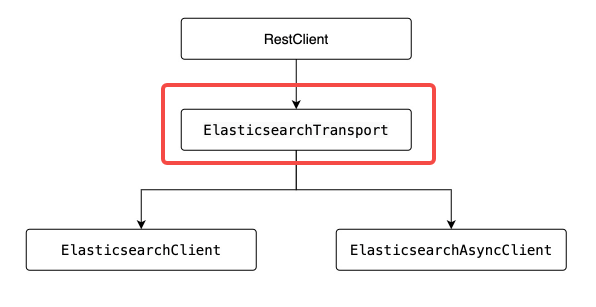
第二个要注意的地方:SpringBoot向es服务端发起的是https请求,这就要求在建立连接的时候使用正确的证书,也就是刚才咱们从容器中复制出来再放入application.yml所在目录的 es01.crt 文件,使用证书的操作发生在创建 ElasticsearchTransport 对象的时候,属于前面总结的套路步骤中的一步,如下图红框所示 。
                          package com.bolingcavalry.security.config;

import co.elastic.clients.elasticsearch.ElasticsearchClient;
import co.elastic.clients.json.jackson.JacksonJsonpMapper;
import co.elastic.clients.transport.ElasticsearchTransport;
import co.elastic.clients.transport.rest_client.RestClientTransport;
import lombok.Setter;
import lombok.extern.slf4j.Slf4j;
import org.apache.http.Header;
import org.apache.http.HttpHost;
import org.apache.http.auth.AuthScope;
import org.apache.http.auth.UsernamePasswordCredentials;
import org.apache.http.client.CredentialsProvider;
import org.apache.http.conn.ssl.NoopHostnameVerifier;
import org.apache.http.impl.client.BasicCredentialsProvider;
import org.apache.http.impl.nio.client.HttpAsyncClientBuilder;
import org.apache.http.message.BasicHeader;
import org.apache.http.ssl.SSLContextBuilder;
import org.apache.http.ssl.SSLContexts;
import org.elasticsearch.client.RestClient;
import org.elasticsearch.client.RestClientBuilder;
import org.elasticsearch.client.RestClientBuilder.HttpClientConfigCallback;
import org.springframework.boot.context.properties.ConfigurationProperties;
import org.springframework.context.annotation.Bean;
import org.springframework.context.annotation.Configuration;
import org.springframework.core.io.ClassPathResource;
import org.springframework.util.StringUtils;

import javax.net.ssl.SSLContext;
import java.io.IOException;
import java.io.InputStream;
import java.nio.file.Files;
import java.nio.file.Path;
import java.nio.file.Paths;
import java.security.KeyManagementException;
import java.security.KeyStore;
import java.security.KeyStoreException;
import java.security.NoSuchAlgorithmException;
import java.security.cert.Certificate;
import java.security.cert.CertificateException;
import java.security.cert.CertificateFactory;

@ConfigurationProperties(prefix = "elasticsearch") //配置的前缀
@Configuration
@Slf4j
public class ClientConfig {

    @Setter
    private String hosts;

    @Setter
    private String username;

    @Setter
    private String passwd;

    @Setter
    private String apikey;

    /**
     * 解析配置的字符串,转为HttpHost对象数组
     * @return
     */
    private HttpHost[] toHttpHost() {
        if (!StringUtils.hasLength(hosts)) {
            throw new RuntimeException("invalid elasticsearch configuration");
        }

        String[] hostArray = hosts.split(",");
        HttpHost[] httpHosts = new HttpHost[hostArray.length];
        HttpHost httpHost;
        for (int i = 0; i < hostArray.length; i++) {
            String[] strings = hostArray[i].split(":");
            httpHost = new HttpHost(strings[0], Integer.parseInt(strings[1]), "https");
            httpHosts[i] = httpHost;
        }

        return httpHosts;
    }

    @Bean
    public ElasticsearchClient clientByPasswd() throws Exception {
        ElasticsearchTransport transport = getElasticsearchTransport(username, passwd, toHttpHost());
        return new ElasticsearchClient(transport);
    }

    private static SSLContext buildSSLContext() {
        ClassPathResource resource = new ClassPathResource("es01.crt");
        SSLContext sslContext = null;
        try {
            CertificateFactory factory = CertificateFactory.getInstance("X.509");
            Certificate trustedCa;
            try (InputStream is = resource.getInputStream()) {
                trustedCa = factory.generateCertificate(is);
            }
            KeyStore trustStore = KeyStore.getInstance("pkcs12");
            trustStore.load(null, null);
            trustStore.setCertificateEntry("ca", trustedCa);
            SSLContextBuilder sslContextBuilder = SSLContexts.custom()
                    .loadTrustMaterial(trustStore, null);
            sslContext = sslContextBuilder.build();
        } catch (CertificateException | IOException | KeyStoreException | NoSuchAlgorithmException |
                 KeyManagementException e) {
            log.error("ES连接认证失败", e);
        }

        return sslContext;
    }

    private static ElasticsearchTransport getElasticsearchTransport(String username, String passwd, HttpHost...hosts) {
        // 账号密码的配置
        final CredentialsProvider credentialsProvider = new BasicCredentialsProvider();
        credentialsProvider.setCredentials(AuthScope.ANY, new UsernamePasswordCredentials(username, passwd));

        // 自签证书的设置,并且还包含了账号密码
        HttpClientConfigCallback callback = httpAsyncClientBuilder -> httpAsyncClientBuilder
                .setSSLContext(buildSSLContext())
                .setSSLHostnameVerifier(NoopHostnameVerifier.INSTANCE)
                .setDefaultCredentialsProvider(credentialsProvider);

        // 用builder创建RestClient对象
        RestClient client = RestClient
                           .builder(hosts)
                           .setHttpClientConfigCallback(callback)
                           .build();

        return new RestClientTransport(client, new JacksonJsonpMapper());
    }

    private static ElasticsearchTransport getElasticsearchTransport(String apiKey, HttpHost...hosts) {
        // 将ApiKey放入header中
        Header[] headers = new Header[] {new BasicHeader("Authorization", "ApiKey " + apiKey)};

        // es自签证书的设置
        HttpClientConfigCallback callback = httpAsyncClientBuilder -> httpAsyncClientBuilder
                .setSSLContext(buildSSLContext())
                .setSSLHostnameVerifier(NoopHostnameVerifier.INSTANCE);

        // 用builder创建RestClient对象
        RestClient client = RestClient
                           .builder(hosts)
                           .setHttpClientConfigCallback(callback)
                           .setDefaultHeaders(headers)
                           .build();

        return new RestClientTransport(client, new JacksonJsonpMapper());
    }

    @Bean
    public ElasticsearchClient clientByApiKey() throws Exception {
        ElasticsearchTransport transport = getElasticsearchTransport(apikey, toHttpHost());
        return new ElasticsearchClient(transport);
    }
}
既然两个ElasticsearchClient对象都已经注册到Spring环境,那么只要在业务类中注入就能用来操作es了 。
新建业务类ESService.java,如下,可见通过Resource注解选择了账号密码鉴权的ElasticsearchClient对象 。
                          package com.bolingcavalry.security.service;

import co.elastic.clients.elasticsearch.ElasticsearchClient;
import org.springframework.beans.factory.annotation.Autowired;
import org.springframework.stereotype.Service;

import javax.annotation.Resource;
import java.io.IOException;

@Service
public class ESService {

    @Resource(name="clientByPasswd")
    private ElasticsearchClient elasticsearchClient;

    public void addIndex(String name) throws IOException {
        elasticsearchClient.indices().create(c -> c.index(name));
    }

    public boolean indexExists(String name) throws IOException {
        return elasticsearchClient.indices().exists(b -> b.index(name)).value();
    }

    public void delIndex(String name) throws IOException {
        elasticsearchClient.indices().delete(c -> c.index(name));
    }
}
                          package com.bolingcavalry.security.service;

import org.junit.jupiter.api.Assertions;
import org.junit.jupiter.api.Test;
import org.springframework.beans.factory.annotation.Autowired;
import org.springframework.boot.test.context.SpringBootTest;

@SpringBootTest
class ESServiceTest {

    @Autowired
    ESService esService;

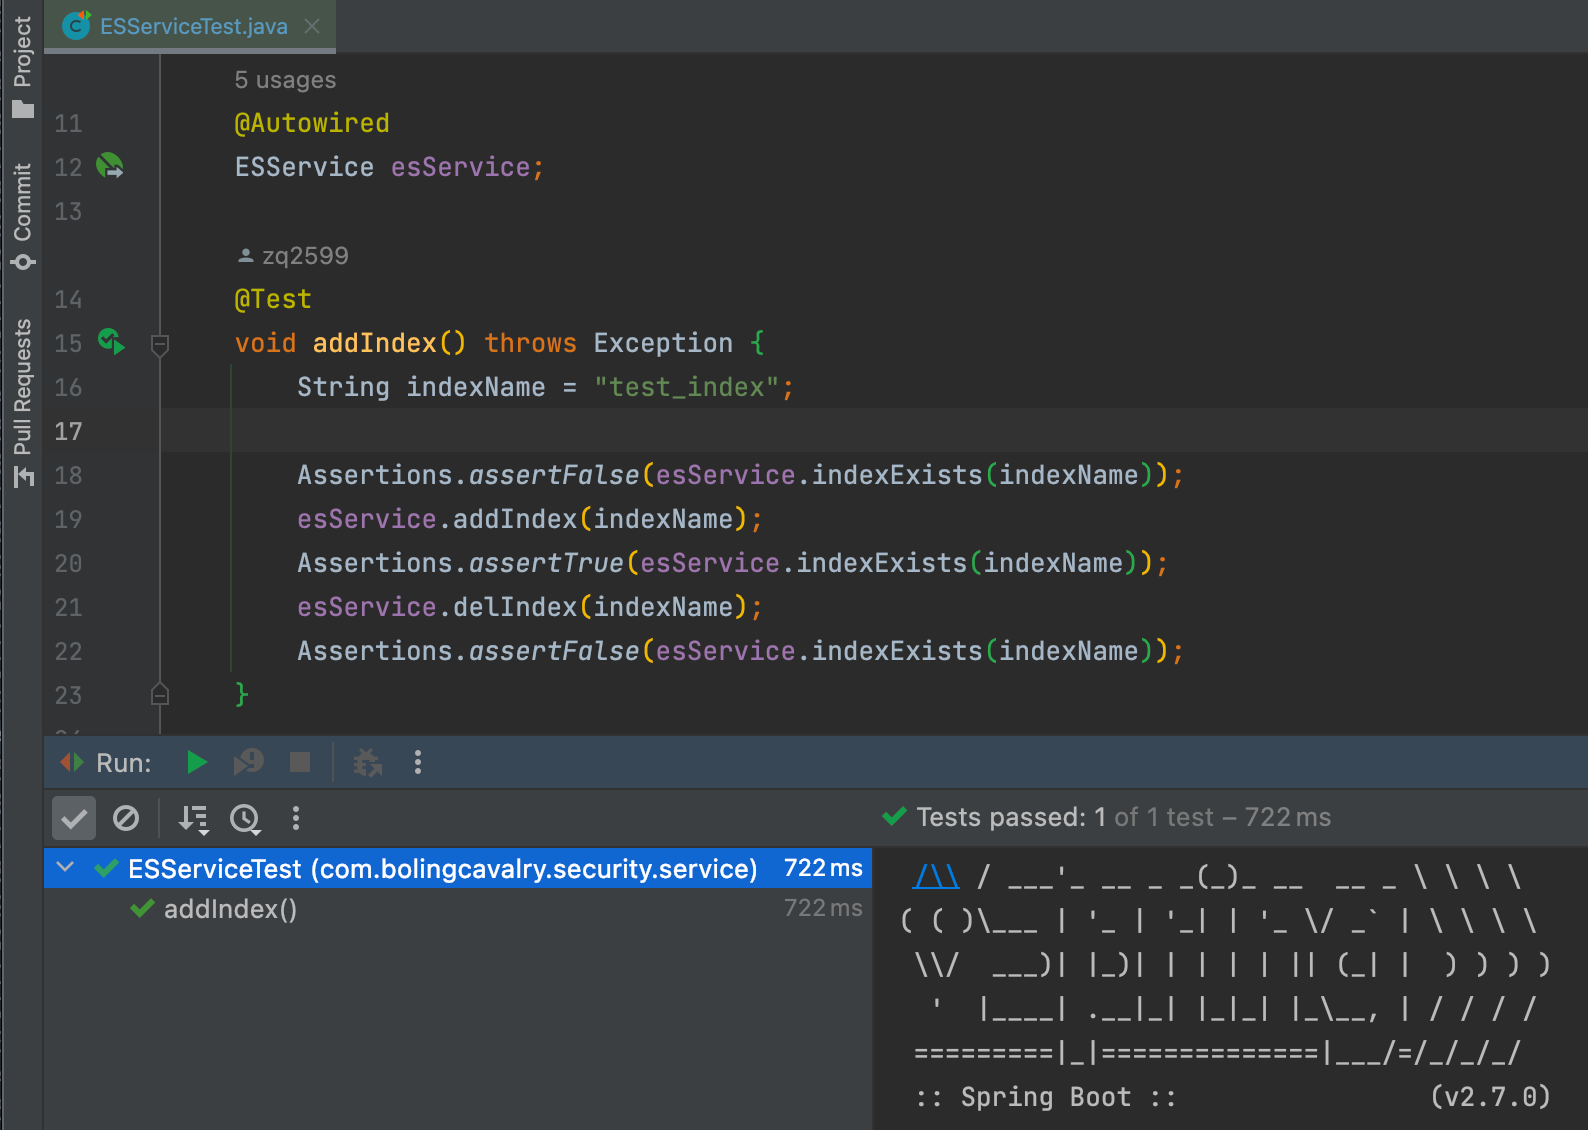
    @Test
    void addIndex() throws Exception {
        String indexName = "test_index";

        Assertions.assertFalse(esService.indexExists(indexName));
        esService.addIndex(indexName);
        Assertions.assertTrue(esService.indexExists(indexName));
        esService.delIndex(indexName);
        Assertions.assertFalse(esService.indexExists(indexName));
    }
}
再来试试ApiKey鉴权操作es,修改ESService.java源码,改动如下图红框所示 。
为了检查创建的索引是否符合预期,注释掉单元测试类中删除索引的代码,如下图,如此一来,单元测试执行完成后,新增的索引还保留在es环境中 。
再执行一次单元测试,依旧符合预期 。
用eshead查看,可见索引创建成功 。
至此,SpringBoot操作带有安全检查的elasticsearch8的实战就完成了,在SpringData提供elasticsearch8操作的库之前,基于es官方原生client库的操作是常见的elasticsearch8访问方式,希望本文能给您一些参考 。
| 名称 | 链接 | 备注 |
|---|---|---|
| 项目主页 | https://github.com/zq2599/blog_demos | 该项目在GitHub上的主页 |
| git仓库地址(https) | https://github.com/zq2599/blog_demos.git | 该项目源码的仓库地址,https协议 |
| git仓库地址(ssh) | git@github.com:zq2599/blog_demos.git | 该项目源码的仓库地址,ssh协议 |

学习路上,你不孤单,欣宸原创一路相伴... 。
最后此篇关于java与es8实战之五:SpringBoot应用中操作es8(带安全检查:https、账号密码、APIKey)的文章就讲到这里了,如果你想了解更多关于java与es8实战之五:SpringBoot应用中操作es8(带安全检查:https、账号密码、APIKey)的内容请搜索CFSDN的文章或继续浏览相关文章,希望大家以后支持我的博客! 。
我正在通过 labrepl 工作,我看到了一些遵循此模式的代码: ;; Pattern (apply #(apply f %&) coll) ;; Concrete example user=> (a
我从未向应用商店提交过应用,但我会在不久的将来提交。 到目前为止,我对为 iPhone 而非 iPad 进行设计感到很自在。 我了解,通过将通用PAID 应用放到应用商店,客户只需支付一次就可以同时使
我有一个应用程序,它使用不同的 Facebook 应用程序(2 个不同的 AppID)在 Facebook 上发布并显示它是“通过 iPhone”/“通过 iPad”。 当 Facebook 应用程序
我有一个要求,我们必须通过将网站源文件保存在本地 iOS 应用程序中来在 iOS 应用程序 Webview 中运行网站。 Angular 需要服务器来运行应用程序,但由于我们将文件保存在本地,我们无法
所以我有一个单页客户端应用程序。 正常流程: 应用程序 -> OAuth2 服务器 -> 应用程序 我们有自己的 OAuth2 服务器,因此人们可以登录应用程序并获取与用户实体关联的 access_t
假设我有一个安装在用户设备上的 Android 应用程序 A,我的应用程序有一个 AppWidget,我们可以让其他 Android 开发人员在其中以每次安装成本为基础发布他们的应用程序推广广告。因此
Secrets of the JavaScript Ninja中有一个例子它提供了以下代码来绕过 JavaScript 的 Math.min() 函数,该函数需要一个可变长度列表。 Example:
当我分别将数组和对象传递给 function.apply() 时,我得到 NaN 的 o/p,但是当我传递对象和数组时,我得到一个数字。为什么会发生这种情况? 由于数组也被视为对象,为什么我无法使用它
CFSDN坚持开源创造价值,我们致力于搭建一个资源共享平台,让每一个IT人在这里找到属于你的精彩世界. 这篇CFSDN的博客文章ASP转换格林威治时间函数DateDiff()应用由作者收集整理,如果你
我正在将列表传递给 map并且想要返回一个带有合并名称的 data.frame 对象。 例如: library(tidyverse) library(broom) mtcars %>% spl
我有一个非常基本的问题,但我不知道如何实现它:我有一个返回数据框,其中每个工具的返回值是按行排列的: tmp<-as.data.frame(t(data.frame(a=rnorm(250,0,1)
我正在使用我的 FB 应用创建群组并邀请用户加入我的应用群组,第一次一切正常。当我尝试创建另一个组时,出现以下错误: {"(OAuthException - #4009) (#4009) 在有更多用户
我们正在开发一款类似于“会说话的本”应用程序的 child 应用程序。它包含大量用于交互式动画的 JPEG 图像序列。 问题是动画在 iPad Air 上播放正常,但在 iPad 2 上播放缓慢或滞后
我关注 clojure 一段时间了,它的一些功能非常令人兴奋(持久数据结构、函数式方法、不可变状态)。然而,由于我仍在学习,我想了解如何在实际场景中应用,证明其好处,然后演化并应用于更复杂的问题。即,
我开发了一个仅使用挪威语的应用程序。该应用程序不使用本地化,因为它应该仅以一种语言(挪威语)显示。但是,我已在 Info.plist 文件中将“本地化 native 开发区域”设置为“no”。我还使用
读完 Anthony's response 后上a style-related parser question ,我试图说服自己编写单体解析器仍然可以相当紧凑。 所以而不是 reference ::
multicore 库中是否有类似 sapply 的东西?还是我必须 unlist(mclapply(..)) 才能实现这一点? 如果它不存在:推理是什么? 提前致谢,如果这是一个愚蠢的问题,我们深表
我喜欢在窗口中弹出结果,以便更容易查看和查找(例如,它们不会随着控制台继续滚动而丢失)。一种方法是使用 sink() 和 file.show()。例如: y <- rnorm(100); x <- r
我有一个如下所示的 spring mvc Controller @RequestMapping(value="/new", method=RequestMethod.POST) public Stri
我正在阅读 StructureMap关于依赖注入(inject),首先有两部分初始化映射,具体类类型的接口(interface),另一部分只是实例化(请求实例)。 第一部分需要配置和设置,这是在 Bo

我是一名优秀的程序员,十分优秀!