- Java锁的逻辑(结合对象头和ObjectMonitor)
- 还在用饼状图?来瞧瞧这些炫酷的百分比可视化新图形(附代码实现)⛵
- 自动注册实体类到EntityFrameworkCore上下文,并适配ABP及ABPVNext
- 基于Sklearn机器学习代码实战
感谢大家对上篇博文的支持💕 。
回到正题,今天和大家分享下学习动画过程中的内容。动画对我来讲还是蛮新鲜的,大家知道在接触 WPF 之前我只用过 Winform ,而 Winform 中并没有动画的概念,当想要实现某些“动画”效果时,我们必须从头构建自己的动画系统,正如微软文档中对动画的介绍,在 Winform 中做动画我们一般会结合计时器和一些绘图逻辑来实现我们想要的“动画”.
比如,我想让一个矩形逐渐从视野中消失,大概率会按照以下步骤来完成这项工作:
Interval 让计时器检查经历了多长时间 虽然这种方案看上去不难,但是将它应用到窗体上是很麻烦的,需要考虑各种各样的问题。而 WPF 则提供了这个非常有特色的内容,它有自己的属性动画系统,开发人员可以轻松制作出炫丽的动画效果,同时 WPF 还原生支持 3D 效果.
在学习 WPF 动画之前,先来学习下 WPF 中的绘图技术。在上篇 MVVM示例的博文 中,在登录界面的右上角自绘了一个关闭按钮:
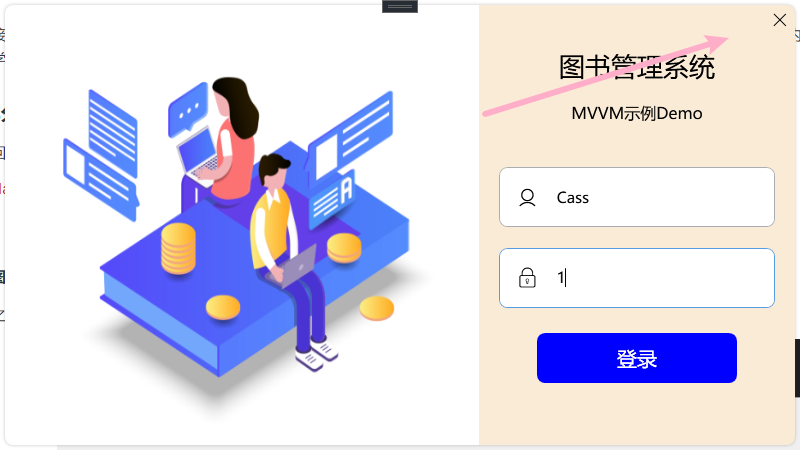
这个关闭按钮中的❌就是通过绘制图形实现的.
我们之前说过, WPF 的图形系统是建立在微软的 DirectX 技术之上的,大家如果玩游戏的话应该会很熟悉这个东西,游戏中经常会听到 DirectX 11 或者 DirectX 12 之类的,这项技术诞生之初是专门为游戏开发人员设计的,是许多 Windows 游戏都需要的一种多媒体技术套件.
对于一般程序员来说,直接使用 DirectX 过于繁重;所以 WPF 在 DirectX 和 .NET 编程模型之间找到了一种平衡,既充分利用 DirectX 的图形性能,又方便我们开发,当然了,这需要付出一些运行效率的代价😉 。
WPF 有两套独立的图形系统,一套系统是以 Shape 类为基类;另一套是以 Goemetry 类为基类。 Shape 类是用于绘制基本形状的类,例如矩形、圆、线条。 Goemetry 类是用于绘制更复杂图形的类,比如曲线、多边形或者文本等。 Shape 类和 Geometry 类的区别在于, Shape 类是基于物理模型的,而 Geometry 类是基于数学模型的。这意味着, Shape 类绘制的图形会受到物理因素的影响,例如屏幕分辨率和显示器的性能。 Geometry 类绘制的图形则不会受到这些因素的影响,因此可以保证图形在任何设备上都具有相同的外观.
为什么 WPF 要提供两套独立的图形系统呢?这是因为在设计图形系统时,需要兼顾方便编程和提高实时性能两个因素。以 Shape 类为基类的图形是 UIElement ,你可以不用做什么工作,就可以像使用控件一样地使用 Shape ,其代价是实时性能。从 Shape 类中派生出来的图形元素要使用较多的资源,速度较慢。从 Geometry 类中派生出来的图形则使用较少的资源,适合组成复杂的图形,如地图等.
在日常开发种, Shape 类要比 Geometry 类更常用,因为前者提供了更为简单和直观的 API ,用于绘制基本形状.
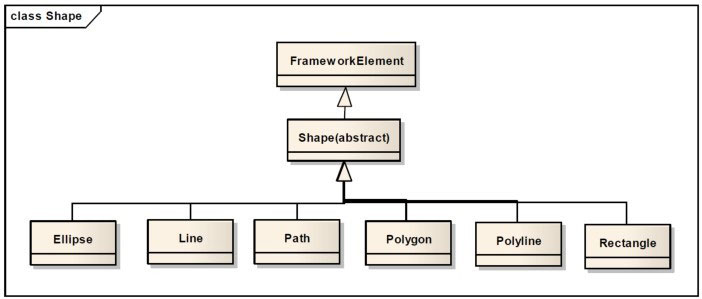
从 Shape 类中派生出了六个类: Line 、 Ellipse 、 Path 、 Polygon 、 Polyline 和 Rectangle :
Line :直线,可以设置 Stroke Rectangle :矩形,既有 Stroke 又有 Fill Ellipse :椭圆 - 长宽相等即为正圆 Polygon :多边形 - 多条直线段围成的闭合区域 Polyline :折线 - 多条首尾相接的直线段组成(不闭合) Path :路径,用来绘制多点连线(闭合) Shape 类中定义了两个类型为 Brush 的属性: Stroke 和 Fill , Stroke 用来画线, Fill 用来填充图形的内部区域。默认情况下,两者的值都为 null ,这个时候,在界面上是看不到绘制的图形的。此外还有 Strech 、 StrokeThickness 、 Data 等属性,就不一一列举了,可以 F12 自己看一下.
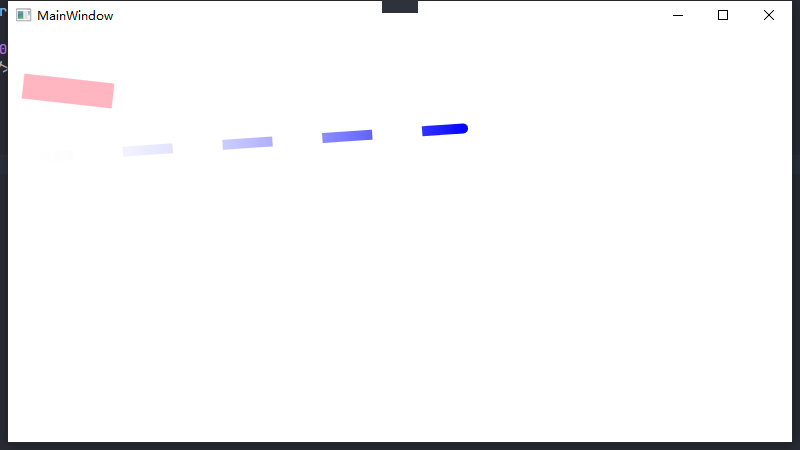
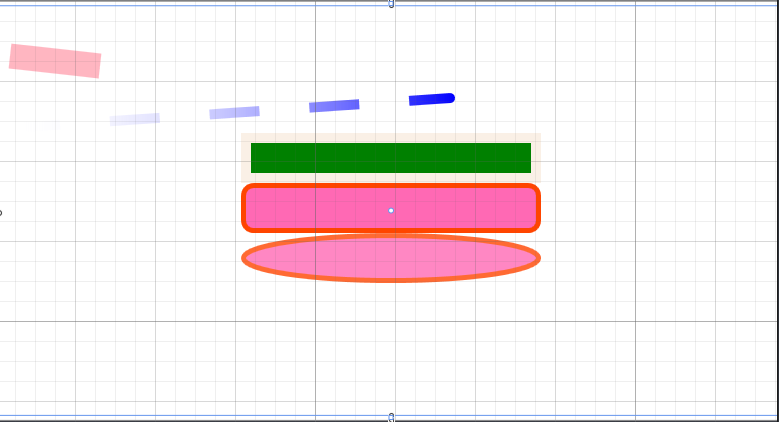
直线是最简单的图形,使用 X1、Y1 两个属性可以设置它的起点坐标, X2、Y2 两个属性则用来设置其终点坐标,控制起点/终点坐标就可以实现平行、交错等效果,一些属性还能控制画出虚线以及控制线段终点的形状.
                          <Window x:Class="LearningWPF.MainWindow" xmlns="http://schemas.microsoft.com/winfx/2006/xaml/presentation"
        xmlns:x="http://schemas.microsoft.com/winfx/2006/xaml"
        xmlns:d="http://schemas.microsoft.com/expression/blend/2008" xmlns:local="clr-namespace:LearningWPF"
        xmlns:mc="http://schemas.openxmlformats.org/markup-compatibility/2006" Title="MainWindow" Width="800"
        Height="450" mc:Ignorable="d" WindowStartupLocation="CenterScreen">
    <Grid>
        <StackPanel Margin="5">
            <Line Stroke="LightPink" StrokeThickness="25" X1="10" X2="100" Y1="50" Y2="60" />
            <Line X1="10" Y1="50" X2="450" Y2="20" StrokeEndLineCap="Round" StrokeDashArray="5" StrokeThickness="10">
                <Line.Stroke>
                    <LinearGradientBrush EndPoint="0,0.5" StartPoint="1,0.5">
                        <GradientStop Color="Blue" />
                        <GradientStop Offset="1" />
                    </LinearGradientBrush>
                </Line.Stroke>
            </Line>
        </StackPanel>
    </Grid>
</Window>
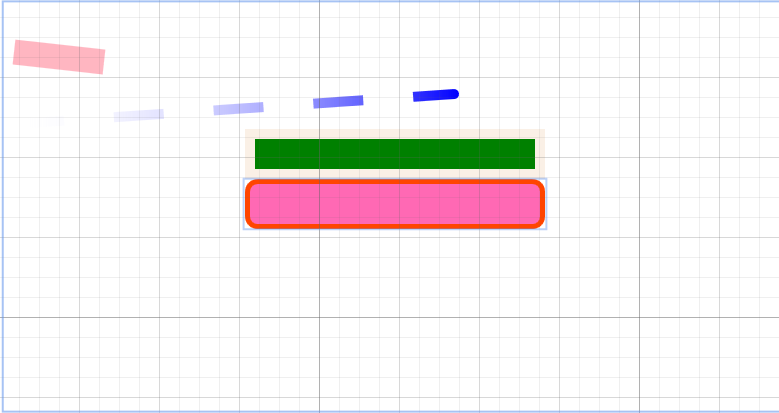
矩形由 Stroke (边线)和 Fill (填充)组成,前者和折线相同,后者是 Brush 类型的画刷.
                          <Rectangle Stroke="Linen" Fill="Green" Height="50" Width="300" StrokeThickness="10" />
<Rectangle Width="300" Height="50" Fill="HotPink" Stroke="OrangeRed" StrokeThickness="5" RadiusX="10"
           RadiusY="10" />
椭圆可以看成 矩形的特例,当矩形的 RadiusX 和 RadiusY 设置为最大值时,矩形就变成了椭圆。 WPF 提供椭圆 Ellipse 只是为了编程方便一点:
<Ellipse Width="300" Height="50" Fill="HotPink" Stroke="OrangeRed" StrokeThickness="5" Opacity="0.8" />
折线由多条直线组成,上一条直线的终点是下一条直线的起点:
<Polyline Points="0,0 10,5 100,100 150,50 200,50" Stroke="HotPink" StrokeThickness="4" Fill="CadetBlue"/>
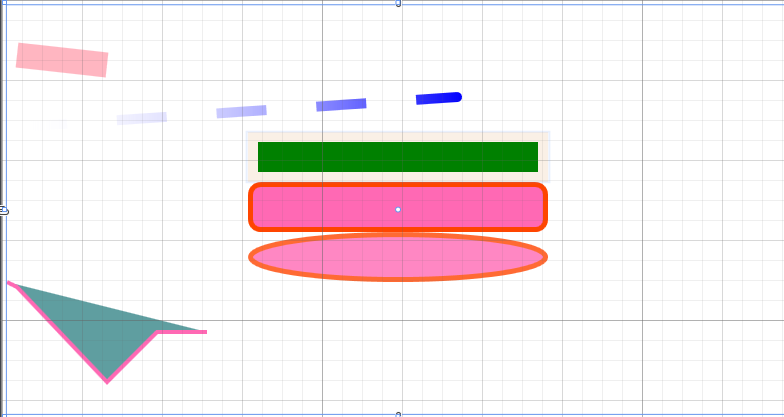
折线通过 Point 属性设置多点来绘制,每个点写明横纵坐标即可。如果设置了 Fill 属性,会在折线的起点和终点之间进行填充.
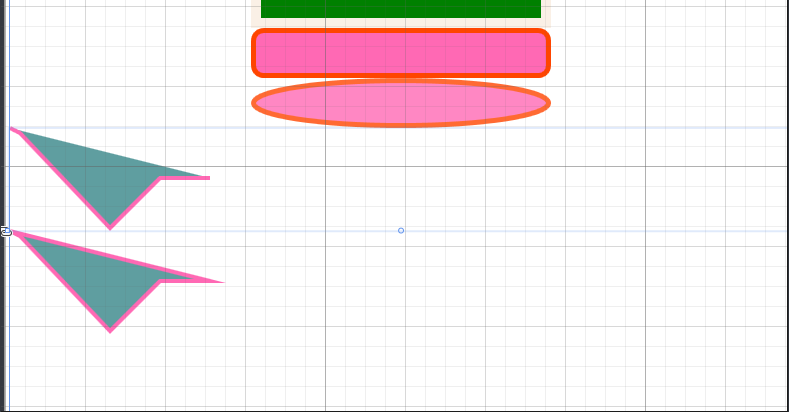
多边形是折线的特例,它自动把折线的终点和起点相连:
<Polygon Points="0,0 10,5 100,100 150,50 200,50" Stroke="HotPink" StrokeThickness="4" Fill="CadetBlue" />
路径 Path 可以说是 WPF 中最强大的绘图工具,它新增了一个类型为 Geometry 的 Data 属性,可以连接以 Goemetry 类为基类的另一套图形系统,相较于 Shape , Gemetry 使用的资源要少的多。 Gemetry 只描述几何形状本身,并不负责图形在页面上的展示。但它可以通过和路径(Path)中的数据(Data)相连而在界面上展示出来,这也是 Path 强大的原因,一来它可以完全替代其他图形,而来它可以将 Gemetry 中的复杂图形结合进来.
在之前 MVVM 示例的 Demo 中,登录界面右上角的关闭按钮的❌就是通过路径 Path 给 Data 属性赋值绘制出来的

Data 属性赋值的语法有两种:
普通标签式标准语法 。
在路径中嵌套 Gemetry 类中提供的各种形状
                                  <Path Stroke="HotPink" StrokeThickness="3">
  <Path.Data>
    <LineGeometry StartPoint="10,10" EndPoint="150,80" />
  </Path.Data>
</Path>
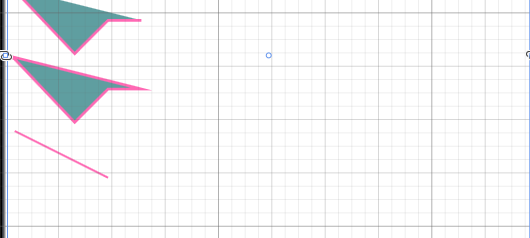
专用于绘制几何图形的“路径标记语法”,也被称为迷你绘图语言🕘 。
上面的关闭按钮采用的便是专用于绘制几何图形的“路径标记语法”,普通标签式标准语法就不看了,写起来太繁琐了,一个稍微线条多的标签就得几十行的代码量,写标签什么的最烦人了💦。在绘制复杂的图形时,专用于绘制几何图形的“路径标记语法”是想要简洁写法的不二之选.
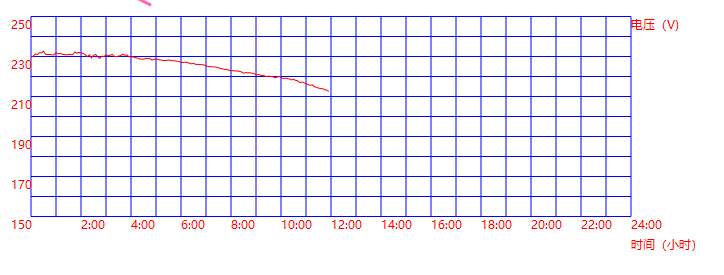
例如下面这个电力系统电压曲线图,这其实是通过路径以及后天代码定时更新数据点画出来的,厉害的嘞。代码部分就不贴了,比较复杂.
路径标记语法实际上就是多个绘图命令的拼接,使用路径标记语法绘图时一般分三步: 移动至起点 => 绘图 => 闭合图形
M10,20 L50,100 C80,50 150,150 200,100 Z 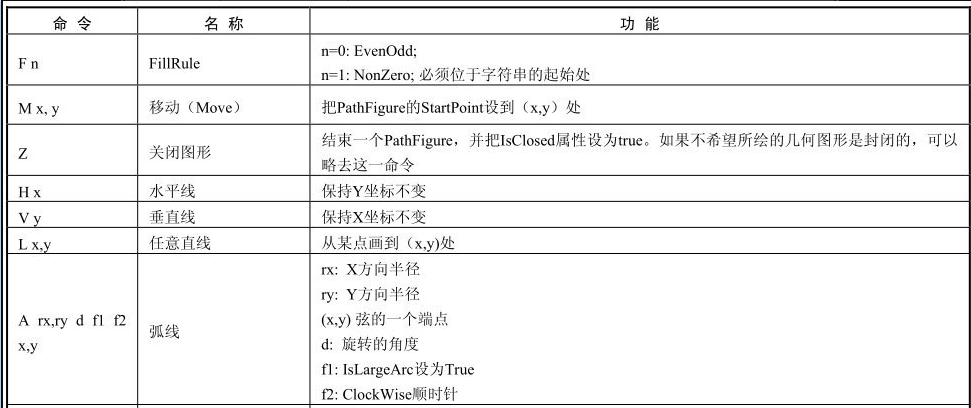
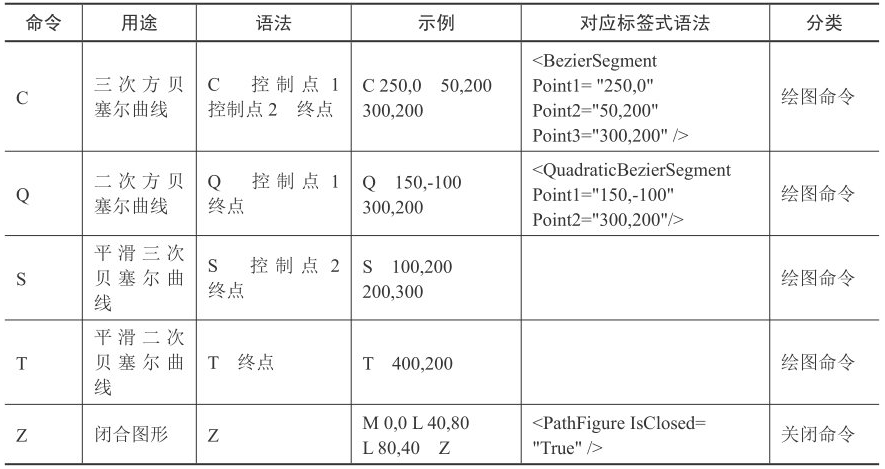
路径标记语法是不区分大小写的,所以A与a、H与h都是等价的.
例如上面普通标签式语法例子中的那条线可以通过这样的路径来实现:
                          <Path Stroke="HotPink" StrokeThickness="3">
  <Path.Data>
    <LineGeometry StartPoint="10,10" EndPoint="150,80" />
  </Path.Data>
</Path>

<Path Margin="5" Data="M0,0 L150,80" Stroke="HotPink" StrokeThickness="4" />
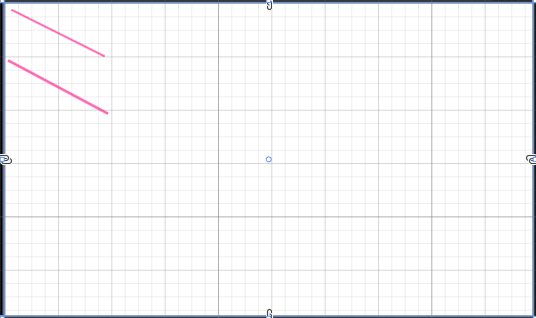
比如再来一条二次贝塞尔曲线:
<Path Stroke="Red" Data="M0,200 Q150,-100 300,200 400,50 500,40" />
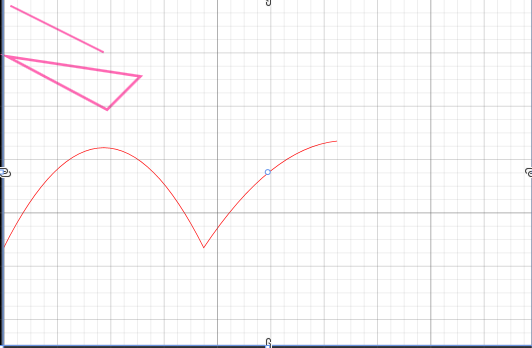
通过路径标记语法绘制图形的过程中,需要注意以下几点:
表明图形起点 即 M... 。
每个命令组合必须和要求的一直,比如上面的贝塞尔曲线 Q ,每部分都必须满足既有控制点也得有终点:

剩余的命令效果参照上面的表中的描述用就可以了 。
略~ 😎 。
🥧鸡汤来喽~ 。
一般来说,动画可以被看作是连续变量进行离散化,然后把离散的内容连续播放的过程。在 WPF 中,动画不一定是位置变化,它可以是任意相关属性的值随时间的变化,只要满足以下两条件即可:
● 该相关属性所在的类必须是 DependencyObject 的派生类,并且移植了 IAnimatable 接口 。
● 该相关属性的数据类型是 WPF 动画所支持的数据类型 。
也就是说,可以用来制作动画的属性必须是 WPF 动画所支持的依赖属性,好巧不巧的是, WPF 对各数据类型动画的支持从控件到几何图形、从排版到风格和模板、几乎所有的对象都可以进行动画。 WPF 中用于支持动画的类大多位于 System.Windows.Media.Animation 名称空间中,大概有200多个类,根据不同的数据类型可以分为几大类,每一种数据类型 WPF 都提供了专门的类.
以 Double 类型为例 Animation 类的典型类继承树结构如下图所示:
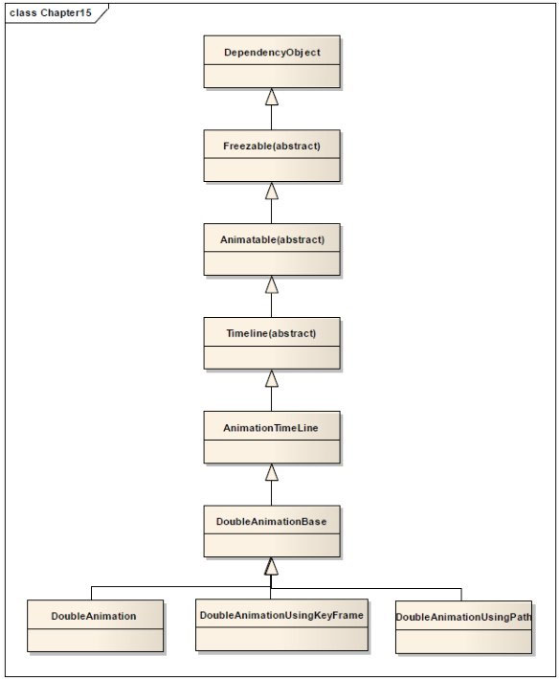
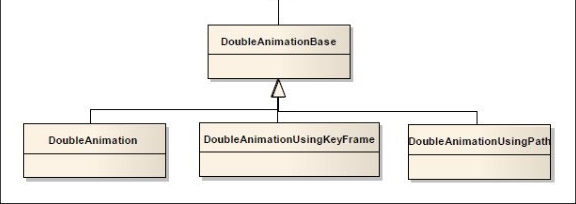
对于其他数据类型,结构是类似的,都是从 AnimationTimeLine 派生出来的,一般情况下,每个类型会从 AnimationTimeLine 派生出一个 xxxxxBase 的抽象基类,然后它们又派生出3种具体的动画 - 简单动画(xxAnimation)、关键帧动画(xxAnimationUsingKeyFrame)、沿路径运动的动画(xxAnimationUsingPath) :
所谓“简单动画”,就是仅仅由变化的起点、终点、变化幅度、变化时间4个要素构成的动画:
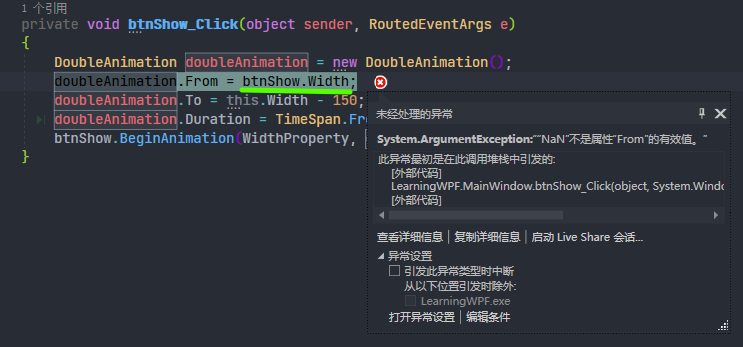
● 变化起点(From属性):如果没有指定变化起点则以变化目标属性的当前值为起点。【可以省略,前提是所选属性值必须是已经设置过硬编码的值,如果属性设置的是自动值会出现 AnimationException :无法使用 NaN 的默认 origin 值】 。
● 变化终点(To属性):如果没有指定变化终点,程序将采用上一次动画的终点或默认值。【同样可省略,同样需要注意无值问题】 。
● 变化幅度(By属性):如果同时指定了变化终点,变化幅度将被忽略.
● 变化时间(Duration属性): 必须指定 ,数据类型为 Duration .
下面是一个简单动画的例子:
                          <Window x:Class="LearningWPF.MainWindow"
        xmlns="http://schemas.microsoft.com/winfx/2006/xaml/presentation"
        xmlns:x="http://schemas.microsoft.com/winfx/2006/xaml"
        xmlns:d="http://schemas.microsoft.com/expression/blend/2008"
        xmlns:local="clr-namespace:LearningWPF"
        xmlns:mc="http://schemas.openxmlformats.org/markup-compatibility/2006"
        Title="MainWindow" Width="800" Height="500"
        mc:Ignorable="d"
        WindowStartupLocation="CenterScreen">
    <Grid>
        <StackPanel>
            <Button Name="btnShow"
                    Width="Auto"
                    Height="50"
                    VerticalAlignment="Center"
                    HorizontalAlignment="Center"
                    Click="btnShow_Click"
                    Content="Click Me"
                    FontSize="26"
                    Foreground="AntiqueWhite">
                <Button.Background>
                    <LinearGradientBrush>
                        <GradientStop Color="HotPink"
                                      Offset="0" />
                        <GradientStop Color="LightGreen"
                                      Offset="0.5" />
                    </LinearGradientBrush>
                </Button.Background>
            </Button>
        </StackPanel>
    </Grid>
</Window>
                          private void btnShow_Click(object sender, RoutedEventArgs e)
{
  DoubleAnimation doubleAnimation = new DoubleAnimation();
  doubleAnimation.From = btnShow.ActualWidth;
  doubleAnimation.To = this.Width - 150;
  //  doubleAnimation.By= this.Width - 300;
  doubleAnimation.Duration = TimeSpan.FromSeconds(1);
  btnShow.BeginAnimation(WidthProperty, doubleAnimation);
}
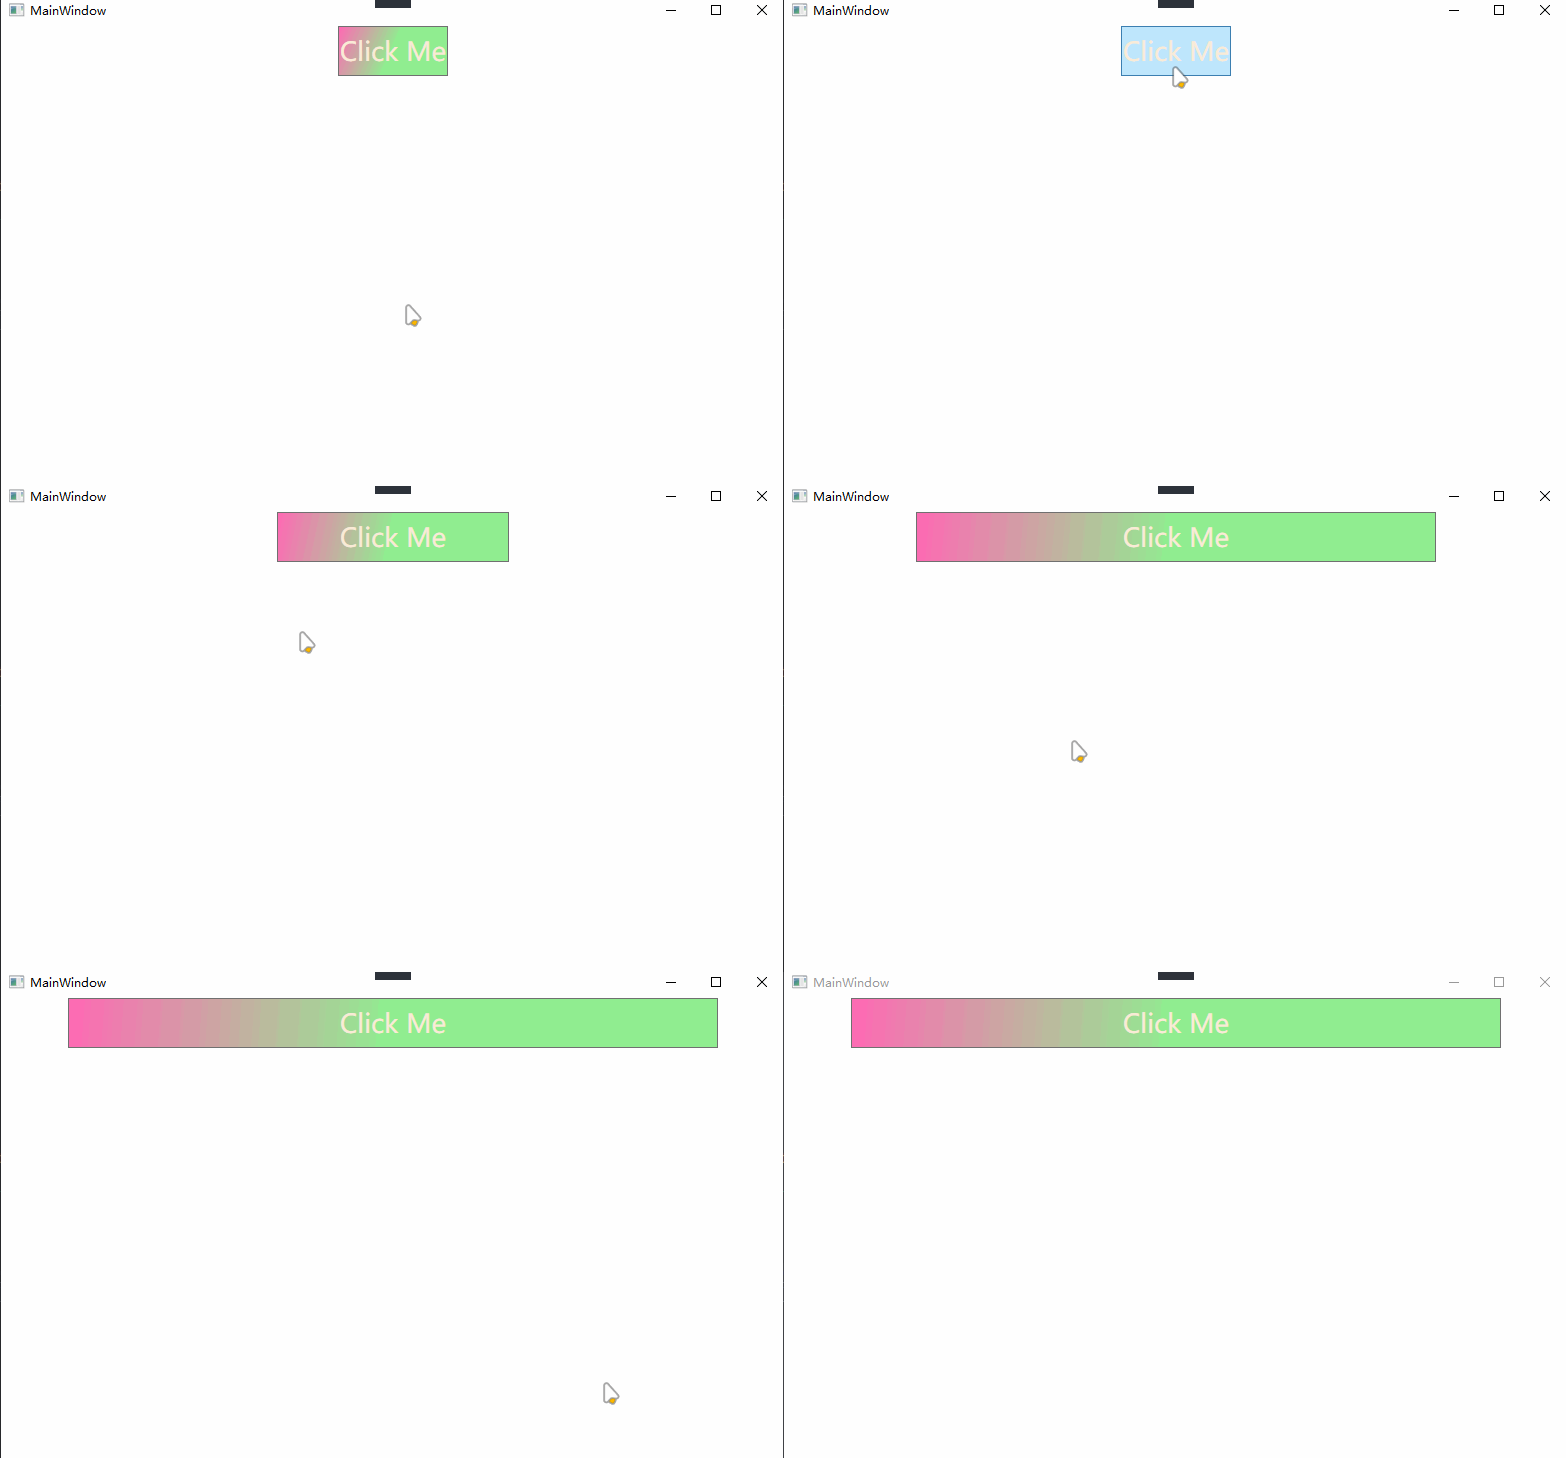
ActualWidth 和 Width 属性的区别
Width 属性反应的是选择的期望宽度,而 AcutalWidth 值指示的是最终使用的渲染宽度。如果使用自动布局,可能根本就没有的 Width 值,所Width属性只会返回 Double.NaN 值,开始动画时会抛异常.
这是一个改变按钮 Width 属性的动画,因为 Width 属性是 double 类型,所以要用 DoubleAinmation 类,单击按钮后会把按钮的宽度变为当前窗体的宽度-150,时长1秒。这个例子虽然简单,但说明了 WPF 动画设计的一般步骤:
Width 为 double 类型,选用 DoubleAnimation ; From 、 To 等; BeginAnimation 方法,该方法把 DoubleAnimation 和按钮的 WidthProperty 联系起来 使用 From 、 To 、 By 、 Duration 几个属性的组合就已经可以显示很多不同的效果了,但 WPF 动画系统的强大远不如此。从动画的类继承树可以知道,动画的很多特性都是由 TimeLine 类控制的,这个类提供了动画常用的属性,比如动画时间、开始时刻、动画重复次数、动画终止的状态等,除了上面的 Duration 动画时间, TimeLine 还有以下属性,可以帮助实现更复杂的动画:
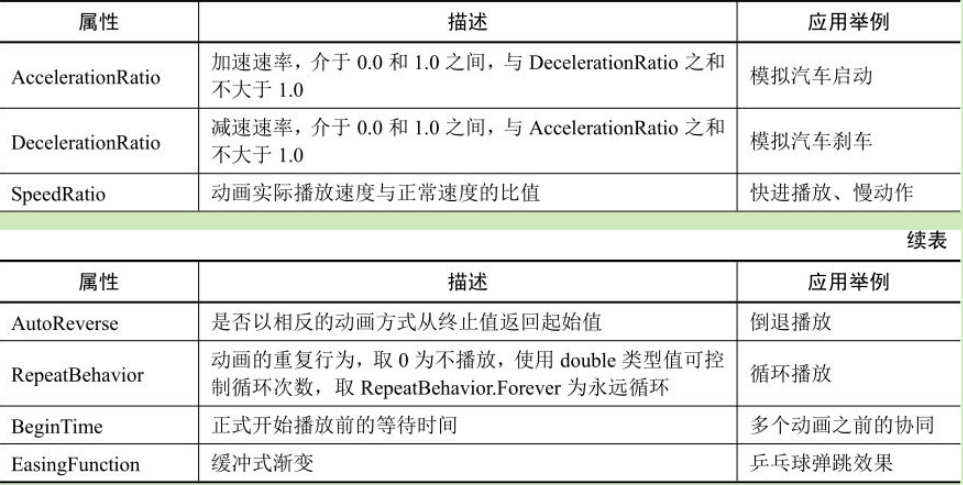
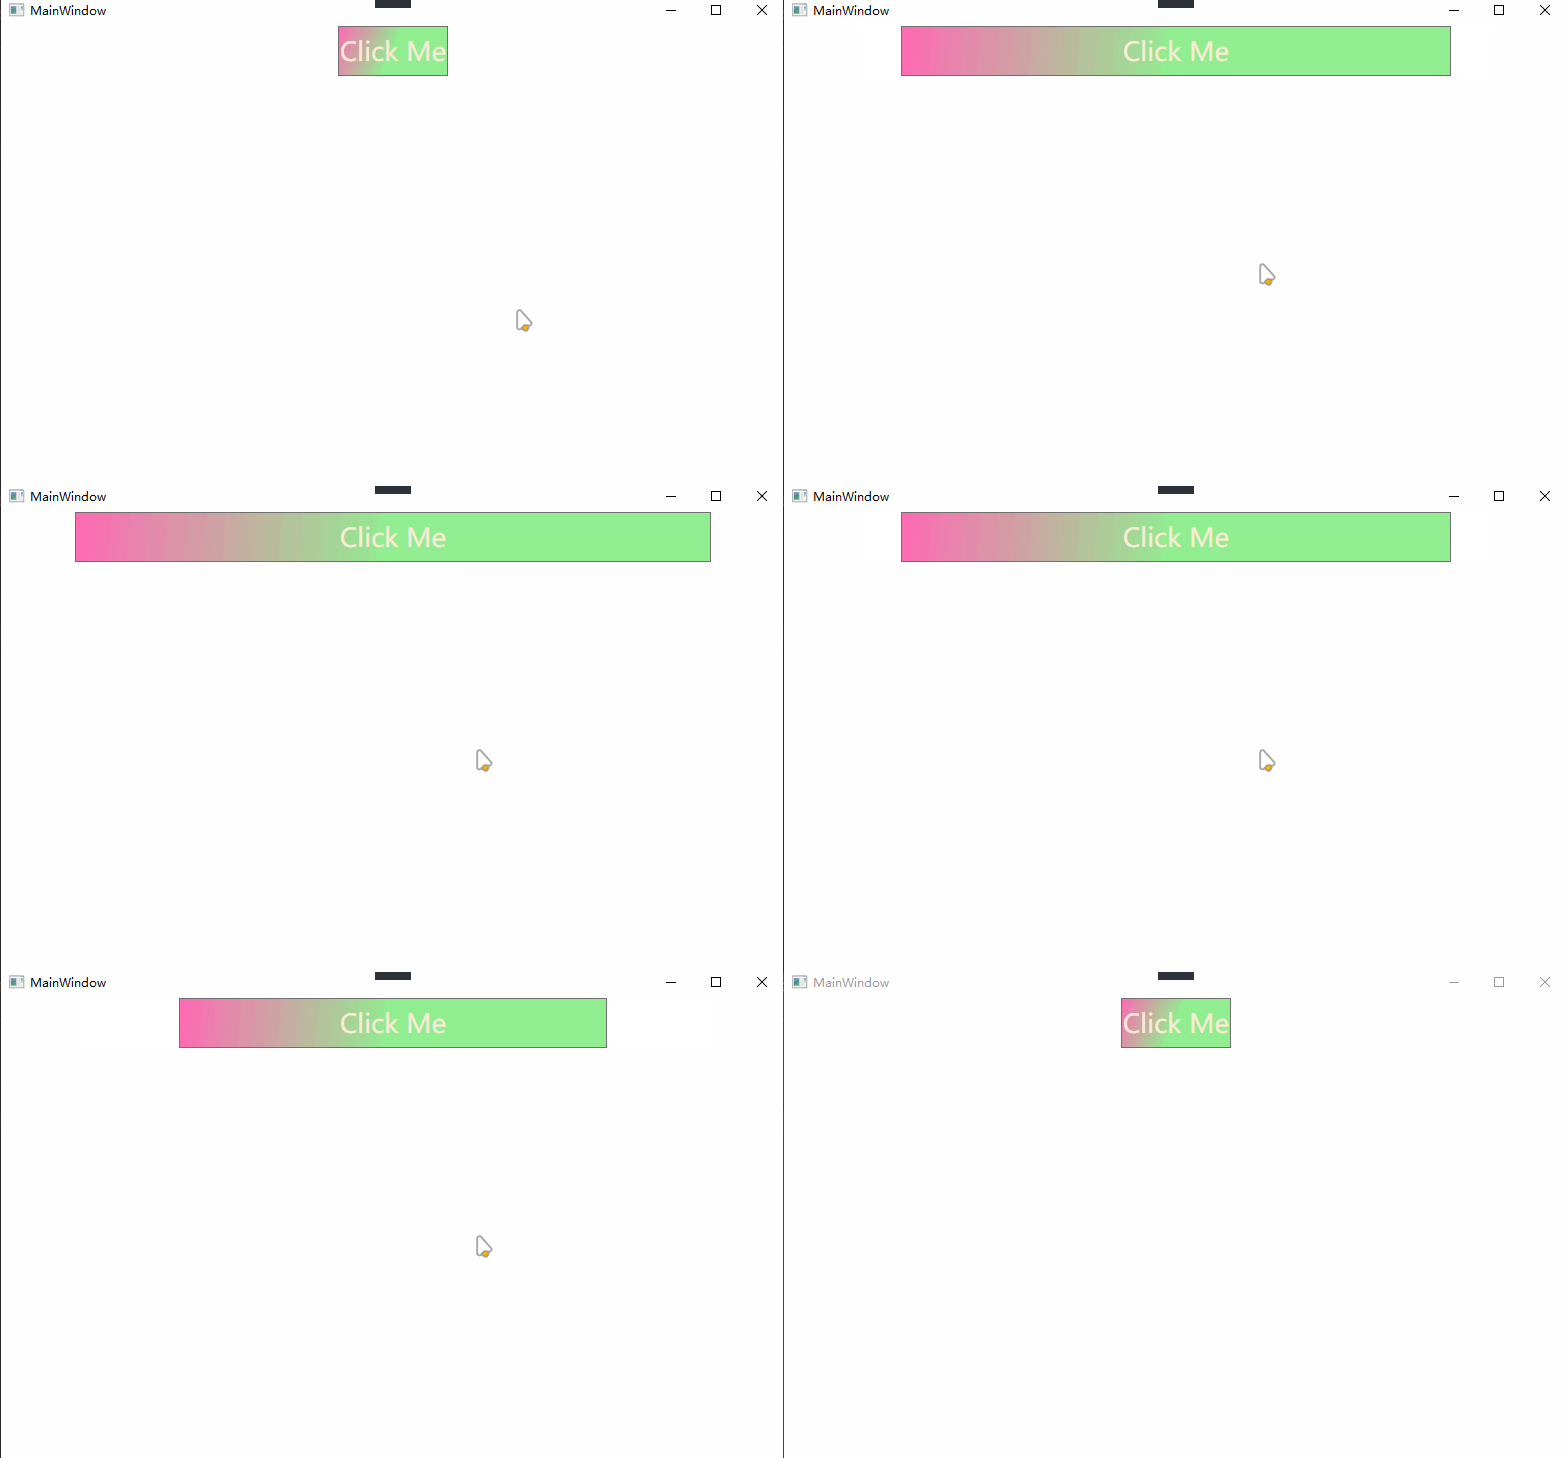
比如可以使用 AutoReverse 属性实现自动复原, RepeatBehavior 属性控制动画重复特性:
                          private void btnShow_Click(object sender, RoutedEventArgs e)
{
  DoubleAnimation doubleAnimation = new DoubleAnimation();
  doubleAnimation.From = btnShow.ActualWidth;
  doubleAnimation.To = this.Width - 150;
  doubleAnimation.Duration = TimeSpan.FromSeconds(1);
  doubleAnimation.AutoReverse = true;
  doubleAnimation.RepeatBehavior = new RepeatBehavior(4);
  btnShow.BeginAnimation(WidthProperty, doubleAnimation);
}
Storyboard 是 ParallelTimeline 的派生类,支持多个动画并发进行。假如你设计的动画只使用了极少的设置内容,你可以使用故事板在 Xaml 中实现动画的设计,可以理解为故事板是 BeginAnimation() 方法的 Xaml 等价物。此外,动画的开始需要一个触发条件,为此 WPF 专门设计了一个触发器类 BeginStoryBoard ,它为 Storyboard 类提供了宿主,每个中能够且仅能够含有一个 Storyboard .
上面的例子加个按钮,通过故事板控制新按钮动画:
                          <Window x:Class="LearningWPF.MainWindow"
        xmlns="http://schemas.microsoft.com/winfx/2006/xaml/presentation"
        xmlns:x="http://schemas.microsoft.com/winfx/2006/xaml"
        xmlns:d="http://schemas.microsoft.com/expression/blend/2008"
        xmlns:local="clr-namespace:LearningWPF"
        xmlns:mc="http://schemas.openxmlformats.org/markup-compatibility/2006"
        Title="MainWindow" Width="800" Height="500" mc:Ignorable="d"
        WindowStartupLocation="CenterScreen">
    <Grid>
        <StackPanel>
            <Button Name="btnShow"
                    Width="Auto"
                    Height="50"
                    VerticalAlignment="Center"
                    HorizontalAlignment="Center"
                    Click="btnShow_Click"
                    Content="Click Me"
                    FontSize="26"
                    Foreground="AntiqueWhite">
                <Button.Background>
                    <LinearGradientBrush>
                        <GradientStop Color="HotPink"
                                      Offset="0" />
                        <GradientStop Color="LightGreen"
                                      Offset="0.5" />
                    </LinearGradientBrush>
                </Button.Background>
                <Button.Triggers>
                    <EventTrigger RoutedEvent="Button.Click">
                        <EventTrigger.Actions>
                            <BeginStoryboard>
                                <Storyboard>
                                    <DoubleAnimation AutoReverse="True"
                                                     Storyboard.TargetName="cmdGrow"
                                                     Storyboard.TargetProperty="Width"
                                                     Duration="0:0:1"
                                                     To="300" />
                                </Storyboard>
                            </BeginStoryboard>
                        </EventTrigger.Actions>
                    </EventTrigger>
                </Button.Triggers>
            </Button>
            <Button Padding="10"
                    Name="cmdGrow"
                    Height="40"
                    Width="200"
                    HorizontalAlignment="Center"
                    VerticalAlignment="Center"
                    Content="Click me and make me grow" Margin="5">
            </Button>
        </StackPanel>
    </Grid>
</Window>
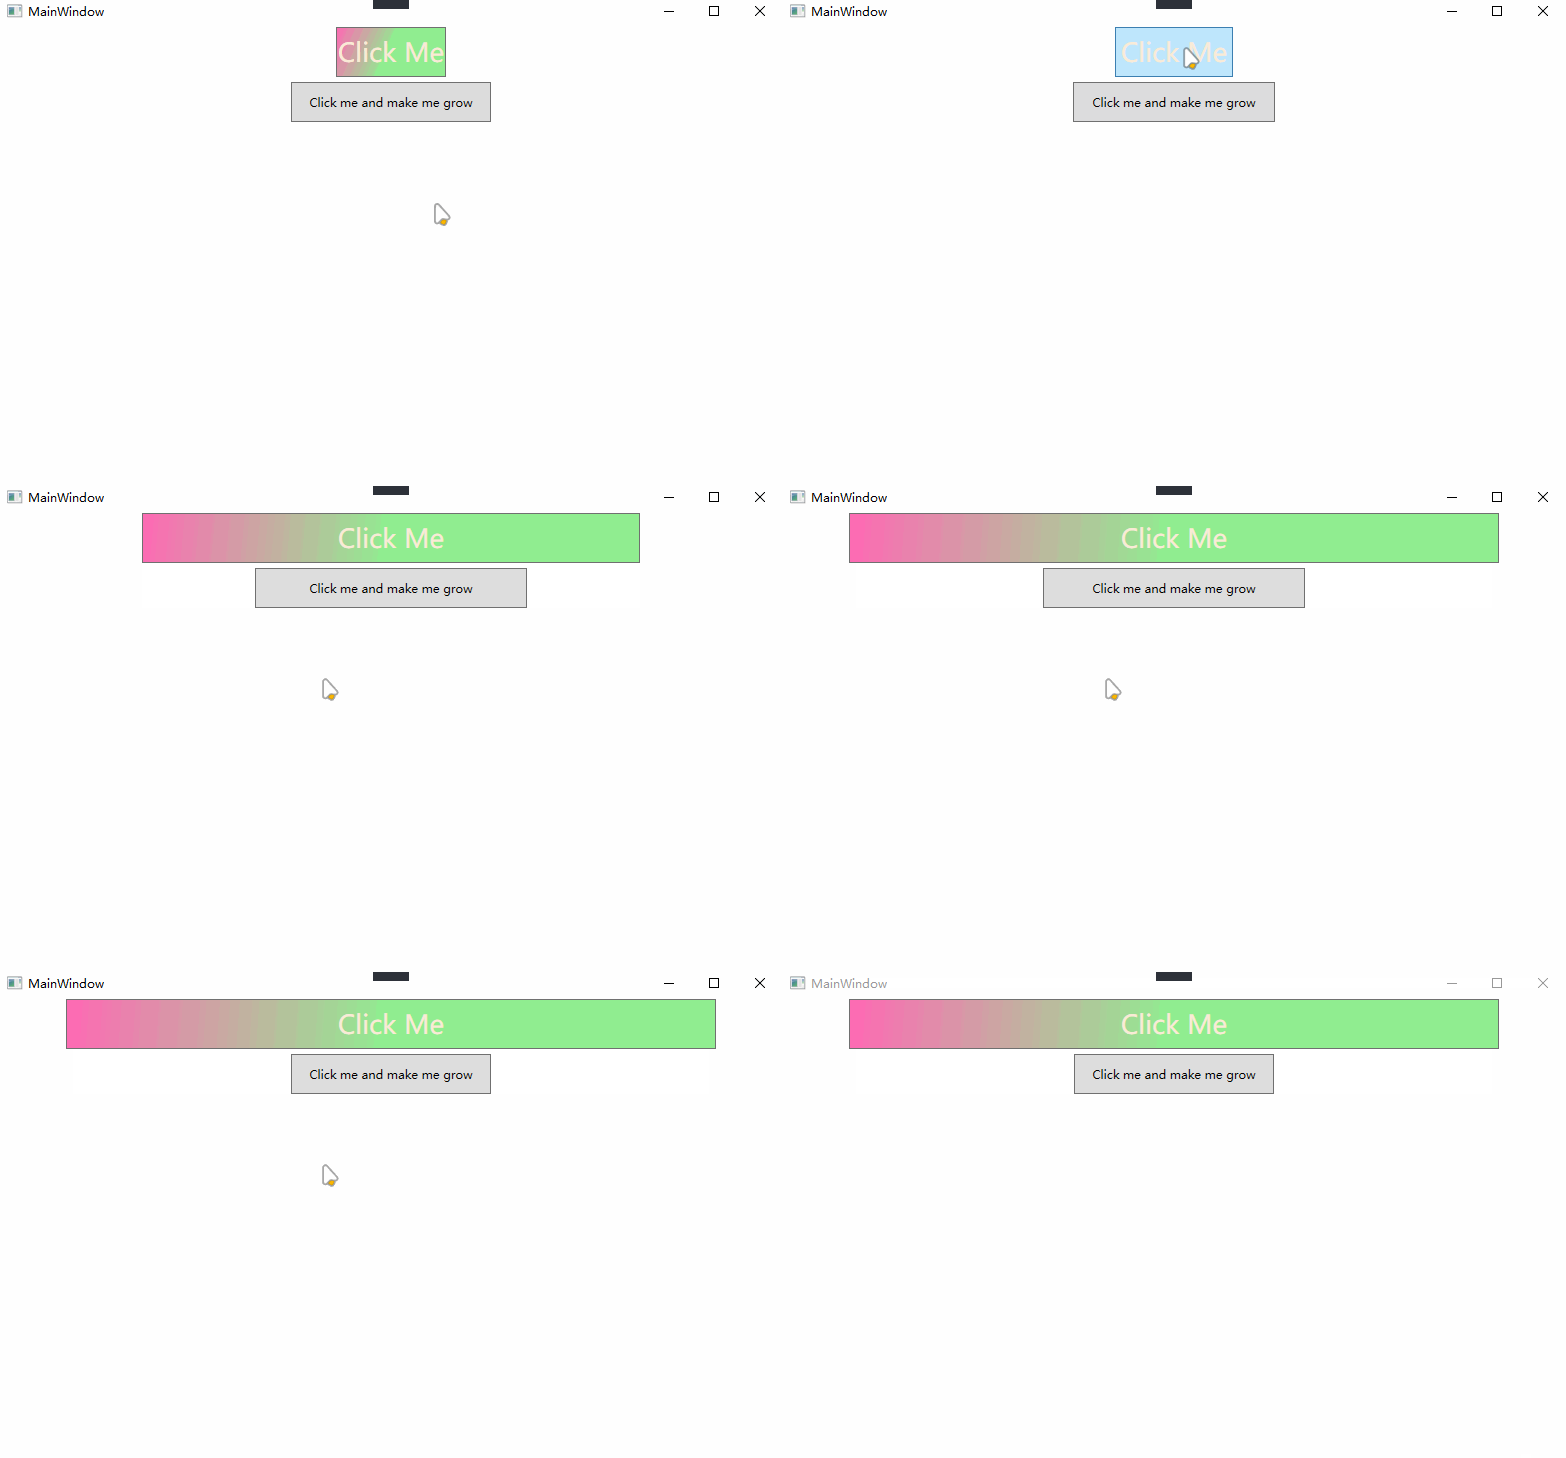
故事板的优点在于可以在 Xaml 界面完成动画的设计以及触发事件的定义,可以使用通用结构捕获触发事件:
                          <EventTrigger  RoutedEvent="" >
  <BeginStoryboard>
    <Storyboard>
      //  具体动画类
    </Storyboard>
    </ BeginStoryboard>
</EventTrigger>
Storyboard 类中含有三个重要的附加属性:
Target ,类型为相关对象( DependencyObject ); 。
TargetName ,其类型为 string ,必须是 FrameworkElement 、 FrameworkContentElement 或 Freezable 对象的名字; 。
TargetProperty ,其类型为 PropertyPath ,必须指向相关属性.
在 Storyboard 标签内内可以定义多个动画,并发运行。比如,上面的例子改一下,不用 Button_Click 事件,改用故事板并且两按钮同时变化 - 并行动画:
                          <Window x:Class="LearningWPF.MainWindow"
        xmlns="http://schemas.microsoft.com/winfx/2006/xaml/presentation"
        xmlns:x="http://schemas.microsoft.com/winfx/2006/xaml"
        xmlns:d="http://schemas.microsoft.com/expression/blend/2008"
        xmlns:local="clr-namespace:LearningWPF"
        xmlns:mc="http://schemas.openxmlformats.org/markup-compatibility/2006"
        Title="MainWindow"
        Width="800"
        Height="500"
        mc:Ignorable="d"
        WindowStartupLocation="CenterScreen">
    <Grid>
        <StackPanel>
            <Button Name="btnShow"
                    Width="200"
                    Height="50"
                    VerticalAlignment="Center"
                    HorizontalAlignment="Center"
                    Content="Click Me"
                    FontSize="26"
                    Foreground="AntiqueWhite">
                <Button.Background>
                    <LinearGradientBrush>
                        <GradientStop Color="HotPink"
                                      Offset="0" />
                        <GradientStop Color="LightGreen"
                                      Offset="0.5" />
                    </LinearGradientBrush>
                </Button.Background>
                <Button.Triggers>
                    <EventTrigger RoutedEvent="Button.Click">
                        <EventTrigger.Actions>
                            <BeginStoryboard>
                                <Storyboard>
                                    <DoubleAnimation AutoReverse="True"
                                                     Storyboard.TargetName="cmdGrow"
                                                     Storyboard.TargetProperty="Width"
                                                     Duration="0:0:1"
                                                     To="300" />
                                    <DoubleAnimation AutoReverse="True"
                                                     Storyboard.TargetName="btnShow"
                                                     Storyboard.TargetProperty="Width"
                                                     Duration="0:0:1"
                                                     To="300" />
                                </Storyboard>
                            </BeginStoryboard>
                        </EventTrigger.Actions>
                    </EventTrigger>
                </Button.Triggers>
            </Button>
            <Button Padding="10"
                    Name="cmdGrow"
                    Height="40"
                    Width="200"
                    HorizontalAlignment="Center"
                    VerticalAlignment="Center"
                    Content="Click me and make me grow" Margin="5">
            </Button>
        </StackPanel>
    </Grid>
</Window>
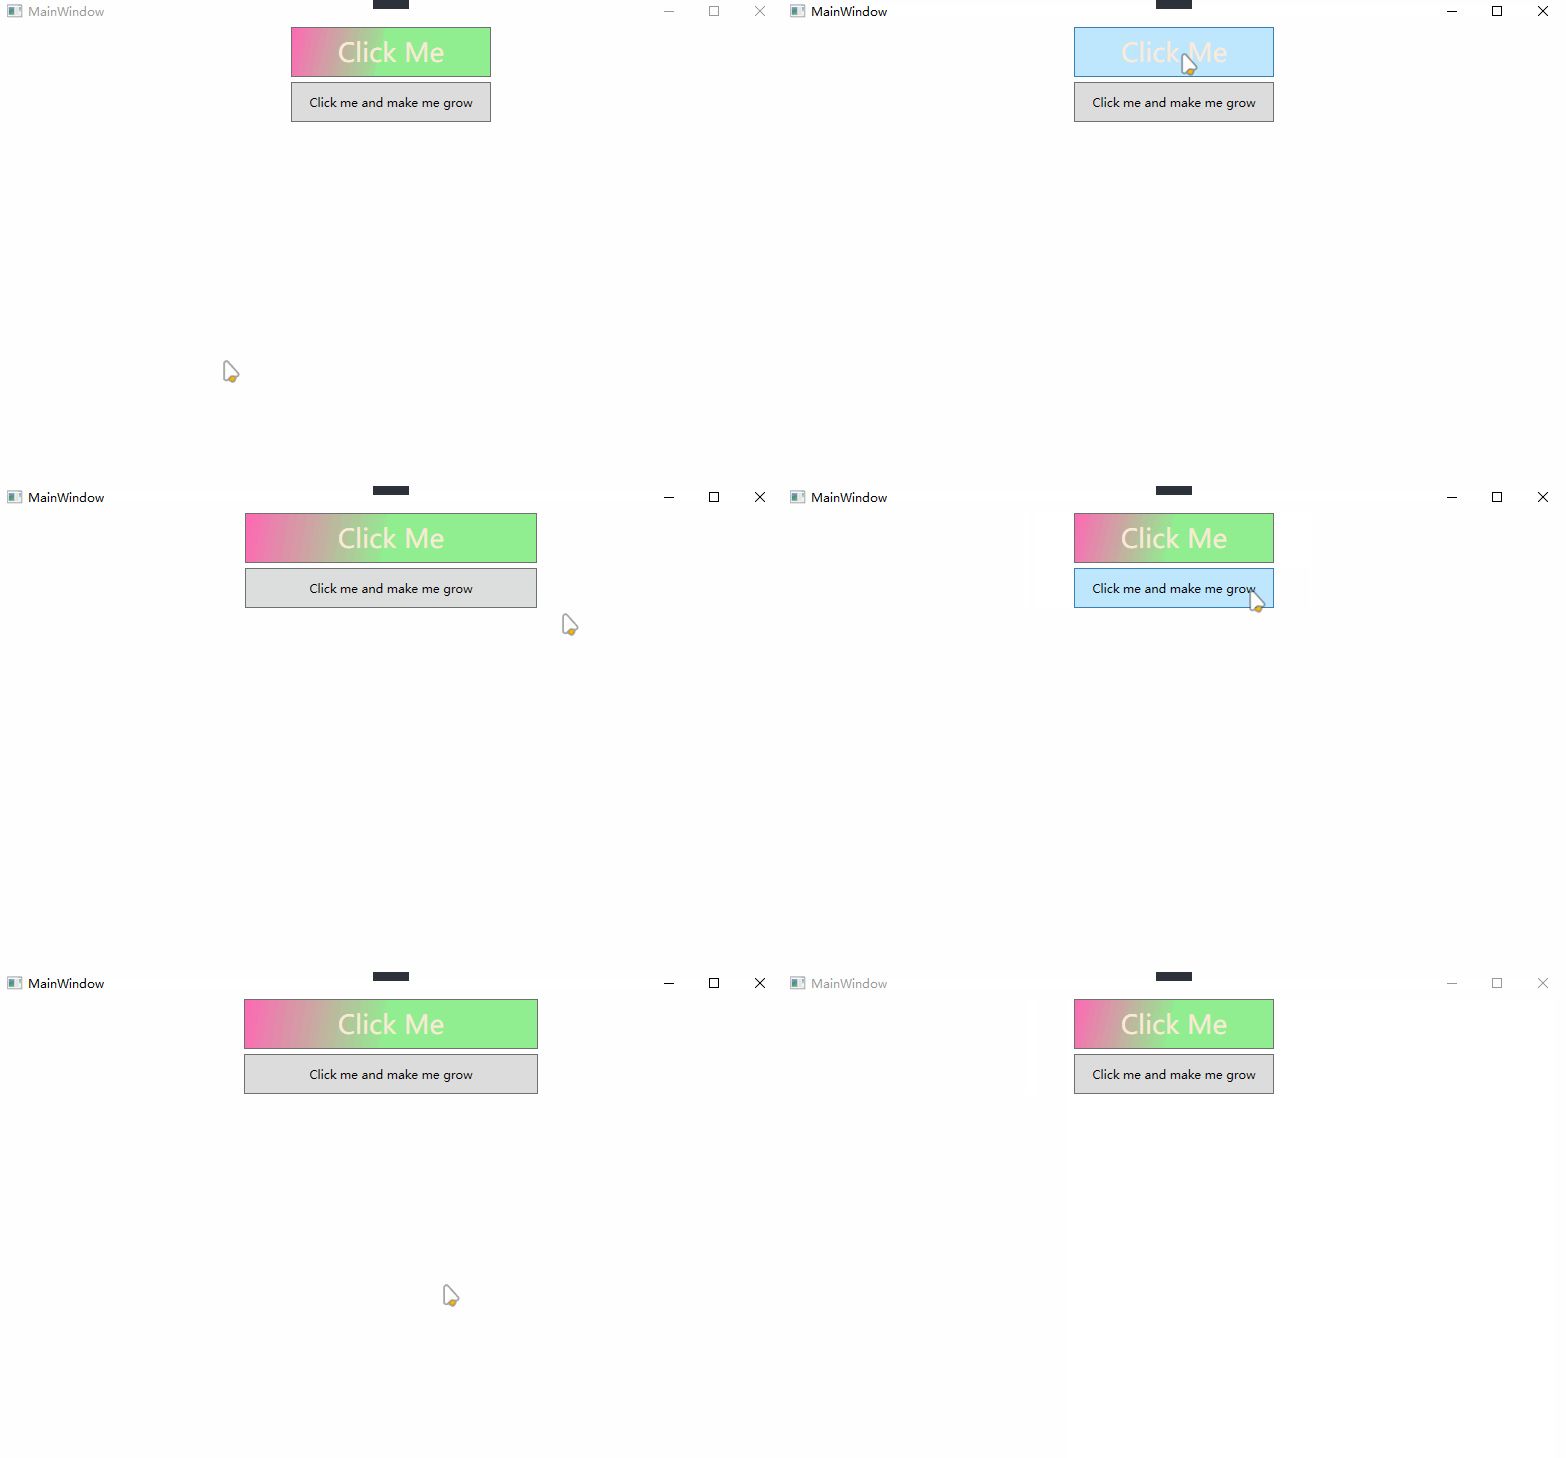
“关键帧动画” - 显然就是一段动画中比较重要的一些帧。帧,即帧率,游戏玩家应该熟悉什么是帧率,比如 CSGO 的游戏帧率300FPS,一般游戏内的FPS指的是画面每秒钟重绘的次数,帧率越高画面的刷新次数就越高,被一枪头的概率就越低,当然低头选手需要排除😅。放到 WPF 里,属性每次细微变化后产生的每一个新画面就称为帧,帧率越高动画越细腻。普通的动画类只支持从一个值到另一个值的线性内插,关键帧动画则允许我们设计动画过程中某些时刻达到的效果.
此外,关键帧动画可以完成前面所述动画的所有功能.
在关键帧动画里,没有 From 、 To 、 By 的属性,关键帧动画的目标值使用关键帧对象进行描述,因此称作“关键帧动画”。适用关键帧动画的前提需要有允许使用关键帧动画的类,比如 DoubleAnimation 有一个 DoubleAnimationUsingKeyFrame 的伴随类,对于其他的 xxAnimation 也一样【 支持关键帧的动画类可以查阅MSDN文档 】.
学习一下MSDN提供的关键帧动画示例:
                          <Rectangle Width="50"
           Height="50"
           HorizontalAlignment="Left"
           Fill="Blue">
  <Rectangle.RenderTransform>
    <TranslateTransform x:Name="MyAnimatedTranslateTransform" X="0" Y="0" />
  </Rectangle.RenderTransform>
  <Rectangle.Triggers>
    <EventTrigger RoutedEvent="Rectangle.MouseLeftButtonDown">
      <BeginStoryboard>
        <Storyboard>
          <DoubleAnimationUsingKeyFrames Storyboard.TargetName="MyAnimatedTranslateTransform" Storyboard.TargetProperty="X" Duration="0:0:10">
            <LinearDoubleKeyFrame KeyTime="0:0:0" Value="0" />
            <LinearDoubleKeyFrame KeyTime="0:0:2" Value="350" />
            <LinearDoubleKeyFrame KeyTime="0:0:7" Value="50" />
            <LinearDoubleKeyFrame KeyTime="0:0:8" Value="200" />
          </DoubleAnimationUsingKeyFrames>
        </Storyboard>
      </BeginStoryboard>
    </EventTrigger>
  </Rectangle.Triggers>
</Rectangle>
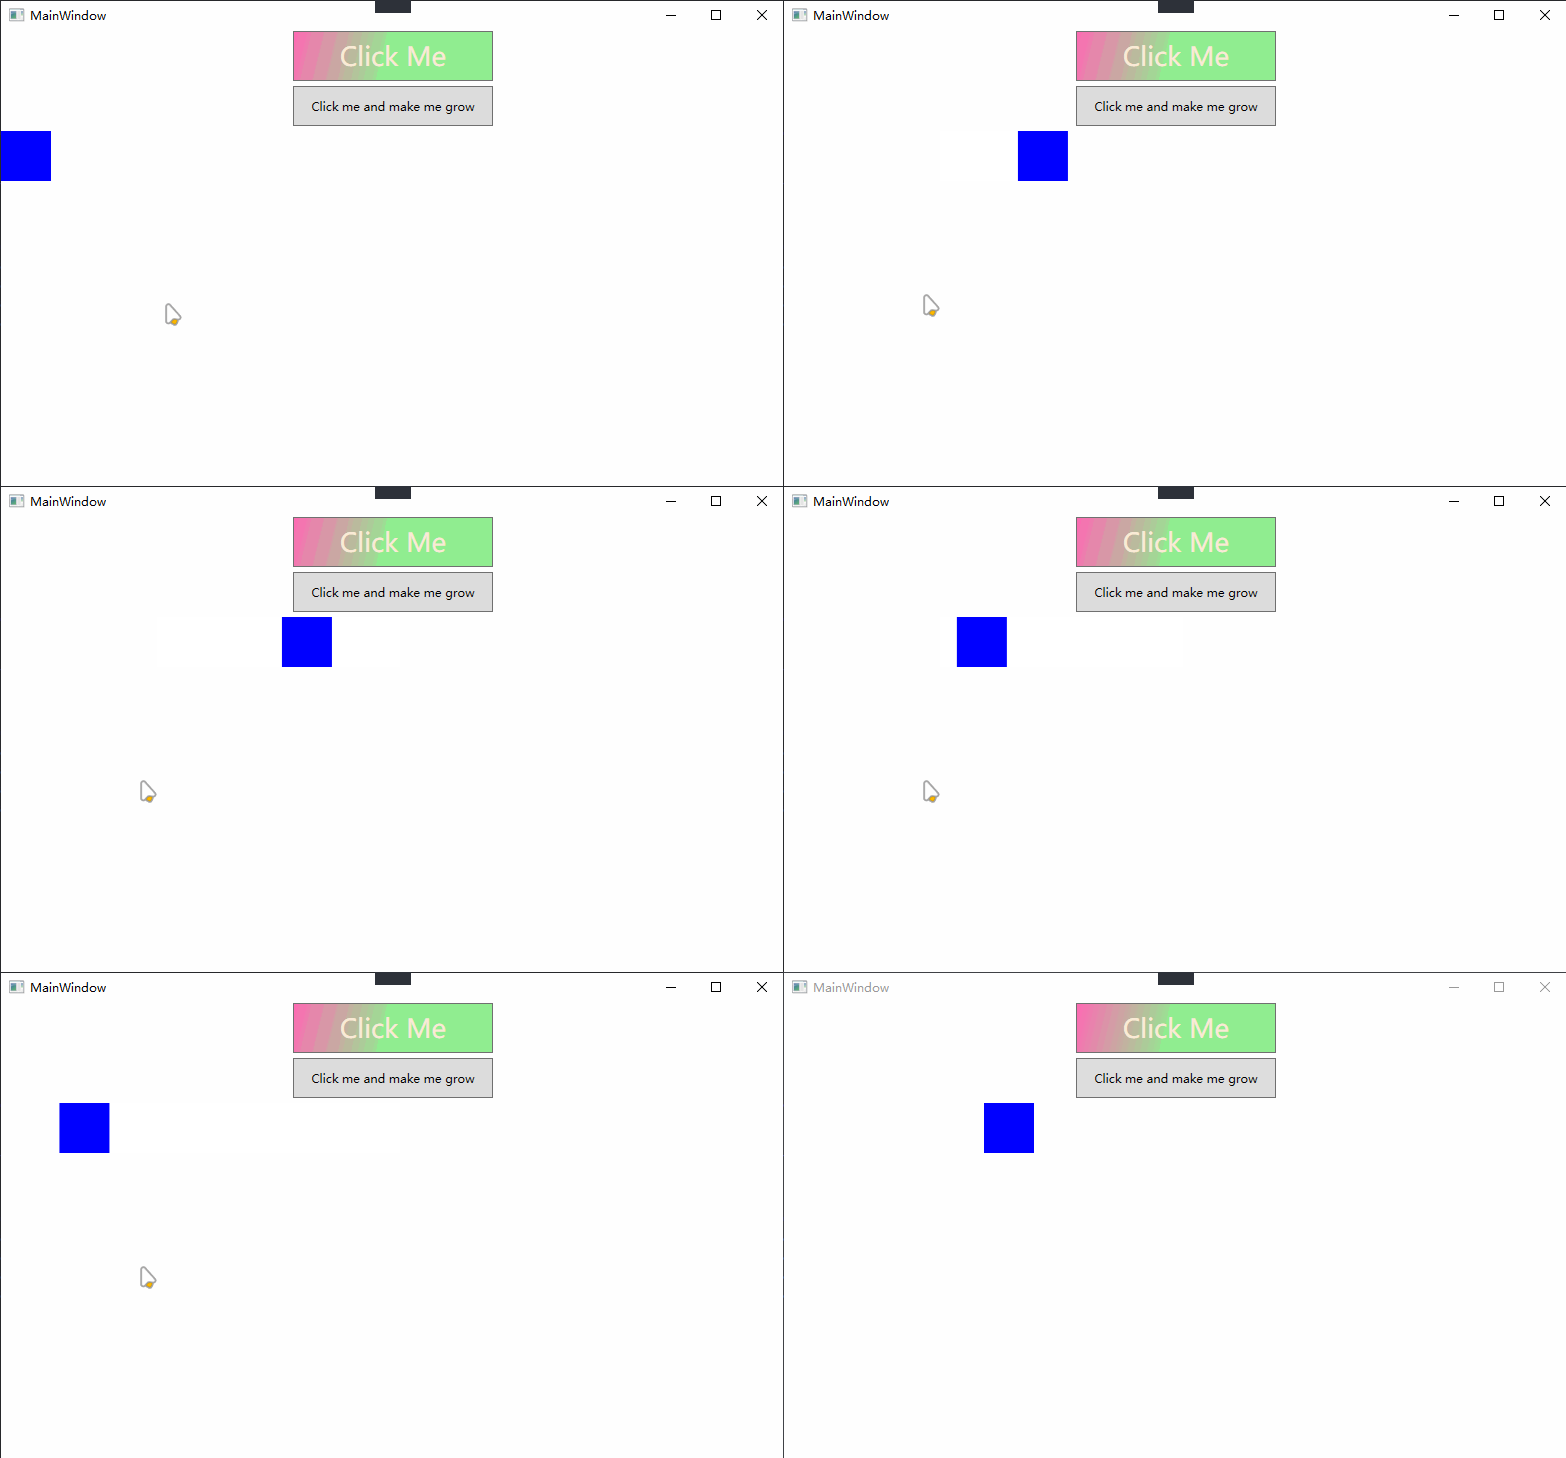
这段 Xaml 创建了一个矩形,通过故事板 Storyboard 添加了一的点击事件触发的动画,矩形会从左边移动到右边。 Storyboard 之前的内容和之前是一样的,主要关注一下它里面的内容:

<Rectangle> :定义一个宽度为 50、高度为 50 的蓝色矩形。 <TranslateTransform> :定义一个用于平移的变换,初始位置为 (0, 0)。 <EventTrigger> :当矩形的左键点击事件触发时执行动画。 <Storyboard> :定义动画的序列。 <DoubleAnimationUsingKeyFrames> :通过关键帧定义矩形的 X 坐标在动画过程中的变化。 <LinearDoubleKeyFrame> :定义不同时间点的关键帧,以实现位置的平滑过渡。 <BeginStoryboard> :触发动画开始。 通过这些关键帧,矩形元素将在10秒的动画过程中,从0秒开始,X位置从0逐渐变为350,然后在7秒时突然变为50,最后在8秒时变为200。这个过程会通过平滑的动画效果展示出来.
关键帧对象(Frame) 主要包含两个参数, Value 是目标值, KeyTime 是到达目标值的时刻 。
"0:0:10" - 这是使用 TimeSpan 说明的动画时间,一般格式为:
days.hours:minutes:seconds.fraction.注意在日和小时之间使用的是点“.”,在时分秒之间使用的是“:”,秒以下又是点“.”。常用动画通常在分秒之间,可以使用简化的形式:"0:0:5"。但不能把3.5秒写成“3.5”而是写成“0:0:3.5”,因为只写“3.5”表示3天5小时🎈 。
写一个拍球动画:
                          <Window x:Class="KeyFrameDemo.MainWindow"
        xmlns="http://schemas.microsoft.com/winfx/2006/xaml/presentation"
        xmlns:x="http://schemas.microsoft.com/winfx/2006/xaml"
        xmlns:d="http://schemas.microsoft.com/expression/blend/2008"
        xmlns:local="clr-namespace:KeyFrameDemo"
        xmlns:mc="http://schemas.openxmlformats.org/markup-compatibility/2006"
        Title="KeyFrameDemo"
        Width="800"
        Height="450"
        WindowStartupLocation="CenterScreen"
        mc:Ignorable="d">
  <Grid>
    <Ellipse Name="ball"
             Width="64"
             Height="64"
             HorizontalAlignment="Center"
             VerticalAlignment="Top"
             Fill="HotPink"
             RenderTransformOrigin="0.5,0.5"
             Stroke="LightPink"
             StrokeThickness="3">
      <Ellipse.RenderTransform>
        <TransformGroup>
          <ScaleTransform ScaleX="1" ScaleY="1" />
          <SkewTransform AngleX="0" AngleY="0" />
          <RotateTransform Angle="0" />
          <TranslateTransform X="0" Y="0" />
        </TransformGroup>
      </Ellipse.RenderTransform>
      <Ellipse.Triggers>
        <EventTrigger RoutedEvent="Ellipse.MouseLeftButtonDown">
          <BeginStoryboard>
            <Storyboard RepeatBehavior="Forever">
              <DoubleAnimationUsingKeyFrames BeginTime="0:0:0"
                                             Storyboard.TargetName="ball"
                                             Storyboard.TargetProperty="(Ellipse.RenderTransform).(TransformGroup.Children)[3].(TranslateTransform.Y)">
                <LinearDoubleKeyFrame KeyTime="00:00:00"
                                      Value="0" />
                <LinearDoubleKeyFrame KeyTime="00:00:03"
                                      Value="293" />
                <LinearDoubleKeyFrame KeyTime="00:00:06"
                                      Value="0" />
              </DoubleAnimationUsingKeyFrames>
              <ColorAnimationUsingKeyFrames BeginTime="0:0:0"
                                            Storyboard.TargetName="ball"
                                            Storyboard.TargetProperty="(Ellipse.Fill).(SolidColorBrush.Color)">
                <LinearColorKeyFrame KeyTime="00:00:00"
                                     Value="DeepPink" />
                <LinearColorKeyFrame KeyTime="00:00:03"
                                     Value="OrangeRed" />
                <LinearColorKeyFrame KeyTime="00:00:06"
                                     Value="Pink" />
              </ColorAnimationUsingKeyFrames>
            </Storyboard>
          </BeginStoryboard>
        </EventTrigger>
      </Ellipse.Triggers>
    </Ellipse>
  </Grid>
</Window>
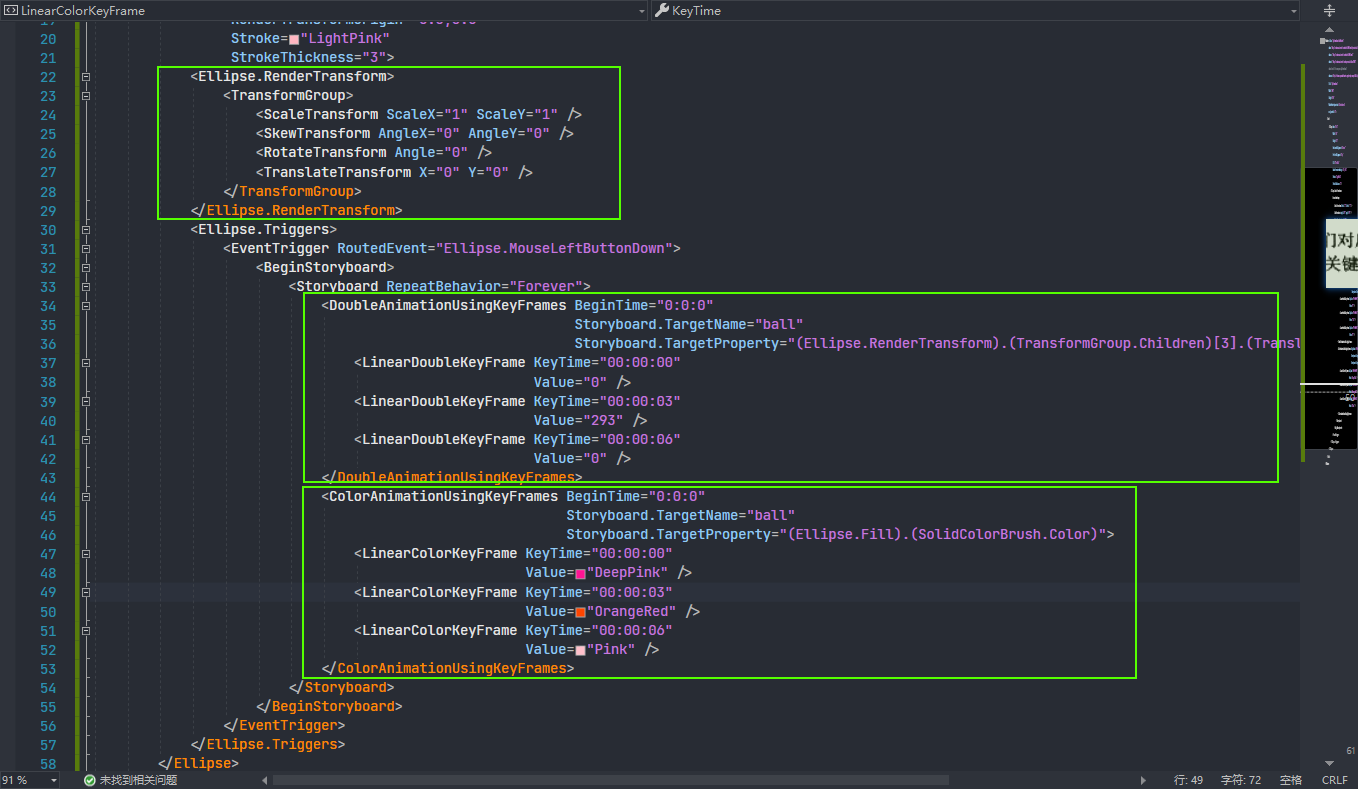
这段代码实现了一个无限循环的动画,当点击椭圆时,它会在垂直方向上上下移动,同时填充颜色从深粉红变化到橙红再到粉红,每个颜色变化的持续时间为 3 秒。整个动画序列会不断循环播放:
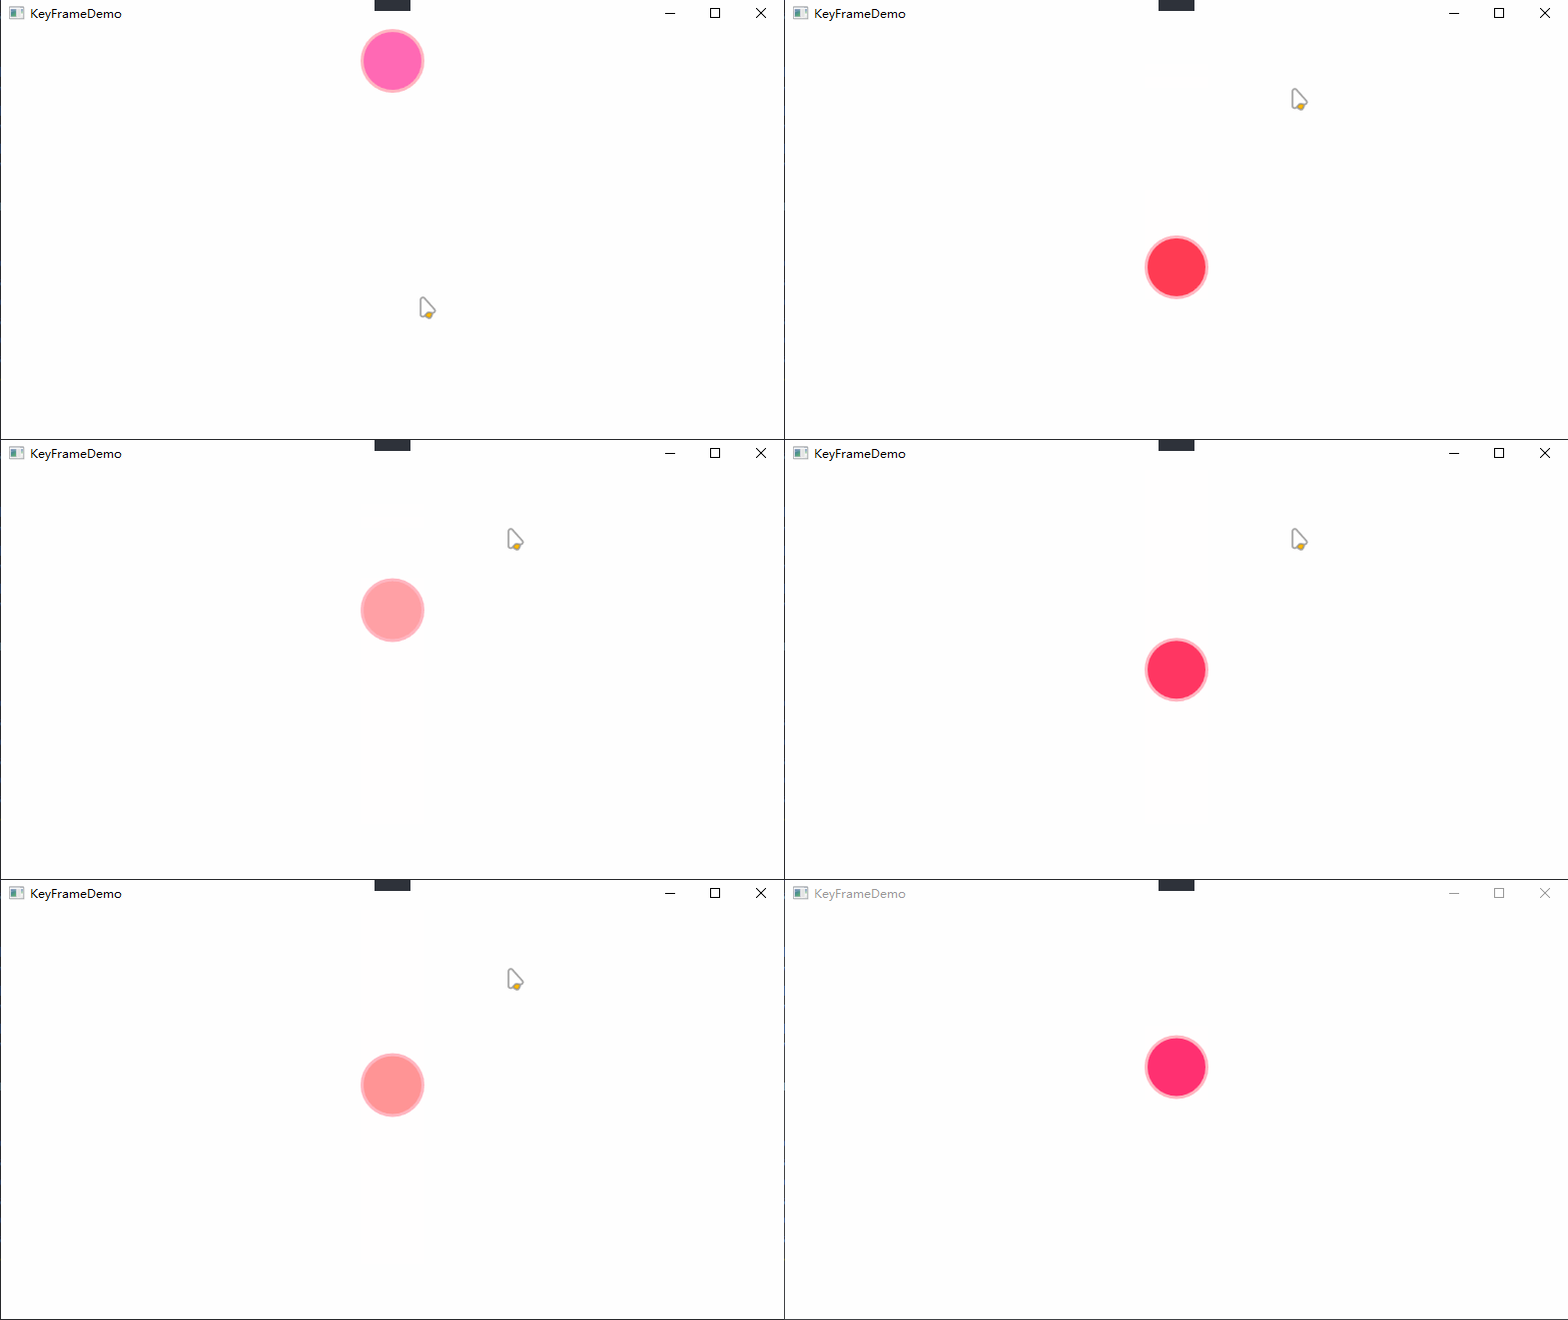
可以看到线性关键帧是匀速的,但有时候为了使效果更逼真,动画不一定都是均匀变化的。这个时候就需要用到 Spline KeyFrame 非线性关键帧
还是上面的拍球例子,球向下运动时,由于重力的作用,球的速度应该是加快的;当球从地上弹起时,球的速度是减慢的。为此,可以用非线性关键帧对它改造一下:
                          <DoubleAnimationUsingKeyFrames BeginTime="0:0:0"
                               Storyboard.TargetName="ball"
                               Storyboard.TargetProperty="(Ellipse.RenderTransform).(TransformGroup.Children)[3].(TranslateTransform.Y)">
  <SplineDoubleKeyFrame KeyTime="00:00:00"
                        Value="0" />
  <SplineDoubleKeyFrame KeyTime="00:00:03"
                        Value="293"
                        KeySpline="0.9,0.06 1,1" />
  <SplineDoubleKeyFrame KeyTime="00:00:06"
                        Value="0"
                        KeySpline="0.06,0.9 1,1" />
</DoubleAnimationUsingKeyFrames>
KeySpline 属性的值是一个贝塞尔曲线的控制点,其值范围应该在 0 到 1 之间,详细内容可以看一下 MSDN文档关键帧动画概述内插方法小节的内容 。
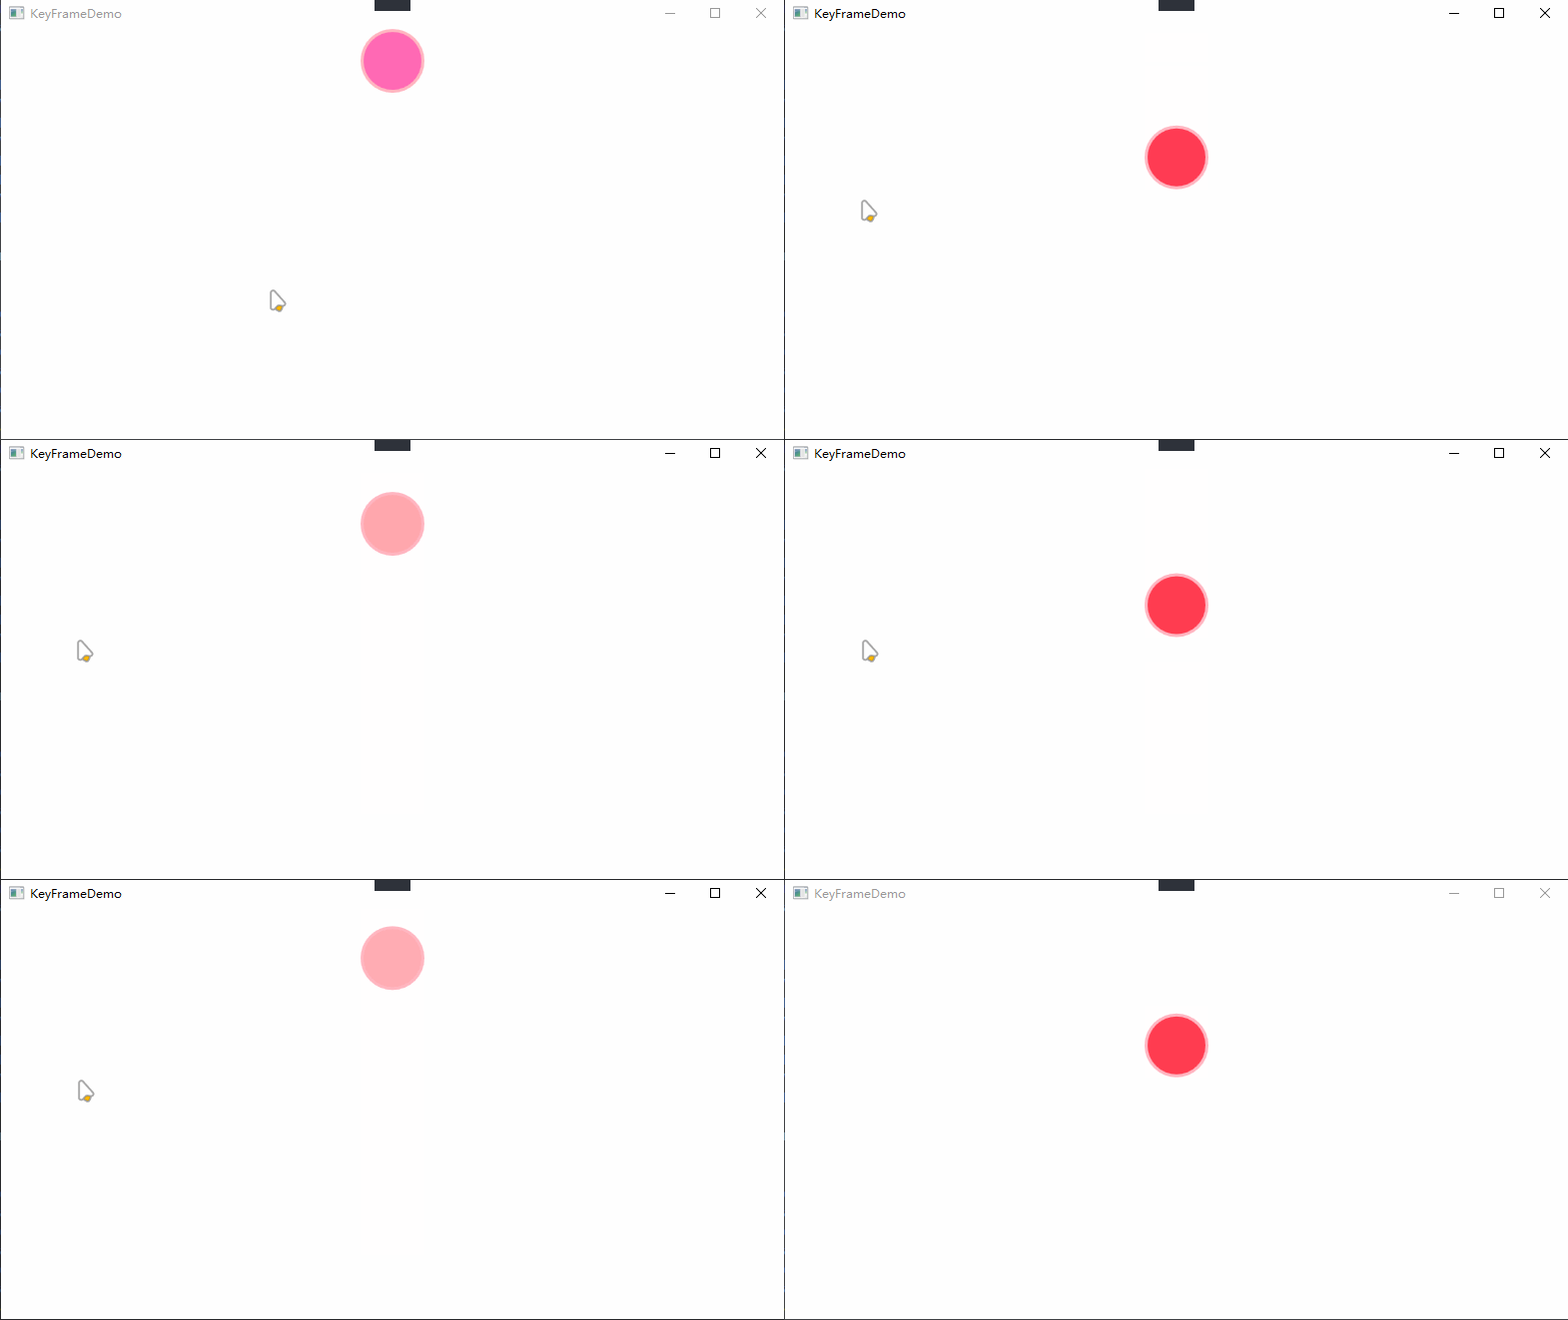
此外,也可以使用不同的缓动函数(Easing Function)来替代 KeySpline 。例如,你可以使用 QuadraticEase 、 CubicEase 等来实现想要的效果.
离散关键帧(Discrete Keyframe)用于创建不连续、突然变化的动画效果。与其他关键帧类型不同,离散关键帧没有过渡,属性值会在关键帧之间突然改变.
在 WPF 动画中,离散关键帧的每个关键帧都是一个明确的属性值,并且不会在关键帧之间插值。当动画播放到离散关键帧时,属性值会突然从前一个关键帧的值变为当前关键帧指定的值。这种突变效果可以用于创造一些特殊的动画效果,比如文字闪烁、元素的跳跃等.
文字闪烁:
                          <Window x:Class="AnimationDemo.MainWindow"
        xmlns="http://schemas.microsoft.com/winfx/2006/xaml/presentation" xmlns:x="http://schemas.microsoft.com/winfx/2006/xaml"
        xmlns:d="http://schemas.microsoft.com/expression/blend/2008" xmlns:local="clr-namespace:AnimationDemo" xmlns:mc="http://schemas.openxmlformats.org/markup-compatibility/2006"
        Title="Animation"
        Width="850" Height="450"
        WindowStartupLocation="CenterScreen"
        mc:Ignorable="d">
    <Grid>
        <TextBlock Text="Shoot for the moon; even if you miss, you'll land among the stars." FontSize="26" VerticalAlignment="Center" HorizontalAlignment="Center">
            <TextBlock.Foreground>
                <SolidColorBrush Color="Black"/>
            </TextBlock.Foreground>
            <TextBlock.Triggers>
                <EventTrigger RoutedEvent="Loaded">
                    <BeginStoryboard>
                        <Storyboard RepeatBehavior="Forever">
                            <ColorAnimationUsingKeyFrames Storyboard.TargetProperty="(TextBlock.Foreground).(SolidColorBrush.Color)">
                                <DiscreteColorKeyFrame KeyTime="0:0:0"
                                                       Value="HotPink" />
                                <DiscreteColorKeyFrame KeyTime="0:0:0.5"
                                                       Value="DarkMagenta" />
                                <DiscreteColorKeyFrame KeyTime="0:0:1"
                                                       Value="LimeGreen" />
                                <DiscreteColorKeyFrame KeyTime="0:0:1.5"
                                                       Value="OrangeRed" />
                            </ColorAnimationUsingKeyFrames>
                        </Storyboard>
                    </BeginStoryboard>
                </EventTrigger>
            </TextBlock.Triggers>
        </TextBlock>
    </Grid>
</Window>
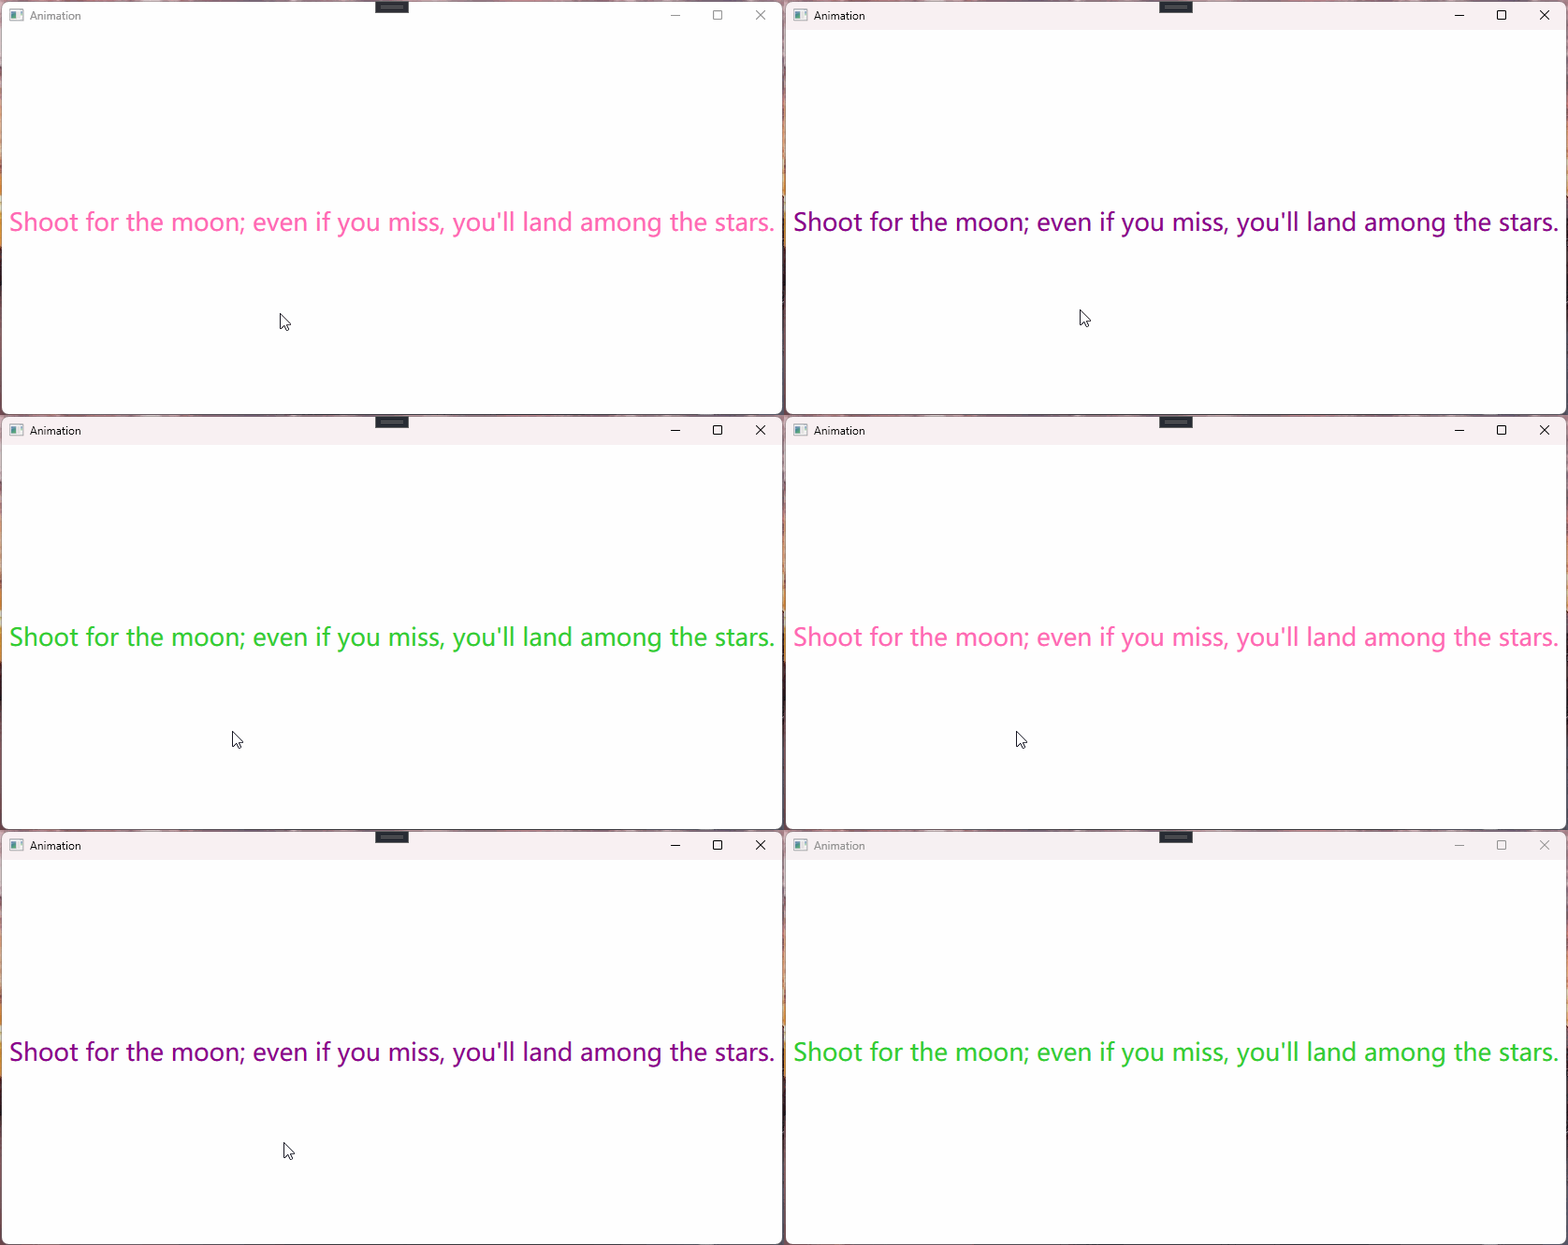
在这个示例中, DiscreteColorKeyFrame 被用来在指定的时间点突然改变文本颜色,创造出了文本闪烁的效果。每个 DiscreteColorKeyFrame 关键帧都表示了一个明确的颜色,而不会在关键帧之间进行颜色的平滑过渡.
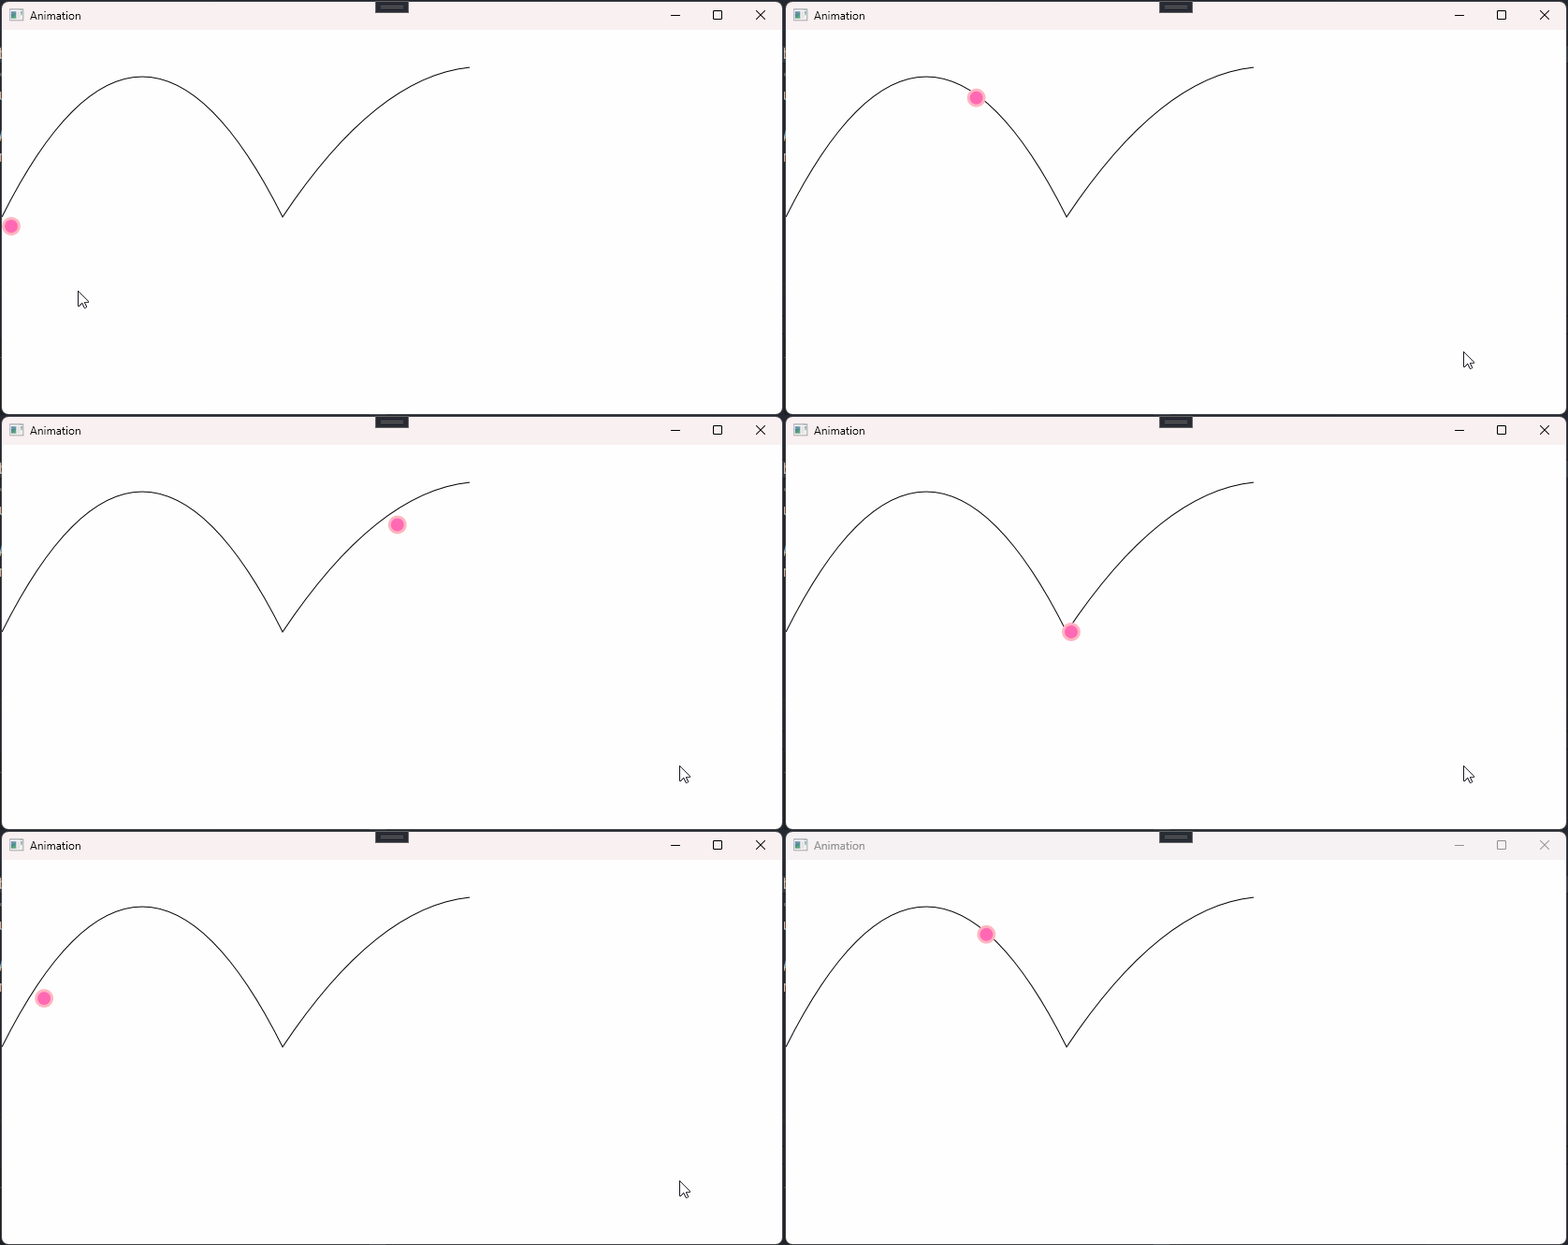
沿路径运动的动画是一种将元素沿着指定的路径进行移动的动画效果。在 WPF 中,可以使用 PathGeometry 和 DoubleAnimationUsingPath 来实现沿路径运动的动画.
比如沿着之前画的贝塞尔曲线的路径运动的动画:
                          <Window x:Class="AnimationDemo.MainWindow"
        xmlns="http://schemas.microsoft.com/winfx/2006/xaml/presentation"
        xmlns:x="http://schemas.microsoft.com/winfx/2006/xaml"
        xmlns:d="http://schemas.microsoft.com/expression/blend/2008"
        xmlns:local="clr-namespace:AnimationDemo"
        xmlns:mc="http://schemas.openxmlformats.org/markup-compatibility/2006"
        Title="Animation"
        Width="850"
        Height="450"
        WindowStartupLocation="CenterScreen"
        mc:Ignorable="d">
    <Grid>
        <Canvas>
            <Path Data="M0,200 Q150,-100 300,200 400,50 500,40"
                  Stroke="Black"
                  StrokeThickness="1" />
            <Ellipse Name="ball"
                     Width="20"
                     Height="20"
                     HorizontalAlignment="Center"
                     VerticalAlignment="Top"
                     Fill="HotPink"
                     RenderTransformOrigin="0.5,0.5"
                     Stroke="LightPink"
                     StrokeThickness="3">
                <Ellipse.RenderTransform>
                    <TransformGroup>
                        <ScaleTransform ScaleX="1"
                                        ScaleY="1" />
                        <SkewTransform AngleX="0"
                                       AngleY="0" />
                        <RotateTransform x:Name="MyRotateTransform"
                                         Angle="0" />
                        <TranslateTransform x:Name="MyTranslateTransform"
                                            X="0"
                                            Y="200" />
                    </TransformGroup>
                </Ellipse.RenderTransform>
                <Ellipse.Triggers>
                    <EventTrigger RoutedEvent="Ellipse.MouseLeftButtonDown">
                        <BeginStoryboard>
                            <Storyboard RepeatBehavior="Forever">
                                <DoubleAnimationUsingPath AutoReverse="True"
                                                          RepeatBehavior="Forever"
                                                          Source="Angle"
                                                          Storyboard.TargetName="MyRotateTransform"
                                                          Storyboard.TargetProperty="Angle"
                                                          Duration="0:0:5">
                                    <DoubleAnimationUsingPath.PathGeometry>
                                        <PathGeometry Figures="M0,200 Q150,-100 300,200 400,50 500,40" />
                                    </DoubleAnimationUsingPath.PathGeometry>
                                </DoubleAnimationUsingPath>

                                <DoubleAnimationUsingPath AutoReverse="True"
                                                          RepeatBehavior="Forever"
                                                          Source="Y"
                                                          Storyboard.TargetName="MyTranslateTransform"
                                                          Storyboard.TargetProperty="(Y)"
                                                          Duration="0:0:5">
                                    <DoubleAnimationUsingPath.PathGeometry>
                                        <PathGeometry Figures="M0,200 Q150,-100 300,200 400,50 500,40" />
                                    </DoubleAnimationUsingPath.PathGeometry>
                                </DoubleAnimationUsingPath>

                                <DoubleAnimationUsingPath AutoReverse="True"
                                                          RepeatBehavior="Forever"
                                                          Source="X"
                                                          Storyboard.TargetName="MyTranslateTransform"
                                                          Storyboard.TargetProperty="(X)"
                                                          Duration="0:0:5">
                                    <DoubleAnimationUsingPath.PathGeometry>
                                        <PathGeometry Figures="M0,200 Q150,-100 300,200 400,50 500,40" />
                                    </DoubleAnimationUsingPath.PathGeometry>
                                </DoubleAnimationUsingPath>
                            </Storyboard>
                        </BeginStoryboard>
                    </EventTrigger>
                </Ellipse.Triggers>
            </Ellipse>
        </Canvas>
    </Grid>
</Window>
以上内容就是本篇的所有内容了,图形系部分主要有 Shape 和 Goemetry 两大类,可以直接对 Shape 进行排版、设定风格和数据绑定,后者则需要通过视觉元素才能在屏幕上显示出来。动画则一般分为简单动画、关键帧动画以及沿路径运动的动画,日常使用过程种应该是关键帧动画用的多一点,当然除了文章中例举的关键帧类型,还有其他很多各式的关键帧类型,这些应该够用.
图形和动画之间应该加上图形转换的🤐 。
记得点赞哟💖 。
最后此篇关于WPF入门笔记-08-动画的文章就讲到这里了,如果你想了解更多关于WPF入门笔记-08-动画的内容请搜索CFSDN的文章或继续浏览相关文章,希望大家以后支持我的博客! 。
有没有办法在另一个 WPF 窗口内托管 WPF 窗口。我有几个有点复杂的表格。但现在为了简化事情,我试图将其中一些合并为一个“仪表板”表单中的标签页。 请注意,我不是要托管 Windows 窗体,而是
WPF 特有的哪些方面和实践在非 WPF GUI 编程中最有用(并且并非难以实现)? 最佳答案 通过学习 WPF 命令,我了解了命令模式。它构成了 UI - 代码分离的基础,我认为应该在其他应用程序中
WinRT/Metro 正在获得一个新的 SemanticZoom控制,但我很难为 WPF 找到任何东西。 我不想为我的特定项目切换到 Metro,因为它不允许我制作窗口应用程序或跨多个显示器的多个实
我很难解决我的问题,我快要疯了。 想法是这样的:我有两个 ListView 元素,当一个元素从第一个列表掉落到第二个列表时,我需要打开一个对话,但我需要被掉落的元素的信息以及被添加以填充对话的元素。
如果我遵循TabControl,并且一切正常,当我切换到第二个Tabitem时,它显示就没有问题。 //datagrid //datagrid2 但是如果我有这个xaml,当我
在 Windows 窗体应用程序中,我们的数据 GridView 有很多事件,如行鼠标双击或行单击以及额外的...... 但是在 WPF 中我找不到这些事件。我如何将行鼠标双击添加到其中包含数据网格的
在这个项目中,代码 正确编译和执行 ;但是,我需要帮助解决两个问题: VS2012 WPF 设计器不适用于此 XAML 文件。它显示消息设计 View 对于 x64 和 ARM 目标平台不可用。 我收
目前我正在设计 WPF ScrollViewer,我发现了这个 Content="M 0 0 L 4 4 L 0 8 Z" 阅读 MSDN examples .现在我真的很想知道这意味着什么,但我无法
在 WPF 中,元素的可见性可以为“可见”,但实际上在屏幕上不可见,因为它的父元素(或父元素的父元素)具有折叠的可见性。 我希望能够知道一个元素是否实际呈现在屏幕上,而不必遍历可视化树检查父元素。 有
我应该使用 ApplicationCommands.Close用于关闭模式对话框还是该命令被认为是为关闭应用程序保留的?如果是后者,请大家创建Close每个命令 Dialog盒子或只是一个 Close
WPF 是否有任何可用的 piemenu 控件? 最佳答案 我在我的最爱中找到了这个,你可以看看: This 祝你今天过得愉快。 关于wpf - WPF 的菜单,我们在Stack Overflow上找
我正在尝试使用 WrapPanel 和两个 TextBlock 将星号 (*) 附加到某些文本的左侧,允许文本换行,并强制文本右对齐。通过创建一个 FlowDirection 设置为 RightToL
这里是场景(简化):我在Window上有一个控件(比如说一个Rectangle)。我迷上了MouseMove事件,以使其启动拖放操作。然后在MouseDown事件中进行动画处理,向右移动50个像素。但
我有一个 ListView ,它的项目来源是一个列表。我希望用户只选择一项。当我将 listview 的 SelectionMode 设置为 single 时,用户仍然可以选择多个项目,并且似乎 li
就目前而言,这个问题不适合我们的问答形式。我们希望答案得到事实、引用或专业知识的支持,但这个问题可能会引起辩论、争论、投票或扩展讨论。如果您觉得这个问题可以改进并可能重新打开,visit the he
INotifyPropertyChanged 的目的是什么。我知道每当更改属性时都会触发此事件,但是 View /用户界面如何知道触发了此事件: 这是实现 INotifyPropertyChang
我正在查看工具箱中的 WPF 组件,但找不到 2005/2008 中存在的错误提供程序。 被移除了吗? 最佳答案 ErrorProvider是一个 Winforms 控件。 WPF 中没有等效项。但是
我试图在单击和双击 wpf Image 控件时有不同的行为。不幸的是,单击首先被触发,因此双击被忽略。 最佳答案 如果您改用 MouseDown 事件,则它在 EventArgs 中为 ClickCo
这可能吗? 我使用了一个框架控件并且:显示(例如:showwindow.xaml) 但是我得到这个错误: root element is not valid for navigation 最佳答案 确
我在蓝色背景的窗口上放置了一个扩展器,我想让扩展器的按钮与默认颜色不同(蓝色,它是从窗口接收的)。当我修改扩展器的背景属性时,它会将整个扩展器、标题和全部更改为新颜色。但是,我只想更改按钮本身。谁能指

我是一名优秀的程序员,十分优秀!