
 个人中心
个人中心 文章发布
文章发布
作者热门文章
- Java锁的逻辑(结合对象头和ObjectMonitor)
- 还在用饼状图?来瞧瞧这些炫酷的百分比可视化新图形(附代码实现)⛵
- 自动注册实体类到EntityFrameworkCore上下文,并适配ABP及ABPVNext
- 基于Sklearn机器学习代码实战


 31
31
 4
4


本文主要基于Kubernetes1.22.2和Linux操作系统Ubuntu 18.04.
| 服务器版本 | docker软件版本 | Kubernetes(k8s)集群版本 | CPU架构 |
|---|---|---|---|
| Ubuntu 18.04.5 LTS | Docker version 20.10.14 | v1.22.2 | x86_64 |
Kubernetes集群架构:k8scludes1作为master节点,k8scludes2,k8scludes3作为worker节点.
| 服务器 | 操作系统版本 | CPU架构 | 进程 | 功能描述 |
|---|---|---|---|---|
| k8scludes1/192.168.110.128 | Ubuntu 18.04.5 LTS | x86_64 | docker,kube-apiserver,etcd,kube-scheduler,kube-controller-manager,kubelet,kube-proxy,coredns,calico | k8s master节点 |
| k8scludes2/192.168.110.129 | Ubuntu 18.04.5 LTS | x86_64 | docker,kubelet,kube-proxy,calico | k8s worker节点 |
| k8scludes3/192.168.110.130 | Ubuntu 18.04.5 LTS | x86_64 | docker,kubelet,kube-proxy,calico | k8s worker节点 |
下图描述了软件部署方式的变迁: 传统部署时代 , 虚拟化部署时代 , 容器部署时代 .
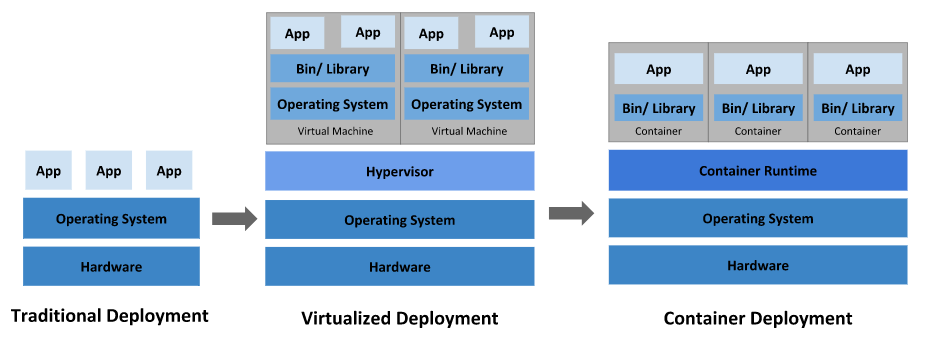
传统部署时代 :
早期,各个组织是在物理服务器上运行应用程序。 由于无法限制在物理服务器中运行的应用程序资源使用,因此会导致资源分配问题。 例如,如果在同一台物理服务器上运行多个应用程序, 则可能会出现一个应用程序占用大部分资源的情况,而导致其他应用程序的性能下降。 一种解决方案是将每个应用程序都运行在不同的物理服务器上, 但是当某个应用程式资源利用率不高时,剩余资源无法被分配给其他应用程式, 而且维护许多物理服务器的成本很高.
虚拟化部署时代 :
因此,虚拟化技术被引入了。虚拟化技术允许你在单个物理服务器的 CPU 上运行多台虚拟机(VM)。 虚拟化能使应用程序在不同 VM 之间被彼此隔离,且能提供一定程度的安全性, 因为一个应用程序的信息不能被另一应用程序随意访问.
虚拟化技术能够更好地利用物理服务器的资源,并且因为可轻松地添加或更新应用程序, 而因此可以具有更高的可扩缩性,以及降低硬件成本等等的好处。 通过虚拟化,你可以将一组物理资源呈现为可丢弃的虚拟机集群.
每个 VM 是一台完整的计算机,在虚拟化硬件之上运行所有组件,包括其自己的操作系统.
容器部署时代 :
容器类似于 VM,但是更宽松的隔离特性,使容器之间可以共享操作系统(OS)。 因此,容器比起 VM 被认为是更轻量级的。且与 VM 类似,每个容器都具有自己的文件系统、CPU、内存、进程空间等。 由于它们与基础架构分离,因此可以跨云和 OS 发行版本进行移植.
容器因具有许多优势而变得流行起来,例如:
在这篇博客中,我们将详细介绍如何在Ubuntu 18.04上安装和部署Kubernetes 1.22.2集群。我们将使用kubeadm工具,这是Kubernetes官方推荐的用于快速部署Kubernetes集群的工具.
如果您的平台在Centos系统上,关于Kubernetes(k8s)集群的安装部署,可以查看博客《Centos7 安装部署Kubernetes(k8s)集群》 https://www.cnblogs.com/renshengdezheli/p/16686769.html.
如果您对Ubuntu系统不熟悉,Ubuntu系统的详细操作,请查看博客《 centos系统和Ubuntu系统命令区别以及常见操作 》.
Kubernetes 是一个可移植、可扩展的开源平台,用于管理容器化的工作负载和服务,可促进声明式配置和自动化。 Kubernetes 拥有一个庞大且快速增长的生态,其服务、支持和工具的使用范围相当广泛.
Kubernetes 这个名字源于希腊语,意为“舵手”或“飞行员”。k8s 这个缩写是因为 k 和 s 之间有八个字符的关系。 Google 在 2014 年开源了 Kubernetes 项目。 Kubernetes 建立在 Google 大规模运行生产工作负载十几年经验的基础上, 结合了社区中最优秀的想法和实践.
Kubernetes 为你提供的功能如下:
Kubernetes 集群架构如下:
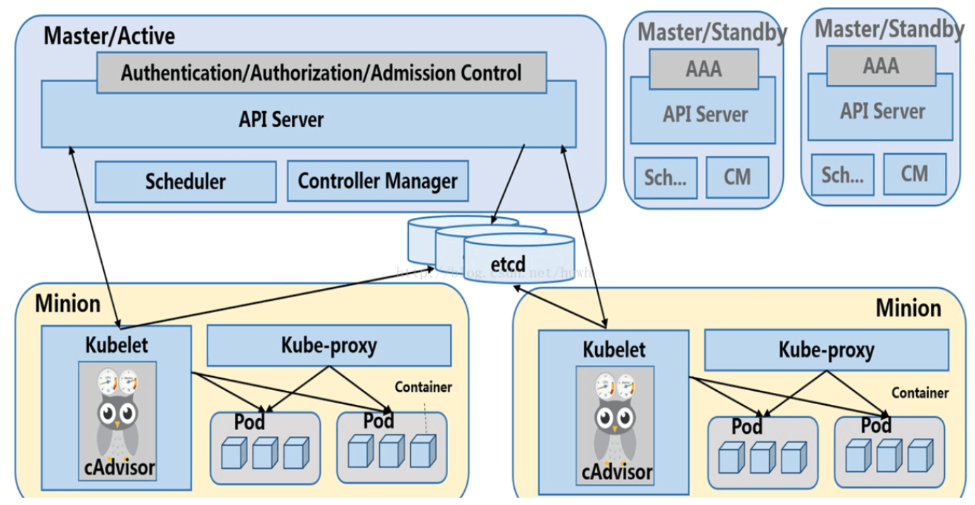
Kubernetes 集群组件如下:
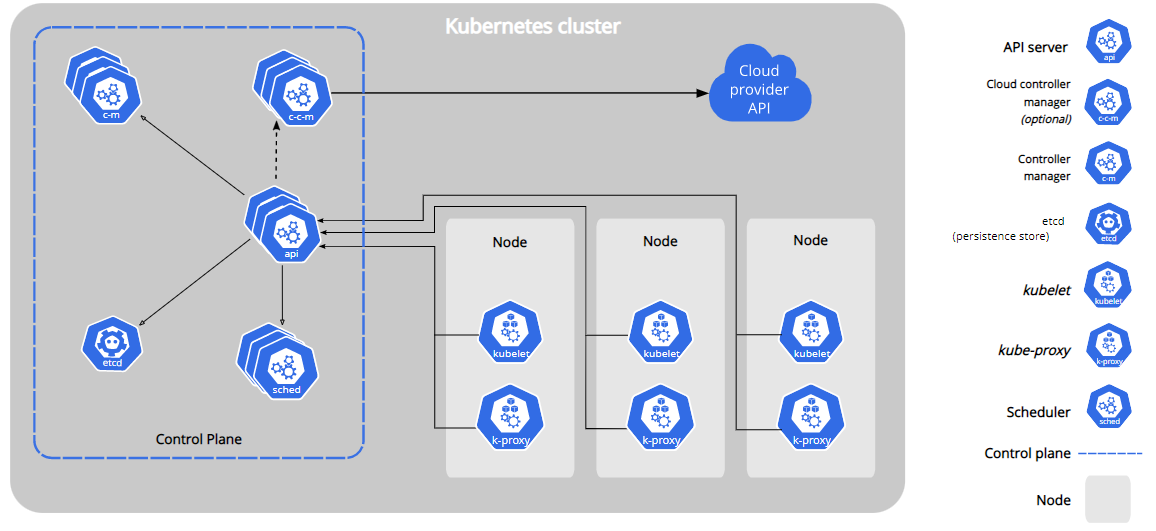
Kubernetes有两种节点类型:master节点,worker节点 。master节点又称为控制平面(Control Plane)。控制平面有很多组件,控制平面组件会为集群做出全局决策,比如资源的调度。 以及检测和响应集群事件,例如当不满足部署的 replicas 字段时, 要启动新的 pod).
控制平面组件可以在集群中的任何节点上运行。 然而,为了简单起见,设置脚本通常会在同一个计算机上启动所有控制平面组件, 并且不会在此计算机上运行用户容器.
控制平面组件如下 :
节点组件会在每个节点上运行,负责维护运行的 Pod 并提供 Kubernetes 运行环境.
node组件如下 :
先配置节点的基本环境,3个节点都要同时设置,在此以k8scludes1作为示例.
查看Ubuntu系统版本.
                          root@localhost:~# lsb_release -a
No LSB modules are available.
Distributor ID:	Ubuntu
Description:	Ubuntu 18.04.5 LTS
Release:	18.04
Codename:	bionic
首先设置主机名.
                          root@localhost:~# vim /etc/hostname

root@localhost:~# cat /etc/hostname
k8scludes1
配置节点静态IP地址(可选).
                          root@localhost:~# vim /etc/netplan/01-netcfg.yaml

root@localhost:~# cat /etc/netplan/01-netcfg.yaml
network:
  version: 2
  renderer: networkd
  ethernets:
    ens32:
      dhcp4: no
      addresses: [192.168.110.128/24]
      gateway4: 192.168.110.2
      nameservers:
        addresses: [192.168.110.2,114.114.114.114]
使配置生效.
root@localhost:~# netplan apply
测试机器是否可以访问网络.
                          root@localhost:~# ping www.baidu.com
PING www.baidu.com (14.215.177.39) 56(84) bytes of data.
64 bytes from www.baidu.com (14.215.177.39): icmp_seq=1 ttl=128 time=48.0 ms
64 bytes from www.baidu.com (14.215.177.39): icmp_seq=2 ttl=128 time=52.9 ms
64 bytes from www.baidu.com (14.215.177.39): icmp_seq=3 ttl=128 time=39.8 ms
^C
--- www.baidu.com ping statistics ---
3 packets transmitted, 3 received, 0% packet loss, time 2009ms
rtt min/avg/max/mdev = 39.843/46.940/52.968/5.417 ms
配置IP地址和主机名映射.
                          root@localhost:~# ifconfig
ens32: flags=4163<UP,BROADCAST,RUNNING,MULTICAST>  mtu 1500
        inet 192.168.110.128  netmask 255.255.255.0  broadcast 192.168.110.255
        inet6 fe80::20c:29ff:fe92:3462  prefixlen 64  scopeid 0x20<link>
        ether 00:0c:29:92:34:62  txqueuelen 1000  (Ethernet)
        RX packets 3600  bytes 909889 (909.8 KB)
        RX errors 0  dropped 0  overruns 0  frame 0
        TX packets 2327  bytes 225443 (225.4 KB)
        TX errors 0  dropped 0 overruns 0  carrier 0  collisions 0

lo: flags=73<UP,LOOPBACK,RUNNING>  mtu 65536
        inet 127.0.0.1  netmask 255.0.0.0
        inet6 ::1  prefixlen 128  scopeid 0x10<host>
        loop  txqueuelen 1000  (Local Loopback)
        RX packets 54  bytes 6421 (6.4 KB)
        RX errors 0  dropped 0  overruns 0  frame 0
        TX packets 54  bytes 6421 (6.4 KB)
        TX errors 0  dropped 0 overruns 0  carrier 0  collisions 0

root@localhost:~# vim /etc/hosts

root@localhost:~# cat /etc/hosts
127.0.0.1	localhost
127.0.1.1	tom
192.168.110.128 k8scludes1
192.168.110.129 k8scludes2
192.168.110.130 k8scludes3

# The following lines are desirable for IPv6 capable hosts
::1     localhost ip6-localhost ip6-loopback
ff02::1 ip6-allnodes
ff02::2 ip6-allrouters
重启机器之后,主机名变为k8scludes1,另外两台机器也进行相同操作.
k8scludes1可以ping通其他两个节点则成功.
                          root@k8scludes1:~# ping k8scludes1
PING k8scludes1 (192.168.110.128) 56(84) bytes of data.
64 bytes from k8scludes1 (192.168.110.128): icmp_seq=1 ttl=64 time=0.014 ms
64 bytes from k8scludes1 (192.168.110.128): icmp_seq=2 ttl=64 time=0.040 ms
64 bytes from k8scludes1 (192.168.110.128): icmp_seq=3 ttl=64 time=0.058 ms
^C
--- k8scludes1 ping statistics ---
3 packets transmitted, 3 received, 0% packet loss, time 2048ms
rtt min/avg/max/mdev = 0.014/0.037/0.058/0.018 ms

root@k8scludes1:~# ping k8scludes2
PING k8scludes2 (192.168.110.129) 56(84) bytes of data.
64 bytes from k8scludes2 (192.168.110.129): icmp_seq=1 ttl=64 time=0.465 ms
64 bytes from k8scludes2 (192.168.110.129): icmp_seq=2 ttl=64 time=2.98 ms
64 bytes from k8scludes2 (192.168.110.129): icmp_seq=3 ttl=64 time=2.34 ms
^C
--- k8scludes2 ping statistics ---
3 packets transmitted, 3 received, 0% packet loss, time 2048ms
rtt min/avg/max/mdev = 0.465/1.932/2.983/1.069 ms

root@k8scludes1:~# ping k8scludes3
PING k8scludes3 (192.168.110.130) 56(84) bytes of data.
64 bytes from k8scludes3 (192.168.110.130): icmp_seq=1 ttl=64 time=0.450 ms
64 bytes from k8scludes3 (192.168.110.130): icmp_seq=2 ttl=64 time=3.71 ms
^C
--- k8scludes3 ping statistics ---
2 packets transmitted, 2 received, 0% packet loss, time 1022ms
rtt min/avg/max/mdev = 0.450/2.083/3.717/1.634 ms
配置Ubuntu软件源,软件源如下,最后三行是k8s源.
                          root@localhost:~# cat /etc/apt/sources.list
deb http://mirrors.aliyun.com/ubuntu/ bionic main restricted universe multiverse
deb-src http://mirrors.aliyun.com/ubuntu/ bionic main restricted universe multiverse

deb http://mirrors.aliyun.com/ubuntu/ bionic-security main restricted universe multiverse
deb-src http://mirrors.aliyun.com/ubuntu/ bionic-security main restricted universe multiverse

deb http://mirrors.aliyun.com/ubuntu/ bionic-updates main restricted universe multiverse
deb-src http://mirrors.aliyun.com/ubuntu/ bionic-updates main restricted universe multiverse

deb http://mirrors.aliyun.com/ubuntu/ bionic-proposed main restricted universe multiverse
deb-src http://mirrors.aliyun.com/ubuntu/ bionic-proposed main restricted universe multiverse

deb http://mirrors.aliyun.com/ubuntu/ bionic-backports main restricted universe multiverse
deb-src http://mirrors.aliyun.com/ubuntu/ bionic-backports main restricted universe multiverse

deb https://mirrors.aliyun.com/kubernetes/apt/ kubernetes-xenial main
deb [arch=amd64] https://mirrors.aliyun.com/docker-ce/linux/ubuntu bionic stable
# deb-src [arch=amd64] https://mirrors.aliyun.com/docker-ce/linux/ubuntu bionic stable
apt-key.gpg是k8s的deb源公钥,加载k8s的deb源公钥命令为:apt-key add apt-key.gpg,下载并加载k8s的deb源公钥命令为:curl -s https://packages.cloud.google.com/apt/doc/apt-key.gpg | sudo apt-key add - ; apt-get update,但是谷歌的网址访问不了,我们直接去网上下载apt-key.gpg文件.
                          #apt-key.gpg文件下载好了
root@localhost:~# ls
 apt-key.gpg
加载k8s的deb源公钥.
                          root@localhost:~# cat apt-key.gpg | apt-key add -
OK
更新软件源.
                          root@localhost:~# apt-get update
Hit:1 http://mirrors.aliyun.com/ubuntu bionic InRelease
Hit:2 http://mirrors.aliyun.com/ubuntu bionic-security InRelease
Hit:3 http://mirrors.aliyun.com/ubuntu bionic-updates InRelease
Get:4 https://mirrors.aliyun.com/kubernetes/apt kubernetes-xenial InRelease [9,383 B]
Hit:5 http://mirrors.aliyun.com/ubuntu bionic-proposed InRelease
Hit:6 http://mirrors.aliyun.com/ubuntu bionic-backports InRelease
Hit:7 https://mirrors.aliyun.com/docker-ce/linux/ubuntu bionic InRelease
Ign:8 https://mirrors.aliyun.com/kubernetes/apt kubernetes-xenial/main amd64 Packages
Get:8 https://mirrors.aliyun.com/kubernetes/apt kubernetes-xenial/main amd64 Packages [54.7 kB]
Fetched 54.7 kB in 2s (33.3 kB/s)
Reading package lists... Done
关闭防火墙.
                          root@k8scludes1:~# ufw disable
Firewall stopped and disabled on system startup
Linux swapoff命令用于关闭系统交换分区(swap area).
注意 :如果不关闭swap,就会在kubeadm初始化Kubernetes的时候报错:“[ERROR Swap]: running with swap on is not supported. Please disable swap”.
                          root@k8scludes1:~# swapoff -a ;sed -i '/swap/d' /etc/fstab

root@k8scludes1:~# cat /etc/fstab
# /etc/fstab: static file system information.
#
# Use 'blkid' to print the universally unique identifier for a
# device; this may be used with UUID= as a more robust way to name devices
# that works even if disks are added and removed. See fstab(5).
#
# <file system> <mount point>   <type>  <options>       <dump>  <pass>
/dev/mapper/tom--vg-root /               ext4    errors=remount-ro 0       1
此时基本环境就配置完毕了.
k8s是容器编排工具,需要容器管理工具,所以三个节点同时安装docker,还是以k8scludes1为例.
安装docker.
                          root@k8scludes1:~# apt-get install docker-ce
Reading package lists... Done
Building dependency tree
Reading state information... Done
The following additional packages will be installed:
  containerd.io dbus-user-session docker-ce-cli docker-ce-rootless-extras docker-scan-plugin libltdl7 pigz
 ......
Processing triggers for libc-bin (2.27-3ubuntu1.2) ...
查看docker安装包.
                          root@k8scludes	1:~# dpkg -l | grep docker
ii  docker-ce                              5:20.10.14~3-0~ubuntu-bionic                    amd64        Docker: the open-source application container engine
ii  docker-ce-cli                          5:20.10.14~3-0~ubuntu-bionic                    amd64        Docker CLI: the open-source application container engine
ii  docker-ce-rootless-extras              5:20.10.14~3-0~ubuntu-bionic                    amd64        Rootless support for Docker.
ii  docker-scan-plugin                     0.17.0~ubuntu-bionic                            amd64        Docker scan cli plugin.
设置docker开机自启动并现在启动docker.
                          root@k8scludes1:~# systemctl enable docker --now
Synchronizing state of docker.service with SysV service script with /lib/systemd/systemd-sysv-install.
Executing: /lib/systemd/systemd-sysv-install enable docker
查看docker状态.
                          root@k8scludes1:~# systemctl status docker
● docker.service - Docker Application Container Engine
   Loaded: loaded (/lib/systemd/system/docker.service; enabled; vendor preset: enabled)
   Active: active (running) since Sat 2022-04-16 21:39:46 CST; 3min 21s ago
     Docs: https://docs.docker.com
 Main PID: 1822 (dockerd)
    Tasks: 9
   CGroup: /system.slice/docker.service
           └─1822 /usr/bin/dockerd -H fd:// --containerd=/run/containerd/containerd.sock
查看docker版本.
                          root@k8scludes1:~# docker --version
Docker version 20.10.14, build a224086
注意kubernetes V1.22.2版本及其以后,要求容器的cgroup driver 为systemd,但是docker默认的cgroup driver 是cgroupfs,kubernetes 1.21版本及其之前,是不需要修改cgroup driver的.
可以使用docker info | grep -i cgroup查看cgroup driver.
                          root@k8scludes1:~# docker info | grep -i cgroup
WARNING: No swap limit support
 Cgroup Driver: cgroupfs
 Cgroup Version: 1
配置docker镜像加速器,并设置docker的cgroup driver 为systemd.
                          root@k8scludes1:~# cat > /etc/docker/daemon.json <<EOF
> {
> "registry-mirrors": ["https://frz7i079.mirror.aliyuncs.com"],
> "exec-opts": ["native.cgroupdriver=systemd"]
> }
> EOF

root@k8scludes1:~# cat /etc/docker/daemon.json
{
"registry-mirrors": ["https://frz7i079.mirror.aliyuncs.com"],
"exec-opts": ["native.cgroupdriver=systemd"]
}
重启docker.
                          root@k8scludes1:~# systemctl restart docker

root@k8scludes1:~# systemctl status docker
● docker.service - Docker Application Container Engine
   Loaded: loaded (/lib/systemd/system/docker.service; enabled; vendor preset: enabled)
   Active: active (running) since Sat 2022-04-16 21:51:29 CST; 8s ago
     Docs: https://docs.docker.com
 Main PID: 3541 (dockerd)
    Tasks: 9
   CGroup: /system.slice/docker.service
           └─3541 /usr/bin/dockerd -H fd:// --containerd=/run/containerd/containerd.sock
这时Cgroup Driver就变为systemd了.
                          root@k8scludes1:~# docker info | grep -i cgroup
 Cgroup Driver: systemd
 Cgroup Version: 1
WARNING: No swap limit support
设置iptables不对bridge的数据进行处理,启用IP路由转发功能.
                          root@k8scludes1:~# cat <<EOF> /etc/sysctl.d/k8s.conf
> net.bridge.bridge-nf-call-ip6tables = 1
> net.bridge.bridge-nf-call-iptables = 1
> net.ipv4.ip_forward = 1
> EOF
使配置生效.
                          root@k8scludes1:~# sysctl -p /etc/sysctl.d/k8s.conf
net.bridge.bridge-nf-call-ip6tables = 1
net.bridge.bridge-nf-call-iptables = 1
net.ipv4.ip_forward = 1
三个节点都安装kubelet,kubeadm,kubectl,以k8scludes1为例:
                          root@k8scludes1:~# apt-get -y install kubelet=1.22.2-00 kubeadm=1.22.2-00 kubectl=1.22.2-00
Reading package lists... Done
Building dependency tree
Reading state information... Done
The following additional packages will be installed:
  conntrack cri-tools kubernetes-cni socat
......
Unpacking kubeadm (1.22.2-00) ...
Setting up conntrack (1:1.4.4+snapshot20161117-6ubuntu2) ...
Setting up kubernetes-cni (0.8.7-00) ...
Setting up cri-tools (1.23.0-00) ...
Setting up socat (1.7.3.2-2ubuntu2) ...
Setting up kubelet (1.22.2-00) ...
Created symlink /etc/systemd/system/multi-user.target.wants/kubelet.service → /lib/systemd/system/kubelet.service.
Setting up kubectl (1.22.2-00) ...
Setting up kubeadm (1.22.2-00) ...
Processing triggers for man-db (2.8.3-2ubuntu0.1) ...
设置kubelet开机自启动并现在启动kubelet.
root@k8scludes1:~# systemctl enable kubelet --now
kubelet现在是启动不了的.
                          root@k8scludes1:~# systemctl status kubelet
● kubelet.service - kubelet: The Kubernetes Node Agent
   Loaded: loaded (/lib/systemd/system/kubelet.service; enabled; vendor preset: enabled)
  Drop-In: /etc/systemd/system/kubelet.service.d
           └─10-kubeadm.conf
   Active: activating (auto-restart) (Result: exit-code) since Sat 2022-04-16 22:07:09 CST; 7s ago
     Docs: https://kubernetes.io/docs/home/
  Process: 5282 ExecStart=/usr/bin/kubelet $KUBELET_KUBECONFIG_ARGS $KUBELET_CONFIG_ARGS $KUBELET_KUBEADM_ARGS $KUBELET_EXTRA_ARGS (code=exited, status=1/FAILURE)
 Main PID: 5282 (code=exited, status=1/FAILURE)
更新软件源.
root@k8scludes1:~# apt update
查看可得的kubeadm软件包版本.
                          root@k8scludes1:~# apt-cache madison kubeadm | grep 1.22
   kubeadm |  1.22.8-00 | https://mirrors.aliyun.com/kubernetes/apt kubernetes-xenial/main amd64 Packages
   kubeadm |  1.22.7-00 | https://mirrors.aliyun.com/kubernetes/apt kubernetes-xenial/main amd64 Packages
   kubeadm |  1.22.6-00 | https://mirrors.aliyun.com/kubernetes/apt kubernetes-xenial/main amd64 Packages
   kubeadm |  1.22.5-00 | https://mirrors.aliyun.com/kubernetes/apt kubernetes-xenial/main amd64 Packages
   kubeadm |  1.22.4-00 | https://mirrors.aliyun.com/kubernetes/apt kubernetes-xenial/main amd64 Packages
   kubeadm |  1.22.3-00 | https://mirrors.aliyun.com/kubernetes/apt kubernetes-xenial/main amd64 Packages
   kubeadm |  1.22.2-00 | https://mirrors.aliyun.com/kubernetes/apt kubernetes-xenial/main amd64 Packages
   kubeadm |  1.22.1-00 | https://mirrors.aliyun.com/kubernetes/apt kubernetes-xenial/main amd64 Packages
   kubeadm |  1.22.0-00 | https://mirrors.aliyun.com/kubernetes/apt kubernetes-xenial/main amd64 Packages
kubeadm init:在主节点k8scludes1上初始化 Kubernetes 控制平面节点.
                          root@k8scludes1:~# kubeadm init --image-repository registry.aliyuncs.com/google_containers --kubernetes-version=v1.22.2 --pod-network-cidr=10.244.0.0/16

[init] Using Kubernetes version: v1.22.2
[preflight] Running pre-flight checks
......
[bootstrap-token] Creating the "cluster-info" ConfigMap in the "kube-public" namespace
[kubelet-finalize] Updating "/etc/kubernetes/kubelet.conf" to point to a rotatable kubelet client certificate and key
[addons] Applied essential addon: CoreDNS
[addons] Applied essential addon: kube-proxy

Your Kubernetes control-plane has initialized successfully!

To start using your cluster, you need to run the following as a regular user:

  mkdir -p $HOME/.kube
  sudo cp -i /etc/kubernetes/admin.conf $HOME/.kube/config
  sudo chown $(id -u):$(id -g) $HOME/.kube/config

Alternatively, if you are the root user, you can run:

  export KUBECONFIG=/etc/kubernetes/admin.conf

You should now deploy a pod network to the cluster.
Run "kubectl apply -f [podnetwork].yaml" with one of the options listed at:
  https://kubernetes.io/docs/concepts/cluster-administration/addons/

Then you can join any number of worker nodes by running the following on each as root:

kubeadm join 192.168.110.128:6443 --token ju8p1y.8gjm5q00l6u5y1rp \
        --discovery-token-ca-cert-hash sha256:3f401b6187ed44ff8f4b50aa6453cf3eacc3b86d6a72e3bf2caba02556cb918e
进行kubeadm初始化的时候会去下载各种镜像,可以使用docker images查看.
                          root@k8scludes1:~# docker images
REPOSITORY                                                        TAG       IMAGE ID       CREATED         SIZE
registry.aliyuncs.com/google_containers/kube-apiserver            v1.22.2   e64579b7d886   7 months ago    128MB
registry.aliyuncs.com/google_containers/kube-controller-manager   v1.22.2   5425bcbd23c5   7 months ago    122MB
registry.aliyuncs.com/google_containers/kube-proxy                v1.22.2   873127efbc8a   7 months ago    104MB
registry.aliyuncs.com/google_containers/kube-scheduler            v1.22.2   b51ddc1014b0   7 months ago    52.7MB
registry.aliyuncs.com/google_containers/etcd                      3.5.0-0   004811815584   10 months ago   295MB
registry.aliyuncs.com/google_containers/coredns                   v1.8.4    8d147537fb7d   10 months ago   47.6MB
registry.aliyuncs.com/google_containers/pause                     3.5       ed210e3e4a5b   13 months ago   683kB
根据提示创建目录和配置文件.
                          root@k8scludes1:~# mkdir -p $HOME/.kube

root@k8scludes1:~# sudo cp -i /etc/kubernetes/admin.conf $HOME/.kube/config

root@k8scludes1:~# sudo chown $(id -u):$(id -g) $HOME/.kube/config
现在已经可以看到master节点了.
                          root@k8scludes1:~# kubectl get node
NAME         STATUS     ROLES                  AGE    VERSION
k8scludes1   NotReady   control-plane,master   178m   v1.22.2
接下来把另外的两个worker节点也加入到k8s集群.
kubeadm init的时候输出了如下这句.
                          kubeadm join 192.168.110.128:6443 --token ju8p1y.8gjm5q00l6u5y1rp \
        --discovery-token-ca-cert-hash sha256:3f401b6187ed44ff8f4b50aa6453cf3eacc3b86d6a72e3bf2caba02556cb918e
在另外两个worker节点执行这一命令就可以把节点加入到k8s集群里.
如果加入集群的token忘了,可以使用如下的命令获取最新的加入命令token.
                          root@k8scludes1:~# kubeadm token create --print-join-command
kubeadm join 192.168.110.128:6443 --token 4xk96a.qizykuirhn8ccvcw --discovery-token-ca-cert-hash sha256:3f401b6187ed44ff8f4b50aa6453cf3eacc3b86d6a72e3bf2caba02556cb918e
在k8scludes2执行加入集群的token命令.
                          root@k8scludes2:~# kubeadm join 192.168.110.128:6443 --token 4xk96a.qizykuirhn8ccvcw --discovery-token-ca-cert-hash sha256:3f401b6187ed44ff8f4b50aa6453cf3eacc3b86d6a72e3bf2caba02556cb918e
[preflight] Running pre-flight checks
[preflight] Reading configuration from the cluster...
[preflight] FYI: You can look at this config file with 'kubectl -n kube-system get cm kubeadm-config -o yaml'
[kubelet-start] Writing kubelet configuration to file "/var/lib/kubelet/config.yaml"
[kubelet-start] Writing kubelet environment file with flags to file "/var/lib/kubelet/kubeadm-flags.env"
[kubelet-start] Starting the kubelet
[kubelet-start] Waiting for the kubelet to perform the TLS Bootstrap...

This node has joined the cluster:
* Certificate signing request was sent to apiserver and a response was received.
* The Kubelet was informed of the new secure connection details.

Run 'kubectl get nodes' on the control-plane to see this node join the cluster.
可以发现worker节点加入到k8s集群后多了两个镜像.
                          root@k8scludes2:~# docker images
REPOSITORY                                      TAG       IMAGE ID       CREATED         SIZE
registry.aliyuncs.com/google_containers/pause   3.5       ed210e3e4a5b   13 months ago   683kB
registry.aliyuncs.com/google_containers/kube-proxy   v1.22.2   873127efbc8a   7 months ago    104MB
在k8scludes3执行加入集群的token命令.
                          root@k8scludes3:~# kubeadm join 192.168.110.128:6443 --token 4xk96a.qizykuirhn8ccvcw --discovery-token-ca-cert-hash sha256:3f401b6187ed44ff8f4b50aa6453cf3eacc3b86d6a72e3bf2caba02556cb918e
[preflight] Running pre-flight checks
[preflight] Reading configuration from the cluster...
[preflight] FYI: You can look at this config file with 'kubectl -n kube-system get cm kubeadm-config -o yaml'
[kubelet-start] Writing kubelet configuration to file "/var/lib/kubelet/config.yaml"
[kubelet-start] Writing kubelet environment file with flags to file "/var/lib/kubelet/kubeadm-flags.env"
[kubelet-start] Starting the kubelet
[kubelet-start] Waiting for the kubelet to perform the TLS Bootstrap...

This node has joined the cluster:
* Certificate signing request was sent to apiserver and a response was received.
* The Kubelet was informed of the new secure connection details.

Run 'kubectl get nodes' on the control-plane to see this node join the cluster.
可以发现worker节点加入到k8s集群后多了两个镜像.
                          root@k8scludes3:~# docker images
REPOSITORY                                           TAG       IMAGE ID       CREATED         SIZE
registry.aliyuncs.com/google_containers/kube-proxy   v1.22.2   873127efbc8a   7 months ago    104MB
registry.aliyuncs.com/google_containers/pause        3.5       ed210e3e4a5b   13 months ago   683kB
在k8scludes1查看节点状态,可以看到两个worker节点都加入到了k8s集群.
                          root@k8scludes1:~# kubectl get nodes
NAME         STATUS     ROLES                  AGE    VERSION
k8scludes1   NotReady   control-plane,master   3h2m   v1.22.2
k8scludes2   NotReady   <none>                 60s    v1.22.2
k8scludes3   NotReady   <none>                 57s    v1.22.2
虽然现在kubernetes集群已经有1个master节点,2个worker节点,但是此时三个节点的状态都是NotReady的, 原因是没有CNI网络插件 ,为了节点间的通信,需要安装cni网络插件, 常用的cni网络插件有calico和flannel,两者区别为:flannel不支持复杂的网络策略,calico支持网络策略,因为今后还要配置kubernetes网络策略networkpolicy,所以本文选用的cni网络插件为calico! 。
现在去官网下载calico.yaml文件:
官网: https://projectcalico.docs.tigera.io/about/about-calico 。
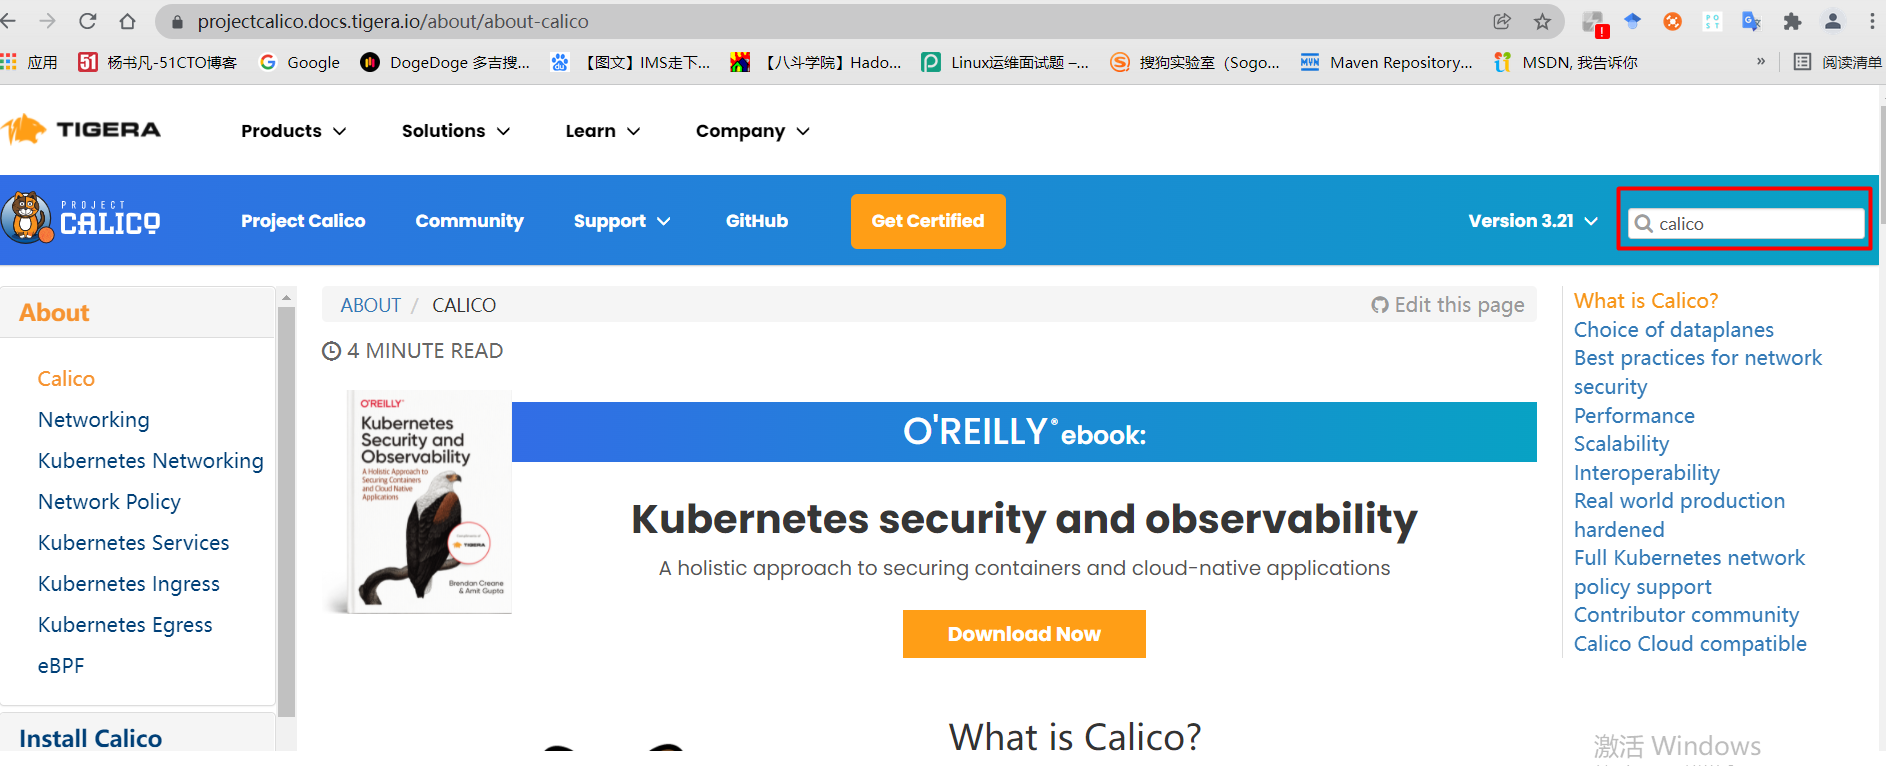
搜索框里直接搜索calico.yaml.
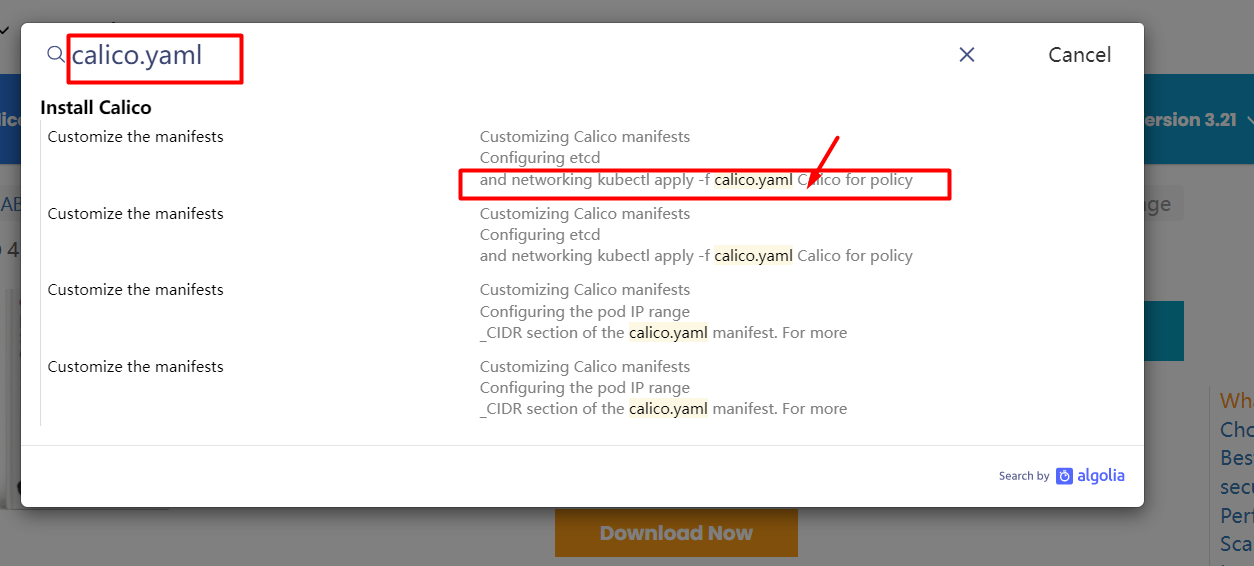
找到下载calico.yaml的命令.
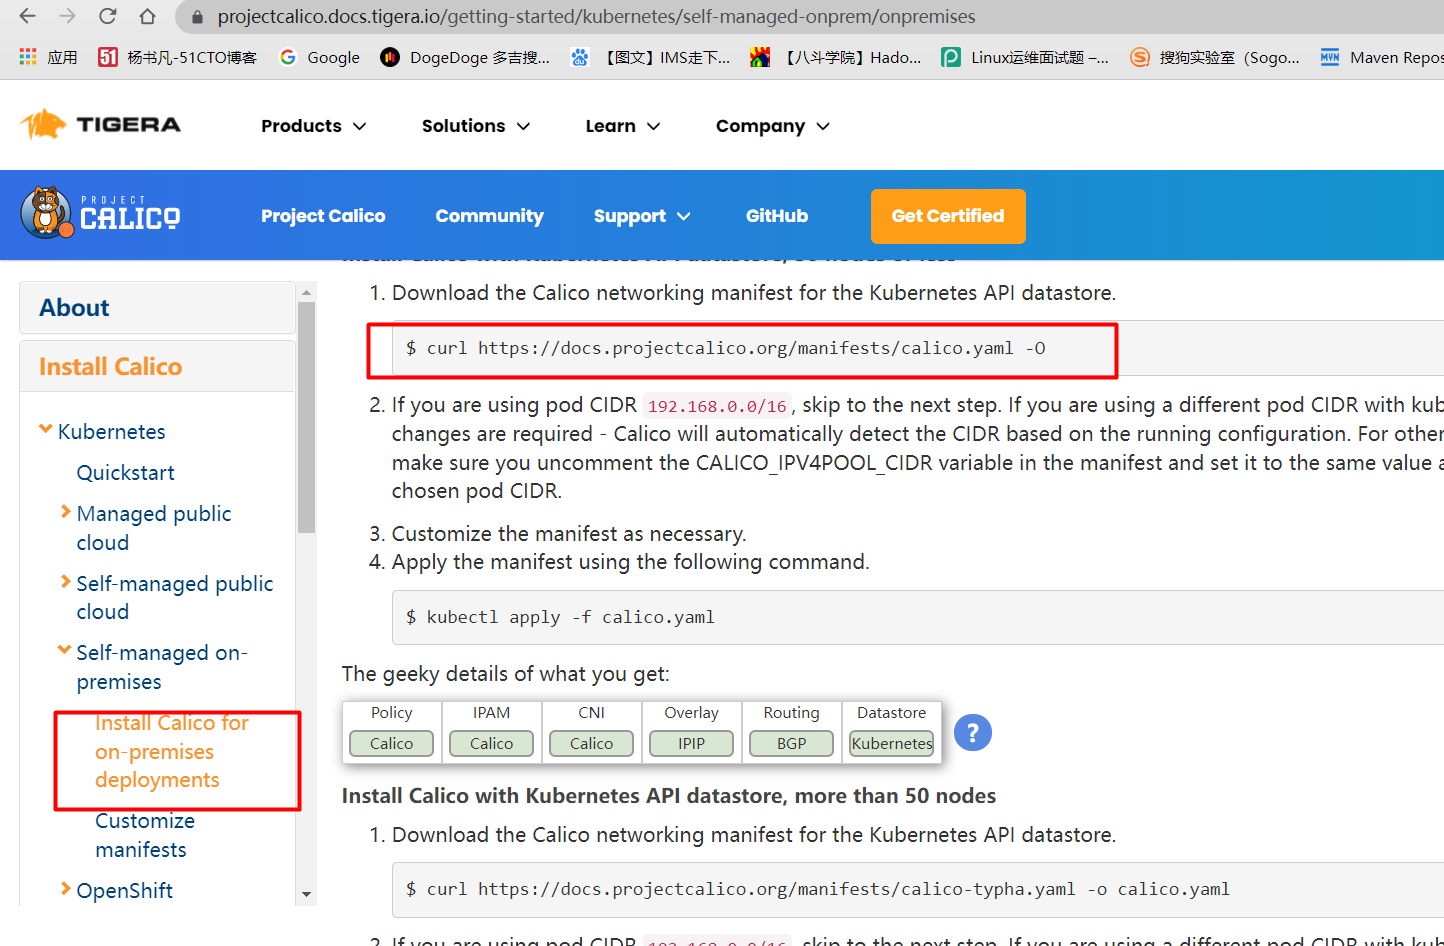
下载calico.yaml文件.
                          root@k8scludes1:~# curl https://docs.projectcalico.org/manifests/calico.yaml -O
  % Total    % Received % Xferd  Average Speed   Time    Time     Time  Current
                                 Dload  Upload   Total   Spent    Left  Speed
100  212k  100  212k    0     0   8736      0  0:00:24  0:00:24 --:--:-- 18568

root@k8scludes1:~# ls
aa.txt  apt-key.gpg  calico.yaml  set.sh
查看需要下载的calico镜像.
                          root@k8scludes1:~# grep image calico.yaml
          image: docker.io/calico/cni:v3.22.2
          image: docker.io/calico/cni:v3.22.2
          image: docker.io/calico/pod2daemon-flexvol:v3.22.2
          image: docker.io/calico/node:v3.22.2
          image: docker.io/calico/kube-controllers:v3.22.2
这四个镜像需要在所有节点都下载,以k8scloudes1为例.
                          root@k8scludes1:~# docker pull docker.io/calico/cni:v3.22.2

root@k8scludes1:~# docker pull docker.io/calico/pod2daemon-flexvol:v3.22.2

root@k8scludes1:~# docker pull docker.io/calico/node:v3.22.2

root@k8scludes1:~# docker pull docker.io/calico/kube-controllers:v3.22.2
此时三个节点都有calico镜像了.
                          root@k8scludes1:~# docker images | grep calico
calico/kube-controllers                                           v3.22.2   a1a88662416b   2 days ago      132MB
calico/cni                                                        v3.22.2   be7dfc21ba2e   2 days ago      236MB
calico/pod2daemon-flexvol                                         v3.22.2   d6660bf471e1   2 days ago      19.7MB
calico/node                                                       v3.22.2   fd1608dbbc19   2 days ago      198MB

root@k8scludes2:~# docker images | grep calico
calico/kube-controllers                         v3.22.2   a1a88662416b   2 days ago      132MB
calico/cni                                      v3.22.2   be7dfc21ba2e   2 days ago      236MB
calico/pod2daemon-flexvol                       v3.22.2   d6660bf471e1   2 days ago      19.7MB
calico/node                                     v3.22.2   fd1608dbbc19   2 days ago      198MB

root@k8scludes3:~# docker images | grep calico
calico/kube-controllers                              v3.22.2   a1a88662416b   2 days ago      132MB
calico/cni                                           v3.22.2   be7dfc21ba2e   2 days ago      236MB
calico/pod2daemon-flexvol                            v3.22.2   d6660bf471e1   2 days ago      19.7MB
calico/node                                          v3.22.2   fd1608dbbc19   2 days ago      198MB
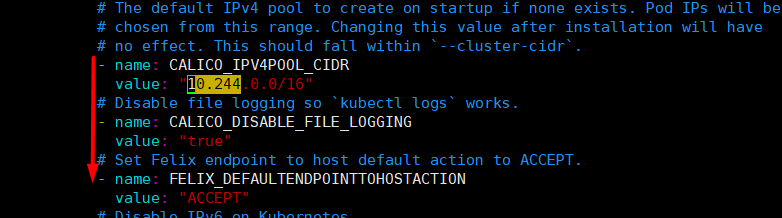
修改calico.yaml 文件,CALICO_IPV4POOL_CIDR的IP段要和kubeadm初始化时候的pod网段一致,注意格式要对齐,不然会报错.
                          root@k8scludes1:~# vim calico.yaml

root@k8scludes1:~# cat calico.yaml | egrep "CALICO_IPV4POOL_CIDR|"10.244""
            - name: CALICO_IPV4POOL_CIDR
              value: "10.244.0.0/16"
不直观的话看图片:修改calico.yaml 文件.
应用calico.yaml文件.
                          root@k8scludes1:~# kubectl apply -f calico.yaml
configmap/calico-config created
customresourcedefinition.apiextensions.k8s.io/bgpconfigurations.crd.projectcalico.org created
customresourcedefinition.apiextensions.k8s.io/bgppeers.crd.projectcalico.org created
......
clusterrolebinding.rbac.authorization.k8s.io/calico-kube-controllers created
clusterrole.rbac.authorization.k8s.io/calico-node created
clusterrolebinding.rbac.authorization.k8s.io/calico-node created
daemonset.apps/calico-node created
serviceaccount/calico-node created
deployment.apps/calico-kube-controllers created
serviceaccount/calico-kube-controllers created
Warning: policy/v1beta1 PodDisruptionBudget is deprecated in v1.21+, unavailable in v1.25+; use policy/v1 PodDisruptionBudget
poddisruptionbudget.policy/calico-kube-controllers created
查看calico pod.
                          root@k8scludes1:~# kubectl get pod -A | grep calico
kube-system   calico-kube-controllers-65898446b5-gtsz6   1/1     Running             0          58s
kube-system   calico-node-d6564                          1/1     Running             0          59s
kube-system   calico-node-jgvjb                          0/1     Running             0          59s
kube-system   calico-node-snkxp                          1/1     Running             0          59s
此时发现三个节点都是Ready状态了.
                          root@k8scludes1:~# kubectl get node
NAME         STATUS   ROLES                  AGE     VERSION
k8scludes1   Ready    control-plane,master   3h44m   v1.22.2
k8scludes2   Ready    <none>                 42m     v1.22.2
k8scludes3   Ready    <none>                 42m     v1.22.2
查看kubectl自动补全命令.
                          root@k8scludes1:~# kubectl --help | grep bash
  completion    Output shell completion code for the specified shell (bash or zsh)
添加source <(kubectl completion bash)到/etc/profile,并使配置生效.
                          root@k8scludes1:~# vim /etc/profile

root@k8scludes1:~# cat /etc/profile | head -3
# /etc/profile: system-wide .profile file for the Bourne shell (sh(1))
# and Bourne compatible shells (bash(1), ksh(1), ash(1), ...).
source <(kubectl completion bash)

root@k8scludes1:~# source /etc/profile
此时即可kubectl命令tab键自动补全.
                          root@k8scludes1:~# kubectl get nodes
NAME         STATUS   ROLES                  AGE     VERSION
k8scludes1   Ready    control-plane,master   3h46m   v1.22.2
k8scludes2   Ready    <none>                 45m     v1.22.2
k8scludes3   Ready    <none>                 45m     v1.22.2
至此,我们已经成功在Ubuntu 18.04上安装并部署了Kubernetes 1.22.2集群。你现在可以开始创建和管理你的Kubernetes资源了.
最后此篇关于Ubuntu安装部署Kubernetes(k8s)集群的文章就讲到这里了,如果你想了解更多关于Ubuntu安装部署Kubernetes(k8s)集群的内容请搜索CFSDN的文章或继续浏览相关文章,希望大家以后支持我的博客! 。
31
4
 0
0
我正在尝试使用以下命令在远程 Ubuntu 服务器的后台运行进程: sshpass -p PASSWORD ssh root@HOST 'nohup COMMAND-THAT-BLOCKS &' 不幸
普通 Ubuntu 和 ARM Ubuntu 有什么区别。我可以运行所有应用程序吗也在 ARM Ubuntu 中的普通 Ubuntu 下运行? Ubuntu 更新会自动发生吗? Torrent 下载器
关闭。这个问题是off-topic .它目前不接受答案。 想改进这个问题? Update the question所以它是on-topic对于堆栈溢出。 9年前关闭。 Improve this que
我正在尝试预置 Xenial 图像,它工作得很好,除了分区。 cloud-init 只能增长根分区,并且在使用扩展分区内的根文件系统构建镜像时不起作用: NAME MAJ:MIN RM SIZ
我对 Ubuntu 和 OpenFoam 真的很陌生,所以尝试学习并做一些教程。我正在使用 Docker 在 Ubuntu 上使用 OpenFoam。 我将文件夹复制到特定目录,但是当我尝试使用终端访
我在使用系统启动设置运行软件时遇到问题。我有 ubuntu 20.04。我试图将这些行插入到 etc/rc.local #!/bin/bash /usr/bin/clamonacc 它不起作用。第二次
TARGETS = client server CL_OBJ = clientMain.o Controller.o UI.o List.o Movie.o Server.o Serializer.o
我有一个 ubuntu服务器系统是8.04 hardy ,我在哪里安装rabbitmq。 rabbitmq依赖于 erlang-nox (>= 1:12.b.3) ,但是在当前的 ubuntu 版本中
我有一个用于开发的 Ubuntu virtualbox 设置。当我在文件中处于 org-mode 时,org-mode 的任何热键都不起作用(例如 M-RETURN 用于创建新标题)。我该怎么做才能让
我的 SchemaCrawler(版本 15.01.03)模式图在 Ubuntu 18.04 LTS 上截断表名。看起来表格通常被画得太窄,因为“[TABLE]”符号也开箱即用。在我的 Mac 上渲染
在 Ubuntu 中,设置应用程序中有几个地方有一个非常漂亮的 ListView ,带有添加/删除按钮,包括外观、键盘布局、隐私、蓝牙等。他们使用什么小部件?我开始使用 Glade 开发我的第一个 U
需要帮助卸载 jjrofiler。没有意识到它需要许可证。通过 .sh 可执行文件安装。 最佳答案 如果您转到 jProfiler 安装目录,您将找到名为 uninstall 的可执行文件,只需从终端
我一直在寻找几天,我没有想出解决方案。我是 ruby 新手,但我想通过使用 spree 开发自己的在线商店。 我使用:rails:Rails 3.2.13 ruby :ruby-1.9.3-p42
我尝试使用以下命令从/usr/local/bin 中删除我的 python2.7 和 python3 文件夹:sudo rm -rf python2.7 和 sudo rm -rf python3。后
在 ubuntu 服务器中(使用 ssh 协议(protocol)), 如何更改因不活动而断开连接的时间? 最佳答案 你能在 .bash_profile 中加入“exec screen -R”,在 .
我使用以下配置在 /etc/apache2/site-available/mysite.local 中创建了一个虚拟主机: ServerAdmin webmaster@localhost
我为大约 210 个用户新设置了一个代理服务器。它运行 ubuntu server 2012 和 squid3。问题是在凌晨 1:30 之后,如果用户尝试打开 google.com、youtube.c
gitlab-ci-multi-runner 1.0.2 (ea19241) Using Shell executor... Running on ip-... Cloning repository.
我有一个备份服务器,它每小时接收许多 rsync 连接。由于打开太多 rsync 实例可能会导致崩溃,我想使用 Semaphore 来限制并发实例的数量。 .我的想法是这样的: ssh root@ba
我有同一个库的多个版本,我的程序动态链接到这些库。有时我想更改使用的版本。 我一直在阅读,出于安全原因,新版本的 Ubuntu 不再支持 LD_LIBRARY_PATH。我可以将路径添加到 /etc/

我是一名优秀的程序员,十分优秀!