
 个人中心
个人中心 文章发布
文章发布
作者热门文章
- Java锁的逻辑(结合对象头和ObjectMonitor)
- 还在用饼状图?来瞧瞧这些炫酷的百分比可视化新图形(附代码实现)⛵
- 自动注册实体类到EntityFrameworkCore上下文,并适配ABP及ABPVNext
- 基于Sklearn机器学习代码实战


 30
30
 4
4


这里分类和汇总了欣宸的全部原创(含配套源码): https://github.com/zq2599/blog_demos 。
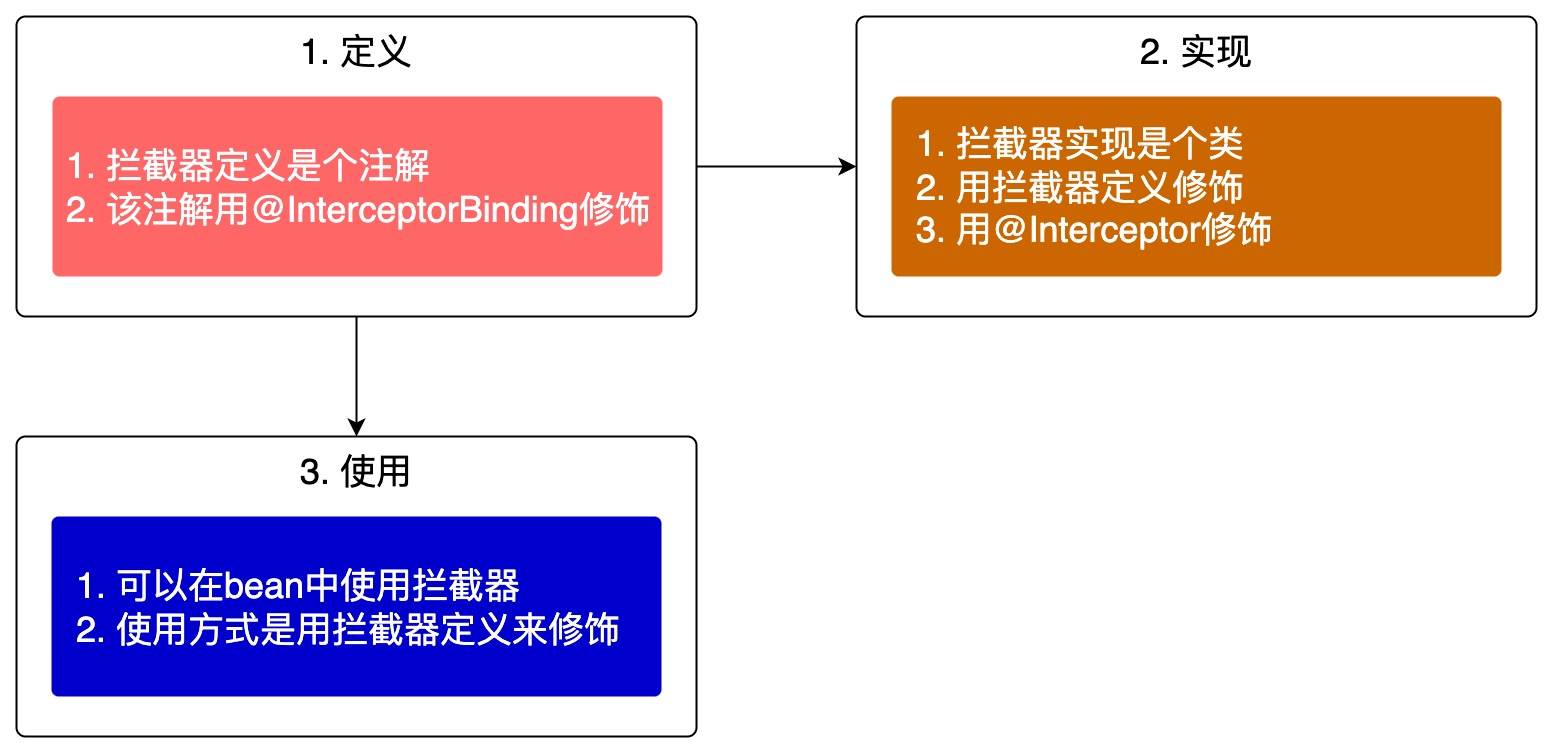
                          package com.bolingcavalry.interceptor.define;

import javax.interceptor.InterceptorBinding;
import java.lang.annotation.ElementType;
import java.lang.annotation.Retention;
import java.lang.annotation.RetentionPolicy;
import java.lang.annotation.Target;
import static java.lang.annotation.ElementType.TYPE;

@InterceptorBinding
@Target({TYPE, ElementType.METHOD})
@Retention(RetentionPolicy.RUNTIME)
public @interface TrackLifeCycle {
}
package com.bolingcavalry.interceptor.impl;
import com.bolingcavalry.interceptor.define.TrackLifeCycle;
import io.quarkus.arc.Priority;
import io.quarkus.logging.Log;
import javax.annotation.PostConstruct;
import javax.annotation.PreDestroy;
import javax.interceptor.AroundConstruct;
import javax.interceptor.Interceptor;
import javax.interceptor.InvocationContext;
@TrackLifeCycle
@Interceptor
@Priority(Interceptor.Priority.APPLICATION + 1)
public class LifeCycleInterceptor {
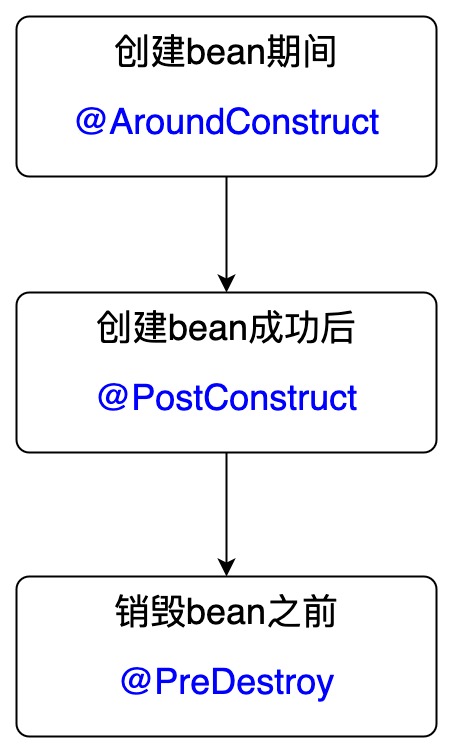
@AroundConstruct
void execute(InvocationContext context) throws Exception {
Log.info("start AroundConstruct");
try {
context.proceed();
} catch (Exception e) {
e.printStackTrace();
}
Log.info("end AroundConstruct");
}
@PostConstruct
public void doPostConstruct(InvocationContext ctx) {
Log.info("life cycle PostConstruct");
}
@PreDestroy
public void doPreDestroy(InvocationContext ctx) {
Log.info("life cycle PreDestroy");
}
}
                          @ApplicationScoped
@TrackLifeCycle
public class Hello {

    public Hello() {
        Log.info(this.getClass().getSimpleName() + " at instance");
    }

    public void helloWorld() {
        Log.info("Hello world!");
    }
}
                          @QuarkusTest
public class LifeCycleTest {

    @Inject
    Hello hello;

    @Test
    public void testLifyCycle() {
        hello.helloWorld();
    }
}
                          15:26:32,447 INFO  [io.quarkus] (main) Quarkus 2.7.3.Final on JVM started in 2.899s. Listening on: http://localhost:8081
15:26:32,448 INFO  [io.quarkus] (main) Profile test activated.
15:26:32,448 INFO  [io.quarkus] (main) Installed features: [agroal, cdi, narayana-jta, resteasy, smallrye-context-propagation, vertx]
15:26:32,483 INFO  [com.bol.lif.Hello] (main) Hello_ClientProxy at instance
15:26:33,040 INFO  [com.bol.int.imp.LifeCycleInterceptor] (main) start AroundConstruct
15:26:33,040 INFO  [com.bol.lif.Hello] (main) Hello_Subclass at instance
15:26:33,040 INFO  [com.bol.int.imp.LifeCycleInterceptor] (main) end AroundConstruct
15:26:33,041 INFO  [com.bol.int.imp.LifeCycleInterceptor] (main) life cycle PostConstruct
15:26:33,041 INFO  [com.bol.lif.Hello] (main) Hello world!
15:26:33,097 INFO  [com.bol.int.imp.LifeCycleInterceptor] (main) life cycle PreDestroy
15:26:33,128 INFO  [io.quarkus] (main) Quarkus stopped in 0.075s
                          public class CachingMovieLister {

  @PostConstruct
  public void populateMovieCache() {
      // populates the movie cache upon initialization...
  }

  @PreDestroy
  public void clearMovieCache() {
      // clears the movie cache upon destruction...
  }
}
                          @ApplicationScoped
@TrackLifeCycle
public class Hello {

    public Hello() {
        Log.info(this.getClass().getSimpleName() + " at instance");
    }

    @PostConstruct
    public void doPostConstruct() {
        Log.info("at doPostConstruct");
    }

    @PreDestroy
    public void doPreDestroy() {
        Log.info("at PreDestroy");
    }

    public void helloWorld() {
        Log.info("Hello world!");
    }
}
                          16:27:54,134 INFO  [io.quarkus] (main) Quarkus 2.7.3.Final on JVM started in 2.529s. Listening on: http://localhost:8081
16:27:54,135 INFO  [io.quarkus] (main) Profile test activated.
16:27:54,135 INFO  [io.quarkus] (main) Installed features: [agroal, cdi, narayana-jta, resteasy, smallrye-context-propagation, vertx]
16:27:54,147 INFO  [com.bol.lif.Hello] (main) Hello_ClientProxy at instance
16:27:54,710 INFO  [com.bol.int.imp.LifeCycleInterceptor] (main) start AroundConstruct
16:27:54,711 INFO  [com.bol.lif.Hello] (main) Hello_Subclass at instance
16:27:54,711 INFO  [com.bol.int.imp.LifeCycleInterceptor] (main) end AroundConstruct
16:27:54,711 INFO  [com.bol.int.imp.LifeCycleInterceptor] (main) life cycle PostConstruct
16:27:54,712 INFO  [com.bol.lif.Hello] (main) at doPostConstruct
16:27:54,712 INFO  [com.bol.lif.Hello] (main) Hello world!
16:27:54,747 INFO  [com.bol.int.imp.LifeCycleInterceptor] (main) life cycle PreDestroy
16:27:54,747 INFO  [com.bol.lif.Hello] (main) at PreDestroy
16:27:54,765 INFO  [io.quarkus] (main) Quarkus stopped in 0.044s
                          package com.bolingcavalry.service.impl;

import io.quarkus.logging.Log;

/**
 * @author zq2599@gmail.com
 * @Title: 资源管理类
 * @Package
 * @Description:
 * @date 4/10/22 10:20 AM
 */
public class ResourceManager {

    public ResourceManager () {
        Log.info("create instance, " + this.getClass().getSimpleName());
    }

    /**
     * 假设再次方法中打开资源,如网络、文件、数据库等
     */
    public void open() {
        Log.info("open resource here");
    }

    /**
     * 假设在此方法中关闭所有已打开的资源
     */
    public void closeAll() {
        Log.info("close all resource here");
    }
}
                          package com.bolingcavalry.config;

import com.bolingcavalry.service.impl.ResourceManager;
import javax.enterprise.context.RequestScoped;

public class SelectBeanConfiguration {

    @RequestScoped
    public ResourceManager getResourceManager() {
        return new ResourceManager();
    }
}
                          package com.bolingcavalry;

import com.bolingcavalry.service.impl.ResourceManager;

import javax.inject.Inject;
import javax.ws.rs.GET;
import javax.ws.rs.Path;
import javax.ws.rs.Produces;
import javax.ws.rs.core.MediaType;

@Path("/resourcemanager")
public class ResourceManagerController {

    @Inject
    ResourceManager resourceManager;

    @GET
    @Produces(MediaType.TEXT_PLAIN)
    public String get() {
        resourceManager.open();
        return "success";
    }
}
                          /**
 * 使用了Disposes注解后,ResourceManager类型的bean在销毁前,此方法都会执行
 * @param resourceManager
 */
public void closeResource(@Disposes ResourceManager resourceManager) {
    // 在这里可以做一些额外的操作,不需要bean参与
    Log.info("do other things that bean do not care");

    // 也可以执行bean的方法
    resourceManager.closeAll();
}
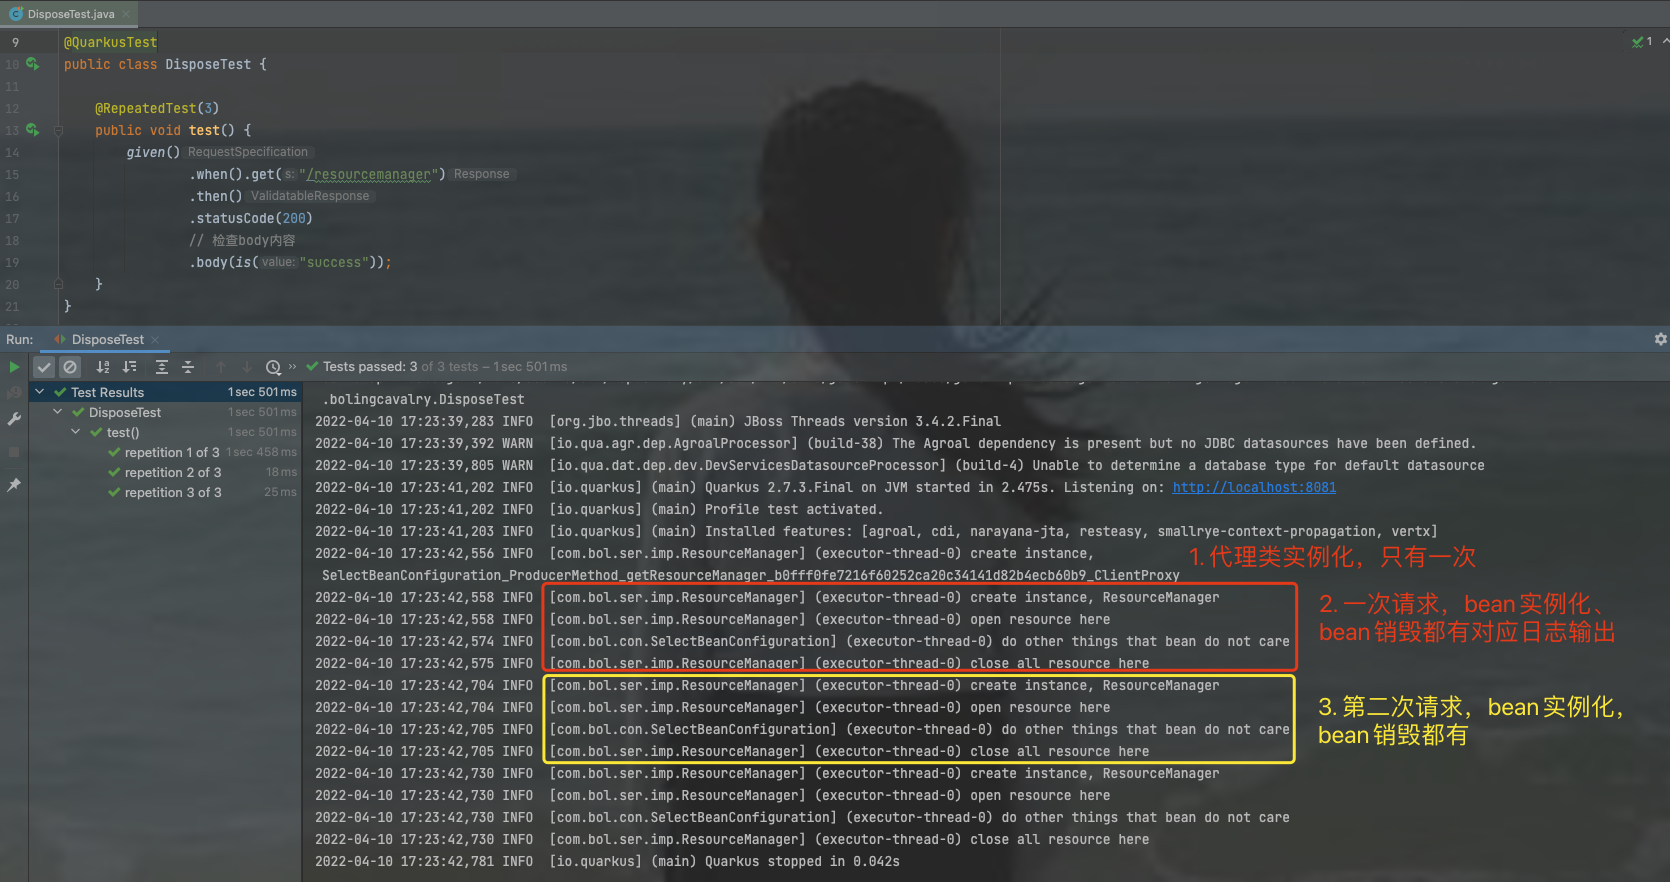
                          @QuarkusTest
public class DisposeTest {

    @RepeatedTest(3)
    public void test() {
        given()
                .when().get("/resourcemanager")
                .then()
                .statusCode(200)
                // 检查body内容
                .body(is("success"));
    }
}
学习路上,你不孤单,欣宸原创一路相伴... 。
最后此篇关于quarkus依赖注入之七:生命周期回调的文章就讲到这里了,如果你想了解更多关于quarkus依赖注入之七:生命周期回调的内容请搜索CFSDN的文章或继续浏览相关文章,希望大家以后支持我的博客! 。
30
4
 0
0
我正在尝试测试依赖于其他服务 authService 的服务 documentViewer angular .module('someModule') .service('docu
如果我的网站上线(不要认为它会,目前它只是一个学习练习)。 我一直在使用 mysql_real_escape_string();来自 POST、SERVER 和 GET 的数据。另外,我一直在使用 i
我有以下代码,它容易受到 SQL 注入(inject)的攻击(我认为?): $IDquery = mysqli_query($connection, "SELECT `ID` FROM users W
我一直在自学如何创建扩展,以期将它们用于 CSS 注入(inject)(以及最终以 CSS 为载体的 SVG 注入(inject),但那是以后的问题)。 这是我当前的代码: list .json {
这个简单的代码应该通过 Java Spring 实现一个简单的工厂。然而结果是空指针,因为 Human 对象没有被注入(inject)对象(所以它保持空)。 我做错了什么? 谢谢 配置 @Config
我正在编写一个 ASP.NET MVC4 应用程序,它最终会动态构建一个 SQL SELECT 语句,以便稍后存储和执行。动态 SQL 的结构由用户配置以用户友好的方式确定,具有标准复选框、下拉列表和
首先让我说我是我为确保 SQL 注入(inject)攻击失败而采取的措施的知己。所有 SQL 查询值都是通过事件记录准备语句完成的,所有运算符(如果不是硬编码)都是通过数字白名单系统完成的。这意味着如
这是 SQL 映射声称可注入(inject)的负载: user=-5305' UNION ALL SELECT NULL,CONCAT(0x716b6b7071,0x4f5577454f76734
我正在使用 Kotlin 和 Android 架构组件(ViewModel、LiveData)构建一个新的 Android 应用程序的架构,并且我还使用 Koin 作为我的依赖注入(inject)提供
假设 RequestScope 处于 Activity 状态(使用 cdi-unit 的 @InRequestScope) 给定 package at.joma.stackoverflow.cdi;
我有一个搜索表单,可以在不同的提供商中搜索。 我从拥有一个基本 Controller 开始 public SearchController : Controller { protected r
SQLite 注入 如果您的站点允许用户通过网页输入,并将输入内容插入到 SQLite 数据库中,这个时候您就面临着一个被称为 SQL 注入的安全问题。本章节将向您讲解如何防止这种情况的发生,确保脚
我可以从什么 dll 中获得 Intercept 的扩展?我从 http://github.com/danielmarbach/ninject.extensions.interception 添加了
使用 NInject 解析具有多个构造函数的类似乎不起作用。 public class Class1 : IClass { public Class1(int param) {...} public
我有一个 MetaManager 类: @Injectable() export class MetaManager{ constructor(private handlers:Handler
我是 Angular 的新手,我不太清楚依赖注入(inject)是如何工作的。我的问题是我有依赖于服务 B 的服务 A,但是当我将服务 A 注入(inject)我的测试服务 B 时,服务 B 变得未定
我正在为我的项目使用 android 应用程序启动、刀柄和空间。我在尝试排队工作时遇到错误: com.test E/WM-WorkerFactory: Could not instantiate co
我不确定这是什么糖语法,但让我向您展示问题所在。 def factors num (1..num).select {|n| num % n == 0} end def mutual_factors
简单的问题,我已经看过这个了:Managing imports in Scalaz7 ,但我不知道如何最小化注入(inject) right和 left方法到我的对象中以构造 \/ 的实例. 我确实尝
在我的 Aurelia SPA 中,我有一些我想在不同模块中使用的功能。它依赖于调用时给出的参数和单例的参数。有没有办法创建一个导出函数,我可以将我的 Auth 单例注入(inject)其中,而不必在

我是一名优秀的程序员,十分优秀!