- Java锁的逻辑(结合对象头和ObjectMonitor)
- 还在用饼状图?来瞧瞧这些炫酷的百分比可视化新图形(附代码实现)⛵
- 自动注册实体类到EntityFrameworkCore上下文,并适配ABP及ABPVNext
- 基于Sklearn机器学习代码实战
文章链接:
基于GPT搭建私有知识库聊天机器人(一)实现原理 。
基于GPT搭建私有知识库聊天机器人(二)环境安装 。
基于GPT搭建私有知识库聊天机器人(三)向量数据训练 。
基于GPT搭建私有知识库聊天机器人(四)问答实现 。
基于GPT搭建私有知识库聊天机器人(五)函数调用 。
在前几篇文章中,我们已经了解了如何使用 GPT 模型来搭建一个简单的聊天机器人,并在后端使用私有知识库来提供答案.
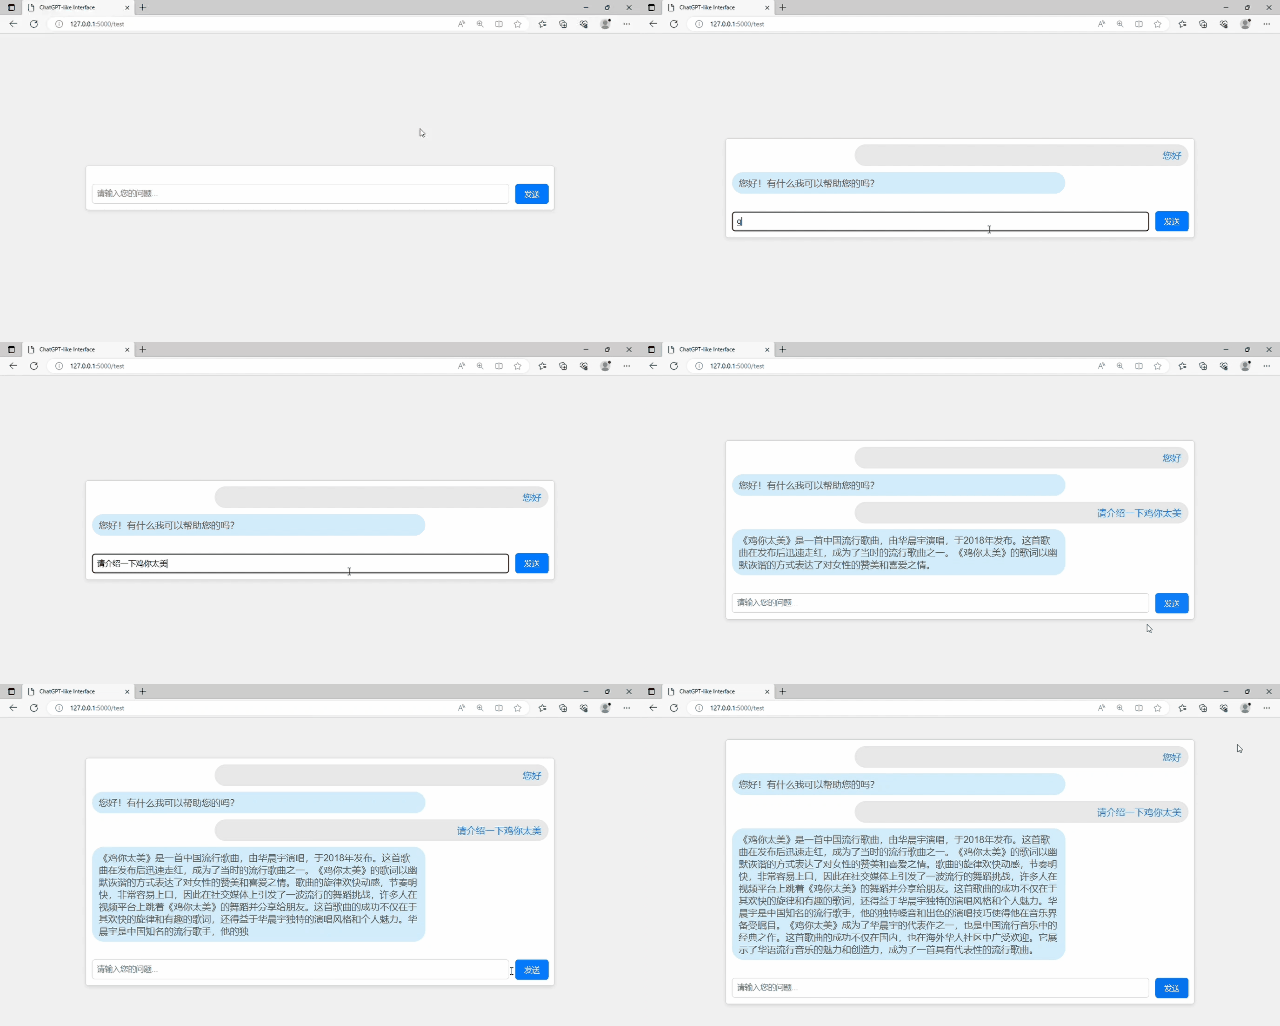
现在,我们将继续改进我们的聊天界面,实现类似chatGPT打字机的效果聊天,避免长时间等待接口数据返回,以提升用户体验.

PS:一本正经的胡说八道 。
在本篇文章中,我们将使用 SSE 技术来实现打字机效果输出。SSE 是一种 HTML5 技术,允许服务器向客户端推送数据,而不需要客户端主动请求。通过 SSE,我们可以在服务器端有新消息时,实时将消息推送到前端,从而实现动态的聊天效果.

首先,我们需要编写前端的JavaScript 代码,以便使用 SSE 技术与服务器进行实时通信.
                          <!DOCTYPE html>
<html>
<head>
    <title>ChatGPT-like Interface</title>
    <link rel="stylesheet" href="static/styles.css">
</head>
<body>
    <div class="chat-container">
        <div class="chat-history" id="chatHistory">
            <!-- Chat messages will be dynamically added here -->
        </div>
        <div class="user-input">
            <input type="text" id="userInput" placeholder="请输入您的问题...">
            <button id="sendButton">发送</button>
        </div>
    </div>

    <script>
        // Your existing chat interface code here...

        // Server communication code
        var eventSource; // Declare the eventSource variable outside the click handler

        document.getElementById("sendButton").addEventListener("click", function () {
            var userMessage = document.getElementById("userInput").value.trim();
            if (userMessage === '') {
                alert('Please enter a message!');
                return;
            }

            appendMessage('user', userMessage); // Add the user's message to the chat history

            // Close the previous SSE connection (if exists)
            if (eventSource) {
                eventSource.close();
            }

            // Establish SSE connection with the user's message as a parameter
            eventSource = new EventSource(`/print_stream?question=${encodeURIComponent(userMessage)}`);

            eventSource.onmessage = function (event) {
                var botMessage = event.data;
                appendMessage('bot', botMessage);
            };

            eventSource.onerror = function (error) {
                console.error("Error occurred with SSE connection:", error);
                // Handle the error if necessary
                isFirstToken = true;
                eventSource.close();
            };
            document.getElementById("userInput").value = '';
        });
        var chatHistoryDiv = document.getElementById("chatHistory"); // 获取 chatHistory 的元素
        var isFirstToken = true; // 用于跟踪是否是第一次返回 token
        function appendMessage(sender, message) {
            if (isFirstToken) {
                // 如果是第一次返回 token,创建新的 <div> 元素,并将 isFirstToken 设置为 false
                var messageDiv = document.createElement('div');
                messageDiv.className = `chat-message ${sender === 'user' ? 'user-message' : 'bot-message'}`;
                chatHistoryDiv.appendChild(messageDiv);
                if(sender === 'bot') {
                    isFirstToken = false;
                }
            } else {
                // 如果不是第一次返回 token,直接获取最后一个 <div> 元素,将新的消息内容追加到现有的元素中
                var messageDiv = chatHistoryDiv.lastElementChild;
            }
            messageDiv.innerText += message; // 将新的消息内容追加到 <div> 中
            chatHistoryDiv.scrollTop = chatHistoryDiv.scrollHeight; // 将滚动条滚动到最底部
        }
    </script>
</body>
</html>
为了实现对话效果,我们需要调整 CSS 样式表中的部分样式。以下是 CSS 样式表:
                          body {
    font-family: Arial, sans-serif;
    background-color: #f0f0f0;
    margin: 0;
    padding: 0;
    display: flex;
    justify-content: center;
    align-items: center;
    min-height: 100vh;
}

.chat-container {
    width: 800px;
    border: 1px solid #ccc;
    border-radius: 5px;
    box-shadow: 0 2px 6px rgba(0, 0, 0, 0.1);
    background-color: #fff;
    overflow: hidden;
}

.chat-history {
    max-height: 800px;
    overflow-y: auto;
    padding: 10px;
}

.chat-message {
    margin-bottom: 10px;
    padding: 8px 12px;
    border-radius: 20px;
    max-width: 70%; /* 设置最大宽度,使得消息在一行中不会过长 */
    align-self: flex-end; /* 靠右显示 */
    word-wrap: break-word; /* 处理长文本的自动换行 */
    overflow-wrap: break-word; /* 处理长文本的自动换行 */
}

.user-message {
    color: #007bff;
    background-color: #e6e6e6; /* 用户消息气泡背景色 */
    text-align: right; /* 靠右显示文本内容 */
    align-self: flex-end; /* 靠右显示气泡 */
    margin-left: auto; /* 添加额外的间距,让气泡靠右 */
}

.bot-message {
    color: #555;
    background-color: #d9edf7; /* 机器人消息气泡背景色 */
    text-align: left; /* 靠左显示文本内容 */
    align-self: flex-start; /* 靠左显示气泡 */
    margin-right: auto; /* 添加额外的间距,让气泡靠左 */
}


.user-input {
    display: flex;
    align-items: center;
    padding: 10px;
}

#userInput {
    flex-grow: 1;
    padding: 8px;
    border: 1px solid #ccc;
    border-radius: 5px;
    margin-right: 10px;
}

#sendButton {
    padding: 8px 15px;
    border: none;
    border-radius: 5px;
    background-color: #007bff;
    color: #fff;
    cursor: pointer;
}

#sendButton:hover {
    background-color: #0056b3;
}
本文依旧使用的langchain框架实现访问openAI,以及利用回调函数接收token数据.
首先,是API入口:
                          from flask import Flask, request, Response, stream_with_context

@app.route("/print_stream")
def print_stream():
    question = request.args.get('question')
    ans = search_schedule(question)

    return Response(stream_with_context(ans), content_type='text/event-stream')
其次,是访问openAI代码(不太了解的可以看下前几篇文章):
                          def search_schedule(query: str) -> str:
    stream_to_web = StreamToWeb()
    llm = ChatOpenAI(temperature=0,
                     model="gpt-3.5-turbo-0613",
                     callback_manager=CallbackManager([stream_to_web]),
                     streaming=True
                     )
    bus_tools = [BusTool()]
    open_ai_agent = initialize_agent(bus_tools,
                                     llm,
                                     agent=AgentType.OPENAI_FUNCTIONS,
                                     verbose=True)
    chain_thread = threading.Thread(target=process_query,
                                    kwargs={"question": query,
                                            "open_ai_agent": open_ai_agent})
    chain_thread.start()
    resp = stream_to_web.generate_tokens()
    return resp
注意:上面调用openai部分代码必须使用异步执行,才能做到一边接收返回token,一边返回前端,否则无法实现打字机效果.
最后,打字机效果核心代码:
                          class StreamToWeb(StreamingStdOutCallbackHandler):
    def __init__(self):
        self.tokens = []
        # 记得结束后这里置true
        self.finish = False

    def on_llm_new_token(self, token: str, **kwargs):
        self.tokens.append(token)

    def on_llm_end(self, response: any, **kwargs: any) -> None:
        self.finish = 1

    def on_llm_error(self, error: Exception, **kwargs: any) -> None:
        print(str(error))
        self.tokens.append(str(error))

    def generate_tokens(self):
        while not self.finish or self.tokens:
            if self.tokens:
                data = self.tokens.pop(0)
                yield f"data: {data}\n\n"
            else:
                pass
注意: yield f"data: {data}\n\n" ,data是前端接受数据的参数,\n\n在SSE要求中必须添加.
通过使用 SSE 技术和打字机样式输出,我们成功改进了聊天机器人的界面,实现了更加动态和流畅的聊天体验。这样的用户界面使得聊天机器人更加接近真实对话,提升了用户体验.
最后此篇关于基于GPT搭建私有知识库聊天机器人(六)仿chatGPT打字机效果的文章就讲到这里了,如果你想了解更多关于基于GPT搭建私有知识库聊天机器人(六)仿chatGPT打字机效果的内容请搜索CFSDN的文章或继续浏览相关文章,希望大家以后支持我的博客! 。
我可以使用 javascript 和其他所有东西,但在重新发明轮子之前,我想知道是否已经有一个类似的 jquery 插件,因为我想使用那个框架而不是 mootools。 我没有钱的问题,特别是 5 欧
我正在 React 应用程序中处理动画。我需要动画在悬停 后开始工作。我尝试了 :hover:after css 但不起作用。将鼠标悬停在图像上后动画可以工作,但我需要在悬停后开始。将鼠标悬停在图像上
我正在使用 jQuery 在按钮单击时实现 slider 效果。我的代码是: $(document).ready(function() { $("#mybutton").click(functio
我需要一个div标签在屏幕右侧滑出,如何使用jQuery获得这种效果?我一直在看这里:http://api.jquery.com/category/effects/sliding/而且这似乎不是我要找
我正在使用此代码实现页面 curl 效果......它在模拟器和设备中工作正常......但它不是(setType:@“pageCurl”)苹果记录的api,这导致它被iPhone拒绝App Stor
我见过各种关于 WPF 效果的引用,但它们似乎是针对位图的,而不是针对文本的。是否可以将除模糊或投影以外的效果应用于XAML中的TextBlock对象? 我想要做的示例可能是轮廓笔划,或斜角/浮雕效果
我见过各种关于 WPF 效果的引用,但它们似乎是针对位图的,而不是针对文本的。是否可以将除模糊或投影以外的效果应用于XAML中的TextBlock对象? 我想要做的示例可能是轮廓笔划,或斜角/浮雕效果
我正在尝试模拟这种效果:http://meyerweb.com/eric/css/edge/complexspiral/demo.html在我的博客上:http://segment6.blogspot
我尝试将样式应用到 Accordion Pane ,但遇到了问题。 这行不通。 accordion.setEffect(new DropShadow(BlurType.ONE_PASS_BOX, Co
关于 Datatables website 的教程足够清楚了: 在我告诉 Datatables 我正在谈论哪一列后,我只需将切换按钮放入: column.visible( ! column.visib
我正在寻找 scratchOut 效果,随便叫它什么。 这是从前景中删除图像的效果,因此背景图像变得可见。 我曾尝试使用 jquery 插件重新创建此效果,但它并不像我希望的那样流畅。 有没有人有这种
本文实例讲述了android实现文字和图片混排(文字环绕图片)效果。分享给大家供大家参考,具体如下: 在平时我们做项目中,或许有要对一张图片或者某一个东西进行文字和图片说明,这时候要求排版美观,所
本文实例讲述了Javafx简单实现【我的电脑资源管理器】效果。分享给大家供大家参考。具体如下: 1. java代码: ?
我是 ngrx 的新手,正在尝试让我的 ngrx 商店的 @Effect 函数正常工作。下面的代码显示了如果我没有使用 ngrx 商店,服务是如何工作的。我首先调用 http.get 来获取列表,然后
基本上我搜索了很多,解决方案建议应用一些 PNG 掩码或不提供所需的解决方案。 我发现了什么。 ffmpeg -i main.mkv -i facecloseup.mkv -filter_compl
有关使用从商店中选择的状态的效果的 Ngrx 文档状态(没有双关语意) Note: For performance reasons, use a flattening operator like co
我有一个数据网格控件,我在其中使用名为 FastShadow 的自定义效果,它就像一个光晕。 我希望效果在其边界之外发光,这样很好,但是当我在顶部绘制另一个形状时,我不希望这个形状受到影响。在本例中,
除了子 div.exception 中的所有内容,我想将 div.main 中的所有文本设为灰色。 div.exception 应该看起来好像类 main 从未添加到父 div。 这可能吗?如果是这样
我有一个 PDF 文件,我想重现此包页面中的页面 curl 效果: https://pub.flutter-io.cn/packages/page_turn 我试过用这个 page_turn插件,它需
我想测试一个效果如下: 如果调度了 LoadEntriesSucces 操作,则效果开始 等待 5 秒 5 秒后发送 http 请求 当响应到达时,将分派(dispatch)新的操作(取决于响应是成功

我是一名优秀的程序员,十分优秀!