- Java锁的逻辑(结合对象头和ObjectMonitor)
- 还在用饼状图?来瞧瞧这些炫酷的百分比可视化新图形(附代码实现)⛵
- 自动注册实体类到EntityFrameworkCore上下文,并适配ABP及ABPVNext
- 基于Sklearn机器学习代码实战
@ 。
IdentityServer4是一个开源的OpenID Connect和OAuth 2.0框架,它实现了这些规范中的所有必需功能.
OAuth 2.0支持多种认证模式,本文主要介绍客户端授权模式认证。客户端授权模式流程如下图所示:
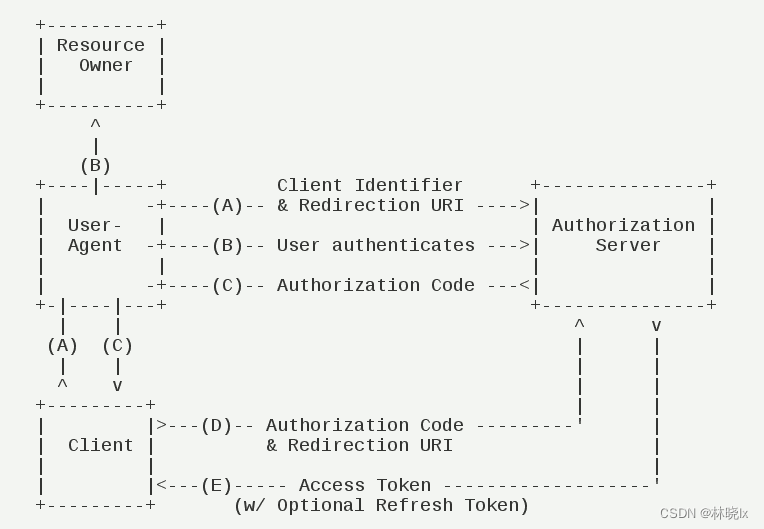
(A)用户访问客户端,后者将前者导向认证服务器.
(B)用户选择是否给予客户端授权.
(C)假设用户给予授权,认证服务器将用户导向客户端事先指定的"重定向URI"(redirection URI),同时附上一个授权码.
(D)客户端收到授权码,附上早先的"重定向URI",向认证服务器申请令牌。这一步是在客户端的后台的服务器上完成的,对用户不可见.
(E)认证服务器核对了授权码和重定向URI,确认无误后,向客户端发送访问令牌(access token)和更新令牌(refresh token).
更多关于OAuth 2.0的介绍,可以参考阮一峰的 理解OAuth 2.0 .
Client是第三方应用,它获得资源所有者的授权后便可以去访问资源。通常第三方登录中的第三方应用就是Client。如微博登录、QQ登录等.
要使用OAuth API需要先注册Client。通常,授权服务器需要提供一个管理页面,其中设置第三方应用的信息,包括应用名称、应用网站地址、应用简介、应用logo、授权回调地址等.
在本示例中,Client的注册是通过SeedData实现的。SeedData是在应用启动时自动执行的,它可以用来初始化数据库,如创建初始用户、角色、权限、和创建Client.
使用Abp.Cli创建一个认证服务分离的项目, 。
在认证服务项目AuthServer中打开appsettings.json,将vue的地址( http://localhost:8081 )配置到ClientUrl和RedirectAllowedUrls 。
                            "App": {
    "SelfUrl": "https://localhost:44350",
    "ClientUrl": "http://localhost:8081",
    "CorsOrigins": "https://*.Matoapp.com,https://localhost:44328,https://localhost:44377,http://localhost:8081,http://localhost:8082,http://localhost:8083",
    "RedirectAllowedUrls": "http://localhost:8081/continue,https://localhost:44380,https://localhost:44328,https://localhost:44369"
  },
项目中已经包含了一个SeedData类和一些配置,我们需要理解并修改这些配置.
我们将创建一个名为Matoapp的Client 。
appsettings.json配置如下 。
                          "OpenIddict": {
    "Applications": {
      "Matoapp_App": {
        "ClientId": "Matoapp_App",
        "RootUrl": "http://localhost:8081"
      },
      ...
    }
}
在OpenIddictDataSeedContributor中配置ClientType为 public ; 。
grantTypes为 authorization_code 和 password ; 。
scopes为该项目的服务名称以及需要的额外userinfo信息; 。
redirectUri客户端的回调地址。设置为 http://localhost:8081/continue .
完整的CreateApplicationsAsync方法如下:
                          private async Task CreateApplicationsAsync()
{
    var commonScopes = new List<string>
    {
        OpenIddictConstants.Permissions.Scopes.Address,
        OpenIddictConstants.Permissions.Scopes.Email,
        OpenIddictConstants.Permissions.Scopes.Phone,
        OpenIddictConstants.Permissions.Scopes.Profile,
        OpenIddictConstants.Permissions.Scopes.Roles,
        "Matoapp",
    };

    var configurationSection = _configuration.GetSection("OpenIddict:Applications");


    //Console Test / Angular Client
    var consoleAndAngularClientId = configurationSection["Matoapp_App:ClientId"];
    if (!consoleAndAngularClientId.IsNullOrWhiteSpace())
    {
        var consoleAndAngularClientRootUrl = configurationSection["Matoapp_App:RootUrl"]?.TrimEnd('/');
        await CreateApplicationAsync(
            name: consoleAndAngularClientId!,
            type: OpenIddictConstants.ClientTypes.Public,
            consentType: OpenIddictConstants.ConsentTypes.Implicit,
            displayName: "Console Test / Angular Application",
            secret: null,
            grantTypes: new List<string>
            {
                OpenIddictConstants.GrantTypes.AuthorizationCode,
                OpenIddictConstants.GrantTypes.Password,
            },
            scopes: commonScopes,
            redirectUri: $"{consoleAndAngularClientRootUrl}/continue",
            clientUri: consoleAndAngularClientRootUrl,
            postLogoutRedirectUri: consoleAndAngularClientRootUrl,
                permissions: new List<string> {
                OpenIddictConstants.Permissions.Scopes.Roles,
                OpenIddictConstants.Permissions.Scopes.Profile,
                OpenIddictConstants.Permissions.Scopes.Email,
                OpenIddictConstants.Permissions.Scopes.Address,
                OpenIddictConstants.Permissions.Scopes.Phone,
                "Matoapp",
                }
        );
    }
    ...
}
我们将使用oidc-client-ts简化Vue中的OAuth2.0授权。有关oidc-client-ts的更多信息,请参阅 oidc-client-ts 。
创建一个vue项目,前端使用element-ui 。
安装oidc-client-ts 。
yarn add oidc-client-ts
创建vue-oidc-client.ts文件,编写代码如下:
                          // vue 2 version
import Router from 'vue-router'
import Vue from 'vue'
import {
  UserManagerSettings,
  Log,
  User,
  UserManager,
  UserProfile,
  WebStorageStateStore,
  UserManagerEvents
} from 'oidc-client-ts'

/**
 * Indicates the sign in behavior.
 */
export enum SignInType {
  /**
   * Uses the main browser window to do sign-in.
   */
  Window,
  /**
   * Uses a popup window to do sign-in.
   */
  Popup
}

/**
 * Logging level values used by createOidcAuth().
 */
export enum LogLevel {
  /**
   * No logs messages.
   */
  None = 0,
  /**
   * Only error messages.
   */
  Error = 1,
  /**
   * Error and warning messages.
   */
  Warn = 2,
  /**
   * Error, warning, and info messages.
   */
  Info = 3,
  /**
   * Everything.
   */
  Debug = 4
}


/**
 * Creates an openid-connect auth instance.
 * @param authName - short alpha-numeric name that identifies the auth instance for routing purposes.
 * This is used to generate default redirect urls (slugified) and identifying routes that needs auth.
 * @param defaultSignInType - the signin behavior when `signIn()` and `signOut()` are called.
 * @param appUrl - url to the app using this instance for routing purposes. Something like `https://domain/app/`.
 * @param oidcConfig - config object for oidc-client.
 * See https://github.com/IdentityModel/oidc-client-js/wiki#configuration for details.
 * @param logger - logger used by oidc-client. Defaults to console.
 * @param logLevel - minimum level to log. Defaults to LogLevel.Error.
 */
export function createOidcAuth(
  authName: string,
  defaultSignInType: SignInType,
  appUrl: string,
  oidcConfig: UserManagerSettings,
) {
  // arg check
  if (!authName) {
    throw new Error('Auth name is required.')
  }
  if (
    defaultSignInType !== SignInType.Window &&
    defaultSignInType !== SignInType.Popup
  ) {
    throw new Error('Only window or popup are valid default signin types.')
  }
  if (!appUrl) {
    throw new Error('App base url is required.')
  }
  if (!oidcConfig) {
    throw new Error('No config provided to oidc auth.')
  }


  const nameSlug = slugify(authName)

  // merge passed oidcConfig with defaults
  const config = {
    automaticSilentRenew: true,
    userStore: new WebStorageStateStore({
      store: sessionStorage
    }),
    ...oidcConfig // everything can be overridden!
  }

  const mgr = new UserManager(config)

  let _inited = false
  const auth = new Vue({
    data() {
      return {
        user: null as User | null,
        myRouter: null as Router | null
      }
    },
    computed: {
      appUrl(): string {
        return appUrl
      },
      authName(): string {
        return authName
      },
      isAuthenticated(): boolean {
        return !!this.user && !this.user.expired
      },
      accessToken(): string {
        return !!this.user && !this.user.expired ? this.user.access_token : ''
      },
      userProfile(): UserProfile {
        return !!this.user && !this.user.expired
          ? this.user.profile
          : {
            iss: '',
            sub: '',
            aud: '',
            exp: 0,
            iat: 0
          }
      },
      events(): UserManagerEvents {
        return mgr.events
      }
    },

    methods: {
      startup() {
        let isCB = false // CB = callback
        if (matchesPath(config.popup_redirect_uri)) {
          mgr.signinPopupCallback()
          isCB = true
        } else if (matchesPath(config.silent_redirect_uri)) {
          mgr.signinSilentCallback()
          isCB = true
        } else if (matchesPath(config.popup_post_logout_redirect_uri)) {
          mgr.signoutPopupCallback()
          isCB = true
        }
        if (isCB) return Promise.resolve(false)

        if (_inited) {
          return Promise.resolve(true)
        } else {
          // load user from storage
          return mgr
            .getUser()
            .then(test => {
              _inited = true
              if (test && !test.expired) {
                this.user = test
              }
              return true
            })
            .catch(err => {
              return false
            })
        }
      },
      signIn(args?: any) {
        return signInReal(defaultSignInType, args)
      },
      signOut(args?: any) {
        if (defaultSignInType === SignInType.Popup) {
          const router = this.myRouter
          return mgr
            .signoutPopup(args)
            .then(() => {
              redirectAfterSignout(router)
            })
            .catch(() => {
              // could be window closed
              redirectAfterSignout(router)
            })
        }
        return mgr.signoutRedirect(args)
      },
      startSilentRenew() {
        mgr.startSilentRenew()
      },
      stopSilentRenew() {
        mgr.stopSilentRenew()
      }
    }
  })

  function signInIfNecessary() {
    if (auth.myRouter) {
      const current = auth.myRouter.currentRoute
      if (current && current.meta.authName === authName) {
        signInReal(defaultSignInType, { state: { current } })
          .then(() => {
            // auth.myRouter()
          })
          .catch(() => {
            setTimeout(signInIfNecessary, 5000)
          })
        // window.location.reload();
        // auth.myRouter.go(); //replace('/');
      }
    }
  }

  function signInReal(type: SignInType, args?: any) {
    switch (type) {
      case SignInType.Popup:
        return mgr.signinPopup(args)
      // case SignInType.Silent:
      //   return mgr.signinSilent(args)
    }
    return mgr.signinRedirect(args)
  }

  function redirectAfterSignout(router: Router | null) {
    if (router) {
      const current = router.currentRoute
      if (current && current.meta.authName === authName) {
        router.replace('/')
        return
      }
    }
    //   window.location.reload(true);
    if (appUrl) window.location.href = appUrl
  }

  /**
   * Translates user manager events to vue events and perform default actions
   * if necessary.
   */
  function handleManagerEvents() {
    mgr.events.addUserLoaded(user => {
      auth.user = user
    })

    mgr.events.addUserUnloaded(() => {
      auth.user = null

      // redirect if on protected route (best method here?)
      // signInIfNecessary()
    })

    mgr.events.addAccessTokenExpired(() => {
      auth.user = null
      signInIfNecessary()
      // if (auth.isAuthenticated) {
      //   mgr
      //     .signinSilent()
      //     .then(() => {
      //       Log.debug(`${authName} auth silent signin after token expiration`)
      //     })
      //     .catch(() => {
      //       Log.debug(
      //         `${authName} auth silent signin error after token expiration`
      //       )
      //       signInIfNecessary()
      //     })
      // }
    })

    mgr.events.addSilentRenewError(e => {
      // TODO: need to restart renew manually?
      if (auth.isAuthenticated) {
        setTimeout(() => {
          mgr.signinSilent()
        }, 5000)
      } else {
        signInIfNecessary()
      }
    })

    mgr.events.addUserSignedOut(() => {
      auth.user = null
      signInIfNecessary()
    })
  }

  handleManagerEvents()
  return auth
}

// general utilities

/**
 * Gets the path portion of a url.
 * @param url - full url
 * @returns
 */
function getUrlPath(url: string) {
  const a = document.createElement('a')
  a.href = url
  let p = a.pathname
  if (p[0] !== '/') p = '/' + p
  return p
}

/**
 * Checks if current url's path matches given url's path.
 * @param {String} testUrl - url to test against.
 */
function matchesPath(testUrl: string) {
  return (
    window.location.pathname.toLocaleLowerCase() ===
    getUrlPath(testUrl).toLocaleLowerCase()
  )
}

function slugify(str: string) {
  str = str.replace(/^\s+|\s+$/g, '') // trim
  str = str.toLowerCase()

  // remove accents, swap ñ for n, etc
  const from = 'ãàáäâẽèéëêìíïîõòóöôùúüûñç·/_,:;'
  const to = 'aaaaaeeeeeiiiiooooouuuunc------'
  for (let i = 0, l = from.length; i < l; i++) {
    str = str.replace(new RegExp(from.charAt(i), 'g'), to.charAt(i))
  }

  str = str
    .replace(/[^a-z0-9 -]/g, '') // remove invalid chars
    .replace(/\s+/g, '-') // collapse whitespace and replace by -
    .replace(/-+/g, '-') // collapse dashes

  return str
}
这里基于 vue-oidc-client 进行修改,因为vue-oidc-client是基于oidc-client,而oidc-client已经不再维护,所以我们使用oidc-client-ts 。
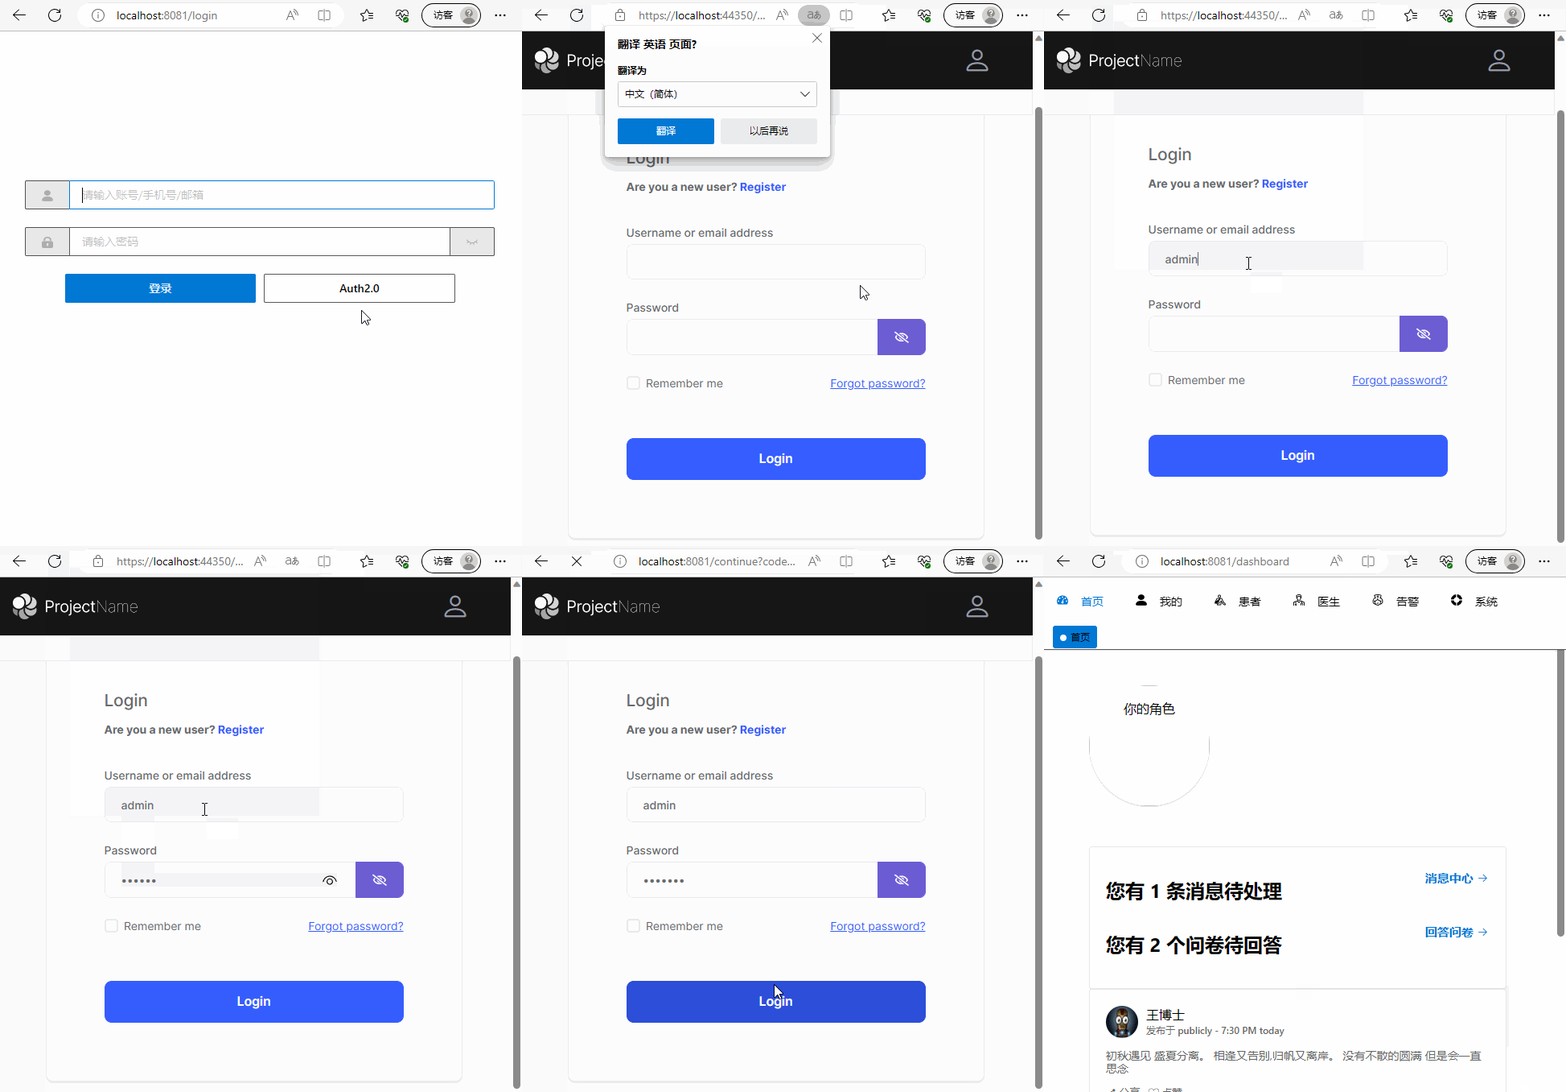
在登录页面login/index.vue中,添加OAuth2.0认证跳转按钮 。
                          <el-row
    type="flex"
    class="row-bg"
    justify="center"
    :gutter="10"
  >
    <el-col :span="10">
      <el-button
        :loading="loading"
        type="primary"
        @click.native.prevent="handleLogin"
      >
        登录
      </el-button>
    </el-col>
    <el-col :span="10">
      <el-button
        :loading="loading"
        @click.native.prevent="handleLoginAuth2"
      >
        Auth2.0
      </el-button>
    </el-col>
  </el-row>
</el-form>
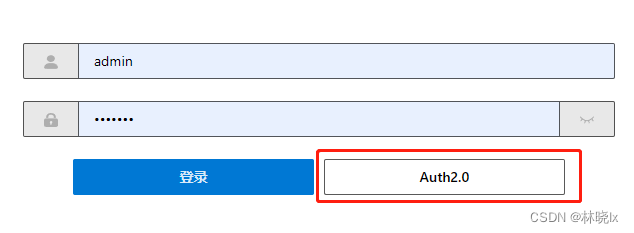
点击跳转后,自动跳转到认证服务器的登录页面 。
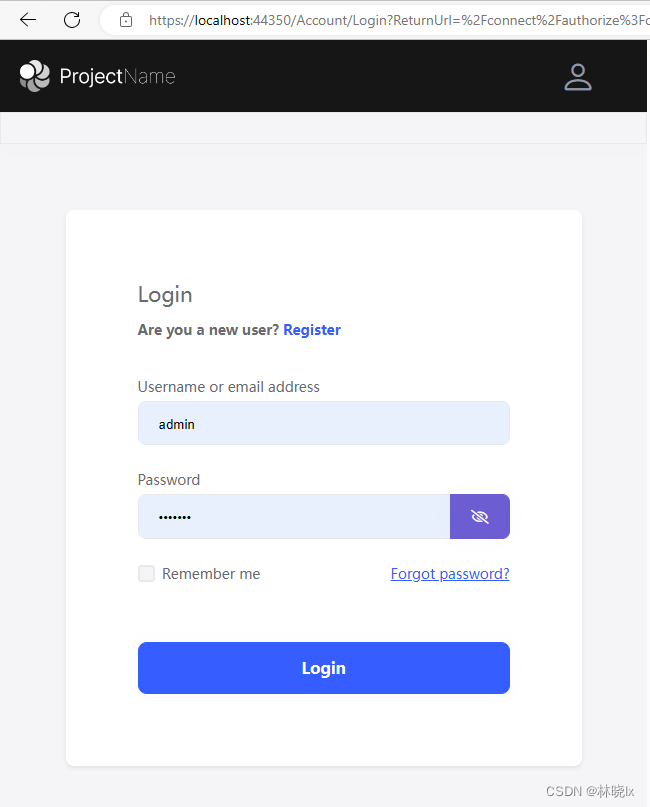
当正确输入用户名和密码后,跳转到客户端的回调地址,并携带授权码code参数 。
环境变量中配置CLIENT_ID,资源服务器地址和认证服务器地址 。
                          VUE_APP_BASE_API = 'https://localhost:44377/'
VUE_APP_BASE_IDENTITY_SERVER = 'https://localhost:44350/'
VUE_APP_CLIENT_ID = 'Matoapp_App'
在login/index.vue中添加handleLoginAuth2方法 。
注意此处的redirect_uri要和认证服务器中的配置一致,否则跳转时会引发400 Bad Request 。
                          async handleLoginAuth2() {
  var loco = window.location;
  var appRootUrl = `${loco.protocol}//${loco.host}`;
  var idsrvAuth = createOidcAuth("main", SignInType.Window, appRootUrl, {
    authority: baseUrl,
    client_id: "Matoapp_App", // 'implicit.shortlived',
    response_type: "code",
    scope: "Matoapp",
    // test use
    prompt: "login",
    metadata: {
      issuer: baseUrl,
      authorization_endpoint: `${baseUrl}connect/authorize`,
      end_session_endpoint: `${baseUrl}logout`,
      token_endpoint: `${baseUrl}connect/token`,
    },
    redirect_uri: appRootUrl + "/continue",
    disablePKCE: true,
  });
  await idsrvAuth.signIn();
}
获取完成授权码后,需要通过授权码获取令牌(Token),此处将调用后端的接口,认证服务器核对了授权码和重定向URI后发放令牌 。
                          function Login(data, baseURL?: string) {
    return await ajaxRequest('/connect/token', 'POST', data, "/", baseURL)
}


@Action
public async LoginByCode(codeInfo: {
  code: string
  redirect_uri: string
}) {
  var code = codeInfo.code;
  var redirect_uri = codeInfo.redirect_uri;
  var data = null;
  var baseUrl = process.env.VUE_APP_BASE_IDENTITY_SERVER;
  await Login({
    grant_type: 'authorization_code',
    code: code,
    client_id: process.env.VUE_APP_CLIENT_ID,
    redirect_uri: redirect_uri
  }, baseUrl)
    .then(async (res) => {
      data = res;
      setToken(data.access_token);
      this.SET_TOKEN(data.access_token);
      return data
    })
  return data
}
获取Token后将其保存到vuex或Cookies中 。
回调页面是在登录成功后,从回调到登录完成的过渡页面.
创建continue/index.vue,简单的显示登录成功的提示,常用的提示有“登录成功,正在为您继续”,“登录成功,正在为您跳转”等友好提示 。
<template>
  <div class="login-container">
    <el-result
      icon="success"
      title="登录成功"
      subTitle="正在继续,请稍候.."
    ></el-result>
  </div>
</template>
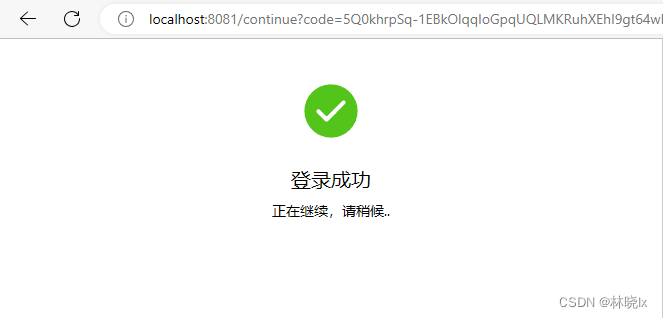
在登录成功后,会跳转到continue页面,回调地址会携带授权码,然后调用认证服务器的connect/token接口,获取token 。
创建onRouteChange函数,在此解析页面地址中的参数 。
                          export default class extends BaseVue {
  redirect?: string;
  otherQuery: Dictionary<string> = {};

  @Watch("$route", { immediate: true })
  private async onRouteChange(route: Route) {
    var loco = window.location;
    var appRootUrl = `${loco.protocol}//${loco.host}`;
    var query = route.query as Dictionary<string>;
    if (query) {
      this.redirect = query.redirect;
      this.otherQuery = this.getOtherQuery(query);
      if (this.otherQuery.code) {
        await UserModule.LoginByCode({
          code: this.otherQuery.code,
          redirect_uri: appRootUrl + "/continue",
        }).then(async (re) => {
          GetCurrentUserInfo(baseUrl)
            .then((re) => {
              var result = re as any;
              this.afterLoginSuccess(result);
            })
            .catch((err) => {
              console.warn(err);
            });
        });
      }
    }
  }
成功后将跳转到首页或者redirect指定的页面 。
                            async afterLoginSuccess(userinfo) {
    this.$router
      .push({
        // path: this.redirect || "/",
        path: "/",
        query: this.otherQuery,
      })
      .catch((err) => {
        console.warn(err);
      });
  }
只需要清除vuex或Cookies中的token即可,可以调用vue-oidc-client的signOut,但只是跳转到配置的登出地址,不会清除token(前提是redirectAfterSignout为true,并设置了post_logout_redirect_uri) 。
最后此篇关于Vue+Volo.Abp实现OAuth2.0客户端授权模式认证的文章就讲到这里了,如果你想了解更多关于Vue+Volo.Abp实现OAuth2.0客户端授权模式认证的内容请搜索CFSDN的文章或继续浏览相关文章,希望大家以后支持我的博客! 。
我们需要实现如下授权规则。 如果用户是 super 管理员,则向他提供所有客户信息。比如订单信息。如果用户是客户管理员,只提供他自己的客户信息。等等 我们计划在 DAO 层实现过滤。 创建通用设计来处
我有 https 设置的 Spring Security。 尝试以安全方式在 URL 上运行 curl GET 时,我看到了意外行为。 当 curl 第一次向服务器发送请求时,它没有授权数据(为什么?
关闭。这个问题是 opinion-based 。它目前不接受答案。 想改进这个问题?更新问题,以便 editing this post 可以用事实和引用来回答它。 1年前关闭。 Improve thi
我正在构建以下内容: 一个 JavaScript 单页应用程序; 一个暴露 RESTful API 的 Node.js 后端,它将存储用户数据; 用户凭据(电子邮件/密码)可以通过单页应用程序创建并存
在带有RESTful Web服务的Spring Boot应用程序中,我已将Spring Security与Spring Social和SpringSocialConfigurer一起配置。 现在,我有
我正在为真实世界组织的成员在 Rails 中构建一个基于社区的站点。我正在努力遵循 RESTful 设计的最佳实践,其中大部分或多或少是书本上的。使我的大脑在整洁的 RESTful 圈子中运转的问题是
我想启用 ABAC mode对于我在 Google 容器引擎中使用的 Kubernetes 集群。 (更具体地说,我想限制自动分配给所有 Pod 的默认服务帐户对 API 服务的访问)。但是,由于 -
奇怪的事情 - 在 git push gitosis 上不会将新用户的 key 添加到/home/git/.ssh/authorized_keys。当然-我可以手动添加 key ,但这不好:( 我能做
我很好奇您提供 的顺序是否正确和元素中的元素重要吗? 最佳答案 是的,顺序很重要。本页介绍了基本原理:http://msdn.microsoft.com/en-us/library/wce3kxhd
我阅读了如何使用 @login_required 的说明以及其他带有解析器的装饰器。但是,如果不使用显式解析器(而是使用默认解析器),如何实现类似的访问控制? 就我而言,我将 Graphite 烯与
我用 php 开发了一个审核应用程序,通过它我可以审核所有帖子和评论。我还可以选择在 Facebook 粉丝页面墙上发布帖子。但是,当我尝试这样做时,会引发异常,显示“用户尚未授权应用程序执行此操作”
我使用 jquery-ajax 方法 POST 来发布授权 header ,但 Firebug 显示错误“401 Unauthorized” header 作为该方法的参数。 我做错了什么?我该怎么办
我有两组用户,一组正在招聘,一组正在招聘。 我想限制每个用户组对某些页面的访问,但是当我在 Controller 中使用 [Authorize] 时,它允许访问任何已登录的用户而不区分他们来自哪个组?
我有一个简单直接的授权实现。好吧,我只是认为我这样做,并且我想确保这是正确的方法。 在我的数据库中,我有如下表:users、roles、user_role、permissions、 role_perm
我的 soap 连接代码: MessageFactory msgFactory = MessageFactory.newInstance(); SOAPMessage message
我想知道是否可以将 mysql 用户设置为只对数据库中的特定表或列具有读取权限? 最佳答案 是的,您可以使用 GRANT 为数据库在细粒度级别执行此操作。见 http://dev.mysql.com/
我试图获得发布流和离线访问的授权,但出现此错误。 而且它没有显示我想要获得的权限。我的代码如下: self.fb = [[Facebook alloc] initWithAppId:@"xxxxxxx
我是 NodeJS 的初学者,我尝试使用 NodeJS + Express 制作身份验证表单。我想对我的密码进行验证(当“confirmpassword”与“password”不同时,它应该不返回任何
我能够为测试 paypal 帐户成功生成访问 token 和 TokenSecret。然而,下一步是为调用创建授权 header 。 在这种情况下,我需要提供我不确定的 Oauth 签名或 API 签
我正在尝试获取授权 steam 页面的 html 代码,但我无法登录。我的代码是 public string tryLogin(string EXP, string MOD, string TIME)

我是一名优秀的程序员,十分优秀!