
 个人中心
个人中心 文章发布
文章发布
作者热门文章
- Java锁的逻辑(结合对象头和ObjectMonitor)
- 还在用饼状图?来瞧瞧这些炫酷的百分比可视化新图形(附代码实现)⛵
- 自动注册实体类到EntityFrameworkCore上下文,并适配ABP及ABPVNext
- 基于Sklearn机器学习代码实战


 27
27
 4
4


QCustomPlot 是开源项目,源码编写十分规范,想要理解它的可视化思路不算特别困难。我在这篇随笔中总结一下常用的源码修改技巧, 下面的每一个技巧都是独立的,不同技巧中添加的代码无任何依赖关系,相互之间也不会引发任何冲突,不会影响 QCustomPlot 原生的接口 。示例中使用的 QCustomPlot 版本号为 2.0.1 ,但在更高的 2.x.x 版本中也适用.
这里选用 FreeGlut 库.
去 https://freeglut.sourceforge.net/index.php 下载 freeglut 源码,编译出 freeglut 库,编译过程不做介绍。然后将编译出来的库以及 GL 文件夹下的五个头文件都包含进项目中,我使用的是 MSVC2015 64bit 静态库,因此在 pro/pri 文件中添加以下代码(因人而异):
                          HEADERS += \
    $$PWD/GL/freeglut.h \
    $$PWD/GL/freeglut_ext.h \
    $$PWD/GL/freeglut_std.h \
    $$PWD/GL/freeglut_ucall.h \
    $$PWD/GL/glut.h

CONFIG(debug, debug | release) {
    LIBS += -L$$PWD/lib64 -lfreeglut_staticd
    LIBS += -L$$PWD/lib64 -lfreeglutd
}

CONFIG(release, debug | release) {
    LIBS += -L$$PWD/lib64 -lfreeglut_static
    LIBS += -L$$PWD/lib64 -lfreeglut
}
在文件的前面几行(比如 #include "qcustomplot.h" 的后面)添加以下代码:
                          #define GLUT_DISABLE_ATEXIT_HACK
#include <GL/freeglut.h>
若同一个界面上有多个 QCustimPlot 窗口对象,且都开启了 GPU 加速,则在窗口切换时图形显示可能会出现错乱(被称为上下文异常),为了避免这种现象,需要在 QCPPaintBufferGlFbo::draw 函数里面添加以下代码:
                          /* inherits documentation from base class */
void QCPPaintBufferGlFbo::draw(QCPPainter *painter) const
{
    if (!painter || !painter->isActive())
    {
        qDebug() << Q_FUNC_INFO << "invalid or inactive painter passed";
        return;
    }
    if (!mGlFrameBuffer)
    {
        qDebug() << Q_FUNC_INFO << "OpenGL frame buffer object doesn't exist, reallocateBuffer was not called?";
        return;
    }

    // 这个 if 语句是新添加的
    if(QOpenGLContext::currentContext() != mGlContext.data())
    {
        mGlContext.data()->makeCurrent(mGlContext.data()->surface());
    }

    painter->drawImage(0, 0, mGlFrameBuffer->toImage());
}
在 pro 文件中,添加以下代码:
                          QT       += printsupport opengl
DEFINES += QCUSTOMPLOT_USE_OPENGL
这个 printsupport 是使用 QCustomPlot 时需要添加的,不论是否启用 GPU 加速都需要添加。后面的 opengl 则是为了启用 GPU 加速而新添的,此外,还需要使用 DEFINES 添加 QCUSTOMPLOT_USE_OPENGL 宏.
对 QCustomPlot 对象使用 setOpenGl() 函数设置是否启用 OpenGL,如下所示:
ui->Plot->setOpenGl(true);
可以通过 openGl() 函数的返回值判断是否成功启用了 GPU 加速:
qDebug() << "启用状态" << ui->Plot->openGl();
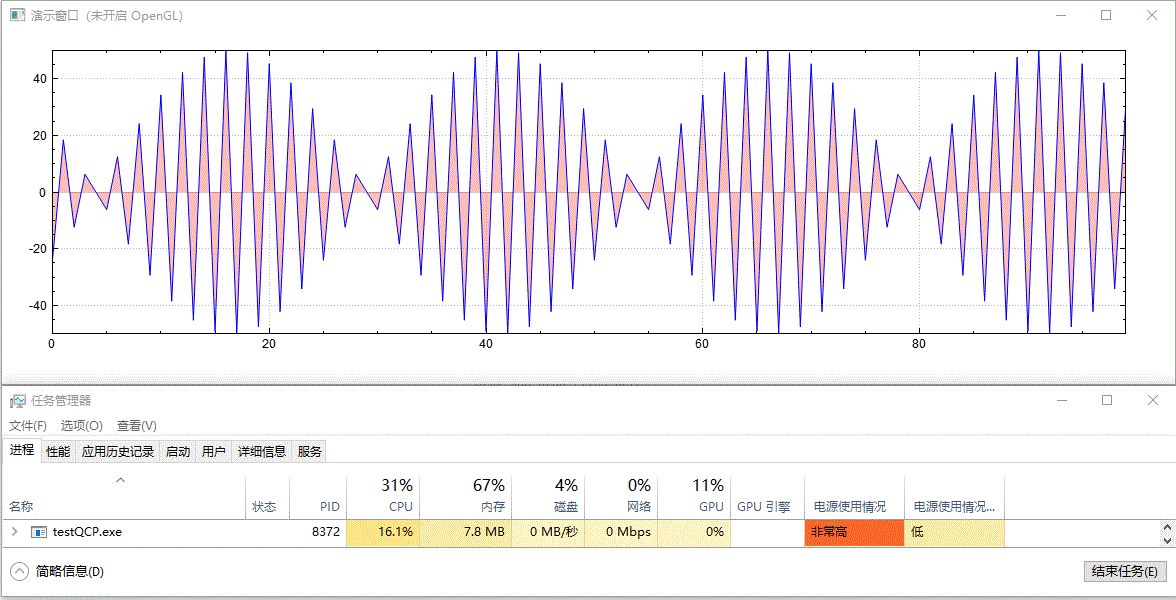
需要注意的是, 当绘制的图形有大块填充区域,尤其是半透明的填充时,GPU 加速的效果才明显 ,这个时候才能减轻 CPU 压力。如果仅仅绘制一些简单的曲线图还开启 OpenGL,结果往往会适得其反,CPU 压力不减反增,有兴趣的可以进行测试,打开任务管理器观察启用前后 CPU 的占用百分比即可.
绘制实时更新的、含有填充区域的图像,未开启 GPU 加速前的效果:
开启 GPU 加速后的效果:
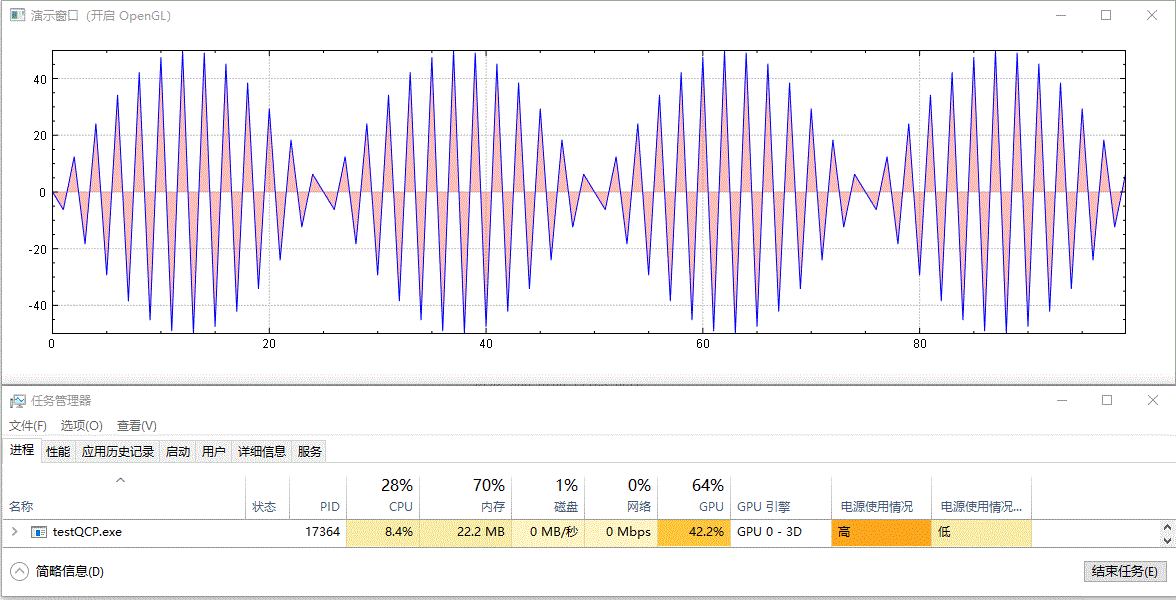
以上演示例中并没有更改数据刷新频率(都为 10 ms 间隔)及数据量大小(都为 100 个点),两者仅有的差别为是否调用了 setOpenGl(true) 开启了 GPU 加速。从结果中可以看到,开启 OpenGL 后,CPU 占用率从 16%~17% 下降到 7%~8%,GPU 占用率从 0% 上升到 41%~43%,并且从视觉效果上看,刷新变得更快了,这可能是因为 CPU 被减轻了压力,单次计算后显示所需时间更短了.
思路是先计算贝塞尔控制点,然后使用 QPainterPath 绘制平滑曲线,参考资料:
在原生的 class QCP_LIB_DECL QCPGraph 类定义中(使用搜索功能找到对应位置)添加以下两个内容,注意 public 与 protected 限定符:
                          class QCP_LIB_DECL QCPGraph : public QCPAbstractPlottable1D<QCPGraphData>
{
public:
    ...
    void setSmooth(bool smooth);             // 新增内容

protected:
    ...
    bool mSmooth;                            // 新增内容
}
在 qcustomplot.h 文件的末尾( #endif 的上一行)添加 SmoothCurveGenerator 类定义的代码:
                          class SmoothCurveGenerator
{
protected:
    static QPainterPath generateSmoothCurveImp(const QVector<QPointF> &points) {
        QPainterPath path;
        int len = points.size();

        if (len < 2) {
            return path;
        }

        QVector<QPointF> firstControlPoints;
        QVector<QPointF> secondControlPoints;
        calculateControlPoints(points, &firstControlPoints, &secondControlPoints);

        path.moveTo(points[0].x(), points[0].y());

        // Using bezier curve to generate a smooth curve.
        for (int i = 0; i < len - 1; ++i) {
            path.cubicTo(firstControlPoints[i], secondControlPoints[i], points[i+1]);
        }

        return path;
    }
public:
    static QPainterPath generateSmoothCurve(const QVector<QPointF> &points) {
        QPainterPath result;

        int segmentStart = 0;
        int i = 0;
        int pointSize = points.size();
        while (i < pointSize) {
            if (qIsNaN(points.at(i).y()) || qIsNaN(points.at(i).x()) || qIsInf(points.at(i).y())) {
                QVector<QPointF> lineData(i - segmentStart); std::copy(points.constBegin() + segmentStart, points.constBegin() + i - segmentStart, lineData.begin());
                result.addPath(generateSmoothCurveImp(lineData));
                segmentStart = i + 1;
            }
            ++i;
        }
        QVector<QPointF> lineData(i - segmentStart); std::copy(points.constBegin() + segmentStart, points.constBegin() + i - segmentStart, lineData.begin());
        result.addPath(generateSmoothCurveImp(lineData));
        return result;
    }

    static QPainterPath generateSmoothCurve(const QPainterPath &basePath, const QVector<QPointF> &points) {
        if (points.isEmpty()) return basePath;

        QPainterPath path = basePath;
        int len = points.size();
        if (len == 1) {
            path.lineTo(points.at(0));
            return path;
        }

        QVector<QPointF> firstControlPoints;
        QVector<QPointF> secondControlPoints;
        calculateControlPoints(points, &firstControlPoints, &secondControlPoints);

        path.lineTo(points.at(0));
        for (int i = 0; i < len - 1; ++i)
            path.cubicTo(firstControlPoints[i], secondControlPoints[i], points[i+1]);

        return path;
    }

    static void calculateFirstControlPoints(double *&result, const double *rhs, int n) {
        result = new double[n];
        double *tmp = new double[n];
        double b = 2.0;
        result[0] = rhs[0] / b;

        // Decomposition and forward substitution.
        for (int i = 1; i < n; i++) {
            tmp[i] = 1 / b;
            b = (i < n - 1 ? 4.0 : 3.5) - tmp[i];
            result[i] = (rhs[i] - result[i - 1]) / b;
        }

        for (int i = 1; i < n; i++) {
            result[n - i - 1] -= tmp[n - i] * result[n - i]; // Backsubstitution.
        }

        delete[] tmp;
    }

    static void calculateControlPoints(const QVector<QPointF> &knots,
                                       QVector<QPointF> *firstControlPoints,
                                       QVector<QPointF> *secondControlPoints) {
        int n = knots.size() - 1;

        firstControlPoints->reserve(n);
        secondControlPoints->reserve(n);

        for (int i = 0; i < n; ++i) {
            firstControlPoints->append(QPointF());
            secondControlPoints->append(QPointF());
        }

        if (n == 1) {
            // Special case: Bezier curve should be a straight line.
            // P1 = (2P0 + P3) / 3
            (*firstControlPoints)[0].rx() = (2 * knots[0].x() + knots[1].x()) / 3;
            (*firstControlPoints)[0].ry() = (2 * knots[0].y() + knots[1].y()) / 3;

            // P2 = 2P1 – P0
            (*secondControlPoints)[0].rx() = 2 * (*firstControlPoints)[0].x() - knots[0].x();
            (*secondControlPoints)[0].ry() = 2 * (*firstControlPoints)[0].y() - knots[0].y();

            return;
        }

        // Calculate first Bezier control points
        double *xs = nullptr;
        double *ys = nullptr;
        double *rhsx = new double[n]; // Right hand side vector
        double *rhsy = new double[n]; // Right hand side vector

        // Set right hand side values
        for (int i = 1; i < n - 1; ++i) {
            rhsx[i] = 4 * knots[i].x() + 2 * knots[i + 1].x();
            rhsy[i] = 4 * knots[i].y() + 2 * knots[i + 1].y();
        }
        rhsx[0] = knots[0].x() + 2 * knots[1].x();
        rhsx[n - 1] = (8 * knots[n - 1].x() + knots[n].x()) / 2.0;
        rhsy[0] = knots[0].y() + 2 * knots[1].y();
        rhsy[n - 1] = (8 * knots[n - 1].y() + knots[n].y()) / 2.0;

        // Calculate first control points coordinates
        calculateFirstControlPoints(xs, rhsx, n);
        calculateFirstControlPoints(ys, rhsy, n);

        // Fill output control points.
        for (int i = 0; i < n; ++i) {
            (*firstControlPoints)[i].rx() = xs[i];
            (*firstControlPoints)[i].ry() = ys[i];

            if (i < n - 1) {
                (*secondControlPoints)[i].rx() = 2 * knots[i + 1].x() - xs[i + 1];
                (*secondControlPoints)[i].ry() = 2 * knots[i + 1].y() - ys[i + 1];
            } else {
                (*secondControlPoints)[i].rx() = (knots[n].x() + xs[n - 1]) / 2;
                (*secondControlPoints)[i].ry() = (knots[n].y() + ys[n - 1]) / 2;
            }
        }

        delete xs;
        delete ys;
        delete[] rhsx;
        delete[] rhsy;
    }
};
在原生的 QCPGraph::QCPGraph(QCPAxis *keyAxis, QCPAxis *valueAxis) 构造函数(使用搜索功能找到对应位置)实现中,添加 mSmooth 成员变量的初始化代码:
                          QCPGraph::QCPGraph(QCPAxis *keyAxis, QCPAxis *valueAxis) :
  QCPAbstractPlottable1D<QCPGraphData>(keyAxis, valueAxis)
{
    ...
    mSmooth = false;  // 新增内容
}
在对应位置添加 QCPGraph::setSmooth() 成员函数的实现(比如写在 void QCPGraph::setAdaptiveSampling(bool enabled) 的后面):
                          void QCPGraph::setSmooth(bool smooth)
{
    mSmooth = smooth;
}
将原生的 QCPGraph::drawLinePlot 成员函数(使用搜索功能找到对应位置)修改为如下形式,实质上只添加了个 if 语句:
                          void QCPGraph::drawLinePlot(QCPPainter *painter, const QVector<QPointF> &lines) const
{
    if (painter->pen().style() != Qt::NoPen && painter->pen().color().alpha() != 0)
    {
        applyDefaultAntialiasingHint(painter);
        if (mSmooth && mLineStyle == lsLine) painter->drawPath(SmoothCurveGenerator::generateSmoothCurve(lines));
        else drawPolyline(painter, lines);
    }
}
对 QCPGraph 对象使用 setSmooth() 函数设置是否启用曲线平滑,如下所示:
ui->Plot->graph(0)->setSmooth(true);
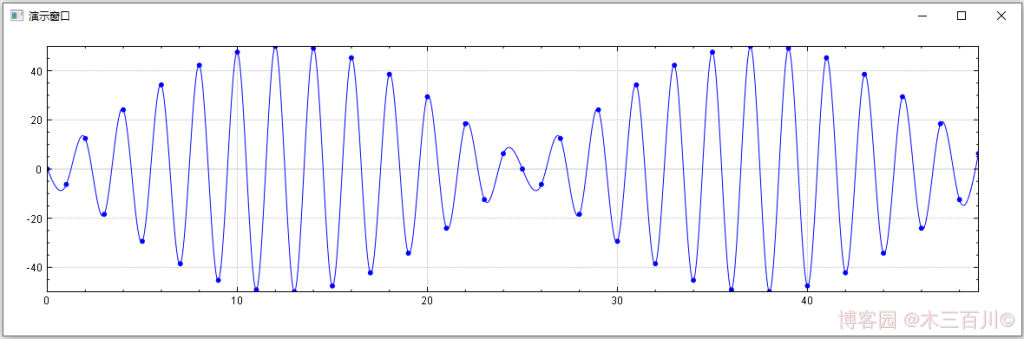
绘制 50 个点,未启用曲线平滑时的效果:

启用曲线平滑时的效果:
一维绘图数据都存储在 QCPDataContainer 这个类里面,绘图数据存储的容器为 QVector<DataType> ,详见 qcustomplot.h 文件中 QCPDataContainer 的类定义。不同的一维绘图类型有着不同的底层数据类型:
QCPGraph 绘图类型,这个 DataType 为 QCPGraphData ,查看 QCPGraphData 类定义,它有且仅有两个 double 类型的成员变量 key 和 value 。因此 QCPGraph 的绘图数据被存储在一块连续的内存块中(类似于 double 数组),绘图数据在内存中按顺序 x0-y0-x1-y1-x2-y2... 这样依次排列, xi 和 yi 分别表示第 i 个横轴数据和第 i 个纵轴数据。 QCPCurve 绘图类型,这个 DataType 为 QCPCurveData ,查看 QCPCurveData 类定义,它有且仅有三个 double 类型的成员变量 t 、 key 和 value 。因此 QCPCurve 的绘图数据在内存中按顺序 t0-x0-y0-t1-x1-y1-t2-x2-y2... 这样依次排列,这个 t 表示参数曲线对应的参变量。 QCPBars 绘图类型,这个 DataType 为 QCPBarsData ,查看 QCPBarsData 类定义,它有且仅有两个 double 类型的成员变量 key 和 value 。因此 QCPBars 绘图数据与 QCPGraph 绘图数据的内存排列方式一样。 QCPStatisticalBox 与 QCPFinancial 这两个绘图类型就相对复杂些,但不变的是,绘图数据仍被依次存储在一块连续的内存块中,感兴趣的可以看下 QCPStatisticalBoxData 与 QCPFinancialData 的类定义。 更新一维绘图数据时, QCustomPlot 提供了一些接口,分别为:
                          // QCPGraph 4个接口
void setData(QSharedPointer<QCPGraphDataContainer> data)
void setData(const QVector<double> &keys, const QVector<double> &values, bool alreadySorted=false)
void addData(const QVector<double> &keys, const QVector<double> &values, bool alreadySorted=false)
void addData(double key, double value)

// QCPCurve 7个接口
void setData(QSharedPointer<QCPCurveDataContainer> data)
void setData(const QVector<double> &t, const QVector<double> &keys, const QVector<double> &values, bool alreadySorted=false)
void setData(const QVector<double> &keys, const QVector<double> &values)
void addData(const QVector<double> &t, const QVector<double> &keys, const QVector<double> &values, bool alreadySorted=false)
void addData(const QVector<double> &keys, const QVector<double> &values)
void addData(double t, double key, double value)
void addData(double key, double value)

// QCPBars 4个接口
void setData(QSharedPointer<QCPBarsDataContainer > data)
void setData(const QVector< double > &keys, const QVector<double> &values, bool alreadySorted=false)
void addData(const QVector< double > &keys, const QVector<double> &values, bool alreadySorted=false)
void addData(double key, double value)

// QCPStatisticalBox 4个接口
void setData(QSharedPointer<QCPStatisticalBoxDataContainer> data)
void setData(const QVector<double> &keys, const QVector<double> &minimum, const QVector<double> &lowerQuartile, const QVector<double> &median, const QVector<double> &upperQuartile, const QVector<double> &maximum, bool alreadySorted=false)
void addData(const QVector<double> &keys, const QVector<double> &minimum, const QVector<double> &lowerQuartile, const QVector<double> &median, const QVector<double> &upperQuartile, const QVector<double> &maximum, bool alreadySorted=false)
void addData(double key, double minimum, double lowerQuartile, double median, double upperQuartile, double maximum, const QVector<double> &outliers=QVector<double>())

// QCPFinancial 4个接口
void setData(QSharedPointer<QCPFinancialDataContainer> data)
void setData(const QVector<double> &keys, const QVector<double> &open, const QVector<double> &high, const QVector<double> &low, const QVector<double> &close, bool alreadySorted=false)
void addData(const QVector<double> &keys, const QVector<double> &open, const QVector<double> &high, const QVector<double> &low, const QVector<double> &close, bool alreadySorted=false)
void addData(double key, double open, double high, double low, double close)
其中第一个接口暴露出来的指针并没有直接指向绘图数据所在内存的首地址,也无法通过这个指针来获得 QVector<DataType> 这个容器的地址。除第一个接口外,原生的 setData() 与 addData() 接口内部都会调用 QVector 相关的 resize() 、 size() 、 std::sort() 、 std::inplace_merge() 等函数,还存在很多 if 语句。 在一些时候,特别是数据点数固定但数值更新速率很高时,频繁的调用 size() 等函数会大大延长刷新时间,此时原生接口中的很多操作都是不必要的,因此不妨直接将存储绘图数据的 QVector<DataType> 容器地址交给使用者,以获得更佳的性能,缩短更新时间.
在 QCPDataContainer 类定义的 public 区域,添加以下一行代码即可:
                          template <class DataType>
class QCPDataContainer // no QCP_LIB_DECL, template class ends up in header (cpp included below)
{
public:
    ...

    // 新添内容
    QVector<DataType>* coreData() { return &mData; }
}
对相应的绘图对象使用 coreData() 函数获得绘图数据的地址,如下所示:
QVector<QCPGraphData> *mData = ui->Plot->graph(0)->data()->coreData();
得到这个地址后,就可以用数组访问的方式逐点更新数据,或者使用 memcpy() 做一次更新。后面绘图时会默认数据已经排好了序,不会再进行排序操作,因此若需要重排数据顺序,需人工提前排好.
                          // 可能需要预分配容器内存,预分配内存仅需一次
mData->reserve(totalSize);
mData->resize(totalSize);

// 逐点更新 xi = 5.0;
(*mData)[i].key = 5.0;

// 逐点更新 yi = sin(5.0);
(*mData)[i].value = sin(5.0);

// 一次更新
memcpy((char*)mData, (char*)pData, sizeof(double)*totalSize*2);
注意:使用 memcpy() 一次更新时,这个 pData 为存储新数据的内存首地址, pData 所指空间中数据的排列方式必须和对应绘图数据的内存排列方式保持一致.
QCPColorMap 绘图数据存储在 QCPColorMapData 这个类里面,详见 qcustomplot.h 文件中 QCPColorMapData 的类定义,绘图数据存储的容器为一维 double 数组, 按行进行存储,纵坐标小的排在数组前面 。纵坐标最小的一行排在数组最前面,纵坐标最大的一行排在数组最后面;存储每行时,横坐标最小的排在数组前面,横坐标最大的排在数组后面。 QCustomPlot 提供的数据更新接口有:
                          // QCPColorMapData
void setData(double key, double value, double z)
void setCell(int keyIndex, int valueIndex, double z)
void fill(double z)

// QCPColorMap
void setData(QCPColorMapData *data, bool copy=false)
同样在数据点数固定但数值更新速率很高时,原生接口中的很多操作都是不必要的.
在 QCPColorMapData 类定义的 public 区域,添加以下一行代码即可:
                          class QCP_LIB_DECL QCPColorMapData
{
public:
    ...

    // 新添内容
    double *coreData() { mDataModified = true; return mData; }
}
对 QCPColorMap 对象使用 coreData() 函数获得绘图数据的地址,如下所示:
double *mData = m_pColorMap->data()->coreData();
得到这个地址后,就可以用数组访问的方式逐点更新数据,或者使用 memcpy() 做一次更新.
                          // 不要在外部使用 new 来分配内存,而应使用原生接口来做内存预分配
m_pColorMap->data()->setSize(xsize, ysize);

// 逐点更新 m[xi][yj] = 5.0; 其中 xi,yj 为非负整型索引值
mData[(yj-1)*xsize+xi] = 5.0;

// 一次更新
memcpy((char*)mData, (char*)pData, sizeof(double)*xsize*ysize);
注意:使用 memcpy() 一次更新时,这个 pData 为存储新数据的内存首地址, pData 所指空间中数据的排列方式必须和 QCPColorMap 绘图数据的内存排列方式保持一致.
最后此篇关于【QCustomPlot】性能提升之修改源码(版本V2.x.x)的文章就讲到这里了,如果你想了解更多关于【QCustomPlot】性能提升之修改源码(版本V2.x.x)的内容请搜索CFSDN的文章或继续浏览相关文章,希望大家以后支持我的博客! 。
27
4
 0
0
我有一个 k*n矩阵 X 和 k*k矩阵A。对于X的每一列,我想计算标量 X[:, i].T.dot(A).dot(X[:, i]) (或者,数学上, Xi' * A * Xi )。 目前,我有一个
很难说出这里问的是什么。这个问题是含糊的、模糊的、不完整的、过于宽泛的或修辞性的,无法以目前的形式得到合理的回答。如需帮助澄清此问题以便重新打开它,visit the help center 。 已关
我是 VueJS 的新手。我已经使用 vuetify/webpack-ssr 模板创建了一个项目,现在我想创建一个登录页面,但是没有显示表单,控制台给了我以下信息: [Vue warn]: Unkno
我尝试将 value 插入到 C++ vector v 之前的第 i 元素(或元素 (i-1) 之后) )。代码很简单 v.insert(v.begin() + i, value); 我确信当 i 介
我需要显示使用合并排序算法排序的 vector 。然而,当我使用 v.begin() 时,我的 friend 使用 v.data() 来传递 vector 。他的代码运行良好,而我的却不行。请解释。
这是我的命令(url1、url2、url3、url4 是占位符): ffmpeg -i url1 -i url2 -i url3 -i url4 -filter_complex “[1:v:0] [1
我以前用过Vue,我知道怎么用v-for渲染元素序列,v-if或v-show有条件地显示元素,并且 v-model例如,控制段落的内容。 但现在我需要对 DOM 进行更精细的控制: 我有一个range
我正在学习所有权和借用。 borrow1 和borrow2 的区别在于在borrow2 打印时使用了&: fn borrow1(v: &Vec) { println!("{}", &v[10]
我找不到一种方法来选择不同的选项来渲染 v-for 中的文本。是否有可能或者我是否需要以不同的方式构建逻辑来执行类似于下面的代码的操作? // i
Iterable 的三个直接子类型是 Map , Seq , 和 Set .除了性能问题之外,似乎还有一个 Seq是从整数到值的映射,以及 Set是从值到 bool 值的映射(如果值在集合中,则为 t
我想应用一个计算方法,如果键存在则增加值,否则将 1。有 Map map = new HashMap<>(); 我不明白为什么 for (int i = 0; i v != null ? v++ :
标准(IEEE 754/C)是否保证以下代码断言永远不会失败? int main() { for ( /* all possible float / double values */ )
代码由Vue语言编写,使用Element-ui框架, 如果一个对象包含某些内容,则会显示该内容,如果不包含则禁用菜单按钮。 输出应该是这样的: a、b(禁用)、c、d、e 但我的是这样的: a、a(禁
如果我这样做: {{ morevalue }} {{ value }} v-else 中的跨度也会在第二个 V-FOR 上循环,即使它上面没有任何 v-for,为什么? 这是
如果我这样做: {{ morevalue }} {{ value }} v-else 中的跨度也会在第二个 V-FOR 上循环,即使它上面没有任何 v-for,为什么? 这是
我将 Vue.js 与 Vuetify 一起使用,我正在尝试使用 v-data-table 从后端加载菜单列表并使用 对其设置一些权限v-switches 但我在尝试 v-model 数组时遇到问题:
我在 Java 的流式操作中努力维护我想要的数据结构,这很可能是由于缺乏正确的理解和实践。 public class Main { public static void main(String
我正在尝试为匹配中的每个匹配呈现一些 HTML,但是,我不太确定 实际上是正确的。 更具体地说,我不确定我是否可以使用 v-bind:match='match'在与循环相同的元素上 v-for='ma
所以我想知道为什么这个 v-if 和 v-else 语句不起作用,为什么我要以不同的方式解决它。 代码如下 Required: Select a Workflow {{ isChain ?
我有一个 VueJS 组件 ,我在同一个模板中使用了两次来显示两组不同的数据。每个都显示在自己的 使用 v-if 切换的容器在导航选项卡上。 似乎这些组件被实例化为同一个实例。我调用 console

我是一名优秀的程序员,十分优秀!