- Java锁的逻辑(结合对象头和ObjectMonitor)
- 还在用饼状图?来瞧瞧这些炫酷的百分比可视化新图形(附代码实现)⛵
- 自动注册实体类到EntityFrameworkCore上下文,并适配ABP及ABPVNext
- 基于Sklearn机器学习代码实战
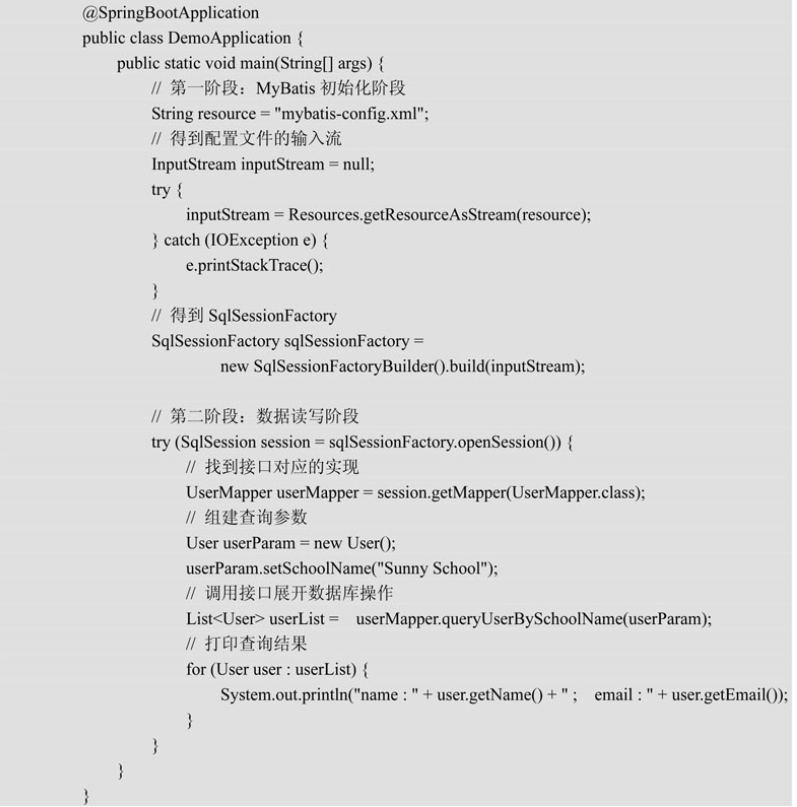
平时我们使用的一般是集成了Spring或是Spring Boot的Mybatis,封装了一层,看源码不直接;如下,看看原生的Mybatis使用示例 。

通过代码可以清晰地看出,MyBatis的操作主要分为两大阶段:
在第一阶段,最关键的就是 SqlSessionFactory 对象。在Spring集成Mybatis的源码中, SqlSessionFactoryBean 也是做这个事情,读取配置并初始化构建 SqlSessionFactory .
                          public class SqlSessionFactoryBean implements FactoryBean<SqlSessionFactory>, InitializingBean, ApplicationListener<ApplicationEvent> {
    // Spring Bean的生命周期会调用此方法
    public void afterPropertiesSet() throws Exception {
        this.sqlSessionFactory = this.buildSqlSessionFactory();
    }
    protected SqlSessionFactory buildSqlSessionFactory(){
        // 构建Configuration....
        Configuration configuration;
        if (this.configuration != null) {
            configuration = this.configuration;
            if (configuration.getVariables() == null) {
                configuration.setVariables(this.configurationProperties);
            } else if (this.configurationProperties != null) {
                configuration.getVariables().putAll(this.configurationProperties);
            }
        } else if (this.configLocation != null) {
            xmlConfigBuilder = new XMLConfigBuilder(this.configLocation.getInputStream(), (String)null, this.configurationProperties);
            configuration = xmlConfigBuilder.getConfiguration();
        } else {
            if (LOGGER.isDebugEnabled()) {
                LOGGER.debug("Property `configuration` or 'configLocation' not specified, using default MyBatis Configuration");
            }

            configuration = new Configuration();
            configuration.setVariables(this.configurationProperties);
        }

        /// 其它code...

        return this.sqlSessionFactoryBuilder.build(configuration);
    }
}
配置文件的解析,最终会生成一个Configuration对象.
                          private void parseConfiguration(XNode root) {
    try {
        Properties settings = this.settingsAsPropertiess(root.evalNode("settings"));
        this.propertiesElement(root.evalNode("properties"));
        this.loadCustomVfs(settings);
        this.typeAliasesElement(root.evalNode("typeAliases"));
        this.pluginElement(root.evalNode("plugins"));
        this.objectFactoryElement(root.evalNode("objectFactory"));
        this.objectWrapperFactoryElement(root.evalNode("objectWrapperFactory"));
        this.reflectionFactoryElement(root.evalNode("reflectionFactory"));
        this.settingsElement(settings);
        this.environmentsElement(root.evalNode("environments"));
        this.databaseIdProviderElement(root.evalNode("databaseIdProvider"));
        this.typeHandlerElement(root.evalNode("typeHandlers"));
        // 解析mappers节点
        this.mapperElement(root.evalNode("mappers"));
    } catch (Exception var3) {
        throw new BuilderException("Error parsing SQL Mapper Configuration. Cause: " + var3, var3);
    }
}
前期的准备已就绪,关键的配置已解析且构建并初始化了SqlSessionFactory了。接下来就是创建数据库连接并执行业务的CRUD。在第二阶段的 OpenSession 方法负责创建并打开数据库链接.
                          public SqlSession openSession(Connection connection) {
    return this.openSessionFromConnection(this.configuration.getDefaultExecutorType(), connection);
}

private SqlSession openSessionFromDataSource(ExecutorType execType, TransactionIsolationLevel level, boolean autoCommit) {
    Transaction tx = null;

    DefaultSqlSession var8;
    try {
        Environment environment = this.configuration.getEnvironment();
        TransactionFactory transactionFactory = this.getTransactionFactoryFromEnvironment(environment);
        tx = transactionFactory.newTransaction(environment.getDataSource(), level, autoCommit);
        Executor executor = this.configuration.newExecutor(tx, execType);
        var8 = new DefaultSqlSession(this.configuration, executor, autoCommit);
    } catch (Exception var12) {
        this.closeTransaction(tx);
        throw ExceptionFactory.wrapException("Error opening session.  Cause: " + var12, var12);
    } finally {
        ErrorContext.instance().reset();
    }

    return var8;
}
最后就是调用Mapper接口的业务方法,返回业务数据.
                          //SqlSession.getMapper()
public <T> T getMapper(Class<T> type) {
    return this.configuration.getMapper(type, this);
}

// configuration.getMapper()
public <T> T getMapper(Class<T> type, SqlSession sqlSession) {
    return this.mapperRegistry.getMapper(type, sqlSession);
}

// mapperRegistry.getMapper()
public <T> T getMapper(Class<T> type, SqlSession sqlSession) {
    MapperProxyFactory<T> mapperProxyFactory = (MapperProxyFactory)this.knownMappers.get(type);
    if (mapperProxyFactory == null) {
        throw new BindingException("Type " + type + " is not known to the MapperRegistry.");
    } else {
        try {
            return mapperProxyFactory.newInstance(sqlSession);
        } catch (Exception var5) {
            throw new BindingException("Error getting mapper instance. Cause: " + var5, var5);
        }
    }
}

// mapperProxyFactory.newInstance()
protected T newInstance(MapperProxy<T> mapperProxy) {
    return Proxy.newProxyInstance(this.mapperInterface.getClassLoader(), new Class[]{this.mapperInterface}, mapperProxy);
}

public T newInstance(SqlSession sqlSession) {
    MapperProxy<T> mapperProxy = new MapperProxy(sqlSession, this.mapperInterface, this.methodCache);
    return this.newInstance(mapperProxy);
}
最后,打完收工,示例代码所涉及到的关键代码就这些.
上面的示例是比较简单的,那么其实现思路到底是什么样的?首先就有几个问题:
第一个问题,绝对离不开动态代理,因为只有接口的时候,那么一定会有动态代理生成代理类同时有拦截处理器(InvocationHandler)来增强其执行逻辑.
第二个问题,Mapper文件中有一个 <mapper> 节点,其 namespace 就是接口的全限定名称,而其下节点 <select>|<update>|.. 都有一个id值,该值与接口的方法是一致的。因此从这里就可以看出来,业务的crud操作节点是通过namespace+id来对应mapper接口及其方法的。那么我们就可以考虑到,在第一个问题中的拦截处理器执行方法method时,我们就可以通过此关联关系找到要执行的SQL.
如上,这么一分析来看,其实大概的实现思路已经出来了。就是动态代理+ <mapper> 节点解析实现了接口方法的调用与业务SQL的执行.
因此在第一阶段的解析时,Mapper文件里的 <Mapper> 节点解析出来的对象就起到了关键的作用。如下,有几个关键的抽象:
MapperRegistry 类的 knownMappers 属性保存着接口及其代理对象的关系.
                          // type = interface
knownMappers.put(type, new MapperProxyFactory(type));
MappedStatement 类对应着 <mapper> 节点下的CRUD节点.
                          public void parseStatementNode() {
    String id = this.context.getStringAttribute("id");
    if (this.databaseIdMatchesCurrent(id, databaseId, this.requiredDatabaseId)) {
        Integer fetchSize = this.context.getIntAttribute("fetchSize");
        Integer timeout = this.context.getIntAttribute("timeout");
        String parameterMap = this.context.getStringAttribute("parameterMap");
        String parameterType = this.context.getStringAttribute("parameterType");
        Class<?> parameterTypeClass = this.resolveClass(parameterType);
        String resultMap = this.context.getStringAttribute("resultMap");
        String resultType = this.context.getStringAttribute("resultType");
        // 解析其他属性...
        this.builderAssistant.addMappedStatement(id, sqlSource, statementType, sqlCommandType, fetchSize, timeout, parameterMap, parameterTypeClass, resultMap, resultTypeClass, resultSetTypeEnum, flushCache, useCache, resultOrdered, (KeyGenerator)keyGenerator, keyProperty, keyColumn, databaseId, langDriver, resultSets);
    }
}
如上是抽象出来整个执行过程的简单流程。实际上还有动态参数绑定与事务等,这些都是在动态代理的拦截处理器中的增强逻辑;下篇再阐述.
最后此篇关于聊聊Mybatis的实现原理的文章就讲到这里了,如果你想了解更多关于聊聊Mybatis的实现原理的内容请搜索CFSDN的文章或继续浏览相关文章,希望大家以后支持我的博客! 。
本文全面深入地探讨了Docker容器通信技术,从基础概念、网络模型、核心组件到实战应用。详细介绍了不同网络模式及其实现,提供了容器通信的技术细节和实用案例,旨在为专业从业者提供深入的技术洞见和实
📒博客首页:崇尚学技术的科班人 🍣今天给大家带来的文章是《Dubbo快速上手 -- 带你了解Dubbo使用、原理》🍣 🍣希望各位小伙伴们能够耐心的读完这篇文章🍣 🙏博主也在学习阶段,如若发
一、写在前面 我们经常使用npm install ,但是你是否思考过它内部的原理是什么? 1、执行npm install 它背后帮助我们完成了什么操作? 2、我们会发现还有一个成为package-lo
Base64 Base64 是什么?是将字节流转换成可打印字符、将可打印字符转换为字节流的一种算法。Base64 使用 64 个可打印字符来表示转换后的数据。 准确的来说,Base64 不算
目录 协程定义 生成器和yield语义 Future类 IOLoop类 coroutine函数装饰器 总结 tornado中的
切片,这是一个在go语言中引入的新的理念。它有一些特征如下: 对数组抽象 数组长度不固定 可追加元素 切片容量可增大 容量大小成片增加 我们先把上面的理念整理在这
文章来源:https://sourl.cn/HpZHvy 引 言 本文主要论述的是“RPC 实现原理”,那么首先明确一个问题什么是 RPC 呢?RPC 是 Remote Procedure Call
源码地址(包含所有与springmvc相关的,静态文件路径设置,request请求入参接受,返回值处理converter设置等等): spring-framework/WebMvcConfigurat
请通过简单的java类向我展示一个依赖注入(inject)原理的小例子虽然我已经了解了spring,但是如果我需要用简单的java类术语来解释它,那么你能通过一个简单的例子向我展示一下吗?提前致谢。
1、背景 我们平常使用手机和电脑上网,需要访问公网上的网络资源,如逛淘宝和刷视频,那么手机和电脑是怎么知道去哪里去拿到这个网络资源来下载到本地的呢? 就比如我去食堂拿吃的,我需要
大家好,我是飞哥! 现在 iptables 这个工具的应用似乎是越来越广了。不仅仅是在传统的防火墙、NAT 等功能出现,在今天流行的的 Docker、Kubernets、Istio 项目中也经
本篇涉及到的所有接口在公开文档中均无,需要下载 GitHub 上的源码,自己创建私有类的文档。 npm run generateDocumentation -- --private yarn gene
我最近在很多代码中注意到人们将硬编码的配置(如端口号等)值放在类/方法的深处,使其难以找到,也无法配置。 这是否违反了 SOLID 原则?如果不是,我是否可以向我的团队成员引用另一个“原则”来说明为什
我是 C#、WPF 和 MVVM 模式的新手。很抱歉这篇很长的帖子,我试图设定我所有的理解点(或不理解点)。 在研究了很多关于 WPF 提供的命令机制和 MVVM 模式的文本之后,我在弄清楚如何使用这
可比较的 jQuery 函数 $.post("/example/handler", {foo: 1, bar: 2}); 将创建一个带有 post 参数 foo=1&bar=2 的请求。鉴于 $htt
如果Django不使用“延迟查询执行”原则,主要问题是什么? q = Entry.objects.filter(headline__startswith="What") q = q.filter(
我今天发现.NET框架在做计算时遵循BODMAS操作顺序。即计算按以下顺序进行: 括号 订单 部门 乘法 添加 减法 但是我四处搜索并找不到任何文档确认 .NET 绝对 遵循此原则,是否有此类文档?如
已结束。此问题不符合 Stack Overflow guidelines .它目前不接受答案。 我们不允许提出有关书籍、工具、软件库等方面的建议的问题。您可以编辑问题,以便用事实和引用来回答它。 关闭
API 回顾 在创建 Viewer 时可以直接指定 影像供给器(ImageryProvider),官方提供了一个非常简单的例子,即离屏例子(搜 offline): new Cesium.Viewer(
As it currently stands, this question is not a good fit for our Q&A format. We expect answers to be

我是一名优秀的程序员,十分优秀!