- Java锁的逻辑(结合对象头和ObjectMonitor)
- 还在用饼状图?来瞧瞧这些炫酷的百分比可视化新图形(附代码实现)⛵
- 自动注册实体类到EntityFrameworkCore上下文,并适配ABP及ABPVNext
- 基于Sklearn机器学习代码实战
最近写个脚本用到 puppeteer,然后安装 Chromium 出现一点问题,这里记录一下解决方案.
在 Puppeteer 安装时会自动安装 Chromium,然而却总是报错 502 导致下载失败,直接下载可以下载,命令行 wget 也可以,猜测是因为 Puppeteer 开启了新的 process 来安装导致环境变量丢失,然后就玄学上网失败了.
这会回头看了看 Puppeteer 的安装脚本,好像可以使用 npm_config_https_proxy 等配置来玄学上网.
                          function overrideProxy() {
    // Override current environment proxy settings with npm configuration, if any.
    const NPM_HTTPS_PROXY = process.env['npm_config_https_proxy'] || process.env['npm_config_proxy'];
    const NPM_HTTP_PROXY = process.env['npm_config_http_proxy'] || process.env['npm_config_proxy'];
    const NPM_NO_PROXY = process.env['npm_config_no_proxy'];
    if (NPM_HTTPS_PROXY) {
        process.env['HTTPS_PROXY'] = NPM_HTTPS_PROXY;
    }
    if (NPM_HTTP_PROXY) {
        process.env['HTTP_PROXY'] = NPM_HTTP_PROXY;
    }
    if (NPM_NO_PROXY) {
        process.env['NO_PROXY'] = NPM_NO_PROXY;
    }
}
不过当时没看就直接打算手动安装 Chromium 了,要手动安装在安装 Puppeteer 时需要先关闭自动下载:
PUPPETEER_SKIP_DOWNLOAD='true' pnpm add puppeteer
这样就可以跳过 Puppeteer 中自动的 Chromium 安装.
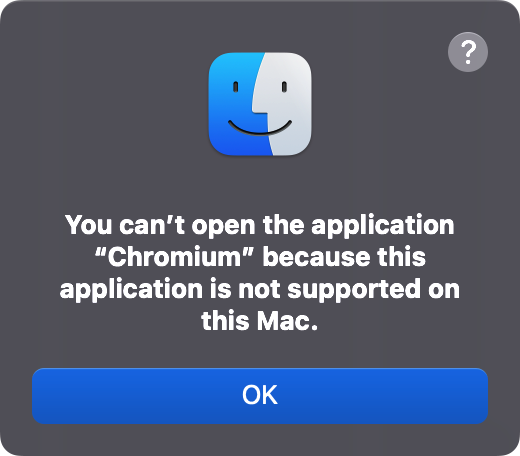
手动安装首先是使用了 homebrew 的方式,但是由于之前玩 Stable Diffusion 一些依赖包的兼容问题,我的 homebrew 切到了 x86 版本,所以安装后的是 intel 芯片版本的 Chromium,导致无法打开,打开就会显示弹窗:
You can’t open the application “Chromium” because this application is not supported on this Mac.

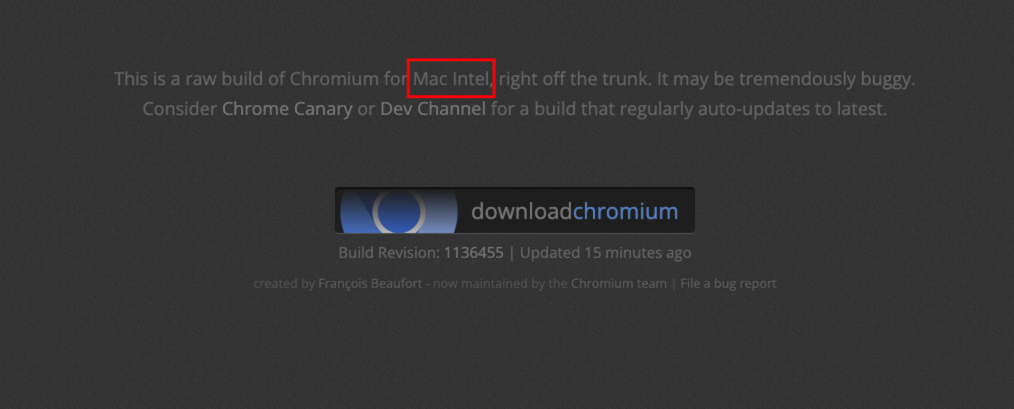
无奈就去官网: https://download-chromium.appspot.com/ 手动下载,结果不成想官网挂的也是 intel 版本:

不死心的下载试了一下,果然不行.
然后无奈的搜了一下,发现了这个问题: https://stackoverflow.com/questions/66002337/is-the-homebrew-chromium-m1-optimised ,其中提及到 homebrew 中安装的脚本:
                           arch = Hardware::CPU.intel? ? "Mac" : "Mac_Arm"
 ...
 url "https://commondatastorage.googleapis.com/chromium-browser-snapshots/#{arch}/#{version}/chrome-mac.zip
原来只需要将地址中的架构类型变更更换为想要的版本就可以了.
而官网对应的下载地址是: https://download-chromium.appspot.com/dl/Mac?type=snapshots ,所以我将其中的 Mac 替换为 Mac_Arm 得到如下地址: https://download-chromium.appspot.com/dl/Mac_Arm?type=snapshots ,打开果然成功下载了.
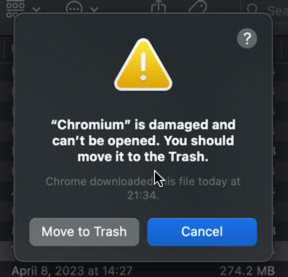
下载完成后解压,就拿到了 Arm 版本的 Chromium。 然而打开时又出现了新的问题:
Chromium is damaged and can't be opened. You should move it to the Trash.

遇到这个报错必须要移除对应的验证:
xattr -c /Applications/Chromium.app
好了,终于可以打开了,可喜可贺.
然而当我打开后又发现 Chromium 上飘着一行提示:
Google API Keys are missing. Some functionality of chromium will be disabled.
不过此时的 Chromium 已经可以正常使用了,但是子曾经曰过:“遇到问题不能坐以待毙”,还是处理下好了.
查了一下原因是 Chromium 的一些功能如 Google 账号同步等等需要使用 Google API Keys,要处理这个提示大体是两种思路:
如果想要禁用提示可以编辑 Chromium.app > Contents > Info.plist 文件并添加以下内容:
                          <key>LSEnvironment</key>
<dict>
    <key>GOOGLE_API_KEY</key>
    <string>no</string>
    <key>GOOGLE_DEFAULT_CLIENT_ID</key>
    <string>no</string>
    <key>GOOGLE_DEFAULT_CLIENT_SECRET</key>
    <string>no</string>
</dict>
而如果想要填入 Google API Keys 则需要去 Google Cloud 申请 API Keys,具体的流程可以参考: https://www.chromium.org/developers/how-tos/api-keys/#acquiring-keys 。
还有一种方法就是直接使用网上流出的 API Keys,比如这个:
                          export GOOGLE_API_KEY="AIzaSyCkfPOPZXDKNn8hhgu3JrA62wIgC93d44k"
export GOOGLE_DEFAULT_CLIENT_ID="811574891467.apps.googleusercontent.com"
export GOOGLE_DEFAULT_CLIENT_SECRET="kdloedMFGdGla2P1zacGjAQh"
在 bash 执行上述代码将 API Keys 设置到环境变量重启 Chromium 即可生效.
但是一定需要注意 ⚠️: 使用了 API Keys 可能会导致数据信息泄漏问题,所以如果有敏感信息切勿使用他人提供的 Key!!! 。
由于 Chromium 不是由 Puppeteer 安装的,所以 Puppeteer 会找不到 Chromium 位置,需要在 Puppeteer 的配置文件中添加 executablePath 来指定 Chromium 的位置:
                          const { join } = require('path');

/**
 * @type {import("puppeteer").Configuration}
 */
module.exports = {
    // Changes the cache location for Puppeteer.
    cacheDirectory: join(__dirname, '.cache', 'puppeteer'),
    executablePath: '/Applications/Chromium.app/Contents/MacOS/Chromium'
};
最后此篇关于MacM1(arm系列芯片)如何安装Chromium|Puppeteer的文章就讲到这里了,如果你想了解更多关于MacM1(arm系列芯片)如何安装Chromium|Puppeteer的内容请搜索CFSDN的文章或继续浏览相关文章,希望大家以后支持我的博客! 。
启用后 chrome://flags/#native-file-system-api在我的 chrome 83.0.4103.61 中,我尝试使用这个新 API 访问文件夹 handle = awai
我下载并开始玩 CEF,但似乎没有任何文档。甚至没有一个有效的维基……我错过了什么吗? 最佳答案 大多数文档都在 CEF 的 header files 中.二进制分发版附带从这些文件生成的文档。它在编
我正在尝试在 ubuntu 上构建 chromium,我遵循了 chromium 官方网站上的所有说明但是之后我遇到了一些错误 fetch --nohooks --no-history chromiu
我尝试使用命令ninja -C out/Debug chrome来编译Chromium。 但是错误消息显示: ninja error loading 'build.ninja': the system
有没有办法告诉Tampermonkey脚本在 Chromium 中运行使用亲属 @require文件路径?例如,如果我有以下脚本标题: // ==UserScript== // @name
在Qt5.2版本下,我使用的是QtWebView,它可以自动调用第三方扩展,支持avi、mpeg、mov、flv等视频格式。但是当我升级到Qt5.10,把QtWebView改成QtWebengineV
我认为这很容易,但我找不到任何指向简单 tar.gz/tar.bz2/zip 存档的链接。 Chrome 使用一些自定义工具,例如 build_depot甚至下载源代码。但是我不想编译源代码,我只想看
我尝试将 --ignore-gpu-blacklist 参数设置为 JCEF,但我找不到方法。我应该使用的方法是这样的:CefApp::onBeforeCommandLineProcessing(St
我尝试使用 update-alternatives 通过以下命令将 Chromium 设置为默认 Web 浏览器。虽然我成功地将'/snap/bin/chromium'添加到--config中,但它不
我在我们的应用程序中遇到了奇怪的行为,这是一个在 Android 上运行的 Phonegap 包装的 WebView。我不确定我是在查看错误还是可能有其他原因,因此提出了这个问题。 大约从 2013
背景 我的任务是用 Chromium 替换我们基于 IE 的打印逻辑,以便我们最终可以支持在 Windows Server Core 或可能支持 .Net Core 的其他操作系统上运行我们当前的服务
Electron 可以编译成操作系统,基于 Chromium 操作系统而不是 Chromium 浏览器吗?至少理论上是这样。 所以我可以在没有任何操作系统的情况下安装我的软件。它可以在类似 kiosk
如果我的计算机上运行多个不同的 native 应用程序,这些应用程序使用某种形式的嵌入式 Chromium(可以是 CEF、Electron 或类似的东西)是否有任何 Chromium 消息传递(进程
我在我的 .NET 应用程序中使用 Puppeteer Sharp 来执行一些网页自动化任务。但是,我必须在只能访问 Intranet 的环境中部署我的应用程序,这意味着 Puppeteer 的 Br
What settings can be modified/added, to optimize Firefox / Chromium for low memory/cpu systems su
What settings can be modified/added, to optimize Firefox / Chromium for low memory/cpu systems su
我有一个 RPi 4 在 kiosk 模式下运行,带有 7 英寸显示屏,它在启动时使用以下参数打开 Chromium(禁用捏合缩放和信息栏): chromium-browser --noerrdial
在 Ubuntu 18.04 上,我尝试创建一个提醒来提醒我每天跟踪我的工作日志。 创建sh文件put_hours.sh #!/bin/bash zenity \ --forms \
所以我尝试我的第一个 Chrome 构建只是为了好玩,我已经通过 gclient 配置和同步获得了我想要的所有文件。然而,没有VS可以打开的项目文件,只有一堆对我来说没用的.gyp文件。 命令“gcl
我创建了一个使用 Playwright 的 Azure 函数。它在本地工作,好吧,那部分不会改变) 然后我创建了 Azure DevOps 管道,因此它使用 Ubuntu 代理,使用 PLAYWRIG

我是一名优秀的程序员,十分优秀!